Contents
- Invitation links and getting started
- Creating and returning to edit your stack
- Adding content to your stack using the Tile Library
- Co-authors
- Editing a Tile
- Changing the layout and appearance of a Tile
- Adding a PowerPoint to your stack
- Adding a video to your stack
- Adding an extra screen to your stack
- Restoring a deleted stack
- Previewing and checking your stack
- Restrictions on what can be included in your stack
- Creating the summary poster
- Your stack on the showcase website
- Marking your stack as ready to publish
- Presenting your stack (general guidance)
- Exploring and sharing published stacks
- Engaging with the viewers of your stack
- Using templates
- Editing your account
- Managing your stack
Invitation links and getting started
If you are creating a stack for an event or conference then you should have received an invite email from Learning Toolbox (mail@ltb.io) which contains the invite link that allows you to create an account, sign and start to make your stack.
If you have not received this invite email then we recommend that you look in your Spam/Junk/Promotions email folders, as sometimes mail readers misdirect welcome emails such a this one into those folders.
If you still cannot find the invite email then you should contact the conference or event support team who are managing the use of Learning Toolbox for your event. They will be able to help you.
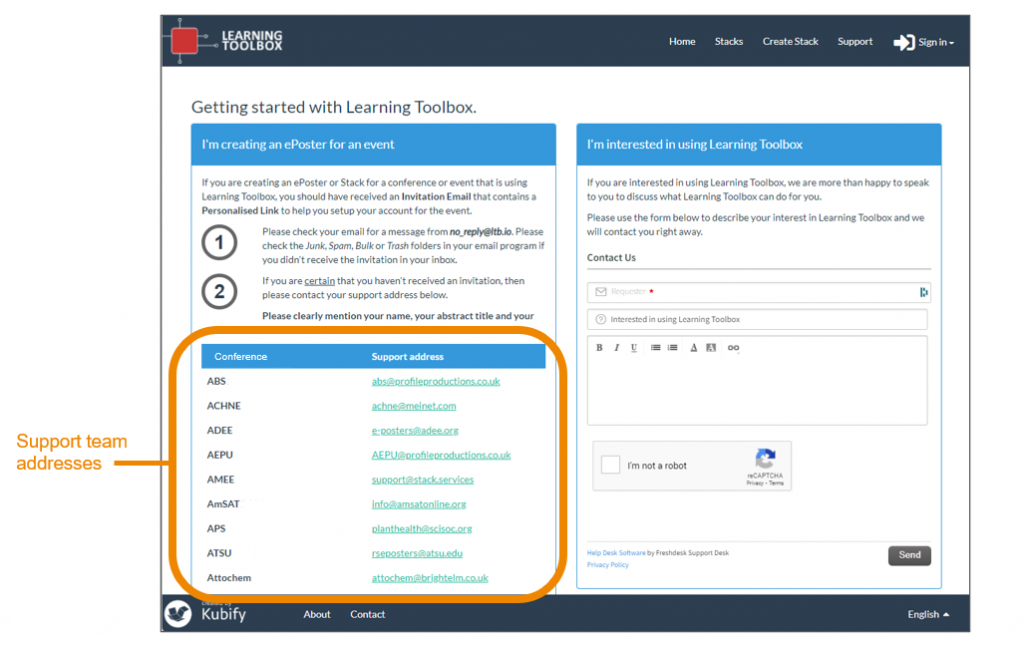
If you do not know the email address of your support team then you can find it on the getting started page (this is the page you see when you click on Create Stack if you are not signed in). On the left hand side of this page you will see that we list the email addresses of the event support teams using Learning Toolbox (as highlighted in the screenshot) . The list is organised alphabetically, so you may have to scroll down the webpage to find your event’s support team email address.
In order to create a stack in Learning Toolbox for a conference or event you must have activated the Learning Toolbox invite link you were sent for that ePoster or stack and you must have signed in using the same account you used when you activated your invite link. If you have not received and activated your invite link then read this FAQ answer [How do I find my invite link].
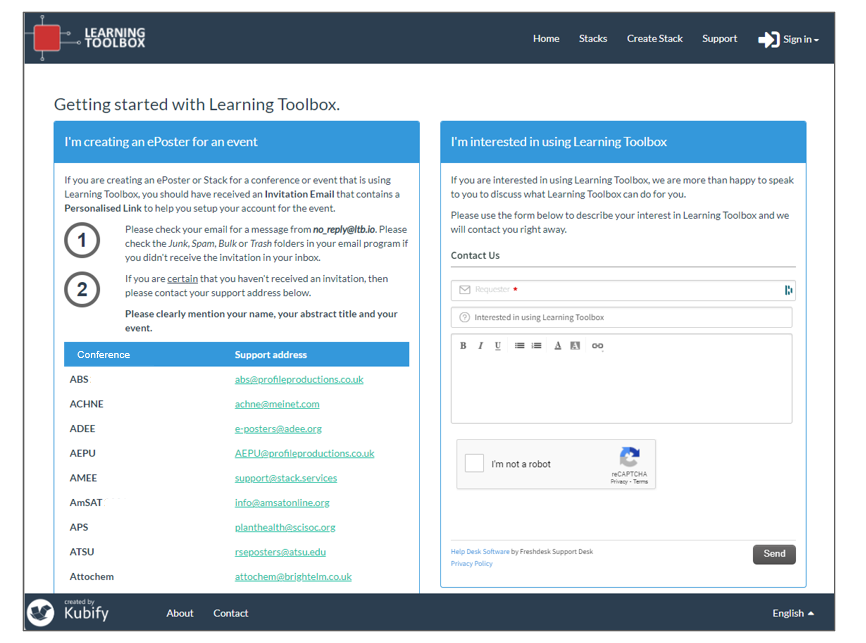
After you have signed into Learning Toolbox (https://my.ltb.io/) do you see the Getting Started Page (image below) when you click on Create Stack?
If you see the Getting Started Page then this means your account does not have permission to make a stack. There are two possible reasons for this:
You are not signed in. Check that you are signed in. If you are not signed in then click on Sign In and make sure to sign in using the same account as you used when you activated your invite.

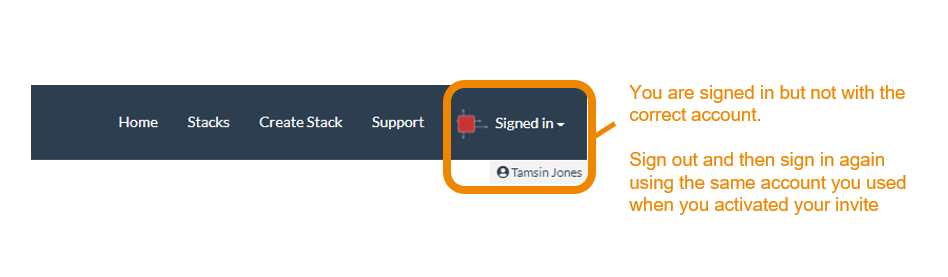
You are signed in but not with the account that you used when you activated your invite. Please sign out and then sign back in again making sure you use the same account that you used when you activated your invite. You will have received an email from Learning Toolbox (no_reply@ltb.io) when you activated your invite reminding you what account you used to do this.
In order to create a stack in Learning Toolbox for a conference or event you must have activated the invite link you were sent for that ePoster/stack and you must have signed in using the same account you used when you activated your invite link.
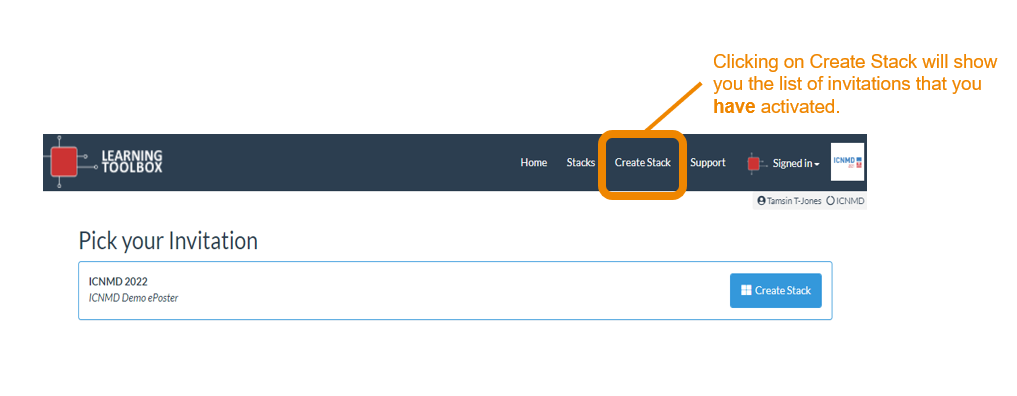
If you click on Create Stack then you will see the list of the invites that you have activated (as shown in the example screenshot below).
If you do not see the name or title you are expecting in the list then this indicates that the account you are using does not yet have permission to create that ePoster/stack. There are two possible reasons for this:
You have not yet activated that ePoster/stack’s invite. If you are making more than one ePoster/stack for an event then you will have been sent a separate invite email for each of your ePosters/stacks. You need to activate each one. If you have not yet activated this ePoster/stack’s invite then find the invite email (it will have been sent to you by no_reply@ltb.io) and click on the invite link and sign-in.
You activated that ePoster/stack with a different account. Sometimes authors accidentally activate their ePoster/stack invites with different accounts (e.g. activating their first ePoster/stack invite by signing in using Google and activating their second ePoster/stack invite by making a local account). If you have done this by accident and you want all your invites connected to the same account then please contact your conference support team (click on Support to see the email address or look for their address on the Getting Started Page) and they should be able to sort that out for you.
Creating and returning to edit your stack
This video gives you a very quick introduction to the Learning Toolbox editor. We recommend that you play this video in full screen.
Press the full-screen icon ![]() at the end of the play bar to play in full-screen.
at the end of the play bar to play in full-screen.
If your country does not allow access to the Vimeo video streaming service then you can access this video here instead.
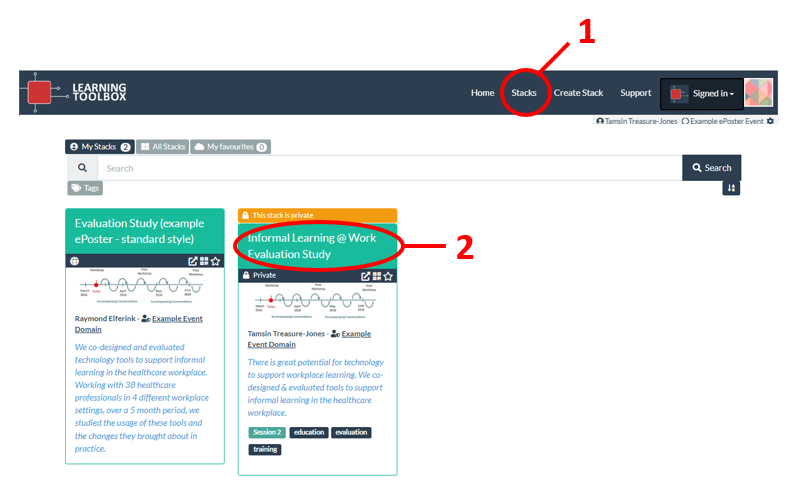
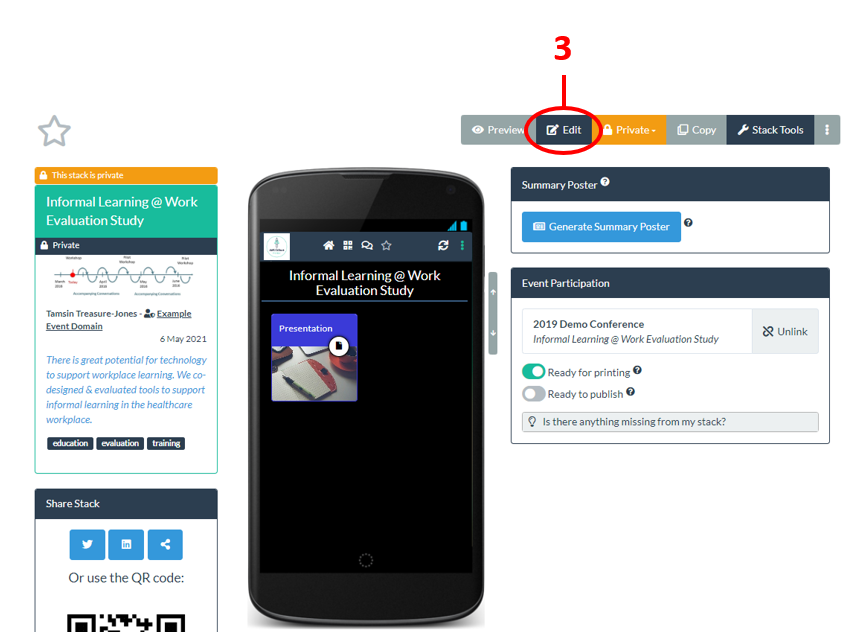
Sign in to the Learning Toolbox website https://my.ltb.io/ and then:
- Click on the Stacks menu
- Click on the title bar of your stack to open it
- Click on the Edit button to open the editor
- You can now edit it as normal. Remember to Save regularly.
These steps are shown in the annotated screenshots below.

In order to create a stack in Learning Toolbox for a conference or event you must have activated the Learning Toolbox invite link you were sent for that ePoster or stack and you must have signed in using the same account you used when you activated your invite link. If you have not received and activated your invite link then read this FAQ answer [How do I find my invite link].
After you have signed into Learning Toolbox (https://my.ltb.io/) do you see the Getting Started Page (image below) when you click on Create Stack?
If you see the Getting Started Page then this means your account does not have permission to make a stack. There are two possible reasons for this:
You are not signed in. Check that you are signed in. If you are not signed in then click on Sign In and make sure to sign in using the same account as you used when you activated your invite.
You are signed in but not with the account that you used when you activated your invite. Please sign out and then sign back in again making sure you use the same account that you used when you activated your invite. You will have received an email from Learning Toolbox (no_reply@ltb.io) when you activated your invite reminding you what account you used to do this.
In order to create a stack in Learning Toolbox for a conference or event you must have activated the invite link you were sent for that ePoster/stack and you must have signed in using the same account you used when you activated your invite link.
If you click on Create Stack then you will see the list of the invites that you have activated (as shown in the example screenshot below).
If you do not see the name or title you are expecting in the list then this indicates that the account you are using does not yet have permission to create that ePoster/stack. There are two possible reasons for this:
You have not yet activated that ePoster/stack’s invite. If you are making more than one ePoster/stack for an event then you will have been sent a separate invite email for each of your ePosters/stacks. You need to activate each one. If you have not yet activated this ePoster/stack’s invite then find the invite email (it will have been sent to you by no_reply@ltb.io) and click on the invite link and sign-in.
You activated that ePoster/stack with a different account. Sometimes authors accidentally activate their ePoster/stack invites with different accounts (e.g. activating their first ePoster/stack invite by signing in using Google and activating their second ePoster/stack invite by making a local account). If you have done this by accident and you want all your invites connected to the same account then please contact your conference support team (click on Support to see the email address or look for their address on the Getting Started Page) and they should be able to sort that out for you.
If you are creating (or have created) stacks for more than one conference or event (e.g. AMEE and NASS) then you will be an author in more than one domain in Learning Toolbox (e.g. both AMEE and NASS).
When you sign-in to Learning Toolbox you will automatically be in the domain that you most recently accessed. If you click on Create Stack or Stacks then it will only show you your activated invitations or stacks that are part of that domain.
You can see which domain you are in by looking at the top right hand corner of the screen. Next to your name it will show you the name of the domain. Next to the Signed In button it will show you the logo of that domain.

To switch to another domain you click on the Signed In button and choose the domain from the drop-down menu.
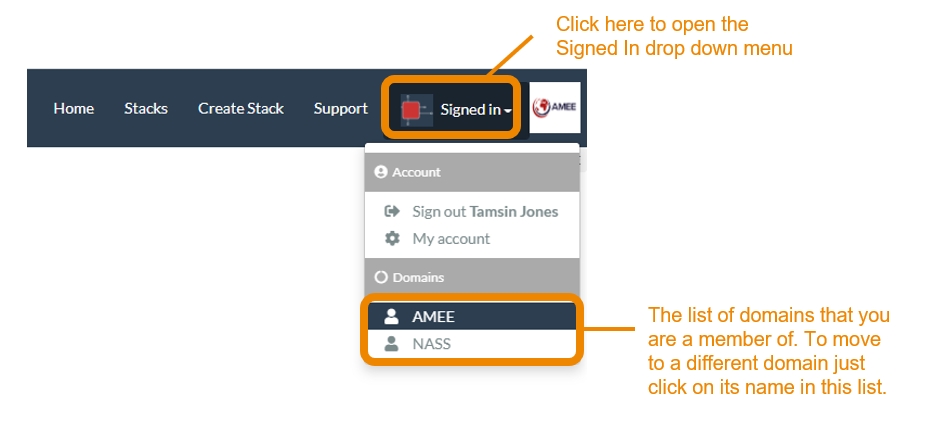
You will then see that the domain name and the domain logo change to the new domain. If you click on Create Stack or Stacks then it will show you your activated invitations or stacks within this domain.
Adding content to your stack using the Tile Library
There are three main sections to the Learning Toolbox editing screen:
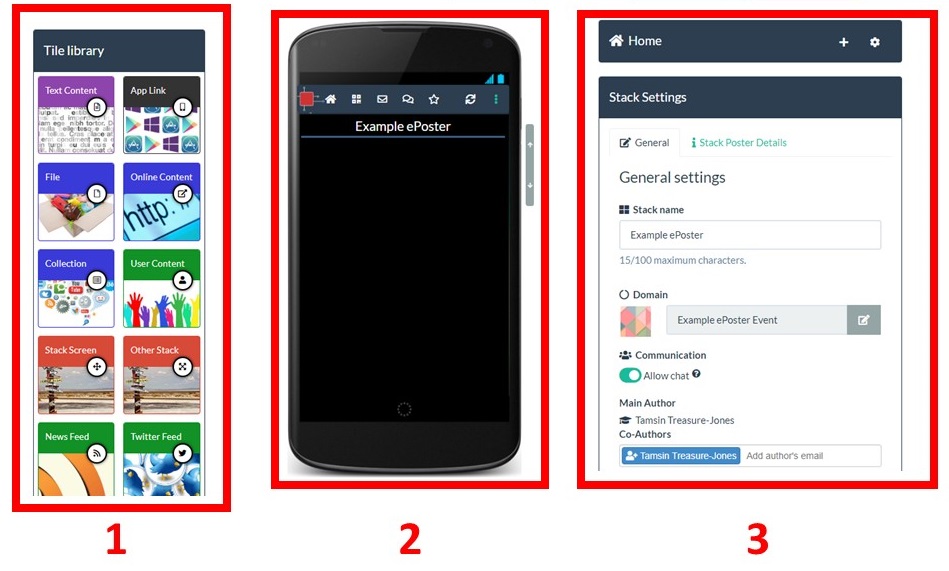
- The tile library shows all the different types of content you can add to your stack.
- Your stack. You see your stack as you build it. It is shown as it would appear on a mobile phone.
- The settings. The settings area changes dynamically depending on which part of the stack you are editing.
You add content to your stack by dragging the relevant tile from the tile library into your stack and then filling in the information required in the settings area.
A summary of the type of information you can add using each Tile is shown below.
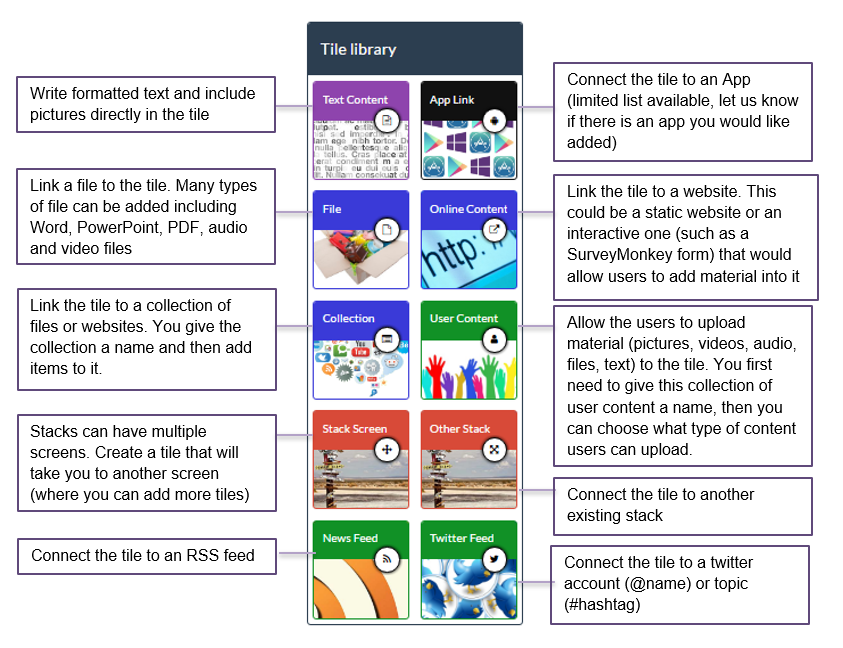
Commonly used Tiles
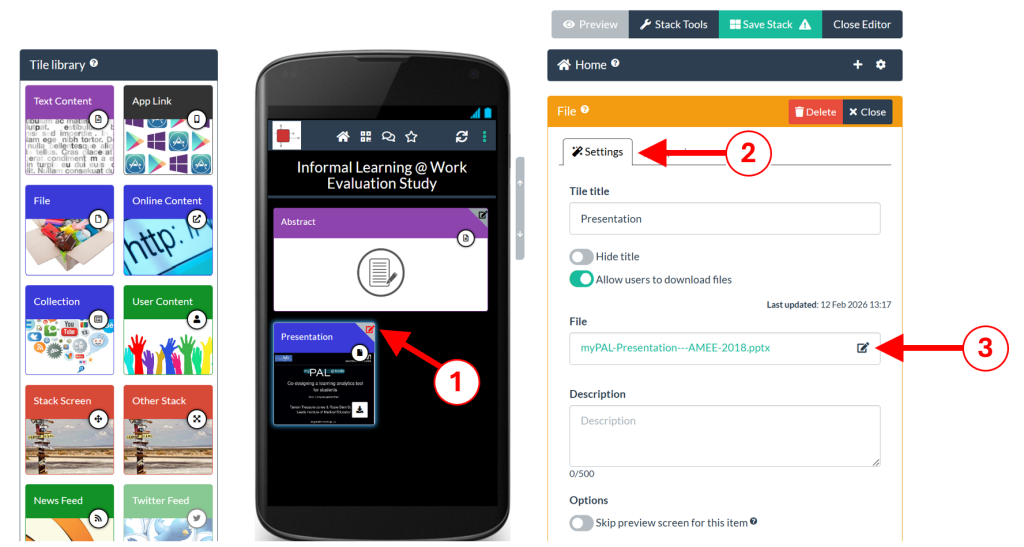
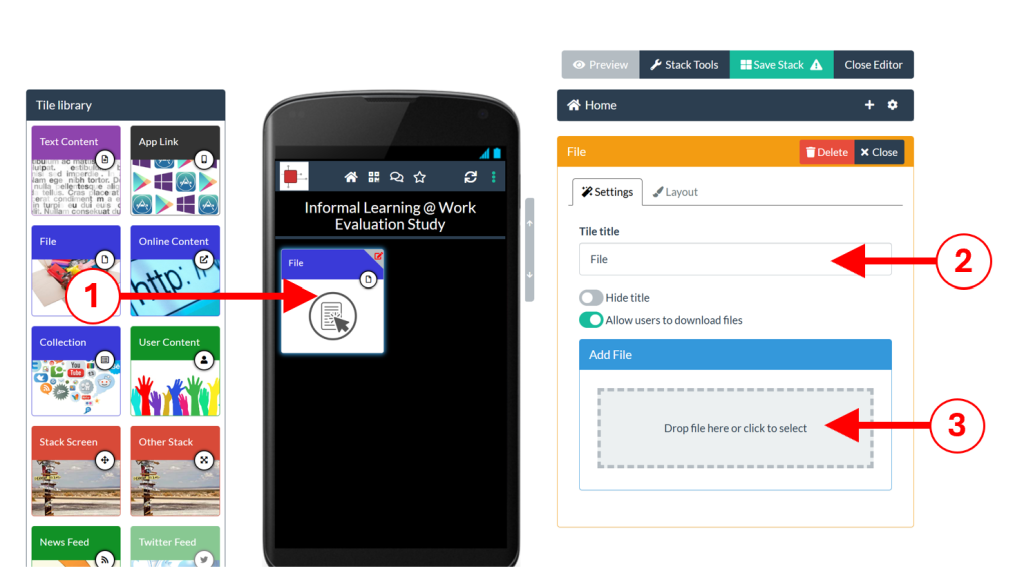
The File Tile is used to add a file to your stack.
Why use the File Tile?
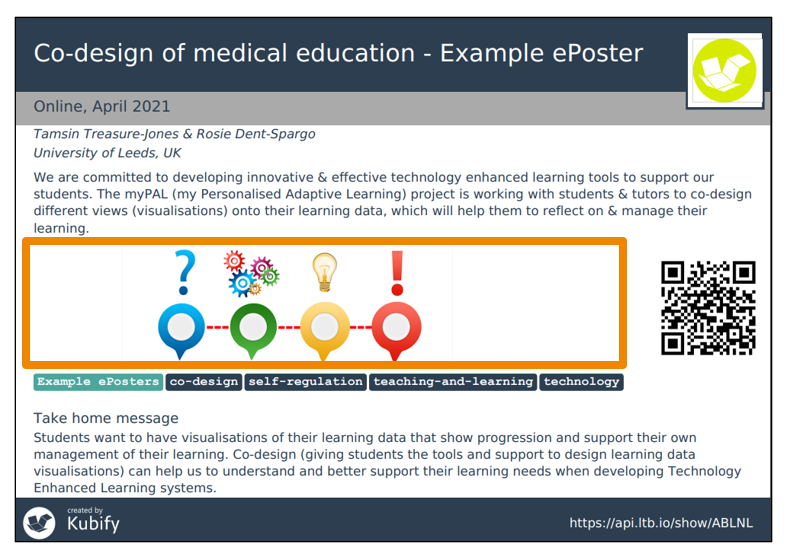
Authors often use the File Tile to add files that help to present their work (powerpoint, video or PDF) or documents that give background material on their work (report, survey, guidelines, case study, handbook). The tile titled Presentation in this example stack is a File Tile.
What file types can be added?
The file types that can be added include: PowerPoint files (.pptx .ppt), Word documents (.docx .doc), PDF files (.pdf), videos (most formats), audio files (most formats), image files (most formats).
Restrictions
Please note that uploaded PowerPoint and Word files are converted into PDF files so that they can be viewed within the in-built PDF viewer. This does mean that animations, narrations and embedded videos in a PowerPoint file will not work when viewed in the in-built PDF viewer, since it is showing the PDF version of the file. However, viewers can download the original file from the tile (if you have allowed that) and open it outside Learning Toolbox. See this FAQ for more advice on how to turn your narrated PowerPoint file into an MP4 video file that can then be added and played in Learning Toolbox.
Please note there is a 400MB file size limit on files uploaded using the File Tile. If your file is a video and is above this size then we recommend that you upload it to a video sharing site such as YouTube or Vimeo and then use the Online Content Tile to link to it.
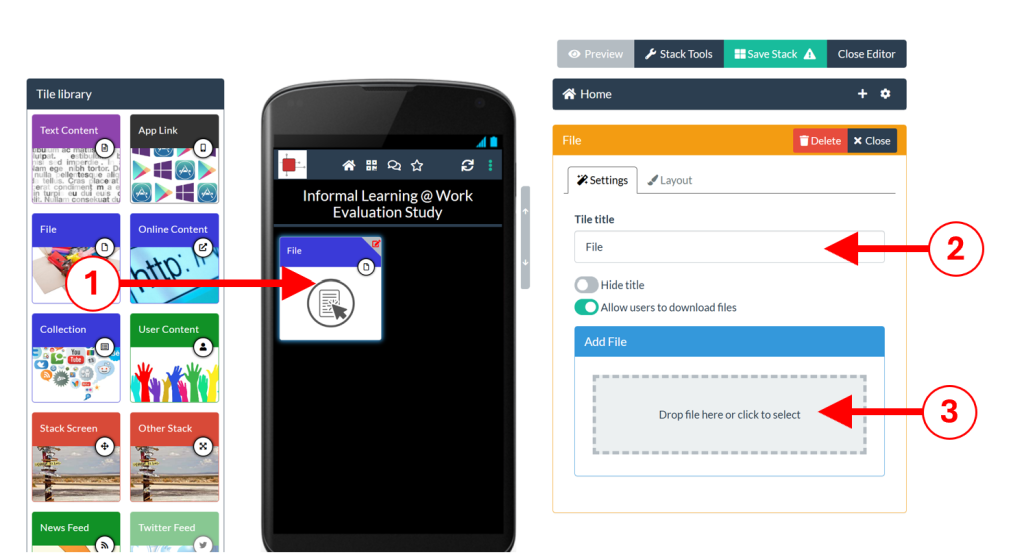
Using the File Tile
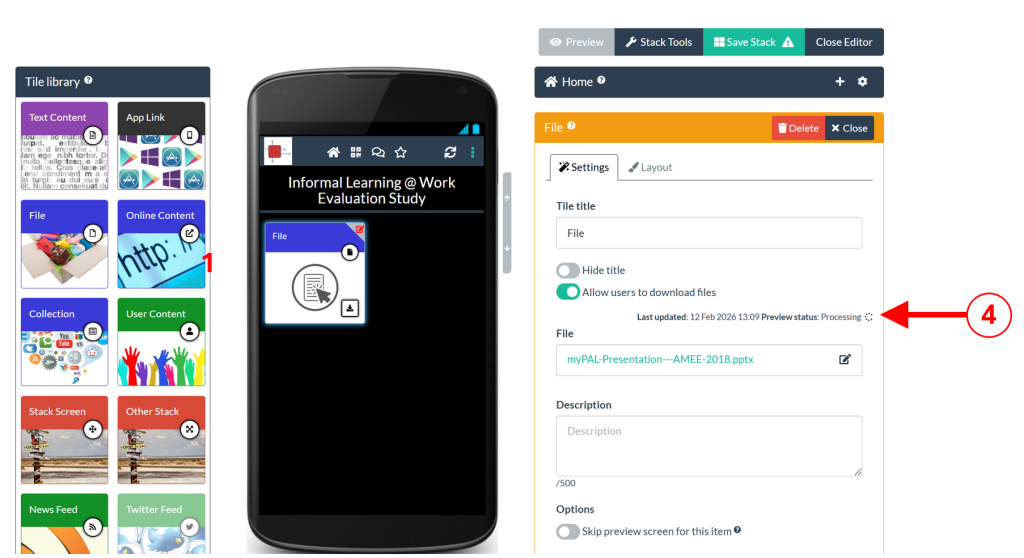
Drag and drop a File Tile from the Tile Library into your stack (1). In the Settings tab, give your tile a title (2) and then click in the Add File box (3) and choose the file to add from your computer.
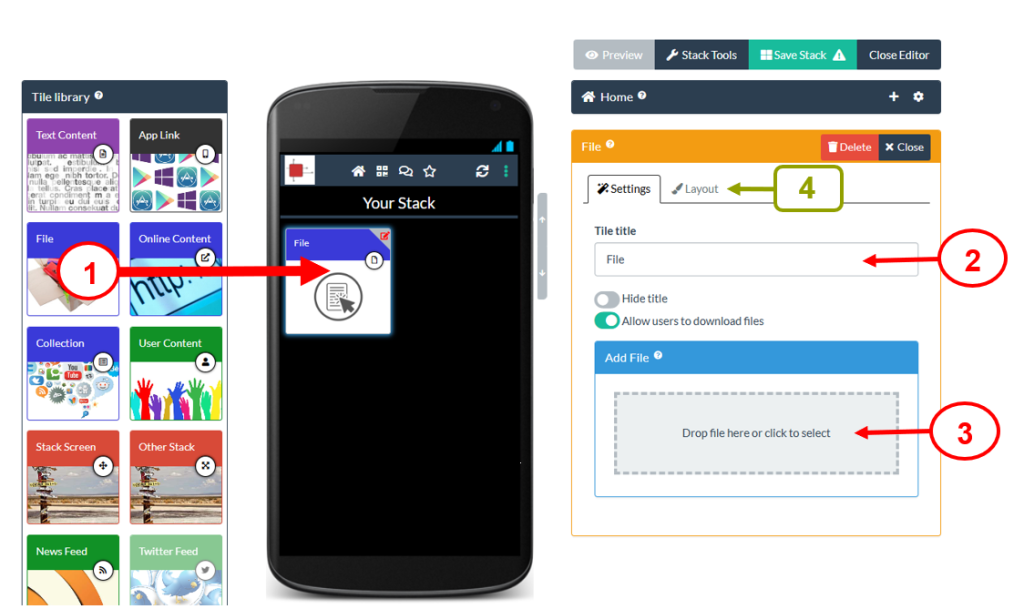
The file will be uploaded and will be processed. This processing makes sure that your file is viewable and produces a background image for your tile.
If you only want viewers to view the file but do not want them to be able to download it then you should switch off the download button.
If you want to use a different background image for your tile or make any other appearance changes to your tile then you can do that in the Layout Tab (4).
Remember to Save your stack after you have added new information.
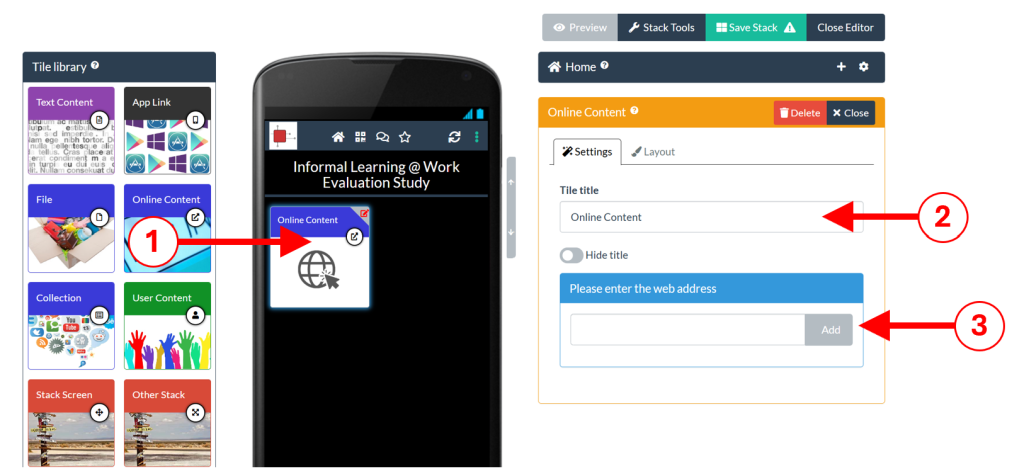
The Online Content Tile is used to link to a web page or online resource.
Why use the Online Content Tile?
Authors often use the Online Content Tile to link to their professional profile (LinkedIn, ResearchGate or staff page), their organisation or project’s web page, a video they have uploaded to YouTube or Vimeo, online references and papers related to their work or to link to another online resource that they have created. The Tiles titled University of Leeds and LRF19 Keynote in this example stack are both Online Content Tiles.
Using the Online Content Tile
Drag and drop an Online Content Tile from the Tile Library into your stack (1). In the Settings tab, give your tile a title (2) and and then type (or paste in) the link to the webpage you want to use and click Add (3).

The tile will be linked to that webpage and (if the website passes us this information) a background image and description will be added to the tile.
If you want to use a different background image for your tile or make any other appearance changes to your tile then you can do that in the Layout Tab (3).
Remember to Save your stack after you have added new information.
The Text Content Tile is used to add text content to your stack. It also allows you to do some basic formatting of that text and include images and weblinks in the text.
Why use the Text Content Tile?
Authors often use the Text Tile add an abstract, introduction or key messages to their stack. The tile titled Abstract in this example stack is a Text Content Tile.
Using the Text Content Tile
Drag and drop an Text Content Tile from the Tile Library into your stack (1) and in the content box (2) you can then add your text. The formatting buttons (at the top of content box) allow you to format the text and even add images or weblinks.
You should give the Tile a meaningful title (3). You can also change the layout of the tile (size, colour and background image) by clicking on the Layout tab (4).
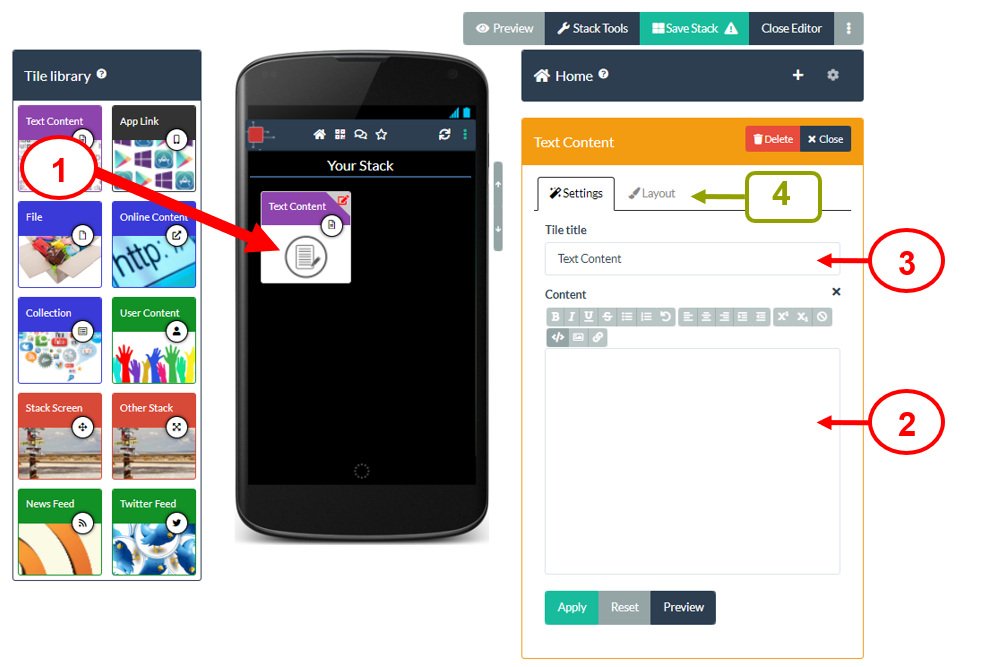
Remember to Save your stack after you have added new content.
Advanced Tiles
The App Link Tile is used to link to an App.
Why use the App Link Tile?
Authors often use the App Link Tile if they have developed an App as part of their work or if they have used or evaluated an App as part of their work. The App link tile will direct a viewer to that App (or the relevant place in the App store) when they click on the tile whilst viewing the stack on a suitable device (e.g. smartphone or tablet).
Using the App Link Tile
Drag and drop an App Link Tile from the Tile Library into your stack (1). Then click on the drop down menu to choose the App that you want to include (2). If you cannot find the App that you want to include in the list then please email support@stack.services and if possible we will add it to the list. A title will automatically be added to the Tile, but you can change this. You can also change the layout of the tile (size, colour and background image) by clicking on the Layout tab (3).
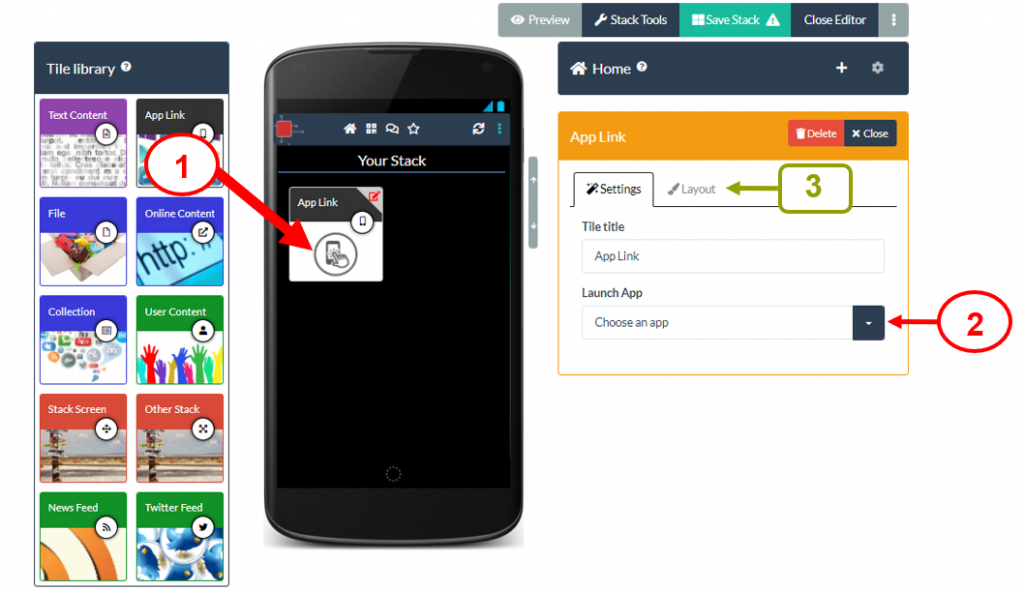
Remember to Save your stack after you have added new content.
The Collection Tile is used to a collection of files or links to your stack.
Why use the Collection Tile?
Authors often use the Collection Tile if they have a set of related material that they want to group together in their stack (such as references or background study materials). The Collection Tile allows you to do this with files and web links. If you want more flexibility over what to include in your set of materials and how it appears onscreen then you should use a Stack Screen Tile instead. The tile titled Related Papers in this example stack is a Collection Tile.
Using the Collection Tile
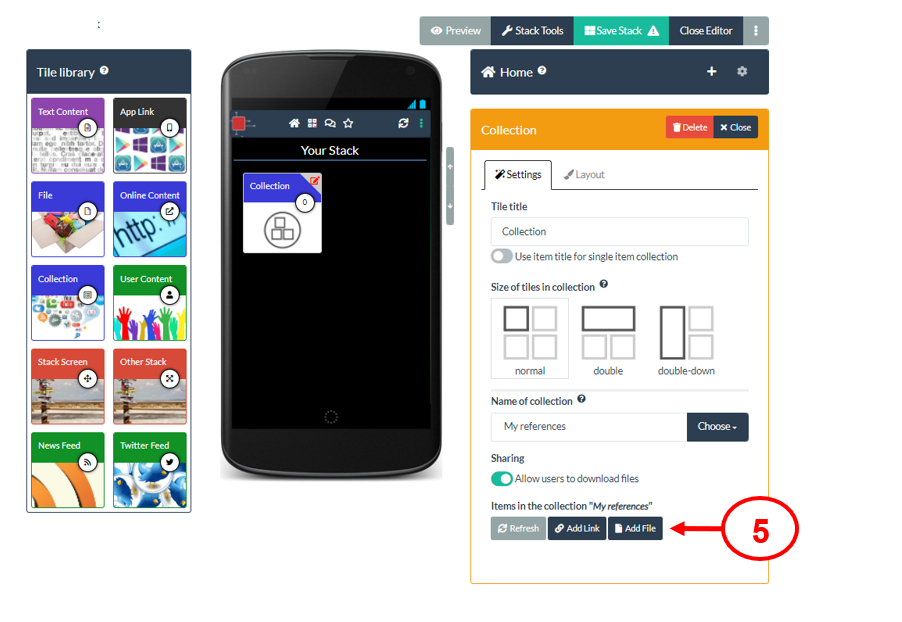
Drag and drop a Collection Tile from the Tile Library into your stack (1). Type in a Title for your Tile (2). Then click on the drop down menu and choose to Add new collection (3).
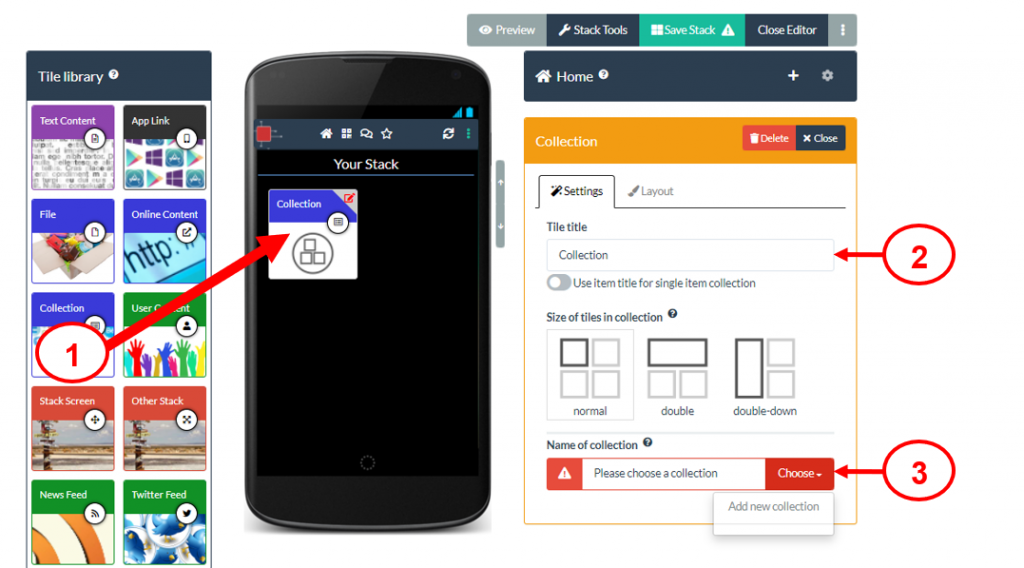
Type in a name for your collection and click on the tick button (4).

Buttons will now appear onscreen allowing you to click and Add a Link or Add a File (5). Click on the appropriate button and then follow the prompts to upload a file or add your weblink. Once it is added then you can click on the appropriate button again to add your next link or file.
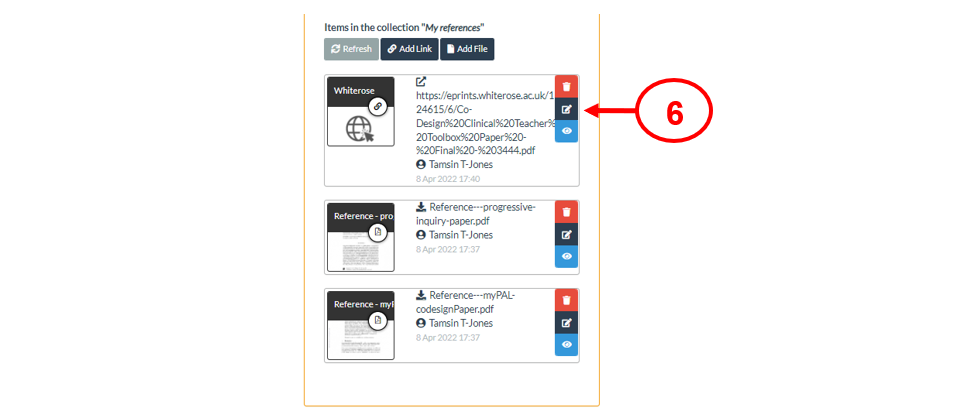
Onscreen you will see a list of the links and files that you have added to this collection. If you need to then you can edit or delete an item by clicking on its edit or delete button (6). It is also possible to drag and drop the items in the list to change the order in which they will appear.
Remember to Save your stack after you have added new content.
The News Feed Tile is used to connect to an RSS news feed and show the most recent posts from that feed in your stack.
Why use the News Feed Tile?
Authors can use the News Feed tile if they want to link to an RSS news feed service that provides up-to-date information on a particular topic related to their work. For example this news feed from BMC Medical Education (https://bmcmededuc.biomedcentral.com/articles/most-recent/rss.xml) provides links to recent articles on medical education. An author may know of a news feed that is particularly relevant to their work and can use the News Feed Tile to link to that.
Using the News Feed Tile
Drag and drop a News Feed Tile from the Tile Library into your stack (1). Type or paste in the URL (web address) to the news feed that you want to connect with and click on the Get Feed button (2).
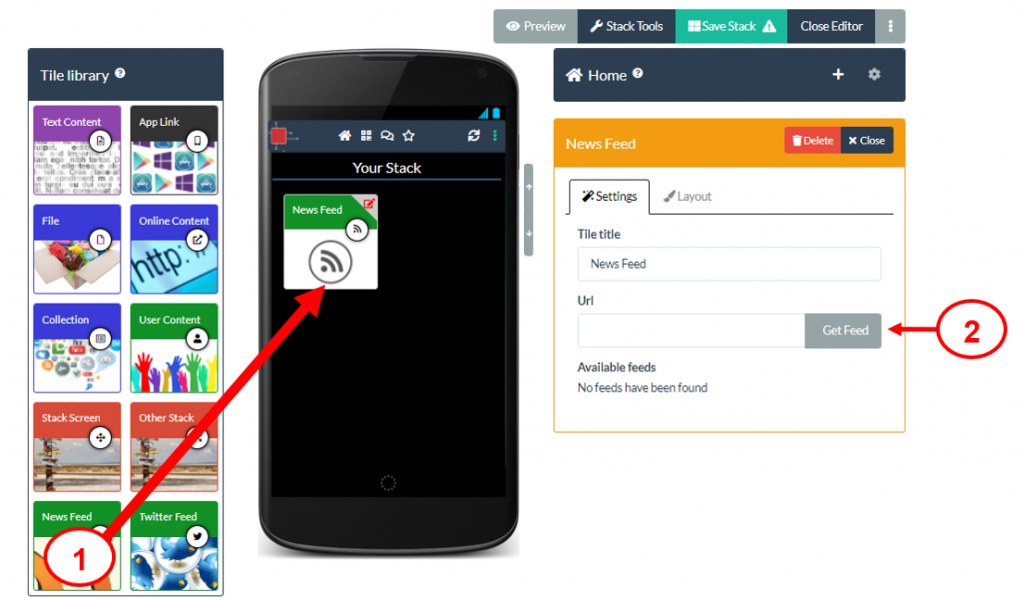
This creates a live link, so that when viewers click on this Tile they will see the most recent updates sent by that news feed service.
Remember to Save your stack after you have added new content.
The Other Stack Tile is used to add a link to another stack.
Why use the Other Stack Tile?
Authors often use the Other Stack Tile if they have more than one ePoster stack in a conference and they want to add a direct link from one of their ePoster stacks to the other ePoster stack. Authors also use the Other Stack Tile if they want to link to another ePoster stack by their research group or if they want to link to an ePoster stack that they made for a previous year’s conference. The tile titled Explore an ePoster in this example stack is an Other Stack tile.
Using the Other Stack Tile
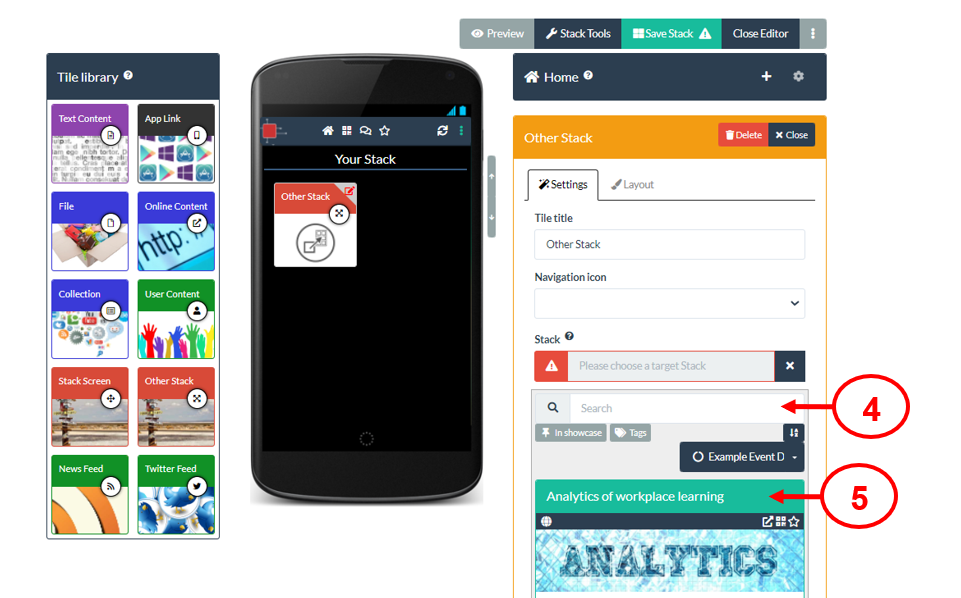
Drag and drop an Other Stack Tile from the Tile Library into your stack (1). Type in a Title for your Tile (2). Then click on the target stack edit icon to choose the stack you want to connect to this Tile (3).
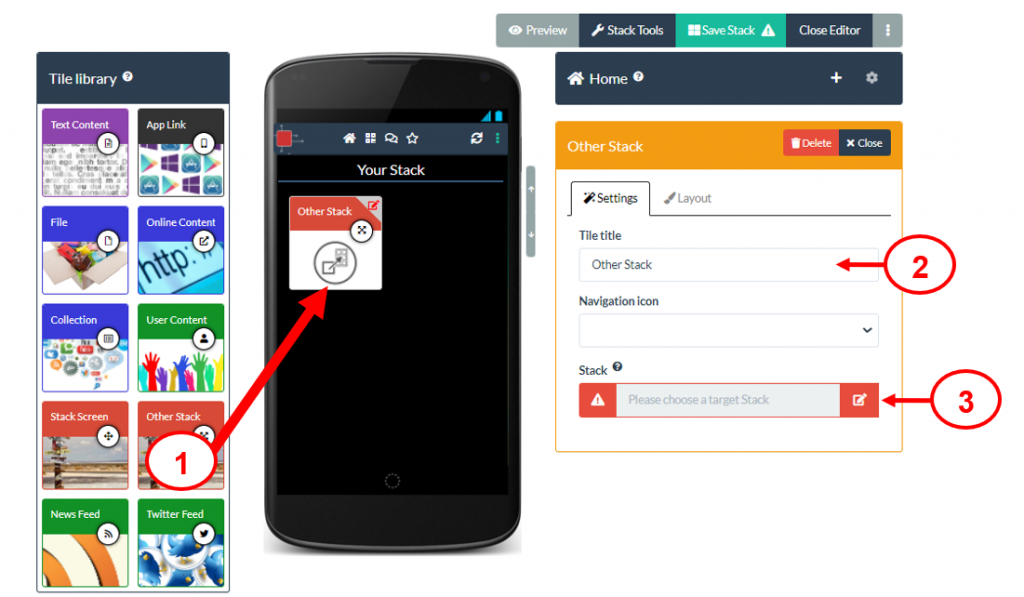
A search box will appear. Type in here to search for the stack you want (4). When you find the stack you want click on its title bar (5) to link it to this Tile.
Remember to Save your stack after you have added new content.
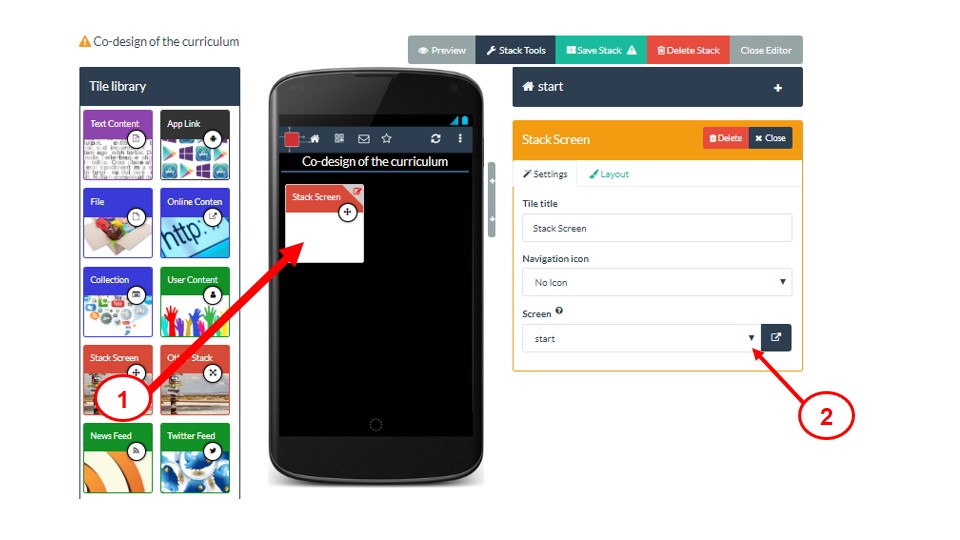
The Stack Screen Tile is used to link to a new screen to your stack and you can then add more content into this new screen.
Why use the Stack Screen Tile?
Authors use the Stack Screen Tile when they want to add structure to their stack. It allows them to create a new screen into which they can add new content. Authors often use the Stack Screen Tile if they have a lot of content and want to separate it into different spaces – e.g. a screen for authors’ information, a screen for presentations, a screen for background material, a screen for references. The tile titled Authors in this example stack is a Stack Screen tile.
Using the Stack Screen Tile
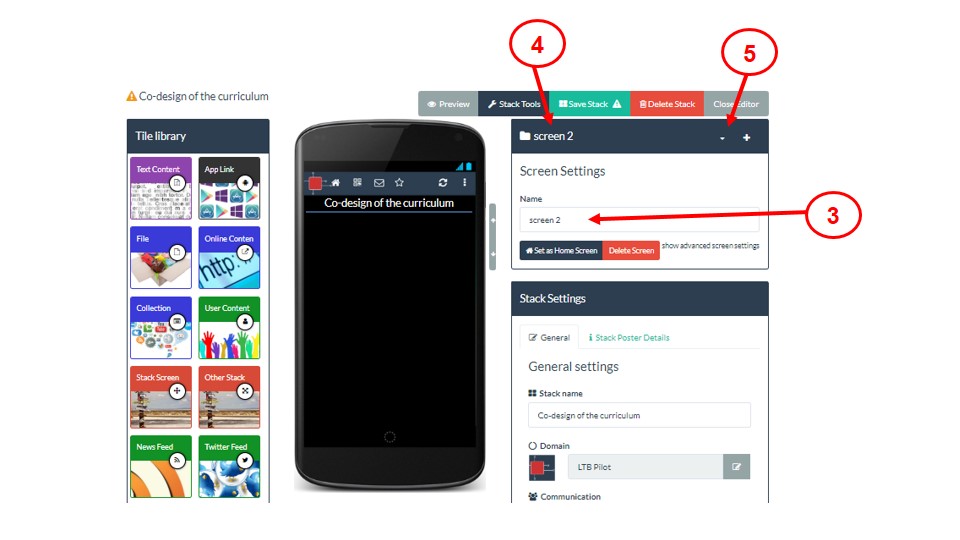
Drag and drop a Stack Screen Tile from the Tile Library into your stack (1). This Tile will be used as the link to your new screen. Type in a Title for your Tile (2). Then click on the drop down menu and choose to Create new screen (3).
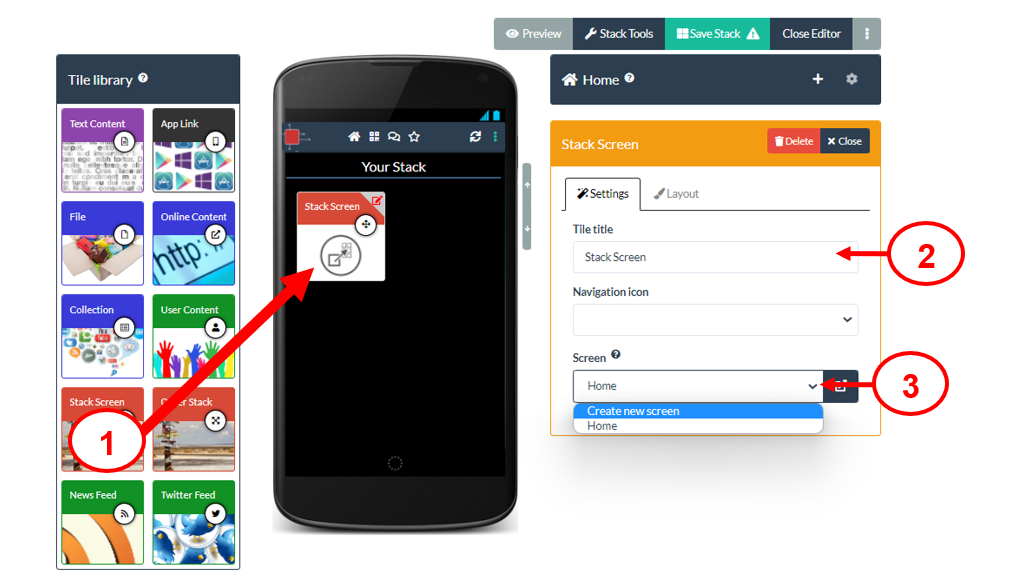
A new empty screen is now created and you can add new content to this screen by dragging in Tiles from the Tile Library as normal (4). Your new screen is automatically called Screen 2. If you want to give it a new name (to help you remember the type of content you have added to this screen) then click on the screen settings icon (5) and add the new name. When you have finished adding content to your new screen then you can return to your stack’s Home screen by clicking drop down menu and choosing Home (6).

Remember to Save your stack after you have added new content.
Status of the ‘Twitter Feed’ tile
5 July 2023
We’re sorry to announce that due to a recent change in Twitter’s policy, we have had to make the ‘Twitter Feed’ tile unavailable.
Since 30 June 2023 Twitter has put in place access restrictions to their platform to no longer allow access for anyone not logged into their platform. This was an unannounced change by Twitter that means that the ‘Twitter Feed’ tile no longer works as expected. Unfortunately this is out of our control.
Read more in this CNN article.
We’re keeping an eye on any developments around this, but in the meantime the ‘Twitter Feed’ tile is unavailable.
If you have already added a ‘Twitter feed’ tile to your stack then when viewers click on it they will get a message explaining why it is not currently working and giving them directions for how to get to your Twitter account or hashtag.
The Learning Toolbox Team
The User Content Tile is used to allow viewers to add content to your stack.
Why use the User Content Tile?
Authors use the User Content Tile if they want to collect information from the viewers of their stack. For example they could be asking viewers to add links to research or reports that are related to the work reported in the stack. They could be asking viewers to share images or sounds related to the work reported in the stack. Another example is when the author has created the the stack to support a round table discussion; the author may then use the User Content tile to allow all participants in the round table discussion to add materials for inclusion in the discussion. The tile titled Your Ideas in this example stack is a User Content tile.
Using the User Content Tile
Drag and drop a User Content Tile from the Tile Library into your stack (1). Type in a Title for your Tile (2). Then click on the drop down menu and choose to Add new collection (3).
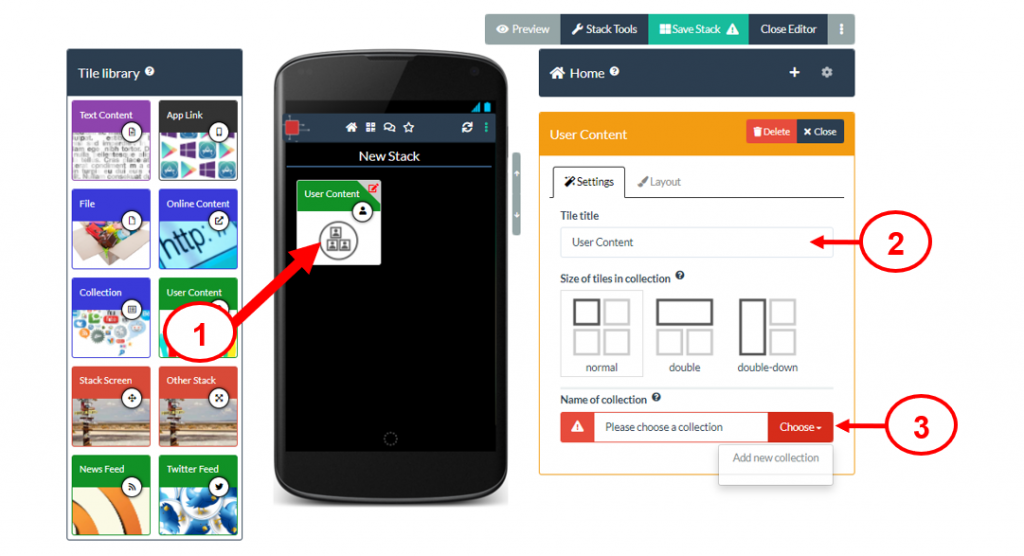
Type in a name for your user content collection and click on the tick button (4).
You can turn on the switch (5) and add some introduction text to explain to viewers what you want them to add. You can also choose the privacy settings for your user content collection (6). If you want every viewer to be able to see all the added material then you should leave this setting in its default position. You can also choose what type of content users can add to the user collection (7). If you want to then you can also choose to add some content (a link or a file) to the collection yourself (8).
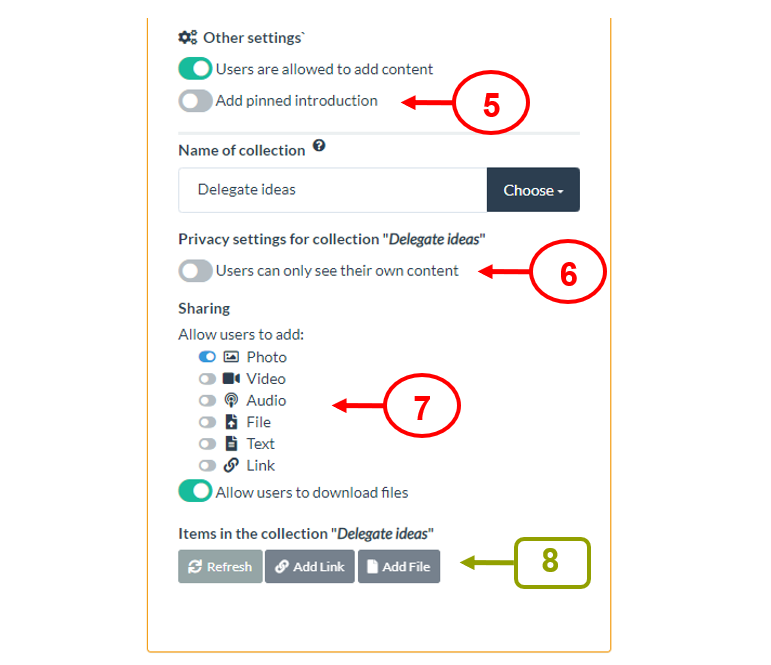
Remember to Save your stack after you have added new content.
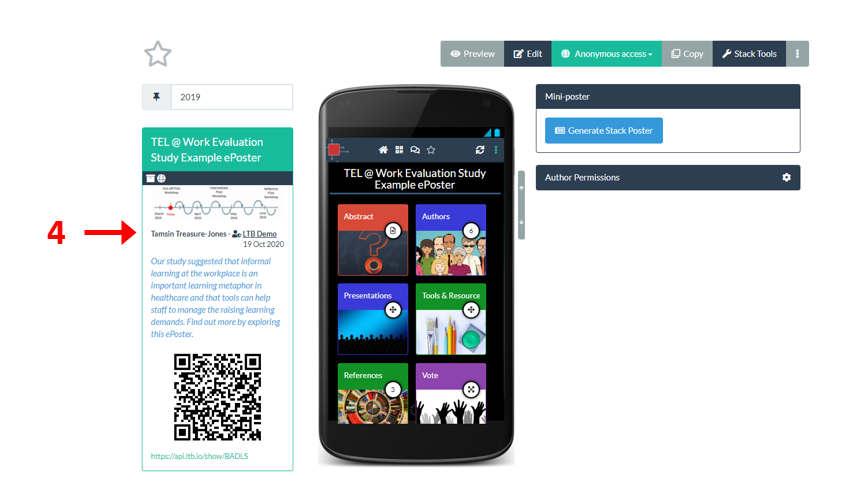
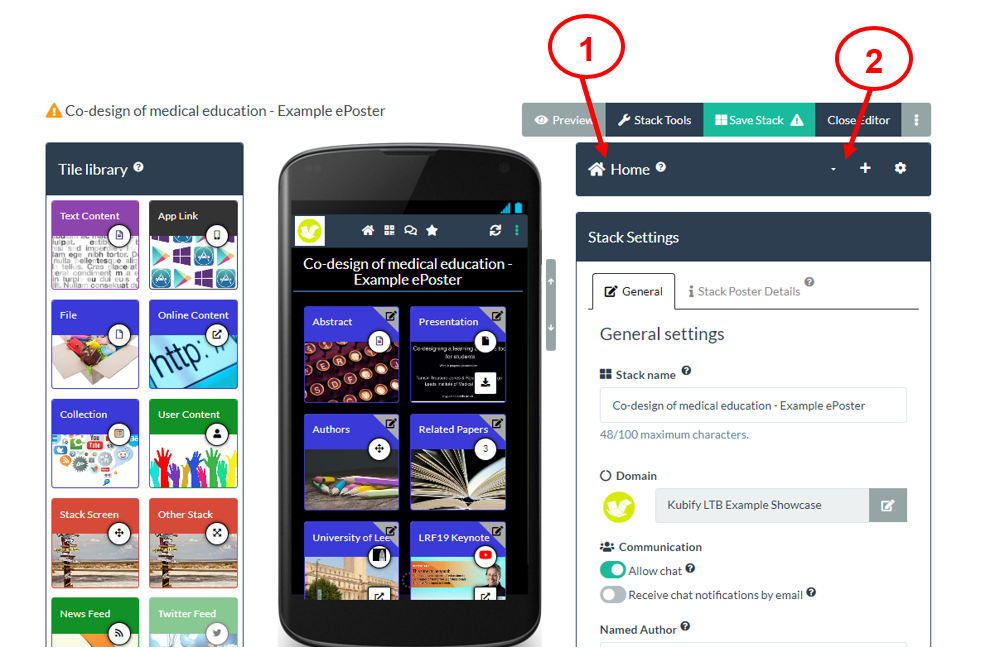
The Named Author space (1) allows you to decide which author’s name you want to appear on the summary view of the stack in the showcase.
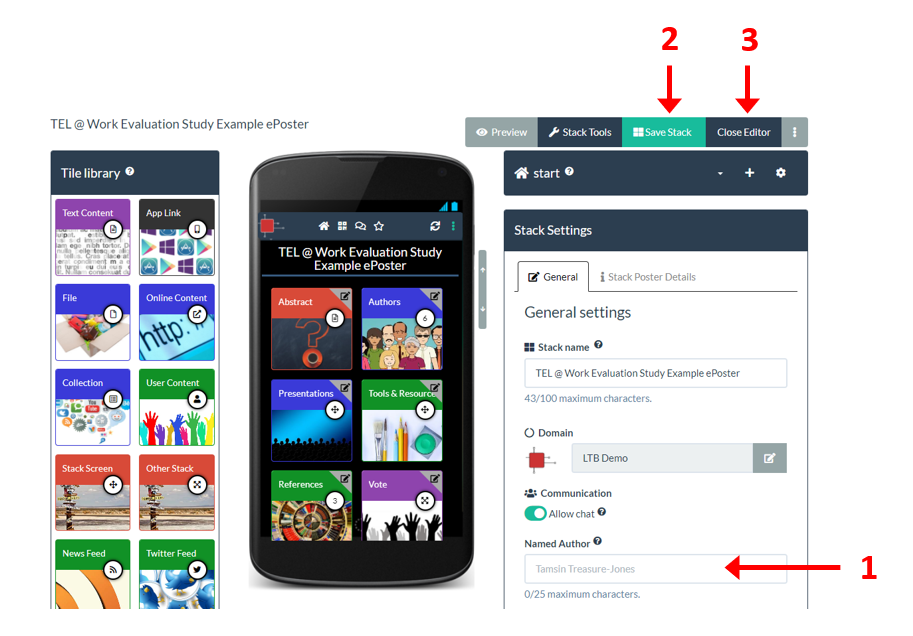
The default is that the editing author’s name will appear here, but you can change this to a different name. If you then save (2) and close the editor (3) then you will be able to see where the Named Author appears in your stack’s summary view (4).
There is a character limit of 25 for the Named Author to ensure that it can be displayed within the summary view. This means you will not be able to list all the co-authors of a stack within the Named Author space. You can use the academic convention of et al. to indicate within the Named Author space that there are more authors (e.g. I could edit the Named Author to be “T. Treasure-Jones et al.”)
You should always add all your co-authors details into the Authors section of the Stack Summary. This will ensure that your co-authors names appear on the printable summary poster.
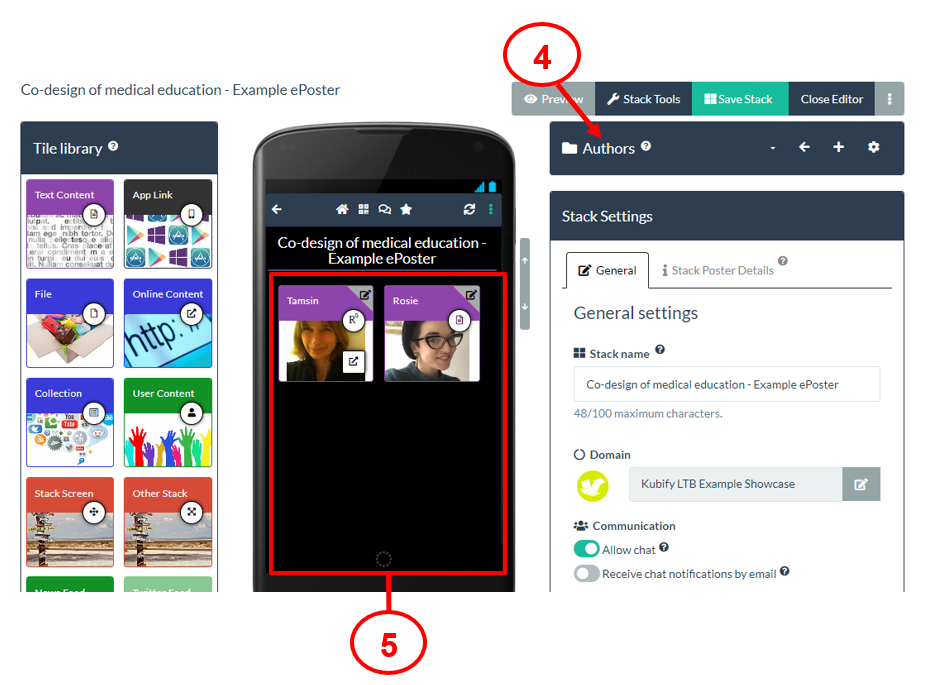
You can also add all your co-authors details within the stack itself. Many authors add a Text Tile listing all the co-authors. Another possible approach is to add a new Screen and on that new screen to add a Tile for each author which links to their professional webpage.
Editing Tiles
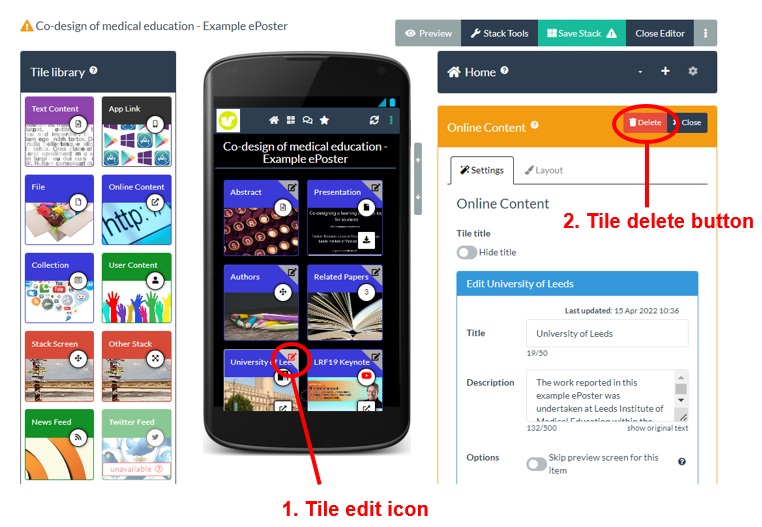
When you are in the editor then you can edit a tile by clicking on its edit button (in the top right hand corner of the tile). 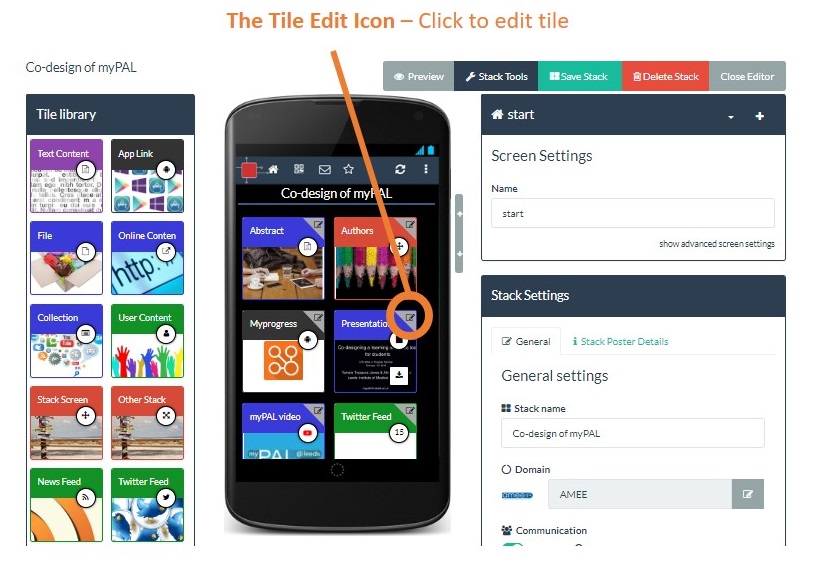
When you are in the editor, you can delete a tile if you no longer want it to be included in your stack.
Click on the tile’s edit icon (1). The settings for that tile will open. Now click on the delete button (2) in the setting’s area. Be careful to make sure you are deleting the correct tile. This delete action cannot be undone. Remember to Save your stack after making changes.
Changing the layout and appearance of a tile
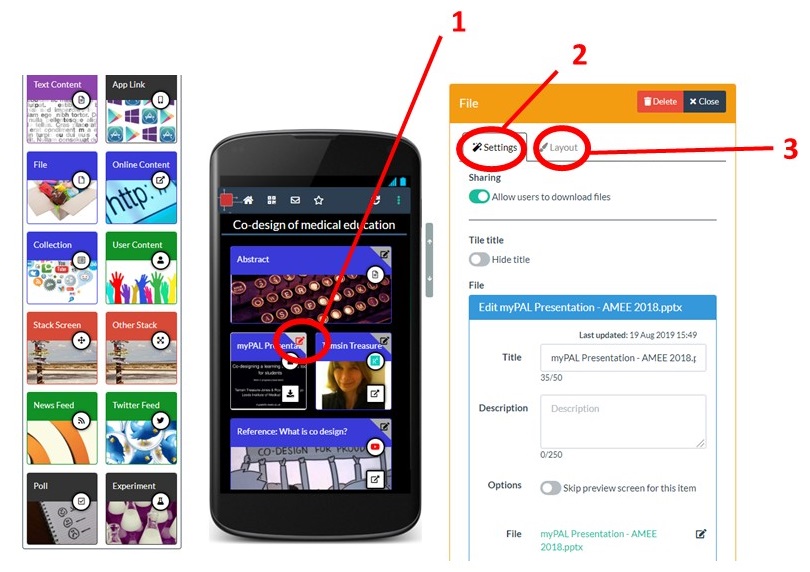
You can always return to a tile that you have previously added to your stack and edit it. Open your stack in the editor then:
- Click on the edit icon on the tile that you want to edit. Note that the edit icon of the tile that is open for editing appears red.
- You can now make any changes you want to the content of the tile in the Settings tab
- And you can make any changes you want to the appearance of the tile in the Layout tab
You can can change the size, title bar colour and tile background image.
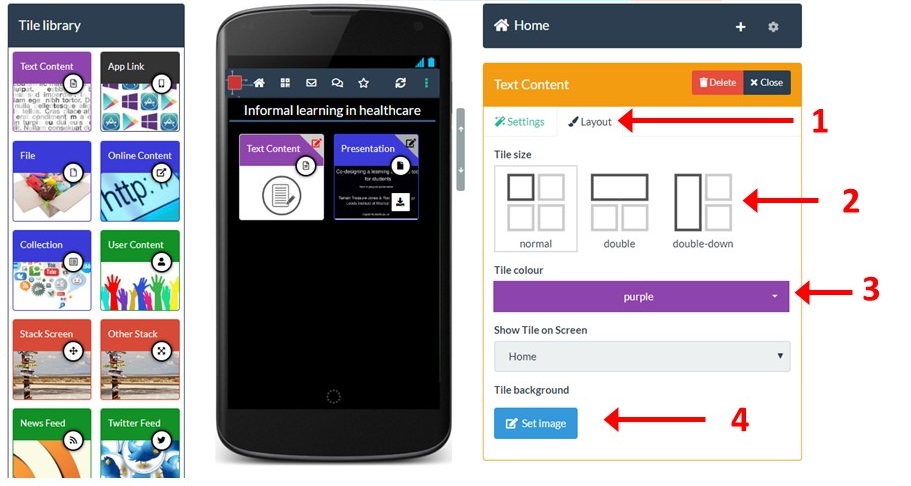
Click on the tile’s edit icon to show its settings then:
- Click on the Layout tab
- Within the Layout tab you can change the tile size
- tile colour
- and set or change the background image
Click on the tile’s edit icon to show its settings and layout tabs, then:
- Click on the Layout tab
- Click on the Set Image button.
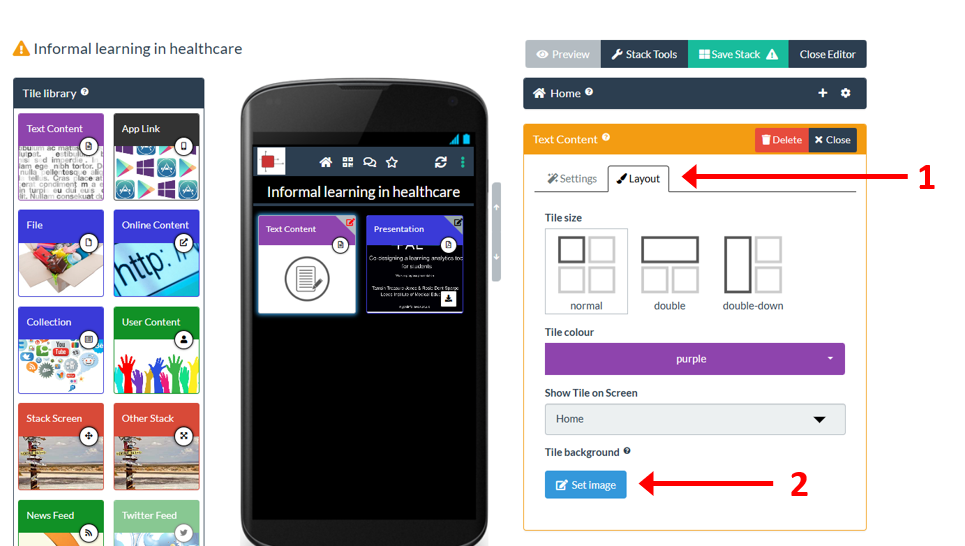
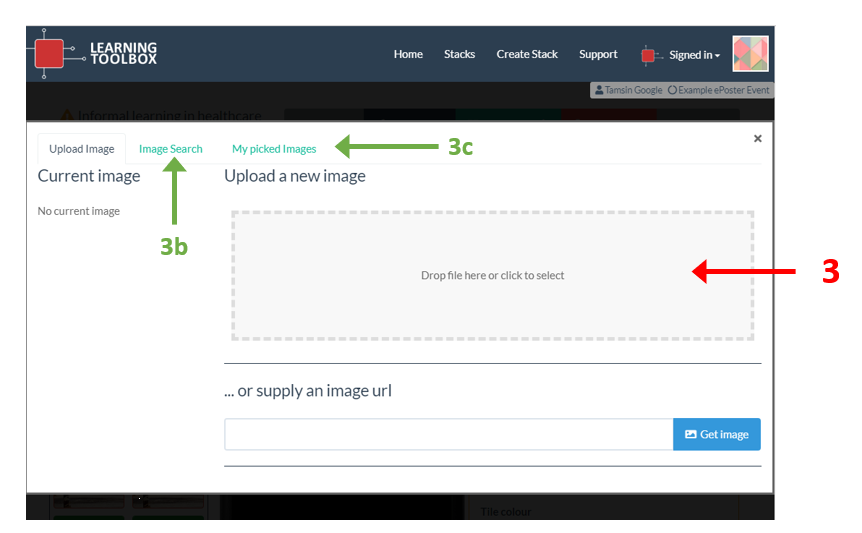
This opens the image selector. Here you can:
3. Upload an image from your computer. If you do not have a suitable image to upload then you can also use the image search (3b) which connects to Pixabay to find an image. This is a repository of copy-right free images that are available for you to use. You can also choose from images you have previously picked from Pixabay (3c).
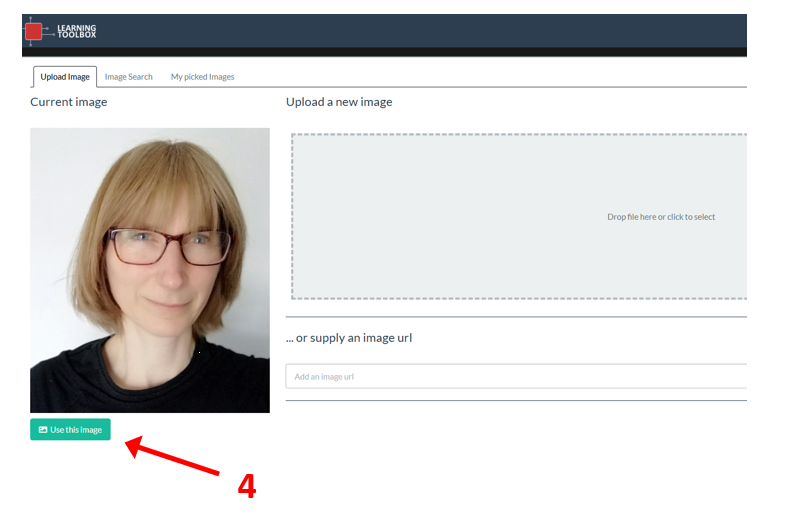
4. After uploading your image, click on the Use this image button.
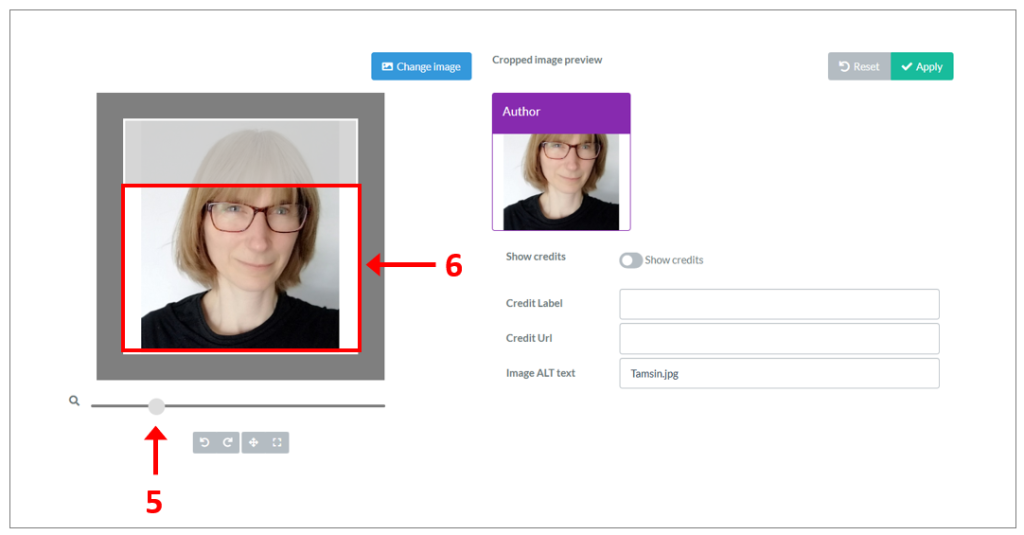
This will open your image in the image cropping tool. Here you can:
5. Resize the image using the resize scrollbar
6. Move the image (drag and drop it) so that the part you want to appear is showing in the focus area.
7. Click on Apply when you are happy with the cropped image preview.
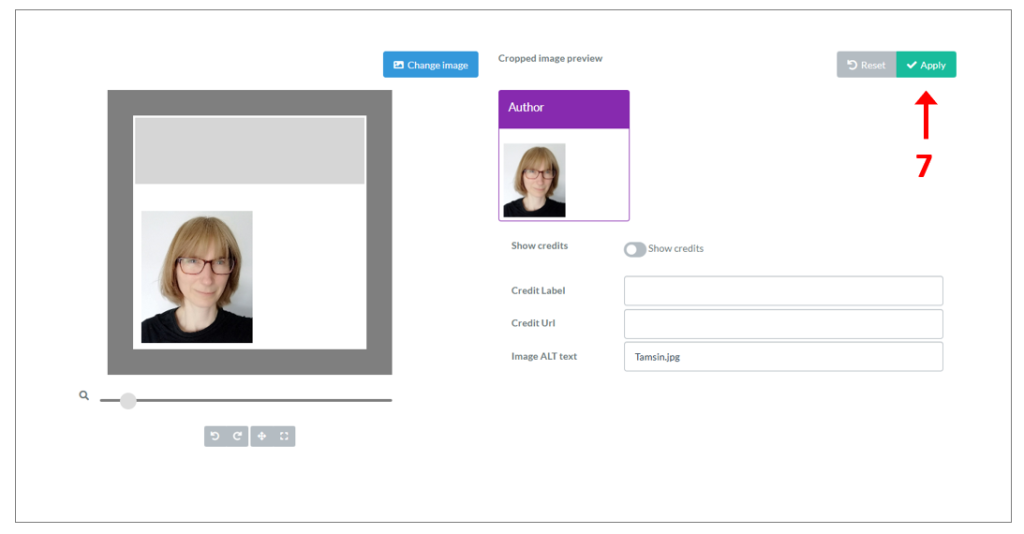
You will then return to the Editor.
When you pick an image then you will have the chance to crop and resize it.
1. You can resize the image using the resize scrollbar.
2. You can crop it by dragging and moving the image so that the area you want appears within the focus area.
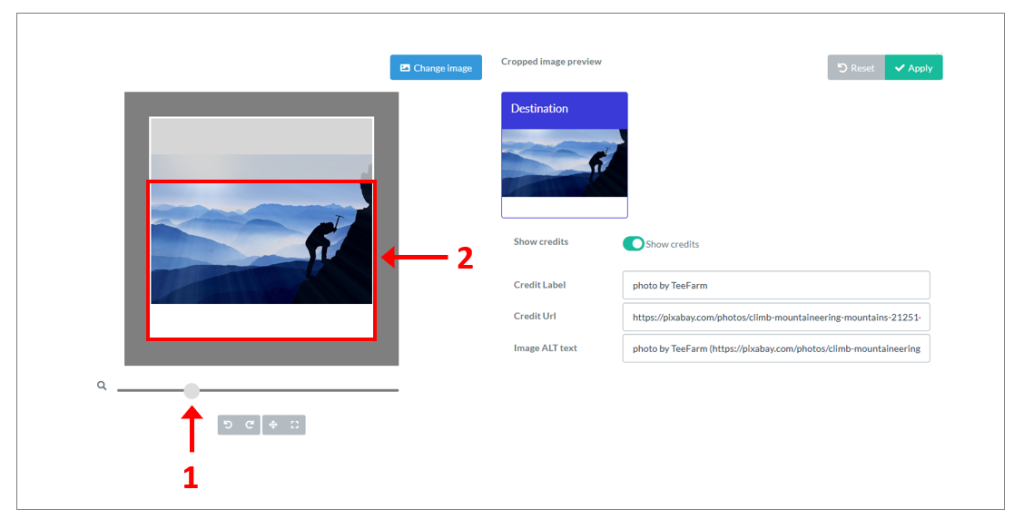
3. Click on Apply when you are happy with the cropped image preview.
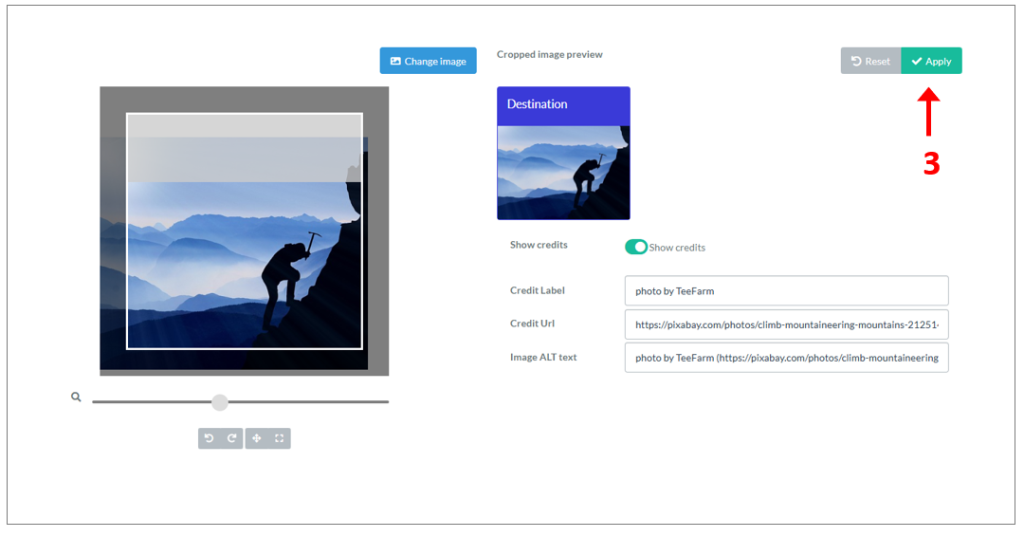
You will then return to the Editor.
Adding a PowerPoint file to your stack
You can add a PowerPoint presentation using the File Tile. Drag and drop a File tile from the Tile Library into your stack (1), in the Settings tab, give your tile a Title (2) and Add (3) the PowerPoint file from your computer.
Learning Toolbox will automatically convert your PowerPoint presentation into a PDF file so that it can be viewed inside the PDF viewer within the Learning Toolbox app or within any web browser. This conversion takes a little time and there will appear a message telling you it is being processed (4). When the processing is finished then you will see the first slide in your presentation appear as the background image on your File Tile. You can edit the tile layout (including the background image) in the Layout tab.
Restrictions
Please note that uploaded PowerPoint are converted into PDF files so that they can be viewed within the in-built PDF viewer. This does mean that animations, narrations and embedded videos in a PowerPoint file will not work when viewed in the in-built PDF viewer, since it is showing the PDF version of the file. However, viewers can download the original file from the tile (if you have allowed that) and open it outside Learning Toolbox. See this FAQ for more advice on how to turn your narrated PowerPoint file into an MP4 video file that can then be added and played in Learning Toolbox.
Please note there is a 400MB file size limit on files uploaded using the File Tile. However, we would recommend that you keep your files much smaller in size if possible since large file sizes will not produce the best experience for the viewer (due to loading times).
If you have added a File to your stack using the File Tile and you want to replace that file with an updated version then this is possible.
Return to your stack and open it for editing and then follow these steps:
- Click on the edit icon in the top right of the File Tile you want to edit
- Look in the Settings area
- Click on the edit icon next to your uploaded filename
You will then be able to upload your new file. Once it has uploaded and processed then you should Save your stack.
Adding a video to your stack
There are two different ways in which you could include a video in your stack. Both approaches will allow the video to be played inside your stack.
1. As a File
You can add a video using the File Tile. Drag and drop a File tile from the Tile Library into your stack (1), in the Settings tab give your tile a Title (2) and then click in the Add File box (3) and add the video file from your computer.
The file will be uploaded and will be processed. You can continue editing and add other tiles whilst this processing is being done. Whilst the video is being processed there will be a default image showing on your file tile. Once the processing is finished then the tile will show a still image from your video as the tile image. However you can can change the tile’s background image as normal (in the Layout tab) once the processing is finished.
Please note there is a 400MB file size limit on files uploaded using the File Tile. If your file is above this size then we recommend that you consider saving your video in a lower resolution (more suitable for viewing on the web) before uploading it. If however you do want to add a larger video file then you can do this by uploading it to a video sharing platform first and then add it to your stack as an online content tile (see below).
2. As Online Content (linking to a video sharing platform)
Another way to add a video to your stack is to upload your video to a video sharing platform like YouTube or Vimeo first. Then in Learning Toolbox you can use the Online Content tile to link to your video.
Drag and drop a Online Content tile from the Tile Library into your stack (1), in the Settings tab give your tile a Title (2) and then Add the weblink (3) to where your online video appears on the video sharing platform.
Some conferences ask their authors to add a video presentation to their stack. A common way that people make video presentations is to use PowerPoint.
If you want to make a video presentation using PowerPoint then we recommend following the instructions from Microsoft (see links below) to add a narration to your PowerPoint presentation and then save that as a video file.
- Record a slideshow with narrations and timings (just follow the basic steps 1-5 in this guide) then:
- Turn your presentation into a video
Please note that Learning Toolbox does not support .PPSX files, so when you save your presentation as a video you should save it as an MP4 file, not as a PPSX file.
Please also note that you should choose to save your video in 720p (or internet) resolution (not the 1040p default that Powerpoint offers) as this is the most suitable format for videos playing on the web. Following these instructions will reduce the chance of hitting any upload issues due to the file size.
You can then add the video to your Learning Toolbox stack using the File Tile.
Adding an extra screen/layer to your stack
If you are adding a lot of material to your stack then you may find it useful to create an extra screen. You can do this by using the Stack Screen tile. This will allow you to add a tile that creates and opens a new screen.
To create an extra screen:
- Add a Stack Screen tile to your stack (1)
- The settings area will show which screen that tile is currently pointing at. Click on the down arrow (2) next to the target screen name and then choose “Create New Screen” from the menu that appears.
- This will immediately create a new empty screen (which will be connected to the stack screen tile you added) and move you to that empty screen
- It will give it a default screen name (3) which you can edit and change to something more meaningful
- You can now add new tiles to this screen as normal
- Note that there is always a bar visible in the window that shows you the name of the current screen you are editing (4)
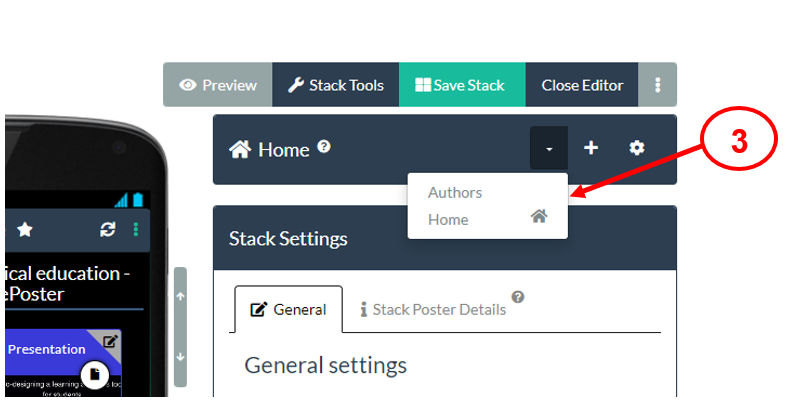
- When you want to move to another screen (e.g. back to the start screen) you can just click on the menu next to the current screen name (5) and choose the name of the screen you want to move to
If you have created different screens in your stack then this FAQ explains how you can move between them when you are editing your stack.
There is a bar (1) in the editor that shows the name of the screen that is currently showing in the mobile view or your stack.
If you want to move to a different screen then click on the drop-down menu icon (2) in that bar.
The drop-down menu will show you the names of the different screens in your stack (3). Choose the name of the screen you want to move to.
When you choose a different screen then that screen’s name will show in the bar (4) and you will see that screen in the mobile view of your stack (5). You can now use the Tile Library as normal to add more tiles to this screen or you can edit any tiles that you had already put on the screen.
Please remember that viewers of your stack will only see the Home screen. If you want them to have access to another screen then you must add a Stack Screen tile to your Home Screen and link that to the other screen. This FAQ explains how to use the Stack Screen Tile and this FAQ explains how you can move Tiles from one screen to another screen.
If you have created different screens in your stack (by using the Stack Screen Tile) then you may later want to move a Tile from one screen to another screen. You can do this in the Layout Tab of the Tile as shown below.
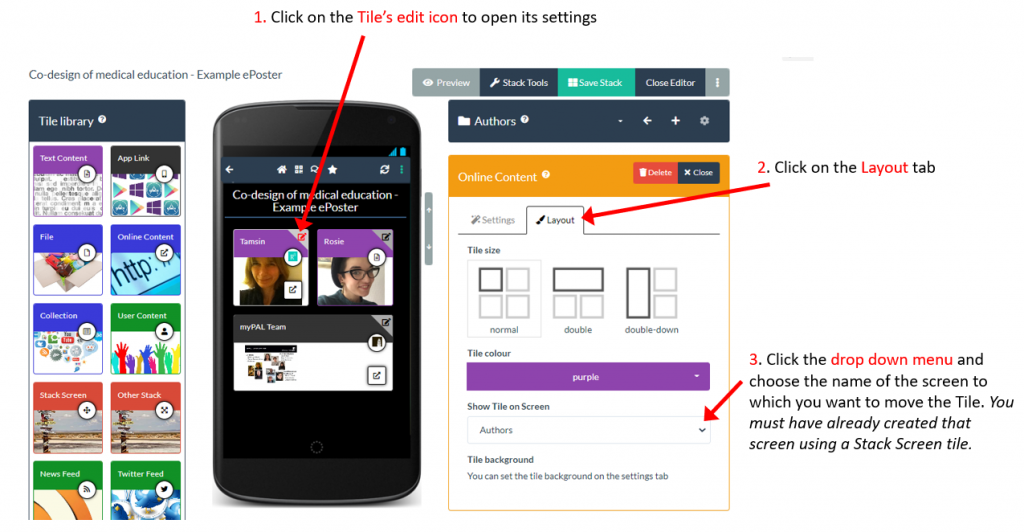
- Click on the Tile’s edit icon to open its settings
- Click on the Layout tab
- Choose the screen from the Show Tile on Screen drop down menu
The screen you want to move the tile to must already exist. The Stack Screen Tile is the easiest way to create a new screen and link to it.
Restrictions on what can be included in your stack
Learning Toolbox automatically creates optimised and resized images to reduce use of bandwith without losing image quality.
For tile background images you want to make sure your that your cropped image –the square or oblong cut-out that you create using the LTB imagepicker– has at least 400 pixels.
For your mini-Poster image you need to make sure that the cut-out has at least a 1000 pixel width, especially when you aim to have it printed.
Don’t worry about measuring this exactly, you can just add the image and then preview your stack or generate your stack summary poster to see how it looks.
You add content to your stack by dragging a tile from the Tile Library into the mobile phone view of your stack and then filling in the required information in the settings area.
A summary of the type of information you can add using each Tile is shown below.
In short: Yes, there are legal restrictions.
You should only upload material that you have permission to add. Even when material is in the public domain (such as websites), you should be careful to ensure that you are not presenting it as if it was your own.
There are two things to consider. Firstly the copyright of the material and secondly whether it contains protected content matter.
Copyright, Copyleft
As a rule of thumb: Do not upload the work of others as your own. Only upload content of others if they have given you permission (or if they have licensed it under Creative Commons).


Another option is to use materials that have been specifically marked as no rights reserved, public domain or copyleft. Usually these works are released under a Creative Commons CC0 license and allow you to freely use them for commercial and non-commercial purposes.
![]() The Pixabay image library that is integrated in Learning Toolbox, provides over 1 million images that can be freely used.
The Pixabay image library that is integrated in Learning Toolbox, provides over 1 million images that can be freely used.
Privacy, Portrait right and trademarks

In addition you should consider if depicted contents may be subject to additional copyrights, property rights, trademarks, protrait right, etc. and may require the consent of a third party or the license of these rights. For example the Disney’s image of Mickey Mouse is a protected trademark.
Restoring your deleted stack
If you have accidentally deleted your stack then it is possible to restore it.
First click on Stacks (1) and then click on the Deleted Stacks tab (2).
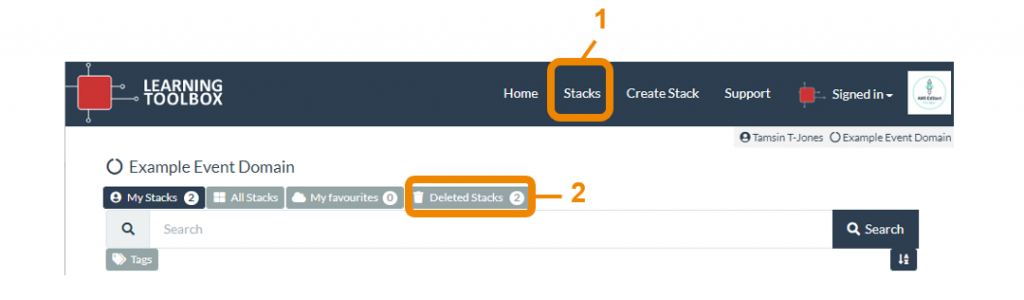
This will then show any stacks that you have deleted. Click on the restore this stack bar (3) of the stack you want to restore.
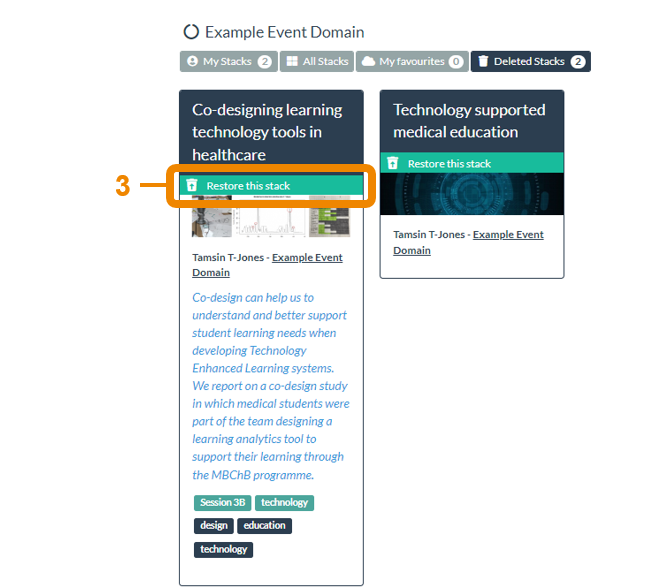
You will then see onscreen any open invitations (invitations that do not already have stack linked to them) to which you can restore and link this stack. Click on the restore button (4) next to the invite you want to restore and link this stack to. Your stack will now be restored and you can click on the Edit button to edit it as normal.
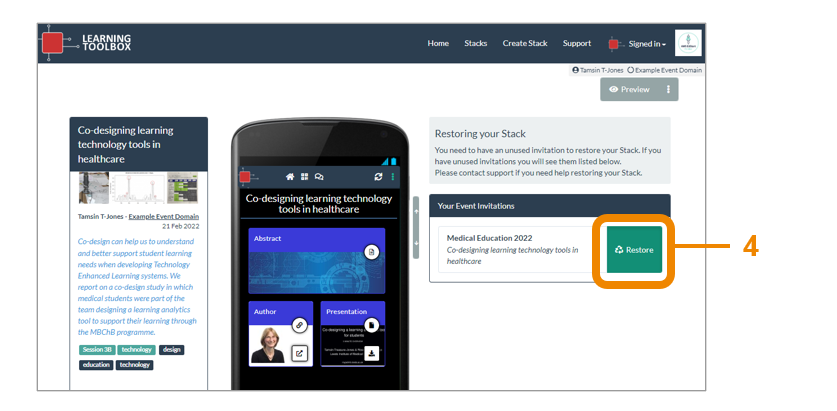
If you do not have any open invitations showing then this is probably because you you have already created a new stack linked to the invite which this deleted stack was previously linked to. In that case you should return to the Stacks and delete the new stack you had made. This will then open the invite again. You can then return to your Deleted Stacks and restore your chosen stack to that invite.
Previewing and checking your stack
If you want to preview and check your stack in a web browser then you can just press the preview button (1) and the stack will open in the viewer. What you see is what viewers of your stack will see if they are viewing your stack in a web browser on a computer or tablet. You can click on the tiles (2) and check that it is working as you expected. Once you are finished then click on the X button (3) to close the viewer and return to the editor.
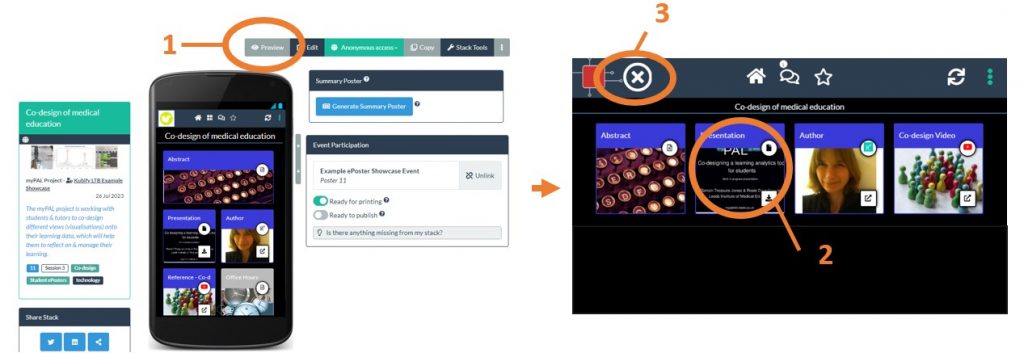
What you see in the preview is exactly what the conference organising team sees when they check and publish your stack. So the preview allows you to be sure the stack is working as you want and you know that the conference team will see exactly the same.
Things you might want to do when previewing your stack include:
- Click on the tiles to check that the content appears as you expect
- Consider if your tile titles are helpful to the viewer
- Consider if the arrangement of your tiles helps the viewer to easily find the content they want
- Consider if your tile background images help to make the ePoster content clear and attractive
- Consider if you could use different colours for your tile title bars to help the viewer see meaningful groupings in your content
If you then decide that you want to make changes then you can just return to edit your stack as normal.
You may also want to check out how you stack looks and works on a smartphone.
You can change the permissions of your stack to determine who can open it and whether it shows up in searches.
To do this sign-in and open your stack as usual, but do not click on the Edit button. Instead next to the Edit button you will see the access permissions button that indicates what permissions your stack currently has (Private, Restricted or Public). If you are still developing the stack then it is probably still set as Private.
Click on that access permissions button and you will see the drop down menu allowing you to change the access permissions for your stack.
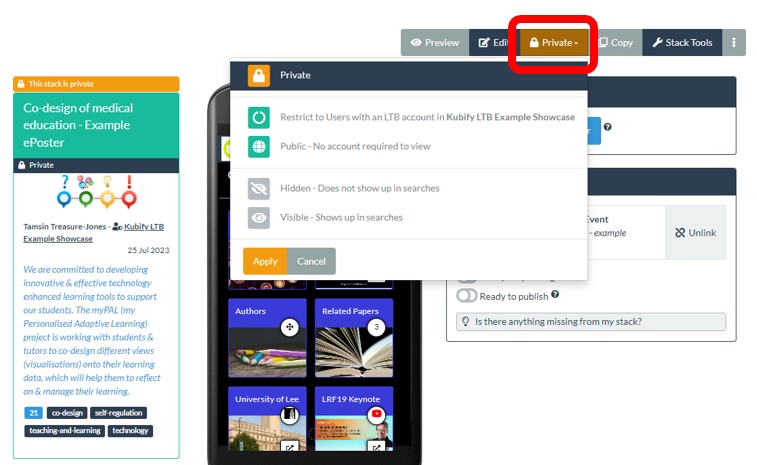
If you are still working on the stack but want to share it with others (perhaps your co-authors) so they can see what you have done, then you should change the permissions to Public and Hidden. This will mean that only people who have been sent the QR code or web address for your stack will be able to open and view it.
If you do not want your stack to be accessible any longer then you should change the permissions to Private.
If your stack is still Private then you should first set its access permissions to Public (See How do I set access permissions?) so that you can view it on your phone without signing in.
You can then view your stack on your smartphone by scanning its QR code. This will open the stack in the browser on your smartphone. You can interact with it in the browser or choose to open it in the LTB App.
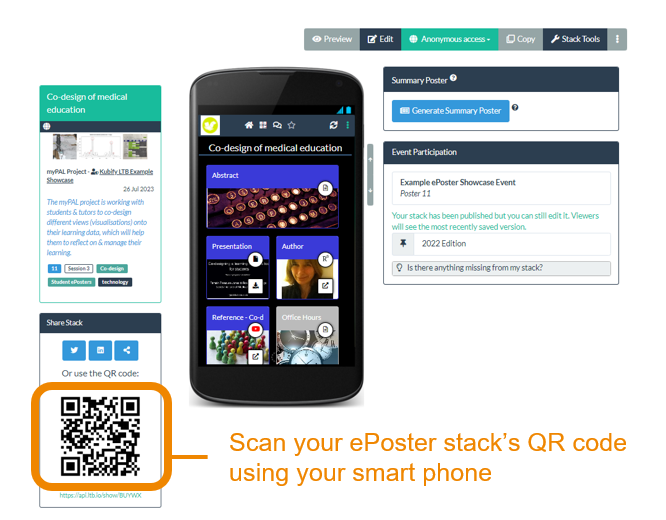
If you are in the editor then you will not see the QR code. You should first press the Close Editor button. This will then bring you to the summary screen which shows the QR code.
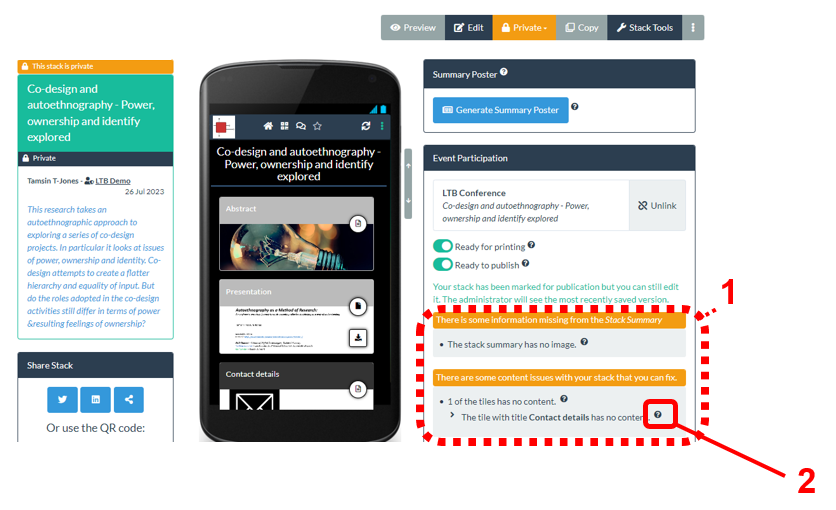
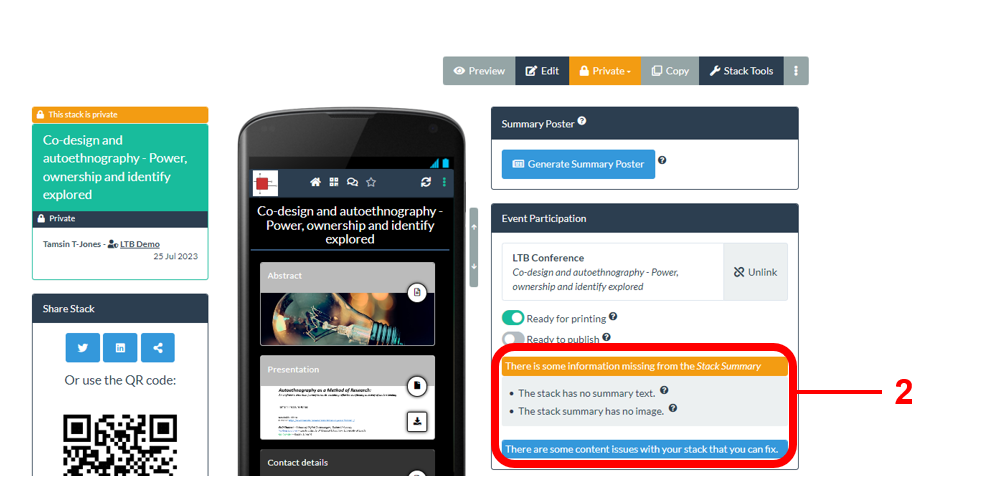
1. When you mark your stack as ready then we will run some basic checks and if we identify any issues then you will see an issue message onscreen telling you what issues we have found.
2. Just click on the help icon (?) next to any issue to find out more about it and how to fix it.
Creating the summary poster
An option often used by onsite conferences to promote your ePoster / stack onsite.
The information you provide in the Stack Summary area is used to create the summary view of your stack. This summary view is used on the the showcase. It can also be used to create a printable summary poster for your stack. Onsite conferences often print these summary posters and display them onsite helping to promote your ePoster / stack to delegates.
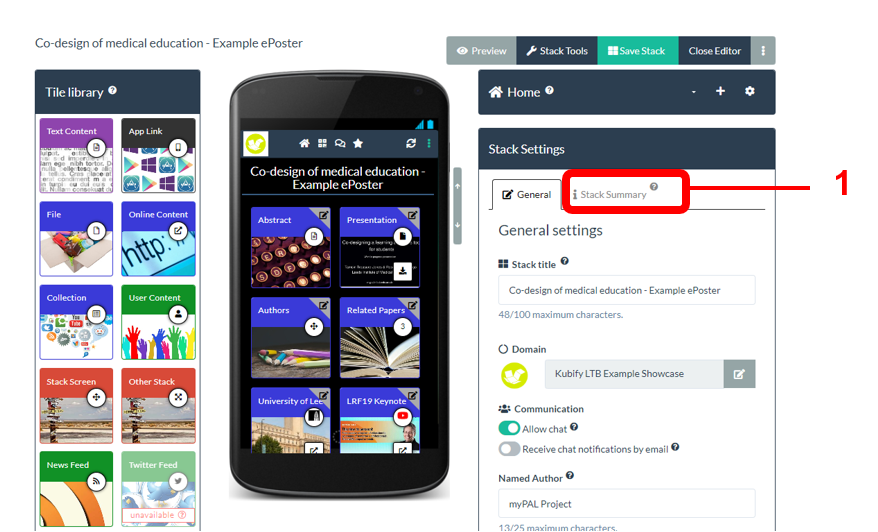
1. Edit your stack and click on the Stack Summary tab.
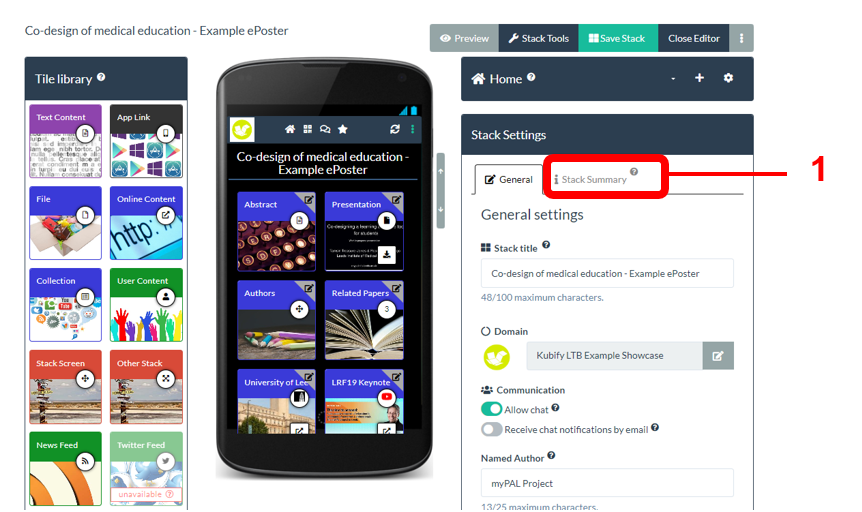
Enter all the information requested in the Stack Summary area.
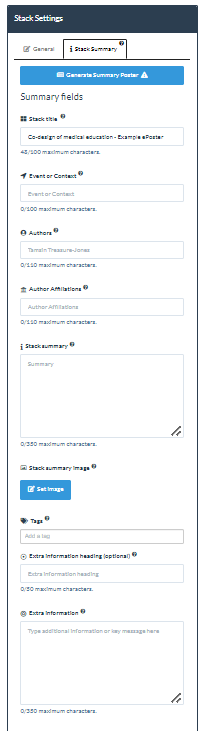
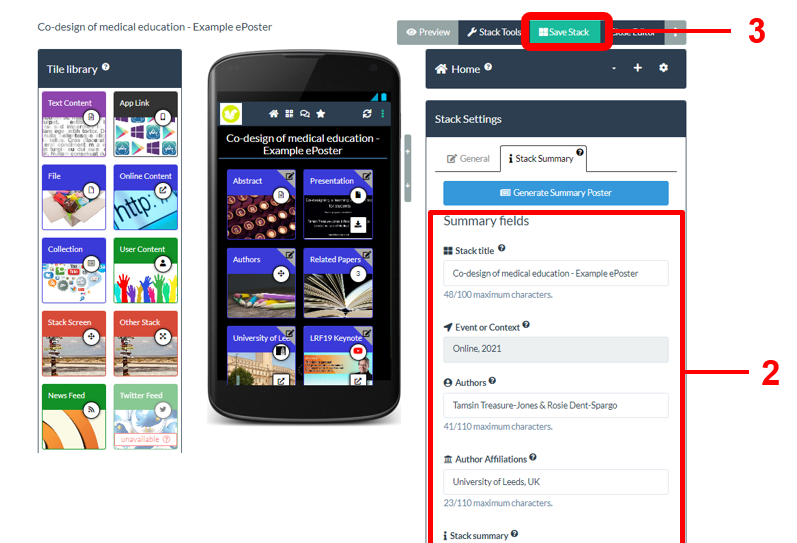
Stack Title: The title of your stack.
Event or Context: If you are creating this for an event then this information will already have been filled in by the event organiser.
Authors: Your name will already appear here, but you can also add your co-authors names. There is limited space (110 characters) so you may need to use only last names (e.g. Jones and Elferink instead of Tamsin Jones and Raymond Elferink). If your list of co-authors is very long then you could choose to use the academic convention et al (e.g. Jones et. al.) and then make sure that you do include all the co-authors names within the main content of your stack.
Author Affiliations: List where the co-authors work.
Stack Summary: Give a summary of your work. This summary text will appear in the summary view or your stack in the showcase and on the printable summary poster for your stack.
Summary Image: Click on the Set Image button to add an image to illustrate your stack’s summary. This image will be used in the summary view of your stack on the showcase and on the printable summary poster. The space available for the image is a wide rectangle.
Tags: Add any tags that help people to find your work. We recommend adding a maximum of 10 tags.
Extra Information Heading: If you want to include some extra information (such as Key Messages or Conclusions) to be added to the printable summary poster then add a heading for that extra information here.
Extra Information: Type in your extra information here if you are using it. This information will only appear on the printable summary poster.
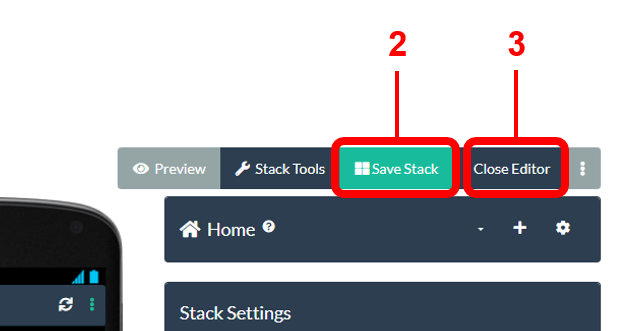
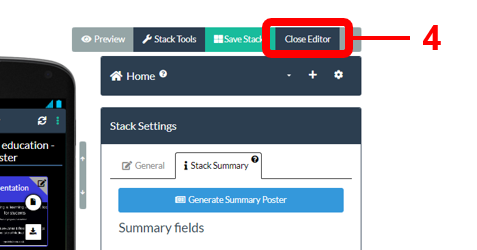
2. Remember to Save when you have added all your summary information.
3. You can then Close the Editor to see the results of the information you have added.
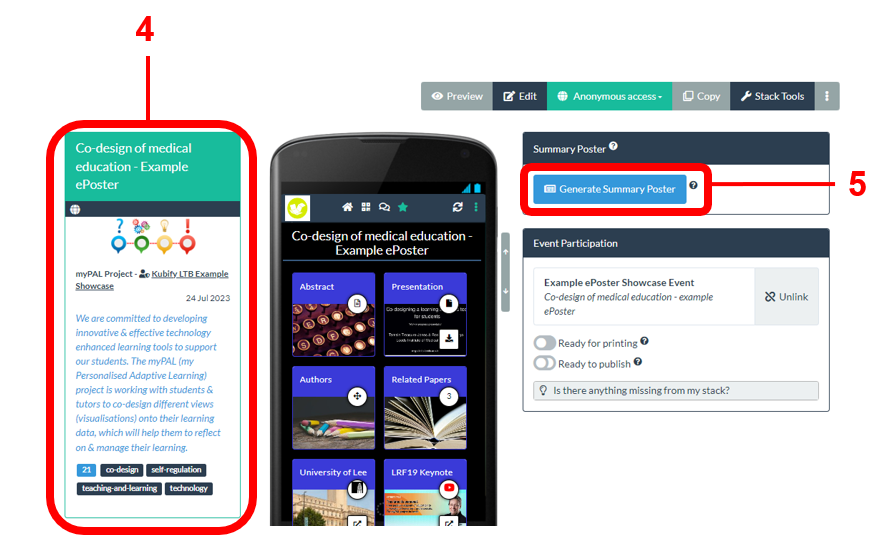
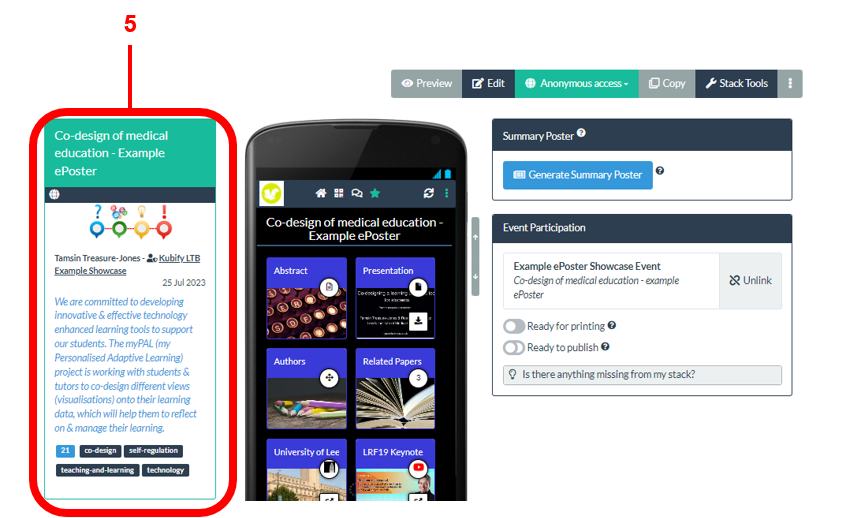
4. You can now see the summary view of your stack. This is how it will appear when viewers are browsing the showcase. When they click on its title then it will open to show them the contents of your stack.
5. You can also generate and view the printable summary poster for your stack.
If you want to make changes to either then just return to edit your stack and edit the information that you provided in the Stack Summary area.
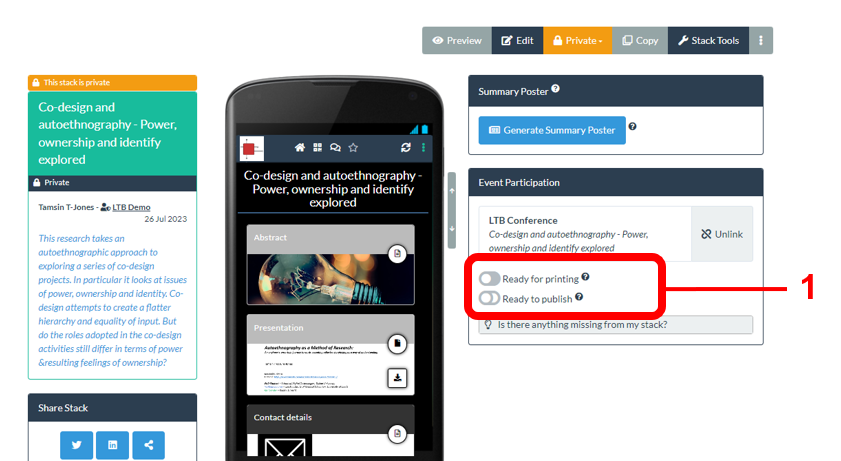
This is an important step if your conference is using the printed summary posters. Printed summary posters are usually used by onsite conferences as way to advertise and provide access to your ePoster/stack at the venue.
Marking your stack as ready for printing will let the administrators know that you are happy for them to generate and print your summary poster.
To mark your ePoster as ready for printing, first close the editor if you have been editing the stack.
1. Then click on the button marked ‘Ready for printing‘ to turn it on.
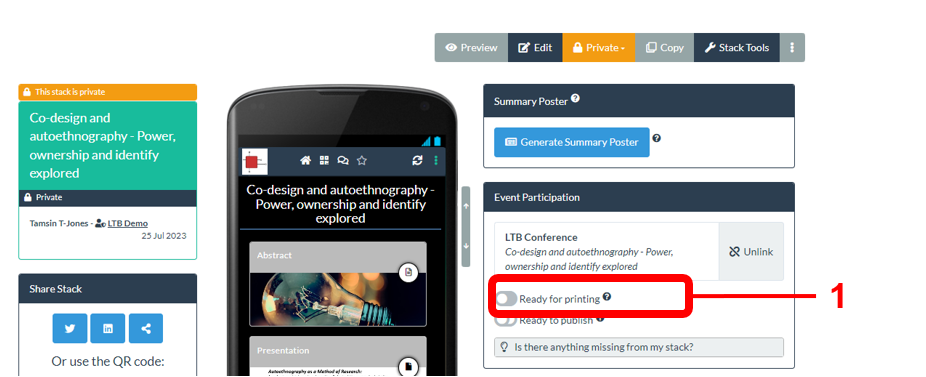
2. When you mark your stack as ready then we will run some basic checks and if we identify any issues then you will see a message onscreen telling you what issues we have found. Just click on the help icon (?) next to any issue to find out more about it and how to fix it.
1. You can view and check your summary poster by clicking on the Generate Summary Poster button.
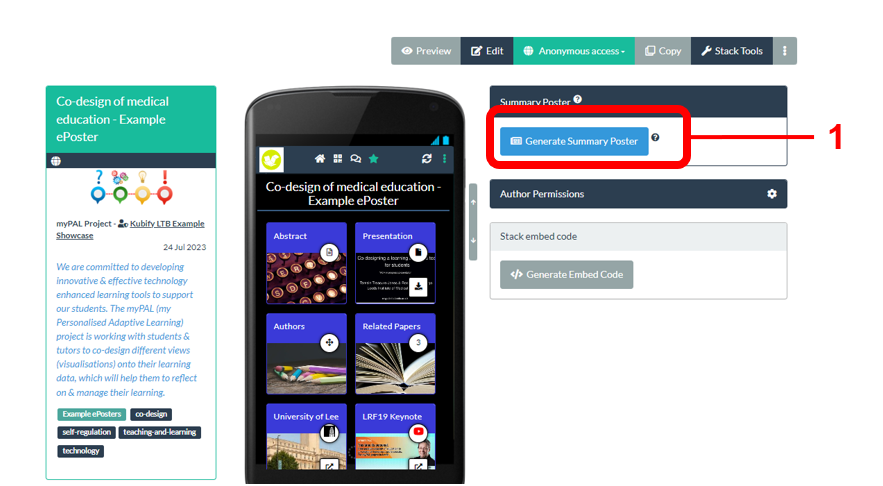
The summary poster will be generated as a PDF file and downloaded to your computer. You can open and view it to check that it looks as you expect.
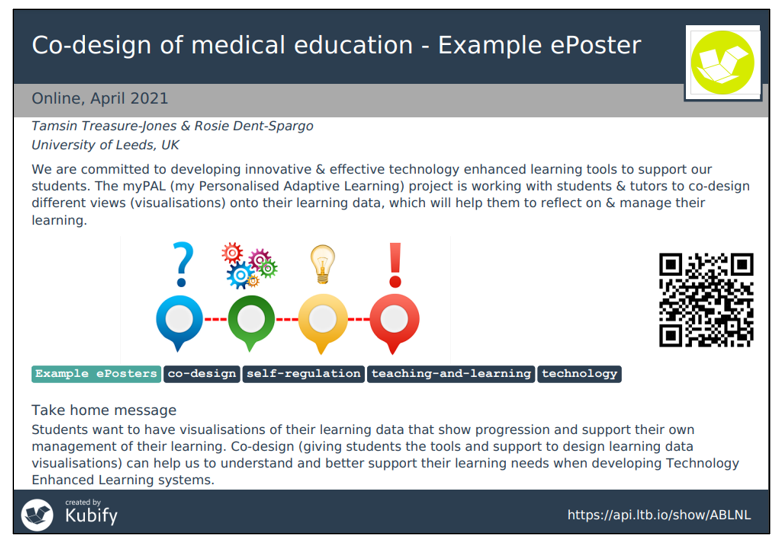
Your summary poster should look something like the example shown below:
If your summary poster does not look as you expected, then return to edit your stack and add the information you want to appear in the Stack Summary area.
The image on the summary poster is intended to be illustrative. It is not an image that it is intended the viewer will look at in detail, because if they want more detail about your work then they can scan the QR code on your summary poster and open and explore your stack.
The ideal dimensions of the image for your summary poster are 1200 x 280 pixels or any ratio 30:7.
When you add an image you can also choose to crop it to these dimensions or zoom in or out to make the key parts of the image fit into these dimensions. This FAQ answer provides more information about cropping and adjusting the size of the image within Learning Toolbox.
Your stack on the showcase website
When your stack is published to the showcase then viewers will see its summary view and be able to click on its title to open and explore its content.
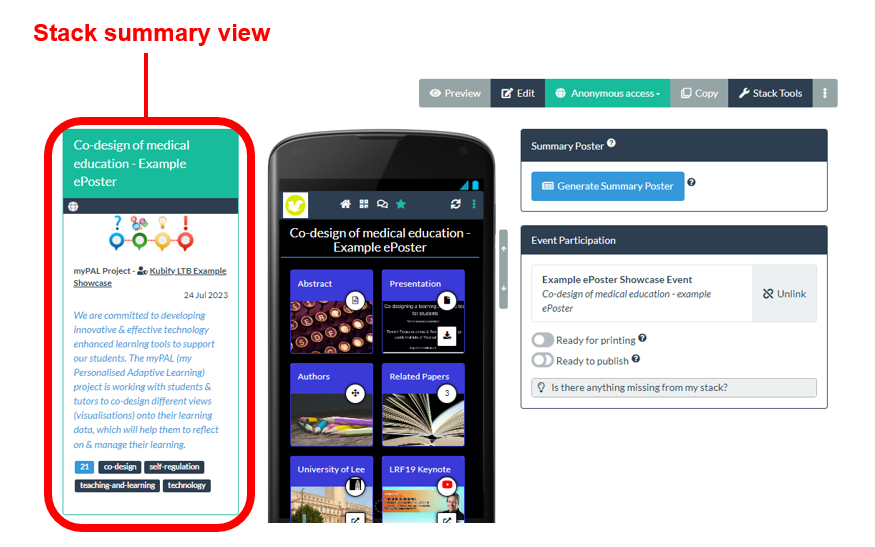
You add the information that is used to create the Stack Summary view in the Stack Summary area in the editor. Adding more information helps your stack stand out in the showcase and also helps it to be found when people search the showcase.
To add this information to your ePoster stack, edit your stack and then:
1. Click on the Stack Summary tab
2. Fill in (or check) the information requested in this area (Stack title, Authors, Author affiliations, Stack summary, Stack summary image and Tags).
You usually do not need to fill in the Extra Information boxes at the bottom of the Stack Summary area unless your conference is onsite (rather than virtual). This extra information is only used on the printable summary posters. Summary posters tend to be used by onsite conferences. They are printed and displayed at the venue to give delegates easy onsite access to the stacks.
3. Save your stack
4. Close the editor
5. You will now see the updated summary view of your stack containing the information you have added. The full list of authors will not appear in the stack summary view, but delegates will see it if they hover over the main author name in the summary view.
If you want to make further changes to the stack summary then you can edit the stack again, update the information in the Stack Summary area and save your stack. The stack summary will again be updated.
Marking your stack as ready to publish to the showcase
Marking your stack as ready for publishing will let the administrators know that you are happy for them to publish your stack to the showcase.
To mark your stack as ready for publishing, first close the editor if you have been editing the stack.
1. Then click on the button marked ‘Ready for publishing‘ to turn it on. You will need to first turn on the ready for printing button if you have not already done so.
We strongly recommend that you preview your stack and check that it works as you expect, before you mark it as ready to publish.
2. When you mark your stack as ready then we will run some basic checks and if we identify any issues then you will see a message onscreen telling you what issues we have found. Just click on the help icon (?) next to any issue to find out more about it and how to fix it.
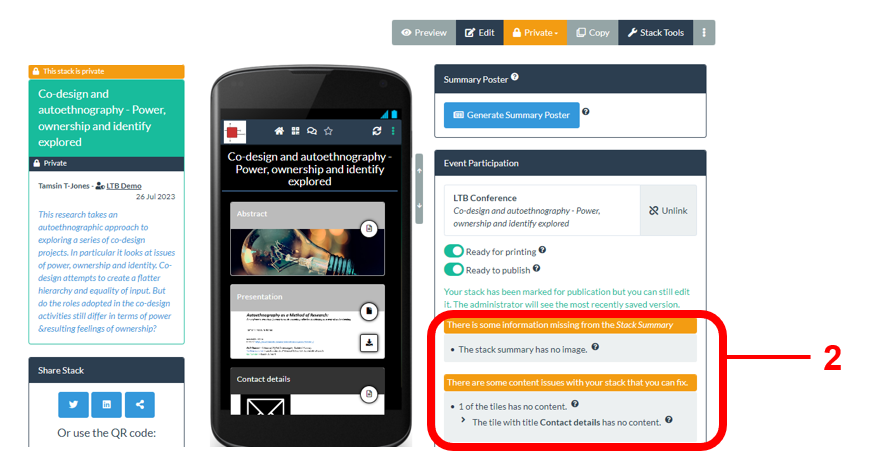
Marking your stack will let the administrators know that your stack is ready. It will not be published to the showcase immediately, as the administrators will publish it and they may have many stacks to review.
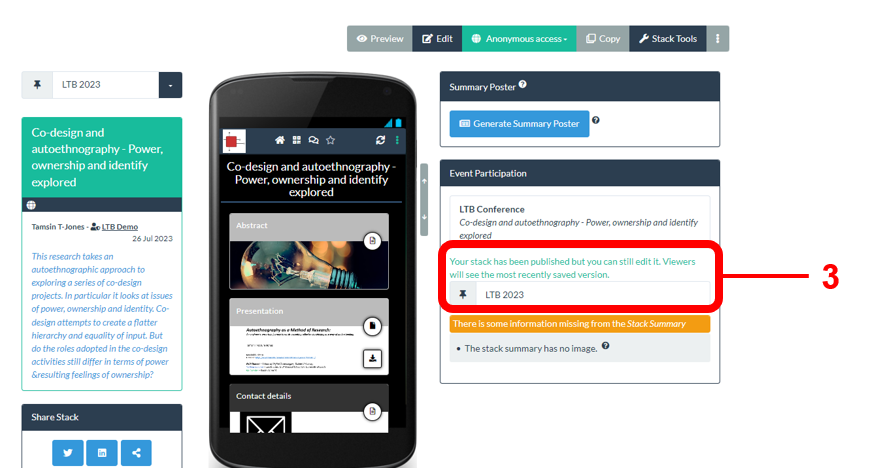
3. Once your stack has been published then you will see a published message onscreen indicating that this has been done and showing the name of the showcase edition to which it has been published.
If you do not see the buttons that allow you to mark you ePoster as ready then this will be because you are creating a stack that is not linked to a conference/event invite with a showcase. In this case you can instead make your stack public yourself by changing its access permissions.
Presenting your stack (General advice)
The exact details of how to present your ePoster / stack (the time available, whether the ePosters/stacks are presented onsite or online etc.) will vary from event to event.
The file below contains some general advice on presenting Learning Toolbox ePoster stacks at conferences and how to practise your presentation.
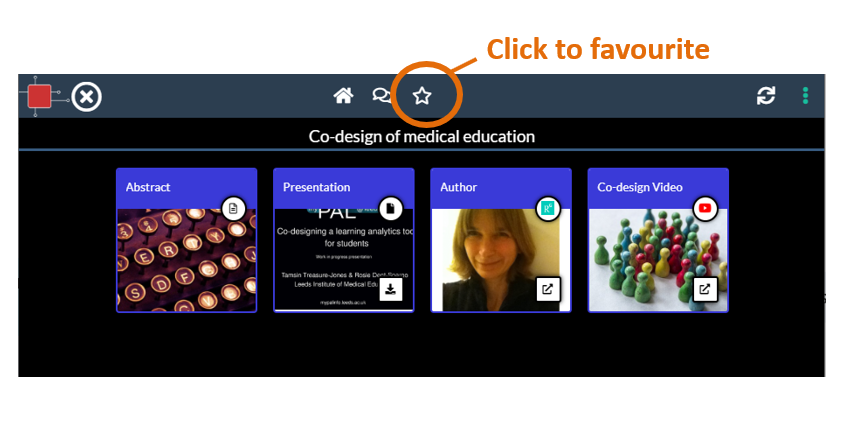
You can favourite any stack when you are viewing it by clicking on the star-shaped favourite button.
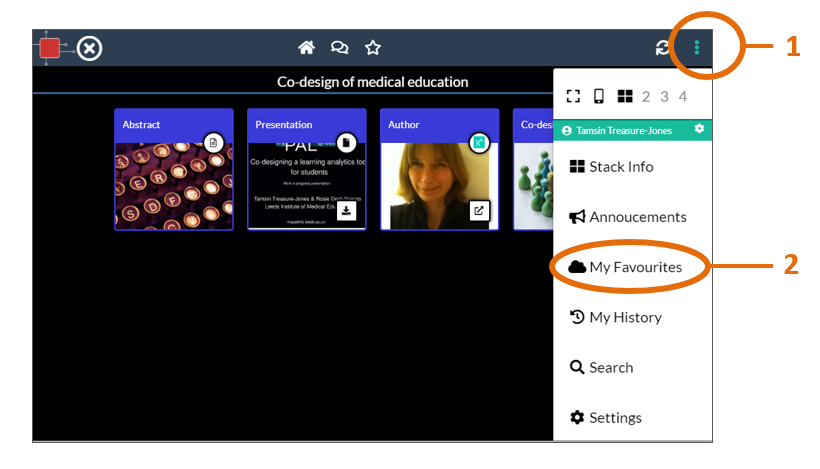
You can then access the list of your favourited stacks from the More Menu inside the viewer. Just click on the More Menu (1) and choose My Favourites (2).
If you are signed in then your favourites will be saved to your account. You will then be able to access them from the My Favourites button whenever you are signed in.
If you are not signed in then your favourites will be saved to the device (laptop, mobile phone, tablet) that you are currently using. If you click on the My Favourites button when you are not signed-in then you will only see the favourites that you have made on that device.
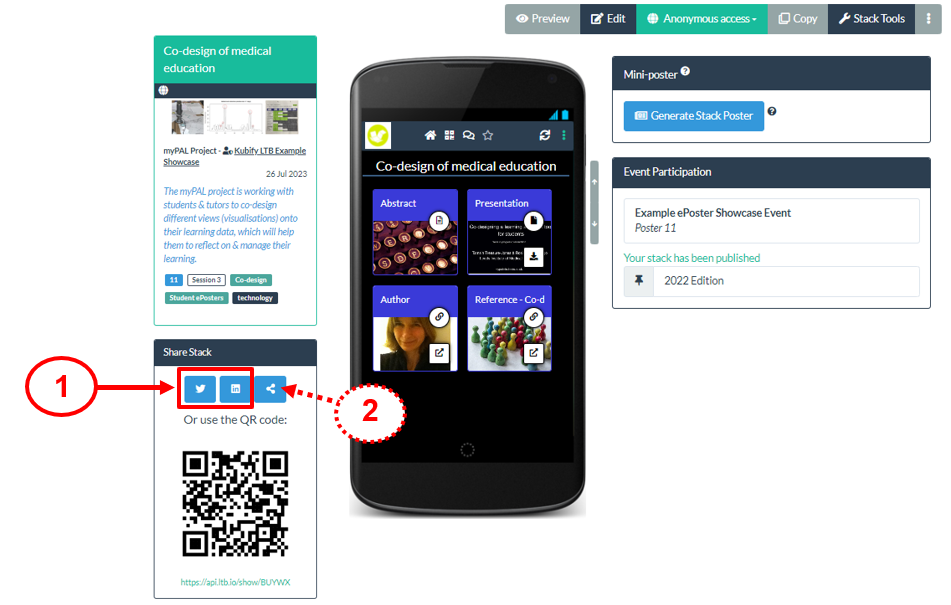
An easy way of sharing an stack with someone is to show them its QR code. They can scan this and view the stack on their own phone.
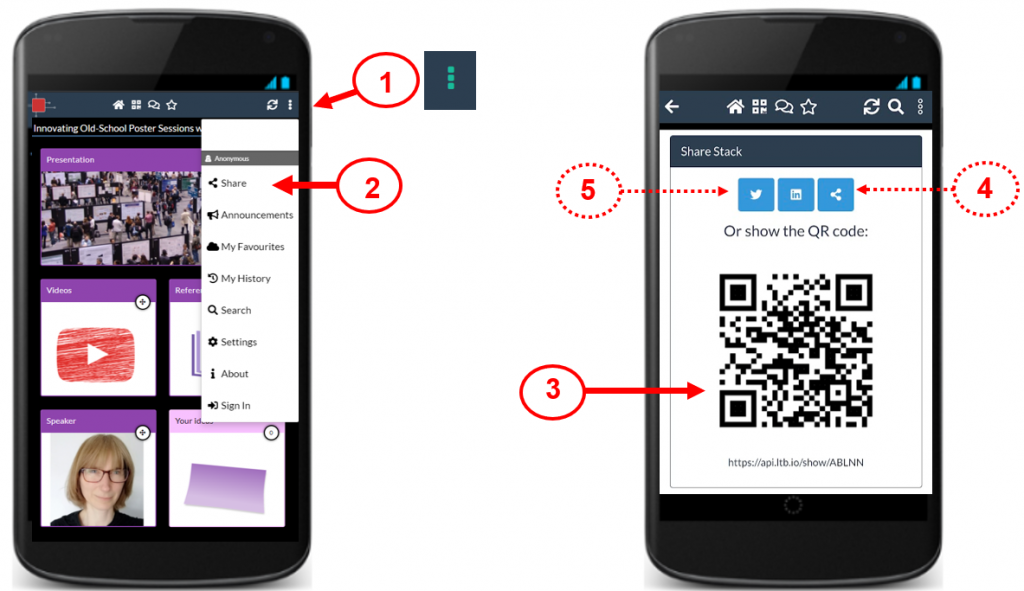
To do this you just need to view the stack in the web browser or Learning Toolbox app on your phone. Then open the 3 dots menu (1) and choose Share (2).
The screen will then show your stack’s sharing information including its QR code (3). The other person can use their phone to scan the QR code. You can also copy the web link (4) for your stack, so you could choose to copy and send that to them instead. You can also share the link to your stack to Twitter or LinkedIn (5).
Please make sure that your stack has been published or you have made it public (by changing its access permissions) before you share it.
Please make sure that your stack has been published or you have made it public (by changing its access permissions) before you share it.
At the moment Learning Toolbox supports easy sharing to Twitter and LinkedIn.
- When you open your stack in Learning Toolbox then you can see its summary information and its sharing information, including the Share to Twitter button and Share to LinkedIn buttons.
- You can also see the copy link button, which you can use to copy the link to your stack and share to any other social media platform that you use.
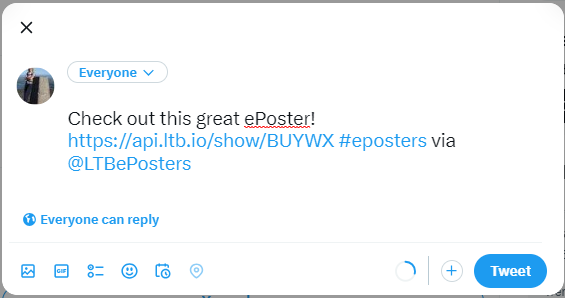
How the process works if you click on the Share to Twitter or Share to LinkedIn buttons
Click on the Share on Twitter button to share the stack to Twitter.
You will be asked to sign into Twitter (if you are not already signed in) and a draft tweet will be created containing the unique web link for your stack. You can edit this tweet as normal before pressing Tweet to post it. But do not edit the link to your stack that has automatically been added into the tweet.
A similar process will be followed if you click on the Share to LinkedIn button.
Where else can I find my stack’s sharing information?
You can also find your stack’s sharing information, including the Share to Twitter and Share to LinkedIn buttons, when you are viewing your stack.
1. Click on the 3 dots menu
2. Choose Share
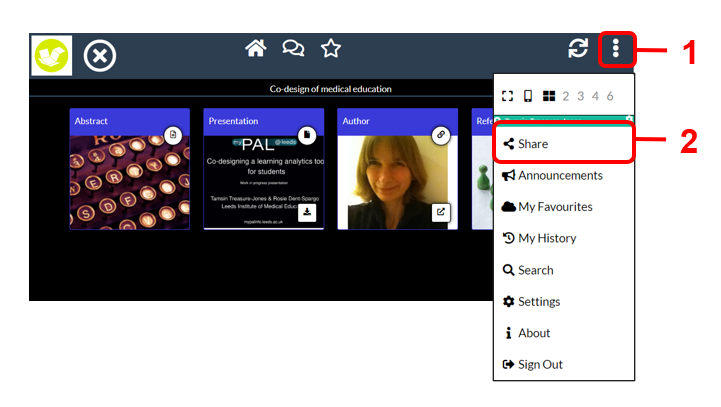
3. You will see the sharing information again here including the Share on Twitter and Share on LinkedIn buttons, copy link button and QR code.
Please make sure that your stack has been published or you have made it public (by changing its access permissions) before you share it.
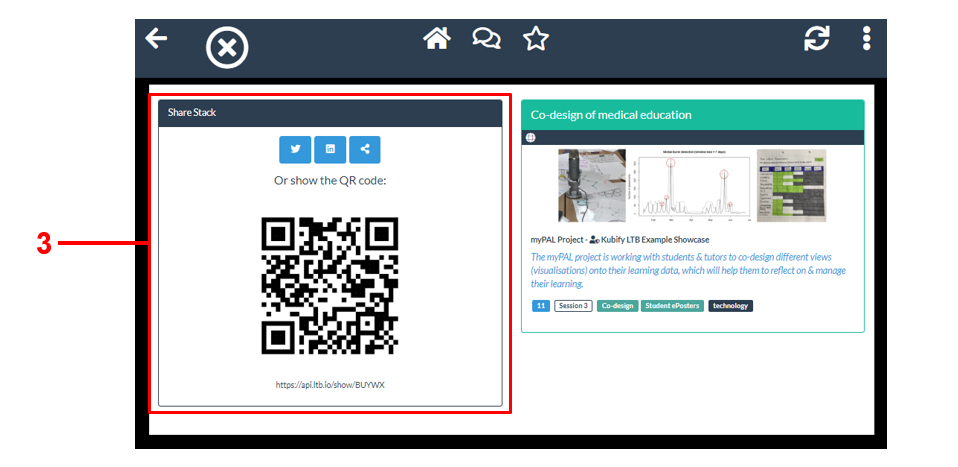
Open your stack in Learning Toolbox. Here you can see the QR code (1) and copy the web link (2) for your stack. You also have the option to share the stack to Twitter or LinkedIn (3).
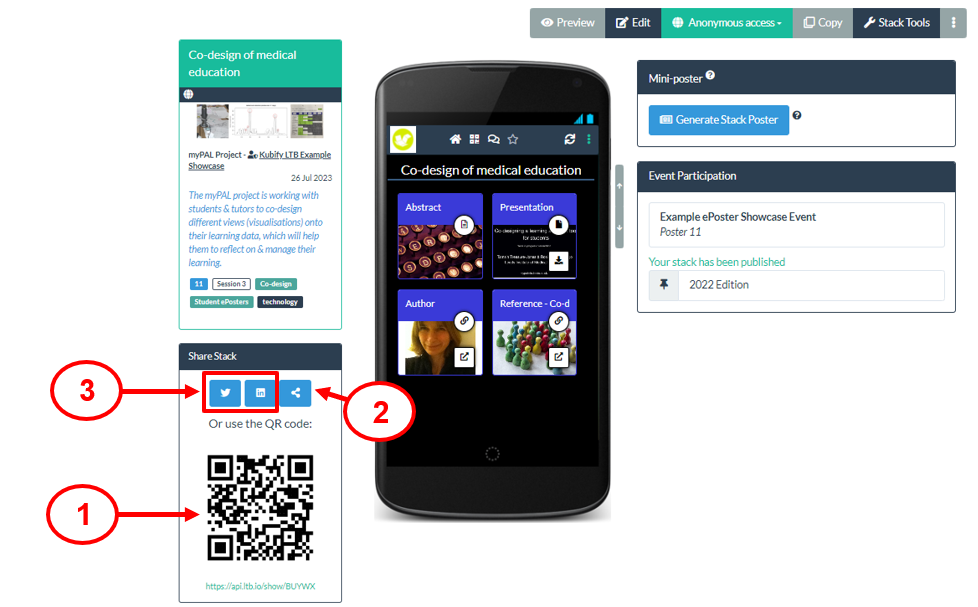
To copy the web link just click on the Copy link button (2). You can then send the link to someone – if they click on the link then they will be able to view your stack.
To download the QR code image just click on the QR code. If you show or send the QR code to someone and they scan it with their phone then it will open your stack on their phone.
You can use the QR code or link wherever you would like (e.g. in your CV, email signature, webpage, paper, lectures) to point people directly to your stack.
You can also find your stack’s sharing information when you are viewing your stack.
1. Click on the 3 dots menu
2. Choose Share
3. You will see the sharing information again here including the QR code, copy link button and share to Twitter and LinkedIn buttons.
Engaging with the viewers of your stacks
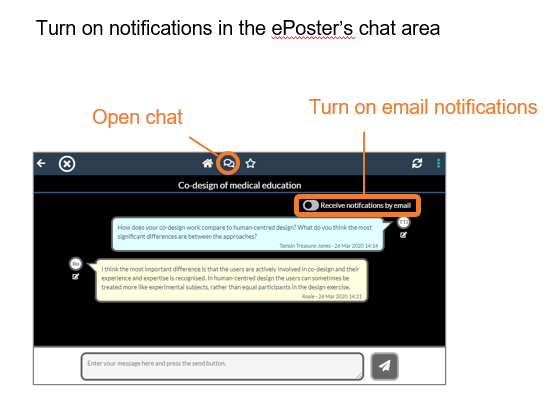
By default each stack has a chat channel that allows viewers (and the author) to post questions, comments and answers that attach to the stack. The chat channel is a single discussion thread.
Viewers of your stack can view and contribute to the chat by tapping on the chat icon when they are viewing your stack. They will then be able to view any chat messages posted to this ePoster. If they want to post a message then they will be asked to sign-in. If they do not have an account then they can sign-in using one of the social media routes or by creating a new Learning Toolbox account.
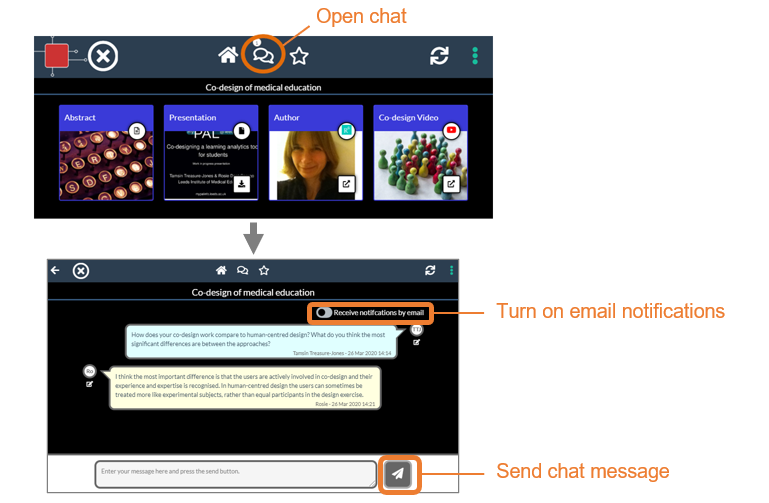
Once they have signed in then they can also turn on email notifications if they want to receive email notifications of any new chat activity on this stack. You can do the same if you are the author.
For more information on how delegates and authors can engage with the published showcase stacks, you can view the Showcase Help Page.
This chat discussion is public – viewable by anyone who looks at the stack. The author can choose to turn off the chat channel if they do not wish to allow discussion around the stack. This is done in the stack editor.
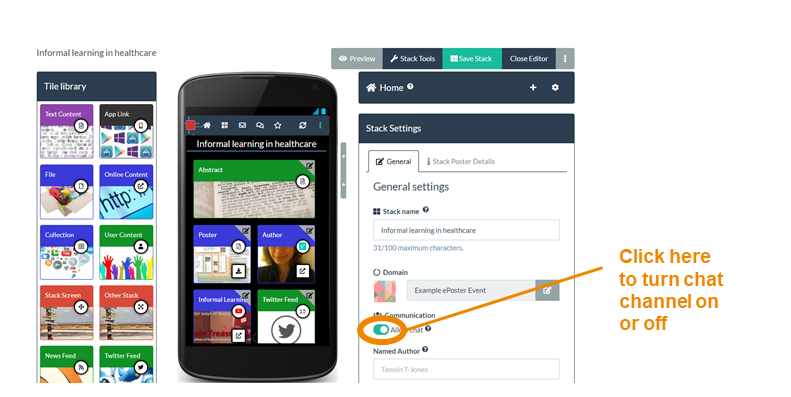
By default each stack has a chat channel that allows viewers (and the author) to post questions, comments and answers that attach to the stack. The chat channel is a single discussion thread.
You can choose to get email notifications of new chat activity on your stack. You can turn this on in the editor. The email notifications will be sent to the email address that you used when signing in.
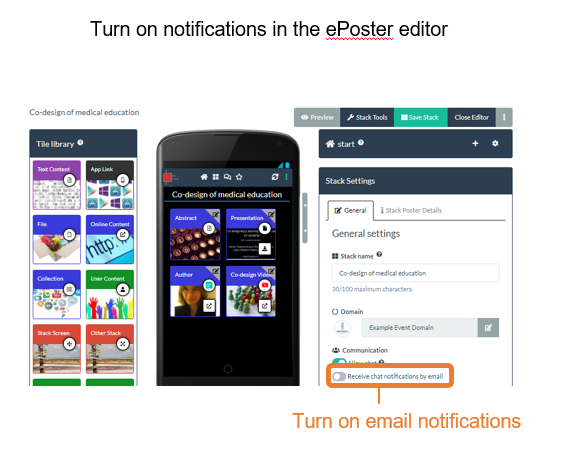
It is also possible to turn on the email notifications when you are viewing any stack. You just open the chat area of that stack and then turn on the email notifications. You can do this for your own stacks and for other authors’ stacks. If you do not see the email notifications switch then this is because you are not signed into Learning Toolbox – there will be a button showing at the bottom of the screen that you can use to sign-in. The email notifications will be sent to the email address that you used when signing in.
For more information on how delegates and authors can engage with the published showcase stacks, you can view the Showcase Help Page.
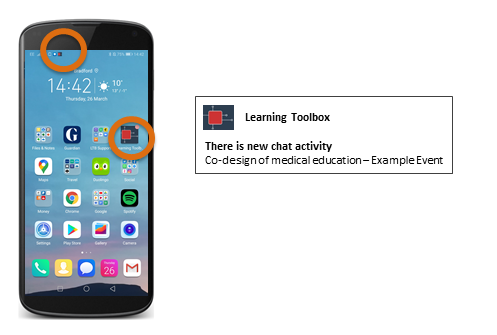
You can get push notifications of new chat activity sent to your smart phone or tablet using the Learning Toolbox App. To get the Learning Toolbox App search your App store for ‘Learning Toolbox’ or scan the QR code below.

- Install the Learning Toolbox App on your phone or tablet and make sure you agree to accept notifications
- Open the Learning Toolbox App on your phone or tablet and sign-in to the App
- Now, even if you close the App on your phone, then whenever there is any new chat activity on any of your stacks (where you are the editing author) then you will receive a notification on your phone/tablet. You will also receive notifications of new chat activity on any other stacks that you favourited whilst signed into Learning Toolbox.
As the author you can remove messages from the chat if you want to. We allow this since it is your stack and so you should have control over what is posted in the chat area and should be able to remove something if you don’t want it there.
Only the editing author and the domain administrator can remove messages from an stack’s chat area.
To remove a chat message, first view your stack and open its chat area. Next to each message you will see there is a small edit icon. Click on the edit icon and you will then see a small bin icon appear in the message. If you click on the bin icon then that message will be deleted (see annotated screenshot below).

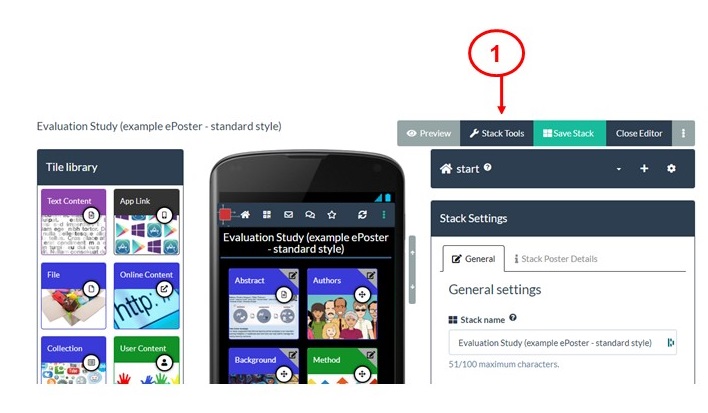
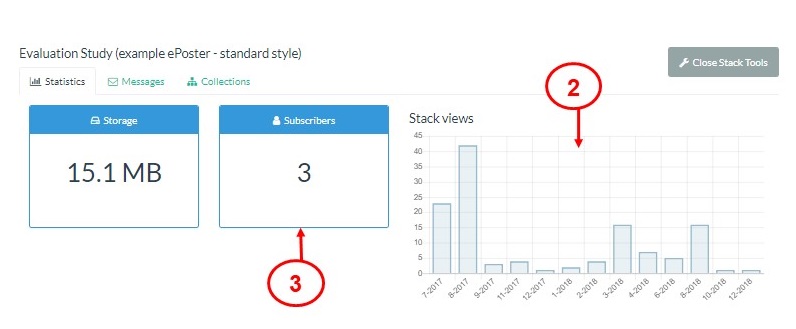
- You can see a simple report on the views of your stack by clicking on the Stack Tools button when you open your stack.
2. This takes you to the simple statistics report for your stack, where you can see the monthly views of your stack.
3. And the number of people who have subscribed to your stack (by making it a favourite).
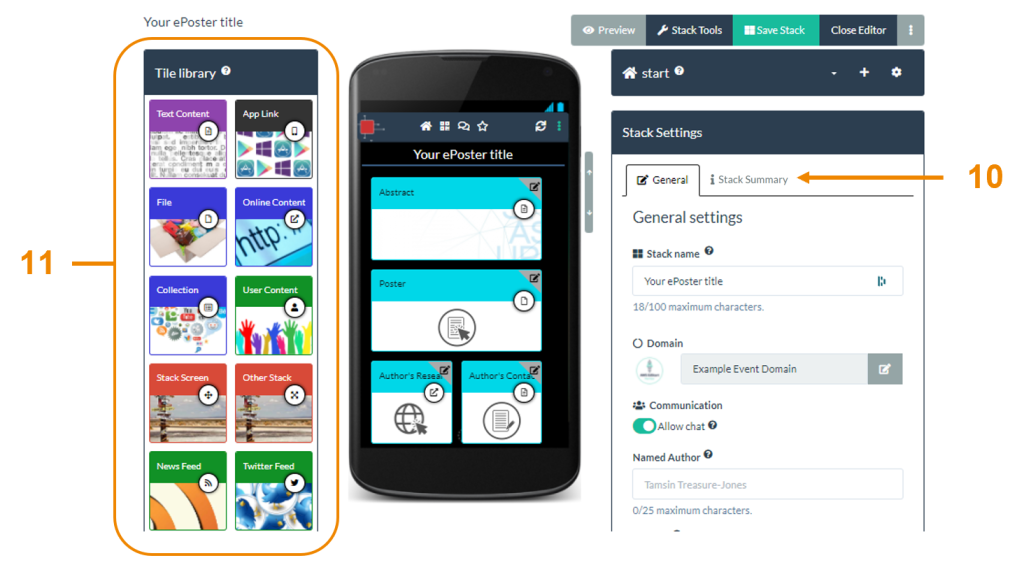
Using templates
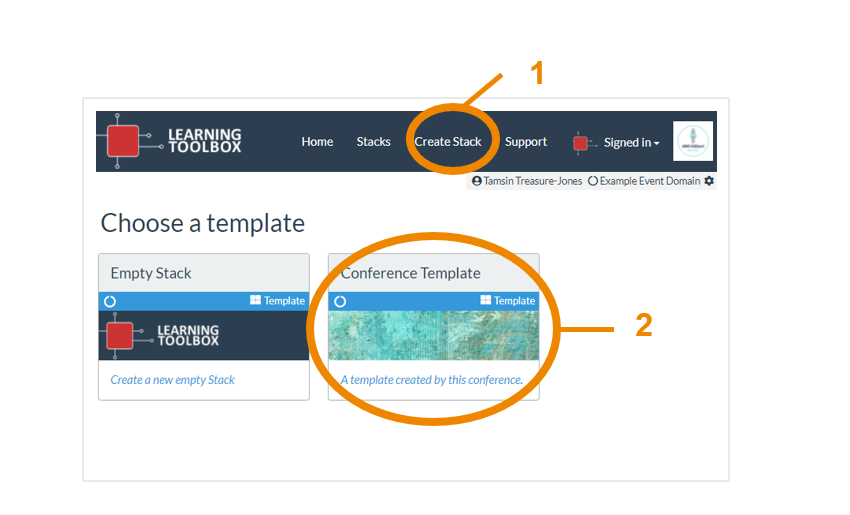
Some conferences have introduced templates for their ePosters stacks. If your conference has a template then when you click on Create Stack (1) then you will be offered the choice of either Creating from an empty stack or using a template (2).
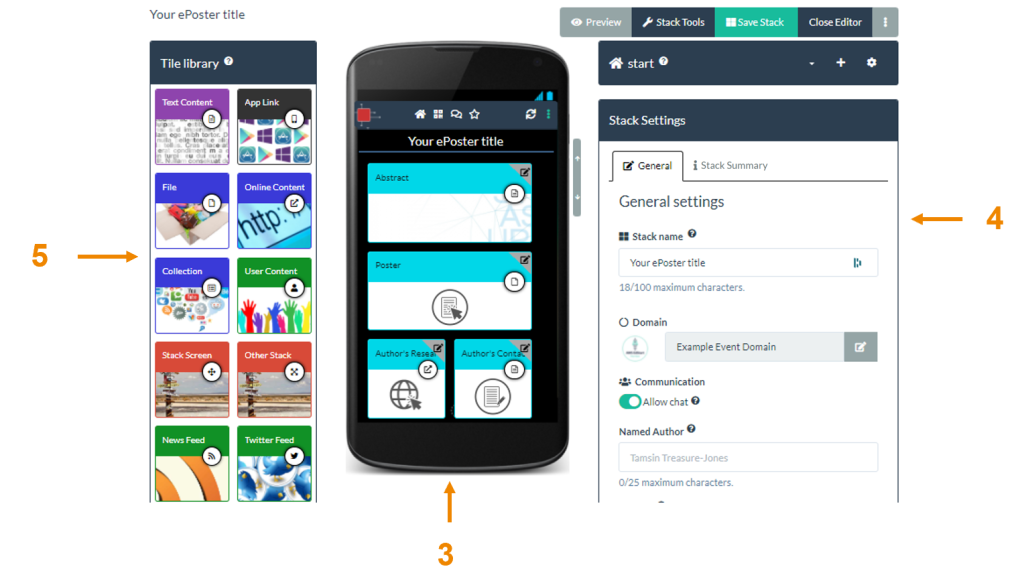
Your initial stack will then be created using the template and you will be taken to the editor. In the centre of this screen you will see a mobile view of your stack (3) containing the tiles (content) from your conference template. On the right you will see the general stack settings area (4) where you can add the summary information about your stack. On the left is the Tile Library (5) which you can use later to add extra tiles/content to your stack.
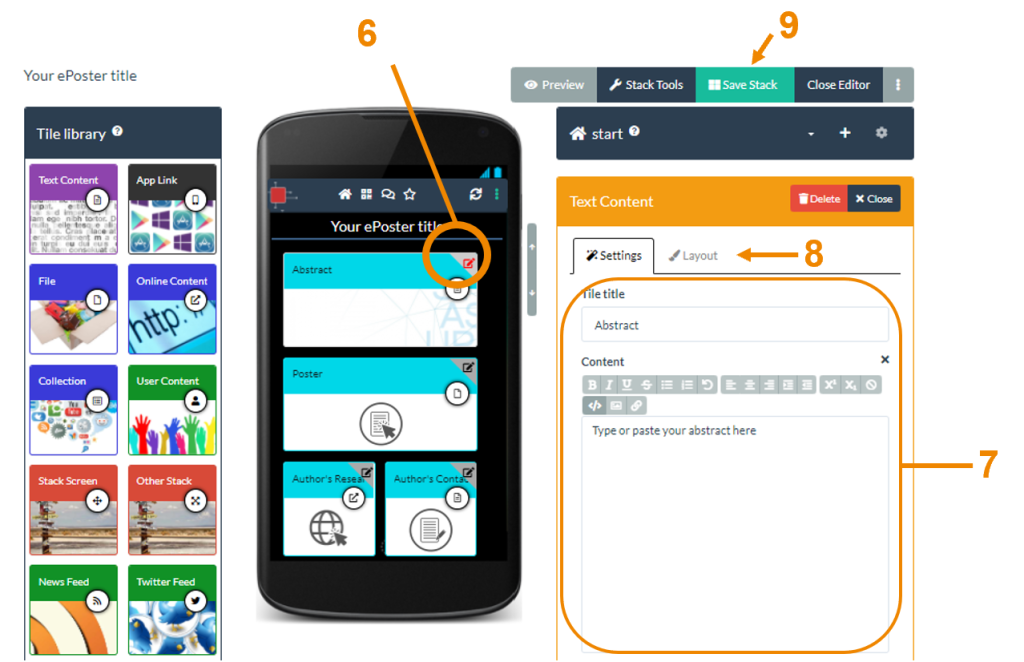
The mobile view with the tiles shows the information your conference is expecting you to include. You should edit each Tile to add the information they have requested. To edit a tile click on the tile edit icon (6) on its top right hand corner. The Settings area (7) will then change to indicate what type of content you can add to this Tile. Add it here in the settings area. You can also change the tile’s appearance (size, title bar colour and background image) in the tile’s Layout tab (8). Remember to save (9) your stack regularly.
When you have finished editing all the tiles that are in your stack then you should also fill out your stack’s summary information in the Stack Summary tab (10) in the General Settings area. This summary information is used when people search the showcase, so it will help people to find your stack. You can also choose to add more tiles/content to your stack using the Tile Library (11). You simply drag and drop the relevant tile from the library into the mobile view of your stack and then add the required information in the settings area. Again, remember to save your stack before closing the editor or leaving the webpage.
Editing your account
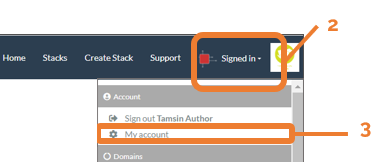
1. Go to Learning Toolbox (my.ltb.io) and sign-in
2. Click on the Signed-in drop-down menu
3. Choose My Account
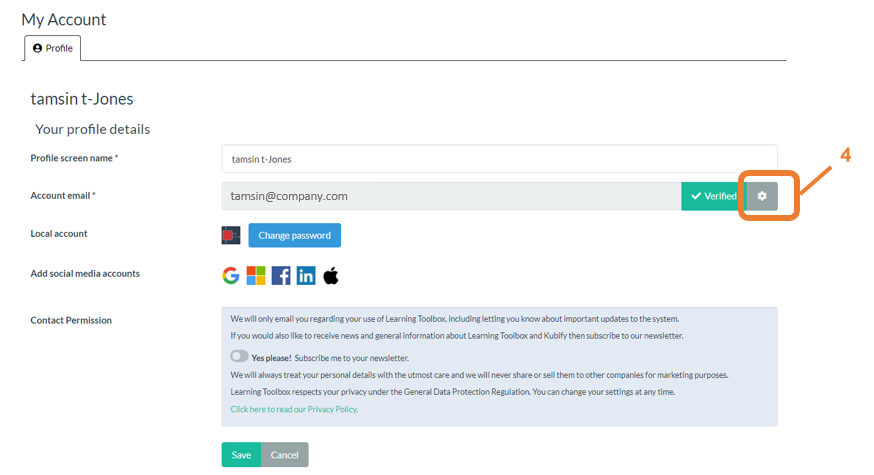
4. Click on the settings cogwheel at the end of the account email box
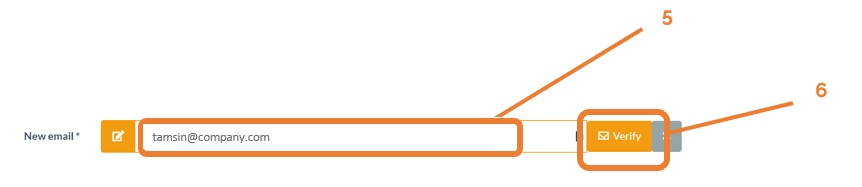
5. A new email box will appear in which you can edit your email address.
6. Click on Verify
7. Sign-out of Learning Toolbox
8. Check your email. In a few minutes you should receive a verification email from Learning Toolbox.
9. Click on the verification link in the verification email.
Your account email address will then be updated. You can then sign-in to Learning Toolbox using your new email address and the same password as you previously used.
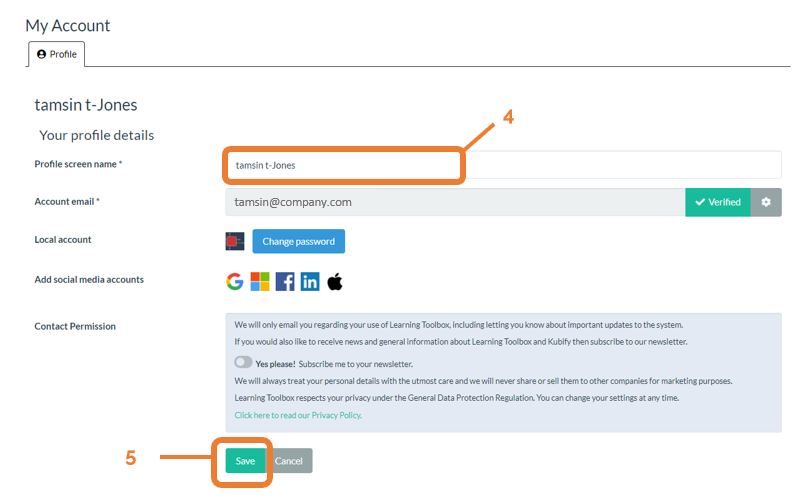
1. Go to Learning Toolbox (my.ltb.io) and sign-in
2. Click on the Signed-in drop-down menu
3. Choose My Account
4. Edit the name showing in the profile screen name box
5. Click on Save.
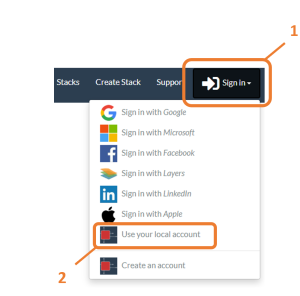
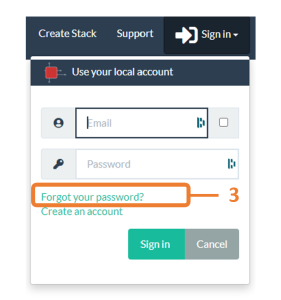
If you have forgotten the password for your Learning Toolbox account then you can follow these steps to reset it.
- Click on Sign-in
2. Choose Use your local account
3. Click on the Forgot your password link
4. Enter your email address
5. Click on Reset my password
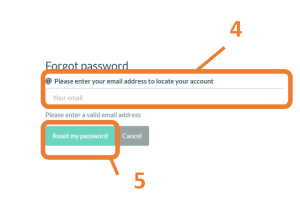
This will then send you an email containing a link that you can use to reset your password.
Managing your stack
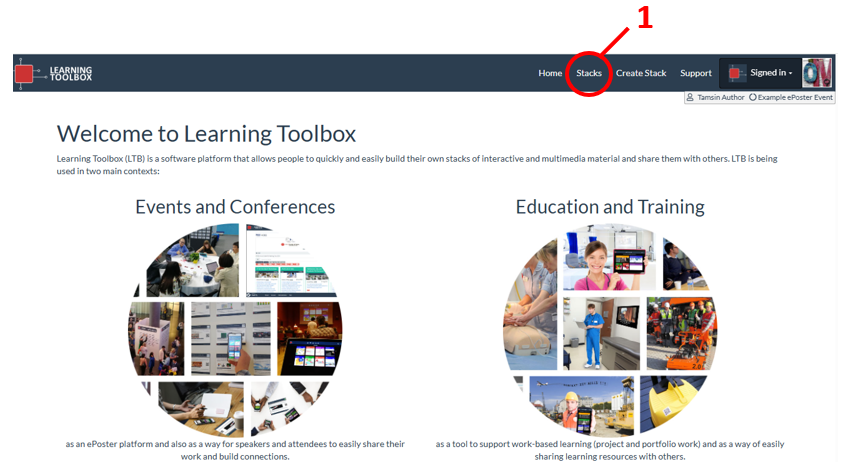
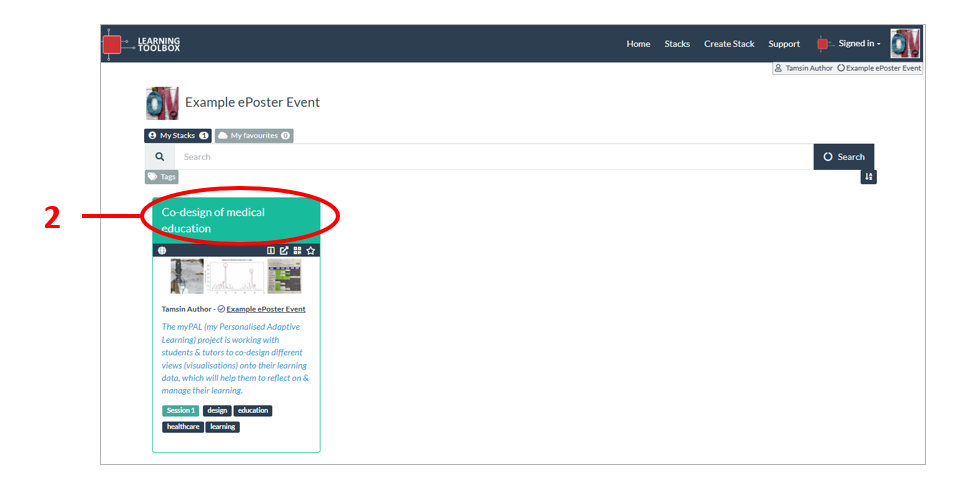
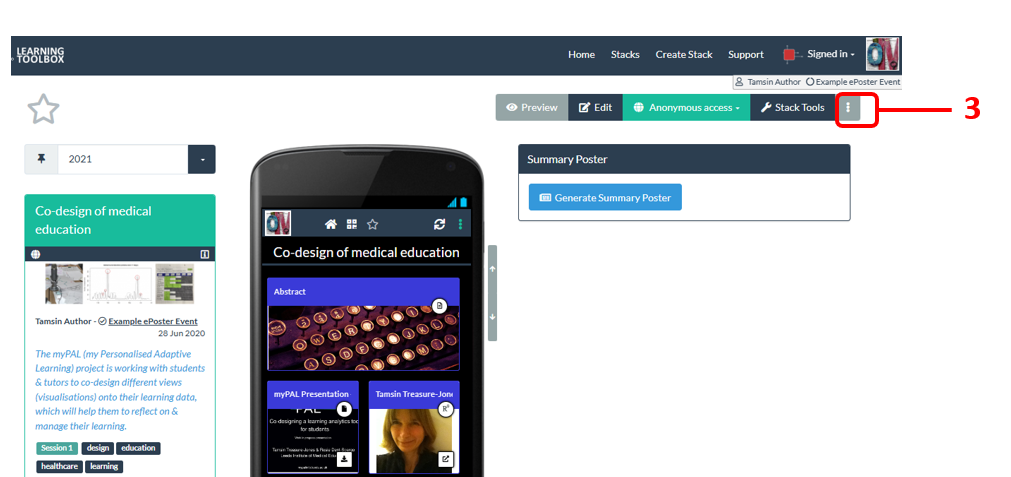
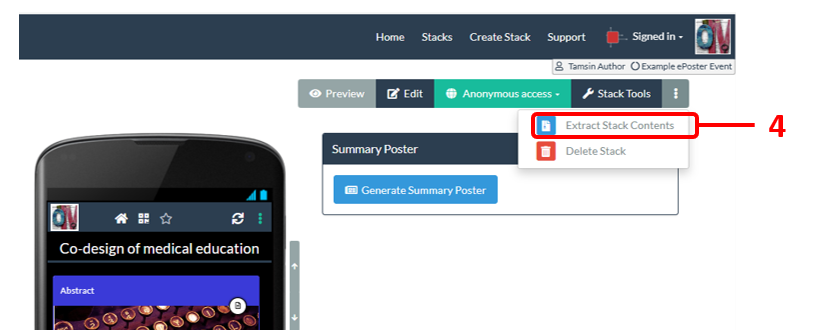
Sign in to Learning Toolbox https://my.ltb.io/ and then:
1. Click on the Stacks menu
2. Click on the title bar of your stack to open it
3. Click on the 3 dots at the end of the stack menu bar
4. Choose Extract Stack Contents from the drop-down menu
5. Click on Generate Zip File in the box that appears
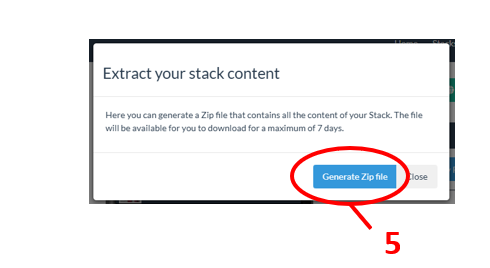
6. Click on Download Zip File
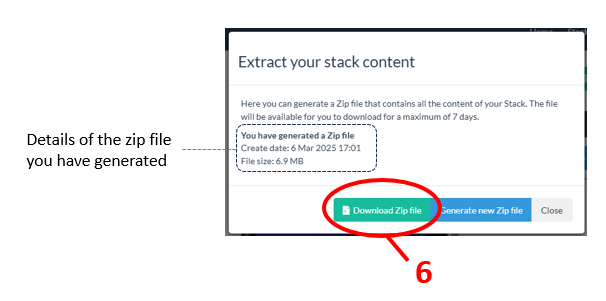
The Zip file will be downloaded to your computer and you can then open it and explore the contents. It is a structured folder containing all the files, images and details of the weblinks that you added to your stack.
You can change the permissions of your stack to determine who can open it and whether it shows up in searches.
To do this sign-in and open your stack as usual, but do not click on the Edit button. Instead next to the Edit button you will see the access permissions button that indicates what permissions your stack currently has (Private, Restricted or Public). If you are still developing the stack then it is probably still set as Private.
Click on that access permissions button and you will see the drop down menu allowing you to change the access permissions for your stack.
If you are still working on the stack but want to share it with others (perhaps your co-authors) so they can see what you have done, then you should change the permissions to Public and Hidden. This will mean that only people who have been sent the QR code or web address for your stack will be able to open and view it.
If you do not want your stack to be accessible any longer then you should change the permissions to Private.