Contents
- Invitation links and getting started
- Creating and returning to edit your stack
- Adding content to your stack using the Tile Library
- Co-authors
- Editing a Tile
- Changing the layout and appearance of a Tile
- Adding a PowerPoint to your stack
- Adding a video to your stack
- Adding an extra screen to your stack
- Restoring a deleted stack
- Previewing and checking your stack
- Restrictions on what can be included in your stack
- Creating the summary poster
- Your stack on the showcase website
- Marking your stack as ready to publish
- Presenting your stack (general guidance)
- Exploring and sharing published stacks
- Engaging with the viewers of your stack
- Using templates
- Editing your account
- Managing your stack
Invitation links and getting started
There are two different ways in which you could include a video in your stack. Both approaches will allow the video to be played inside your stack.
1. As a File
You can add a video using the File Tile. Drag and drop a File tile from the Tile Library into your stack (1), in the Settings tab give your tile a Title (2) and then click in the Add File box (3) and add the video file from your computer.
The file will be uploaded and will be processed. You can continue editing and add other tiles whilst this processing is being done. Whilst the video is being processed there will be a default image showing on your file tile. Once the processing is finished then the tile will show a still image from your video as the tile image. However you can can change the tile’s background image as normal (in the Layout tab) once the processing is finished.
Please note there is a 400MB file size limit on files uploaded using the File Tile. If your file is above this size then we recommend that you consider saving your video in a lower resolution (more suitable for viewing on the web) before uploading it. If however you do want to add a larger video file then you can do this by uploading it to a video sharing platform first and then add it to your stack as an online content tile (see below).
2. As Online Content (linking to a video sharing platform)
Another way to add a video to your stack is to upload your video to a video sharing platform like YouTube or Vimeo first. Then in Learning Toolbox you can use the Online Content tile to link to your video.
Drag and drop a Online Content tile from the Tile Library into your stack (1), in the Settings tab give your tile a Title (2) and then Add the weblink (3) to where your online video appears on the video sharing platform.
Some conferences ask their authors to add a video presentation to their stack. A common way that people make video presentations is to use PowerPoint.
If you want to make a video presentation using PowerPoint then we recommend following the instructions from Microsoft (see links below) to add a narration to your PowerPoint presentation and then save that as a video file.
- Record a slideshow with narrations and timings (just follow the basic steps 1-5 in this guide) then:
- Turn your presentation into a video
Please note that Learning Toolbox does not support .PPSX files, so when you save your presentation as a video you should save it as an MP4 file, not as a PPSX file.
Please also note that you should choose to save your video in 720p (or internet) resolution (not the 1040p default that Powerpoint offers) as this is the most suitable format for videos playing on the web. Following these instructions will reduce the chance of hitting any upload issues due to the file size.
You can then add the video to your Learning Toolbox stack using the File Tile.
Creating and returning to edit your stack
There are two different ways in which you could include a video in your stack. Both approaches will allow the video to be played inside your stack.
1. As a File
You can add a video using the File Tile. Drag and drop a File tile from the Tile Library into your stack (1), in the Settings tab give your tile a Title (2) and then click in the Add File box (3) and add the video file from your computer.
The file will be uploaded and will be processed. You can continue editing and add other tiles whilst this processing is being done. Whilst the video is being processed there will be a default image showing on your file tile. Once the processing is finished then the tile will show a still image from your video as the tile image. However you can can change the tile’s background image as normal (in the Layout tab) once the processing is finished.
Please note there is a 400MB file size limit on files uploaded using the File Tile. If your file is above this size then we recommend that you consider saving your video in a lower resolution (more suitable for viewing on the web) before uploading it. If however you do want to add a larger video file then you can do this by uploading it to a video sharing platform first and then add it to your stack as an online content tile (see below).
2. As Online Content (linking to a video sharing platform)
Another way to add a video to your stack is to upload your video to a video sharing platform like YouTube or Vimeo first. Then in Learning Toolbox you can use the Online Content tile to link to your video.
Drag and drop a Online Content tile from the Tile Library into your stack (1), in the Settings tab give your tile a Title (2) and then Add the weblink (3) to where your online video appears on the video sharing platform.
Some conferences ask their authors to add a video presentation to their stack. A common way that people make video presentations is to use PowerPoint.
If you want to make a video presentation using PowerPoint then we recommend following the instructions from Microsoft (see links below) to add a narration to your PowerPoint presentation and then save that as a video file.
- Record a slideshow with narrations and timings (just follow the basic steps 1-5 in this guide) then:
- Turn your presentation into a video
Please note that Learning Toolbox does not support .PPSX files, so when you save your presentation as a video you should save it as an MP4 file, not as a PPSX file.
Please also note that you should choose to save your video in 720p (or internet) resolution (not the 1040p default that Powerpoint offers) as this is the most suitable format for videos playing on the web. Following these instructions will reduce the chance of hitting any upload issues due to the file size.
You can then add the video to your Learning Toolbox stack using the File Tile.
Adding content to your stack using the Tile Library
There are two different ways in which you could include a video in your stack. Both approaches will allow the video to be played inside your stack.
1. As a File
You can add a video using the File Tile. Drag and drop a File tile from the Tile Library into your stack (1), in the Settings tab give your tile a Title (2) and then click in the Add File box (3) and add the video file from your computer.
The file will be uploaded and will be processed. You can continue editing and add other tiles whilst this processing is being done. Whilst the video is being processed there will be a default image showing on your file tile. Once the processing is finished then the tile will show a still image from your video as the tile image. However you can can change the tile’s background image as normal (in the Layout tab) once the processing is finished.
Please note there is a 400MB file size limit on files uploaded using the File Tile. If your file is above this size then we recommend that you consider saving your video in a lower resolution (more suitable for viewing on the web) before uploading it. If however you do want to add a larger video file then you can do this by uploading it to a video sharing platform first and then add it to your stack as an online content tile (see below).
2. As Online Content (linking to a video sharing platform)
Another way to add a video to your stack is to upload your video to a video sharing platform like YouTube or Vimeo first. Then in Learning Toolbox you can use the Online Content tile to link to your video.
Drag and drop a Online Content tile from the Tile Library into your stack (1), in the Settings tab give your tile a Title (2) and then Add the weblink (3) to where your online video appears on the video sharing platform.
Some conferences ask their authors to add a video presentation to their stack. A common way that people make video presentations is to use PowerPoint.
If you want to make a video presentation using PowerPoint then we recommend following the instructions from Microsoft (see links below) to add a narration to your PowerPoint presentation and then save that as a video file.
- Record a slideshow with narrations and timings (just follow the basic steps 1-5 in this guide) then:
- Turn your presentation into a video
Please note that Learning Toolbox does not support .PPSX files, so when you save your presentation as a video you should save it as an MP4 file, not as a PPSX file.
Please also note that you should choose to save your video in 720p (or internet) resolution (not the 1040p default that Powerpoint offers) as this is the most suitable format for videos playing on the web. Following these instructions will reduce the chance of hitting any upload issues due to the file size.
You can then add the video to your Learning Toolbox stack using the File Tile.
Commonly used Tiles
There are two different ways in which you could include a video in your stack. Both approaches will allow the video to be played inside your stack.
1. As a File
You can add a video using the File Tile. Drag and drop a File tile from the Tile Library into your stack (1), in the Settings tab give your tile a Title (2) and then click in the Add File box (3) and add the video file from your computer.
The file will be uploaded and will be processed. You can continue editing and add other tiles whilst this processing is being done. Whilst the video is being processed there will be a default image showing on your file tile. Once the processing is finished then the tile will show a still image from your video as the tile image. However you can can change the tile’s background image as normal (in the Layout tab) once the processing is finished.
Please note there is a 400MB file size limit on files uploaded using the File Tile. If your file is above this size then we recommend that you consider saving your video in a lower resolution (more suitable for viewing on the web) before uploading it. If however you do want to add a larger video file then you can do this by uploading it to a video sharing platform first and then add it to your stack as an online content tile (see below).
2. As Online Content (linking to a video sharing platform)
Another way to add a video to your stack is to upload your video to a video sharing platform like YouTube or Vimeo first. Then in Learning Toolbox you can use the Online Content tile to link to your video.
Drag and drop a Online Content tile from the Tile Library into your stack (1), in the Settings tab give your tile a Title (2) and then Add the weblink (3) to where your online video appears on the video sharing platform.
Some conferences ask their authors to add a video presentation to their stack. A common way that people make video presentations is to use PowerPoint.
If you want to make a video presentation using PowerPoint then we recommend following the instructions from Microsoft (see links below) to add a narration to your PowerPoint presentation and then save that as a video file.
- Record a slideshow with narrations and timings (just follow the basic steps 1-5 in this guide) then:
- Turn your presentation into a video
Please note that Learning Toolbox does not support .PPSX files, so when you save your presentation as a video you should save it as an MP4 file, not as a PPSX file.
Please also note that you should choose to save your video in 720p (or internet) resolution (not the 1040p default that Powerpoint offers) as this is the most suitable format for videos playing on the web. Following these instructions will reduce the chance of hitting any upload issues due to the file size.
You can then add the video to your Learning Toolbox stack using the File Tile.
Advanced Tiles
There are two different ways in which you could include a video in your stack. Both approaches will allow the video to be played inside your stack.
1. As a File
You can add a video using the File Tile. Drag and drop a File tile from the Tile Library into your stack (1), in the Settings tab give your tile a Title (2) and then click in the Add File box (3) and add the video file from your computer.
The file will be uploaded and will be processed. You can continue editing and add other tiles whilst this processing is being done. Whilst the video is being processed there will be a default image showing on your file tile. Once the processing is finished then the tile will show a still image from your video as the tile image. However you can can change the tile’s background image as normal (in the Layout tab) once the processing is finished.
Please note there is a 400MB file size limit on files uploaded using the File Tile. If your file is above this size then we recommend that you consider saving your video in a lower resolution (more suitable for viewing on the web) before uploading it. If however you do want to add a larger video file then you can do this by uploading it to a video sharing platform first and then add it to your stack as an online content tile (see below).
2. As Online Content (linking to a video sharing platform)
Another way to add a video to your stack is to upload your video to a video sharing platform like YouTube or Vimeo first. Then in Learning Toolbox you can use the Online Content tile to link to your video.
Drag and drop a Online Content tile from the Tile Library into your stack (1), in the Settings tab give your tile a Title (2) and then Add the weblink (3) to where your online video appears on the video sharing platform.
Some conferences ask their authors to add a video presentation to their stack. A common way that people make video presentations is to use PowerPoint.
If you want to make a video presentation using PowerPoint then we recommend following the instructions from Microsoft (see links below) to add a narration to your PowerPoint presentation and then save that as a video file.
- Record a slideshow with narrations and timings (just follow the basic steps 1-5 in this guide) then:
- Turn your presentation into a video
Please note that Learning Toolbox does not support .PPSX files, so when you save your presentation as a video you should save it as an MP4 file, not as a PPSX file.
Please also note that you should choose to save your video in 720p (or internet) resolution (not the 1040p default that Powerpoint offers) as this is the most suitable format for videos playing on the web. Following these instructions will reduce the chance of hitting any upload issues due to the file size.
You can then add the video to your Learning Toolbox stack using the File Tile.
Editing Tiles
There are two different ways in which you could include a video in your stack. Both approaches will allow the video to be played inside your stack.
1. As a File
You can add a video using the File Tile. Drag and drop a File tile from the Tile Library into your stack (1), in the Settings tab give your tile a Title (2) and then click in the Add File box (3) and add the video file from your computer.
The file will be uploaded and will be processed. You can continue editing and add other tiles whilst this processing is being done. Whilst the video is being processed there will be a default image showing on your file tile. Once the processing is finished then the tile will show a still image from your video as the tile image. However you can can change the tile’s background image as normal (in the Layout tab) once the processing is finished.
Please note there is a 400MB file size limit on files uploaded using the File Tile. If your file is above this size then we recommend that you consider saving your video in a lower resolution (more suitable for viewing on the web) before uploading it. If however you do want to add a larger video file then you can do this by uploading it to a video sharing platform first and then add it to your stack as an online content tile (see below).
2. As Online Content (linking to a video sharing platform)
Another way to add a video to your stack is to upload your video to a video sharing platform like YouTube or Vimeo first. Then in Learning Toolbox you can use the Online Content tile to link to your video.
Drag and drop a Online Content tile from the Tile Library into your stack (1), in the Settings tab give your tile a Title (2) and then Add the weblink (3) to where your online video appears on the video sharing platform.
Some conferences ask their authors to add a video presentation to their stack. A common way that people make video presentations is to use PowerPoint.
If you want to make a video presentation using PowerPoint then we recommend following the instructions from Microsoft (see links below) to add a narration to your PowerPoint presentation and then save that as a video file.
- Record a slideshow with narrations and timings (just follow the basic steps 1-5 in this guide) then:
- Turn your presentation into a video
Please note that Learning Toolbox does not support .PPSX files, so when you save your presentation as a video you should save it as an MP4 file, not as a PPSX file.
Please also note that you should choose to save your video in 720p (or internet) resolution (not the 1040p default that Powerpoint offers) as this is the most suitable format for videos playing on the web. Following these instructions will reduce the chance of hitting any upload issues due to the file size.
You can then add the video to your Learning Toolbox stack using the File Tile.
Changing the layout and appearance of a tile
There are two different ways in which you could include a video in your stack. Both approaches will allow the video to be played inside your stack.
1. As a File
You can add a video using the File Tile. Drag and drop a File tile from the Tile Library into your stack (1), in the Settings tab give your tile a Title (2) and then click in the Add File box (3) and add the video file from your computer.
The file will be uploaded and will be processed. You can continue editing and add other tiles whilst this processing is being done. Whilst the video is being processed there will be a default image showing on your file tile. Once the processing is finished then the tile will show a still image from your video as the tile image. However you can can change the tile’s background image as normal (in the Layout tab) once the processing is finished.
Please note there is a 400MB file size limit on files uploaded using the File Tile. If your file is above this size then we recommend that you consider saving your video in a lower resolution (more suitable for viewing on the web) before uploading it. If however you do want to add a larger video file then you can do this by uploading it to a video sharing platform first and then add it to your stack as an online content tile (see below).
2. As Online Content (linking to a video sharing platform)
Another way to add a video to your stack is to upload your video to a video sharing platform like YouTube or Vimeo first. Then in Learning Toolbox you can use the Online Content tile to link to your video.
Drag and drop a Online Content tile from the Tile Library into your stack (1), in the Settings tab give your tile a Title (2) and then Add the weblink (3) to where your online video appears on the video sharing platform.
Some conferences ask their authors to add a video presentation to their stack. A common way that people make video presentations is to use PowerPoint.
If you want to make a video presentation using PowerPoint then we recommend following the instructions from Microsoft (see links below) to add a narration to your PowerPoint presentation and then save that as a video file.
- Record a slideshow with narrations and timings (just follow the basic steps 1-5 in this guide) then:
- Turn your presentation into a video
Please note that Learning Toolbox does not support .PPSX files, so when you save your presentation as a video you should save it as an MP4 file, not as a PPSX file.
Please also note that you should choose to save your video in 720p (or internet) resolution (not the 1040p default that Powerpoint offers) as this is the most suitable format for videos playing on the web. Following these instructions will reduce the chance of hitting any upload issues due to the file size.
You can then add the video to your Learning Toolbox stack using the File Tile.
Adding a PowerPoint file to your stack
There are two different ways in which you could include a video in your stack. Both approaches will allow the video to be played inside your stack.
1. As a File
You can add a video using the File Tile. Drag and drop a File tile from the Tile Library into your stack (1), in the Settings tab give your tile a Title (2) and then click in the Add File box (3) and add the video file from your computer.
The file will be uploaded and will be processed. You can continue editing and add other tiles whilst this processing is being done. Whilst the video is being processed there will be a default image showing on your file tile. Once the processing is finished then the tile will show a still image from your video as the tile image. However you can can change the tile’s background image as normal (in the Layout tab) once the processing is finished.
Please note there is a 400MB file size limit on files uploaded using the File Tile. If your file is above this size then we recommend that you consider saving your video in a lower resolution (more suitable for viewing on the web) before uploading it. If however you do want to add a larger video file then you can do this by uploading it to a video sharing platform first and then add it to your stack as an online content tile (see below).
2. As Online Content (linking to a video sharing platform)
Another way to add a video to your stack is to upload your video to a video sharing platform like YouTube or Vimeo first. Then in Learning Toolbox you can use the Online Content tile to link to your video.
Drag and drop a Online Content tile from the Tile Library into your stack (1), in the Settings tab give your tile a Title (2) and then Add the weblink (3) to where your online video appears on the video sharing platform.
Some conferences ask their authors to add a video presentation to their stack. A common way that people make video presentations is to use PowerPoint.
If you want to make a video presentation using PowerPoint then we recommend following the instructions from Microsoft (see links below) to add a narration to your PowerPoint presentation and then save that as a video file.
- Record a slideshow with narrations and timings (just follow the basic steps 1-5 in this guide) then:
- Turn your presentation into a video
Please note that Learning Toolbox does not support .PPSX files, so when you save your presentation as a video you should save it as an MP4 file, not as a PPSX file.
Please also note that you should choose to save your video in 720p (or internet) resolution (not the 1040p default that Powerpoint offers) as this is the most suitable format for videos playing on the web. Following these instructions will reduce the chance of hitting any upload issues due to the file size.
You can then add the video to your Learning Toolbox stack using the File Tile.
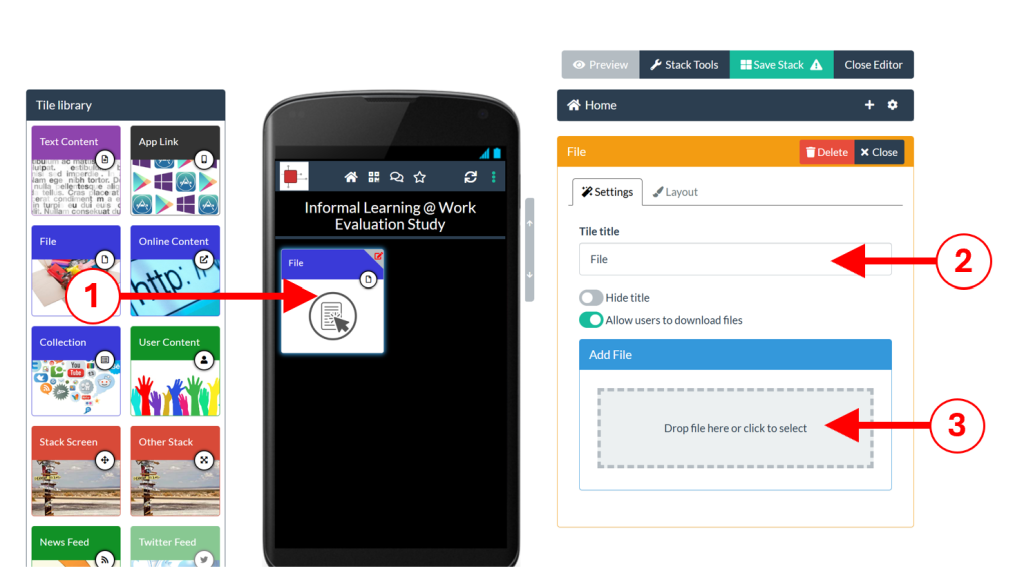
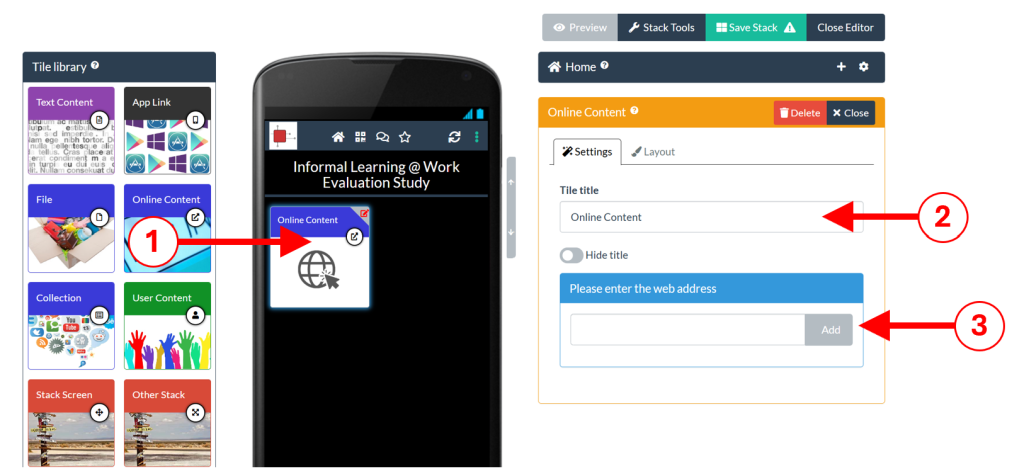
Adding a video to your stack
There are two different ways in which you could include a video in your stack. Both approaches will allow the video to be played inside your stack.
1. As a File
You can add a video using the File Tile. Drag and drop a File tile from the Tile Library into your stack (1), in the Settings tab give your tile a Title (2) and then click in the Add File box (3) and add the video file from your computer.
The file will be uploaded and will be processed. You can continue editing and add other tiles whilst this processing is being done. Whilst the video is being processed there will be a default image showing on your file tile. Once the processing is finished then the tile will show a still image from your video as the tile image. However you can can change the tile’s background image as normal (in the Layout tab) once the processing is finished.
Please note there is a 400MB file size limit on files uploaded using the File Tile. If your file is above this size then we recommend that you consider saving your video in a lower resolution (more suitable for viewing on the web) before uploading it. If however you do want to add a larger video file then you can do this by uploading it to a video sharing platform first and then add it to your stack as an online content tile (see below).
2. As Online Content (linking to a video sharing platform)
Another way to add a video to your stack is to upload your video to a video sharing platform like YouTube or Vimeo first. Then in Learning Toolbox you can use the Online Content tile to link to your video.
Drag and drop a Online Content tile from the Tile Library into your stack (1), in the Settings tab give your tile a Title (2) and then Add the weblink (3) to where your online video appears on the video sharing platform.
Some conferences ask their authors to add a video presentation to their stack. A common way that people make video presentations is to use PowerPoint.
If you want to make a video presentation using PowerPoint then we recommend following the instructions from Microsoft (see links below) to add a narration to your PowerPoint presentation and then save that as a video file.
- Record a slideshow with narrations and timings (just follow the basic steps 1-5 in this guide) then:
- Turn your presentation into a video
Please note that Learning Toolbox does not support .PPSX files, so when you save your presentation as a video you should save it as an MP4 file, not as a PPSX file.
Please also note that you should choose to save your video in 720p (or internet) resolution (not the 1040p default that Powerpoint offers) as this is the most suitable format for videos playing on the web. Following these instructions will reduce the chance of hitting any upload issues due to the file size.
You can then add the video to your Learning Toolbox stack using the File Tile.
Adding an extra screen/layer to your stack
There are two different ways in which you could include a video in your stack. Both approaches will allow the video to be played inside your stack.
1. As a File
You can add a video using the File Tile. Drag and drop a File tile from the Tile Library into your stack (1), in the Settings tab give your tile a Title (2) and then click in the Add File box (3) and add the video file from your computer.
The file will be uploaded and will be processed. You can continue editing and add other tiles whilst this processing is being done. Whilst the video is being processed there will be a default image showing on your file tile. Once the processing is finished then the tile will show a still image from your video as the tile image. However you can can change the tile’s background image as normal (in the Layout tab) once the processing is finished.
Please note there is a 400MB file size limit on files uploaded using the File Tile. If your file is above this size then we recommend that you consider saving your video in a lower resolution (more suitable for viewing on the web) before uploading it. If however you do want to add a larger video file then you can do this by uploading it to a video sharing platform first and then add it to your stack as an online content tile (see below).
2. As Online Content (linking to a video sharing platform)
Another way to add a video to your stack is to upload your video to a video sharing platform like YouTube or Vimeo first. Then in Learning Toolbox you can use the Online Content tile to link to your video.
Drag and drop a Online Content tile from the Tile Library into your stack (1), in the Settings tab give your tile a Title (2) and then Add the weblink (3) to where your online video appears on the video sharing platform.
Some conferences ask their authors to add a video presentation to their stack. A common way that people make video presentations is to use PowerPoint.
If you want to make a video presentation using PowerPoint then we recommend following the instructions from Microsoft (see links below) to add a narration to your PowerPoint presentation and then save that as a video file.
- Record a slideshow with narrations and timings (just follow the basic steps 1-5 in this guide) then:
- Turn your presentation into a video
Please note that Learning Toolbox does not support .PPSX files, so when you save your presentation as a video you should save it as an MP4 file, not as a PPSX file.
Please also note that you should choose to save your video in 720p (or internet) resolution (not the 1040p default that Powerpoint offers) as this is the most suitable format for videos playing on the web. Following these instructions will reduce the chance of hitting any upload issues due to the file size.
You can then add the video to your Learning Toolbox stack using the File Tile.
Restrictions on what can be included in your stack
There are two different ways in which you could include a video in your stack. Both approaches will allow the video to be played inside your stack.
1. As a File
You can add a video using the File Tile. Drag and drop a File tile from the Tile Library into your stack (1), in the Settings tab give your tile a Title (2) and then click in the Add File box (3) and add the video file from your computer.
The file will be uploaded and will be processed. You can continue editing and add other tiles whilst this processing is being done. Whilst the video is being processed there will be a default image showing on your file tile. Once the processing is finished then the tile will show a still image from your video as the tile image. However you can can change the tile’s background image as normal (in the Layout tab) once the processing is finished.
Please note there is a 400MB file size limit on files uploaded using the File Tile. If your file is above this size then we recommend that you consider saving your video in a lower resolution (more suitable for viewing on the web) before uploading it. If however you do want to add a larger video file then you can do this by uploading it to a video sharing platform first and then add it to your stack as an online content tile (see below).
2. As Online Content (linking to a video sharing platform)
Another way to add a video to your stack is to upload your video to a video sharing platform like YouTube or Vimeo first. Then in Learning Toolbox you can use the Online Content tile to link to your video.
Drag and drop a Online Content tile from the Tile Library into your stack (1), in the Settings tab give your tile a Title (2) and then Add the weblink (3) to where your online video appears on the video sharing platform.
Some conferences ask their authors to add a video presentation to their stack. A common way that people make video presentations is to use PowerPoint.
If you want to make a video presentation using PowerPoint then we recommend following the instructions from Microsoft (see links below) to add a narration to your PowerPoint presentation and then save that as a video file.
- Record a slideshow with narrations and timings (just follow the basic steps 1-5 in this guide) then:
- Turn your presentation into a video
Please note that Learning Toolbox does not support .PPSX files, so when you save your presentation as a video you should save it as an MP4 file, not as a PPSX file.
Please also note that you should choose to save your video in 720p (or internet) resolution (not the 1040p default that Powerpoint offers) as this is the most suitable format for videos playing on the web. Following these instructions will reduce the chance of hitting any upload issues due to the file size.
You can then add the video to your Learning Toolbox stack using the File Tile.
Restoring your deleted stack
There are two different ways in which you could include a video in your stack. Both approaches will allow the video to be played inside your stack.
1. As a File
You can add a video using the File Tile. Drag and drop a File tile from the Tile Library into your stack (1), in the Settings tab give your tile a Title (2) and then click in the Add File box (3) and add the video file from your computer.
The file will be uploaded and will be processed. You can continue editing and add other tiles whilst this processing is being done. Whilst the video is being processed there will be a default image showing on your file tile. Once the processing is finished then the tile will show a still image from your video as the tile image. However you can can change the tile’s background image as normal (in the Layout tab) once the processing is finished.
Please note there is a 400MB file size limit on files uploaded using the File Tile. If your file is above this size then we recommend that you consider saving your video in a lower resolution (more suitable for viewing on the web) before uploading it. If however you do want to add a larger video file then you can do this by uploading it to a video sharing platform first and then add it to your stack as an online content tile (see below).
2. As Online Content (linking to a video sharing platform)
Another way to add a video to your stack is to upload your video to a video sharing platform like YouTube or Vimeo first. Then in Learning Toolbox you can use the Online Content tile to link to your video.
Drag and drop a Online Content tile from the Tile Library into your stack (1), in the Settings tab give your tile a Title (2) and then Add the weblink (3) to where your online video appears on the video sharing platform.
Some conferences ask their authors to add a video presentation to their stack. A common way that people make video presentations is to use PowerPoint.
If you want to make a video presentation using PowerPoint then we recommend following the instructions from Microsoft (see links below) to add a narration to your PowerPoint presentation and then save that as a video file.
- Record a slideshow with narrations and timings (just follow the basic steps 1-5 in this guide) then:
- Turn your presentation into a video
Please note that Learning Toolbox does not support .PPSX files, so when you save your presentation as a video you should save it as an MP4 file, not as a PPSX file.
Please also note that you should choose to save your video in 720p (or internet) resolution (not the 1040p default that Powerpoint offers) as this is the most suitable format for videos playing on the web. Following these instructions will reduce the chance of hitting any upload issues due to the file size.
You can then add the video to your Learning Toolbox stack using the File Tile.
Previewing and checking your stack
There are two different ways in which you could include a video in your stack. Both approaches will allow the video to be played inside your stack.
1. As a File
You can add a video using the File Tile. Drag and drop a File tile from the Tile Library into your stack (1), in the Settings tab give your tile a Title (2) and then click in the Add File box (3) and add the video file from your computer.
The file will be uploaded and will be processed. You can continue editing and add other tiles whilst this processing is being done. Whilst the video is being processed there will be a default image showing on your file tile. Once the processing is finished then the tile will show a still image from your video as the tile image. However you can can change the tile’s background image as normal (in the Layout tab) once the processing is finished.
Please note there is a 400MB file size limit on files uploaded using the File Tile. If your file is above this size then we recommend that you consider saving your video in a lower resolution (more suitable for viewing on the web) before uploading it. If however you do want to add a larger video file then you can do this by uploading it to a video sharing platform first and then add it to your stack as an online content tile (see below).
2. As Online Content (linking to a video sharing platform)
Another way to add a video to your stack is to upload your video to a video sharing platform like YouTube or Vimeo first. Then in Learning Toolbox you can use the Online Content tile to link to your video.
Drag and drop a Online Content tile from the Tile Library into your stack (1), in the Settings tab give your tile a Title (2) and then Add the weblink (3) to where your online video appears on the video sharing platform.
Some conferences ask their authors to add a video presentation to their stack. A common way that people make video presentations is to use PowerPoint.
If you want to make a video presentation using PowerPoint then we recommend following the instructions from Microsoft (see links below) to add a narration to your PowerPoint presentation and then save that as a video file.
- Record a slideshow with narrations and timings (just follow the basic steps 1-5 in this guide) then:
- Turn your presentation into a video
Please note that Learning Toolbox does not support .PPSX files, so when you save your presentation as a video you should save it as an MP4 file, not as a PPSX file.
Please also note that you should choose to save your video in 720p (or internet) resolution (not the 1040p default that Powerpoint offers) as this is the most suitable format for videos playing on the web. Following these instructions will reduce the chance of hitting any upload issues due to the file size.
You can then add the video to your Learning Toolbox stack using the File Tile.
Creating the summary poster
An option often used by onsite conferences to promote your ePoster / stack onsite.
There are two different ways in which you could include a video in your stack. Both approaches will allow the video to be played inside your stack.
1. As a File
You can add a video using the File Tile. Drag and drop a File tile from the Tile Library into your stack (1), in the Settings tab give your tile a Title (2) and then click in the Add File box (3) and add the video file from your computer.
The file will be uploaded and will be processed. You can continue editing and add other tiles whilst this processing is being done. Whilst the video is being processed there will be a default image showing on your file tile. Once the processing is finished then the tile will show a still image from your video as the tile image. However you can can change the tile’s background image as normal (in the Layout tab) once the processing is finished.
Please note there is a 400MB file size limit on files uploaded using the File Tile. If your file is above this size then we recommend that you consider saving your video in a lower resolution (more suitable for viewing on the web) before uploading it. If however you do want to add a larger video file then you can do this by uploading it to a video sharing platform first and then add it to your stack as an online content tile (see below).
2. As Online Content (linking to a video sharing platform)
Another way to add a video to your stack is to upload your video to a video sharing platform like YouTube or Vimeo first. Then in Learning Toolbox you can use the Online Content tile to link to your video.
Drag and drop a Online Content tile from the Tile Library into your stack (1), in the Settings tab give your tile a Title (2) and then Add the weblink (3) to where your online video appears on the video sharing platform.
Some conferences ask their authors to add a video presentation to their stack. A common way that people make video presentations is to use PowerPoint.
If you want to make a video presentation using PowerPoint then we recommend following the instructions from Microsoft (see links below) to add a narration to your PowerPoint presentation and then save that as a video file.
- Record a slideshow with narrations and timings (just follow the basic steps 1-5 in this guide) then:
- Turn your presentation into a video
Please note that Learning Toolbox does not support .PPSX files, so when you save your presentation as a video you should save it as an MP4 file, not as a PPSX file.
Please also note that you should choose to save your video in 720p (or internet) resolution (not the 1040p default that Powerpoint offers) as this is the most suitable format for videos playing on the web. Following these instructions will reduce the chance of hitting any upload issues due to the file size.
You can then add the video to your Learning Toolbox stack using the File Tile.
Your stack on the showcase website
There are two different ways in which you could include a video in your stack. Both approaches will allow the video to be played inside your stack.
1. As a File
You can add a video using the File Tile. Drag and drop a File tile from the Tile Library into your stack (1), in the Settings tab give your tile a Title (2) and then click in the Add File box (3) and add the video file from your computer.
The file will be uploaded and will be processed. You can continue editing and add other tiles whilst this processing is being done. Whilst the video is being processed there will be a default image showing on your file tile. Once the processing is finished then the tile will show a still image from your video as the tile image. However you can can change the tile’s background image as normal (in the Layout tab) once the processing is finished.
Please note there is a 400MB file size limit on files uploaded using the File Tile. If your file is above this size then we recommend that you consider saving your video in a lower resolution (more suitable for viewing on the web) before uploading it. If however you do want to add a larger video file then you can do this by uploading it to a video sharing platform first and then add it to your stack as an online content tile (see below).
2. As Online Content (linking to a video sharing platform)
Another way to add a video to your stack is to upload your video to a video sharing platform like YouTube or Vimeo first. Then in Learning Toolbox you can use the Online Content tile to link to your video.
Drag and drop a Online Content tile from the Tile Library into your stack (1), in the Settings tab give your tile a Title (2) and then Add the weblink (3) to where your online video appears on the video sharing platform.
Some conferences ask their authors to add a video presentation to their stack. A common way that people make video presentations is to use PowerPoint.
If you want to make a video presentation using PowerPoint then we recommend following the instructions from Microsoft (see links below) to add a narration to your PowerPoint presentation and then save that as a video file.
- Record a slideshow with narrations and timings (just follow the basic steps 1-5 in this guide) then:
- Turn your presentation into a video
Please note that Learning Toolbox does not support .PPSX files, so when you save your presentation as a video you should save it as an MP4 file, not as a PPSX file.
Please also note that you should choose to save your video in 720p (or internet) resolution (not the 1040p default that Powerpoint offers) as this is the most suitable format for videos playing on the web. Following these instructions will reduce the chance of hitting any upload issues due to the file size.
You can then add the video to your Learning Toolbox stack using the File Tile.
Marking your stack as ready to publish to the showcase
There are two different ways in which you could include a video in your stack. Both approaches will allow the video to be played inside your stack.
1. As a File
You can add a video using the File Tile. Drag and drop a File tile from the Tile Library into your stack (1), in the Settings tab give your tile a Title (2) and then click in the Add File box (3) and add the video file from your computer.
The file will be uploaded and will be processed. You can continue editing and add other tiles whilst this processing is being done. Whilst the video is being processed there will be a default image showing on your file tile. Once the processing is finished then the tile will show a still image from your video as the tile image. However you can can change the tile’s background image as normal (in the Layout tab) once the processing is finished.
Please note there is a 400MB file size limit on files uploaded using the File Tile. If your file is above this size then we recommend that you consider saving your video in a lower resolution (more suitable for viewing on the web) before uploading it. If however you do want to add a larger video file then you can do this by uploading it to a video sharing platform first and then add it to your stack as an online content tile (see below).
2. As Online Content (linking to a video sharing platform)
Another way to add a video to your stack is to upload your video to a video sharing platform like YouTube or Vimeo first. Then in Learning Toolbox you can use the Online Content tile to link to your video.
Drag and drop a Online Content tile from the Tile Library into your stack (1), in the Settings tab give your tile a Title (2) and then Add the weblink (3) to where your online video appears on the video sharing platform.
Some conferences ask their authors to add a video presentation to their stack. A common way that people make video presentations is to use PowerPoint.
If you want to make a video presentation using PowerPoint then we recommend following the instructions from Microsoft (see links below) to add a narration to your PowerPoint presentation and then save that as a video file.
- Record a slideshow with narrations and timings (just follow the basic steps 1-5 in this guide) then:
- Turn your presentation into a video
Please note that Learning Toolbox does not support .PPSX files, so when you save your presentation as a video you should save it as an MP4 file, not as a PPSX file.
Please also note that you should choose to save your video in 720p (or internet) resolution (not the 1040p default that Powerpoint offers) as this is the most suitable format for videos playing on the web. Following these instructions will reduce the chance of hitting any upload issues due to the file size.
You can then add the video to your Learning Toolbox stack using the File Tile.
Presenting your stack (General advice)
There are two different ways in which you could include a video in your stack. Both approaches will allow the video to be played inside your stack.
1. As a File
You can add a video using the File Tile. Drag and drop a File tile from the Tile Library into your stack (1), in the Settings tab give your tile a Title (2) and then click in the Add File box (3) and add the video file from your computer.
The file will be uploaded and will be processed. You can continue editing and add other tiles whilst this processing is being done. Whilst the video is being processed there will be a default image showing on your file tile. Once the processing is finished then the tile will show a still image from your video as the tile image. However you can can change the tile’s background image as normal (in the Layout tab) once the processing is finished.
Please note there is a 400MB file size limit on files uploaded using the File Tile. If your file is above this size then we recommend that you consider saving your video in a lower resolution (more suitable for viewing on the web) before uploading it. If however you do want to add a larger video file then you can do this by uploading it to a video sharing platform first and then add it to your stack as an online content tile (see below).
2. As Online Content (linking to a video sharing platform)
Another way to add a video to your stack is to upload your video to a video sharing platform like YouTube or Vimeo first. Then in Learning Toolbox you can use the Online Content tile to link to your video.
Drag and drop a Online Content tile from the Tile Library into your stack (1), in the Settings tab give your tile a Title (2) and then Add the weblink (3) to where your online video appears on the video sharing platform.
Some conferences ask their authors to add a video presentation to their stack. A common way that people make video presentations is to use PowerPoint.
If you want to make a video presentation using PowerPoint then we recommend following the instructions from Microsoft (see links below) to add a narration to your PowerPoint presentation and then save that as a video file.
- Record a slideshow with narrations and timings (just follow the basic steps 1-5 in this guide) then:
- Turn your presentation into a video
Please note that Learning Toolbox does not support .PPSX files, so when you save your presentation as a video you should save it as an MP4 file, not as a PPSX file.
Please also note that you should choose to save your video in 720p (or internet) resolution (not the 1040p default that Powerpoint offers) as this is the most suitable format for videos playing on the web. Following these instructions will reduce the chance of hitting any upload issues due to the file size.
You can then add the video to your Learning Toolbox stack using the File Tile.
Engaging with the viewers of your stacks
There are two different ways in which you could include a video in your stack. Both approaches will allow the video to be played inside your stack.
1. As a File
You can add a video using the File Tile. Drag and drop a File tile from the Tile Library into your stack (1), in the Settings tab give your tile a Title (2) and then click in the Add File box (3) and add the video file from your computer.
The file will be uploaded and will be processed. You can continue editing and add other tiles whilst this processing is being done. Whilst the video is being processed there will be a default image showing on your file tile. Once the processing is finished then the tile will show a still image from your video as the tile image. However you can can change the tile’s background image as normal (in the Layout tab) once the processing is finished.
Please note there is a 400MB file size limit on files uploaded using the File Tile. If your file is above this size then we recommend that you consider saving your video in a lower resolution (more suitable for viewing on the web) before uploading it. If however you do want to add a larger video file then you can do this by uploading it to a video sharing platform first and then add it to your stack as an online content tile (see below).
2. As Online Content (linking to a video sharing platform)
Another way to add a video to your stack is to upload your video to a video sharing platform like YouTube or Vimeo first. Then in Learning Toolbox you can use the Online Content tile to link to your video.
Drag and drop a Online Content tile from the Tile Library into your stack (1), in the Settings tab give your tile a Title (2) and then Add the weblink (3) to where your online video appears on the video sharing platform.
Some conferences ask their authors to add a video presentation to their stack. A common way that people make video presentations is to use PowerPoint.
If you want to make a video presentation using PowerPoint then we recommend following the instructions from Microsoft (see links below) to add a narration to your PowerPoint presentation and then save that as a video file.
- Record a slideshow with narrations and timings (just follow the basic steps 1-5 in this guide) then:
- Turn your presentation into a video
Please note that Learning Toolbox does not support .PPSX files, so when you save your presentation as a video you should save it as an MP4 file, not as a PPSX file.
Please also note that you should choose to save your video in 720p (or internet) resolution (not the 1040p default that Powerpoint offers) as this is the most suitable format for videos playing on the web. Following these instructions will reduce the chance of hitting any upload issues due to the file size.
You can then add the video to your Learning Toolbox stack using the File Tile.
Using templates
There are two different ways in which you could include a video in your stack. Both approaches will allow the video to be played inside your stack.
1. As a File
You can add a video using the File Tile. Drag and drop a File tile from the Tile Library into your stack (1), in the Settings tab give your tile a Title (2) and then click in the Add File box (3) and add the video file from your computer.
The file will be uploaded and will be processed. You can continue editing and add other tiles whilst this processing is being done. Whilst the video is being processed there will be a default image showing on your file tile. Once the processing is finished then the tile will show a still image from your video as the tile image. However you can can change the tile’s background image as normal (in the Layout tab) once the processing is finished.
Please note there is a 400MB file size limit on files uploaded using the File Tile. If your file is above this size then we recommend that you consider saving your video in a lower resolution (more suitable for viewing on the web) before uploading it. If however you do want to add a larger video file then you can do this by uploading it to a video sharing platform first and then add it to your stack as an online content tile (see below).
2. As Online Content (linking to a video sharing platform)
Another way to add a video to your stack is to upload your video to a video sharing platform like YouTube or Vimeo first. Then in Learning Toolbox you can use the Online Content tile to link to your video.
Drag and drop a Online Content tile from the Tile Library into your stack (1), in the Settings tab give your tile a Title (2) and then Add the weblink (3) to where your online video appears on the video sharing platform.
Some conferences ask their authors to add a video presentation to their stack. A common way that people make video presentations is to use PowerPoint.
If you want to make a video presentation using PowerPoint then we recommend following the instructions from Microsoft (see links below) to add a narration to your PowerPoint presentation and then save that as a video file.
- Record a slideshow with narrations and timings (just follow the basic steps 1-5 in this guide) then:
- Turn your presentation into a video
Please note that Learning Toolbox does not support .PPSX files, so when you save your presentation as a video you should save it as an MP4 file, not as a PPSX file.
Please also note that you should choose to save your video in 720p (or internet) resolution (not the 1040p default that Powerpoint offers) as this is the most suitable format for videos playing on the web. Following these instructions will reduce the chance of hitting any upload issues due to the file size.
You can then add the video to your Learning Toolbox stack using the File Tile.
Editing your account
There are two different ways in which you could include a video in your stack. Both approaches will allow the video to be played inside your stack.
1. As a File
You can add a video using the File Tile. Drag and drop a File tile from the Tile Library into your stack (1), in the Settings tab give your tile a Title (2) and then click in the Add File box (3) and add the video file from your computer.
The file will be uploaded and will be processed. You can continue editing and add other tiles whilst this processing is being done. Whilst the video is being processed there will be a default image showing on your file tile. Once the processing is finished then the tile will show a still image from your video as the tile image. However you can can change the tile’s background image as normal (in the Layout tab) once the processing is finished.
Please note there is a 400MB file size limit on files uploaded using the File Tile. If your file is above this size then we recommend that you consider saving your video in a lower resolution (more suitable for viewing on the web) before uploading it. If however you do want to add a larger video file then you can do this by uploading it to a video sharing platform first and then add it to your stack as an online content tile (see below).
2. As Online Content (linking to a video sharing platform)
Another way to add a video to your stack is to upload your video to a video sharing platform like YouTube or Vimeo first. Then in Learning Toolbox you can use the Online Content tile to link to your video.
Drag and drop a Online Content tile from the Tile Library into your stack (1), in the Settings tab give your tile a Title (2) and then Add the weblink (3) to where your online video appears on the video sharing platform.
Some conferences ask their authors to add a video presentation to their stack. A common way that people make video presentations is to use PowerPoint.
If you want to make a video presentation using PowerPoint then we recommend following the instructions from Microsoft (see links below) to add a narration to your PowerPoint presentation and then save that as a video file.
- Record a slideshow with narrations and timings (just follow the basic steps 1-5 in this guide) then:
- Turn your presentation into a video
Please note that Learning Toolbox does not support .PPSX files, so when you save your presentation as a video you should save it as an MP4 file, not as a PPSX file.
Please also note that you should choose to save your video in 720p (or internet) resolution (not the 1040p default that Powerpoint offers) as this is the most suitable format for videos playing on the web. Following these instructions will reduce the chance of hitting any upload issues due to the file size.
You can then add the video to your Learning Toolbox stack using the File Tile.
Managing your stack
There are two different ways in which you could include a video in your stack. Both approaches will allow the video to be played inside your stack.
1. As a File
You can add a video using the File Tile. Drag and drop a File tile from the Tile Library into your stack (1), in the Settings tab give your tile a Title (2) and then click in the Add File box (3) and add the video file from your computer.
The file will be uploaded and will be processed. You can continue editing and add other tiles whilst this processing is being done. Whilst the video is being processed there will be a default image showing on your file tile. Once the processing is finished then the tile will show a still image from your video as the tile image. However you can can change the tile’s background image as normal (in the Layout tab) once the processing is finished.
Please note there is a 400MB file size limit on files uploaded using the File Tile. If your file is above this size then we recommend that you consider saving your video in a lower resolution (more suitable for viewing on the web) before uploading it. If however you do want to add a larger video file then you can do this by uploading it to a video sharing platform first and then add it to your stack as an online content tile (see below).
2. As Online Content (linking to a video sharing platform)
Another way to add a video to your stack is to upload your video to a video sharing platform like YouTube or Vimeo first. Then in Learning Toolbox you can use the Online Content tile to link to your video.
Drag and drop a Online Content tile from the Tile Library into your stack (1), in the Settings tab give your tile a Title (2) and then Add the weblink (3) to where your online video appears on the video sharing platform.
Some conferences ask their authors to add a video presentation to their stack. A common way that people make video presentations is to use PowerPoint.
If you want to make a video presentation using PowerPoint then we recommend following the instructions from Microsoft (see links below) to add a narration to your PowerPoint presentation and then save that as a video file.
- Record a slideshow with narrations and timings (just follow the basic steps 1-5 in this guide) then:
- Turn your presentation into a video
Please note that Learning Toolbox does not support .PPSX files, so when you save your presentation as a video you should save it as an MP4 file, not as a PPSX file.
Please also note that you should choose to save your video in 720p (or internet) resolution (not the 1040p default that Powerpoint offers) as this is the most suitable format for videos playing on the web. Following these instructions will reduce the chance of hitting any upload issues due to the file size.
You can then add the video to your Learning Toolbox stack using the File Tile.