Contents
- Invitation links and getting started
- Creating and returning to edit your stack
- Adding content to your stack using the Tile Library
- Co-authors
- Editing a Tile
- Changing the layout and appearance of a Tile
- Adding a PowerPoint to your stack
- Adding a video to your stack
- Adding an extra screen to your stack
- Restoring a deleted stack
- Previewing and checking your stack
- Restrictions on what can be included in your stack
- Creating the summary poster
- Your stack on the showcase website
- Marking your stack as ready to publish
- Presenting your stack (general guidance)
- Exploring and sharing published stacks
- Engaging with the viewers of your stack
- Using templates
- Editing your account
- Managing your stack
Invitation links and getting started
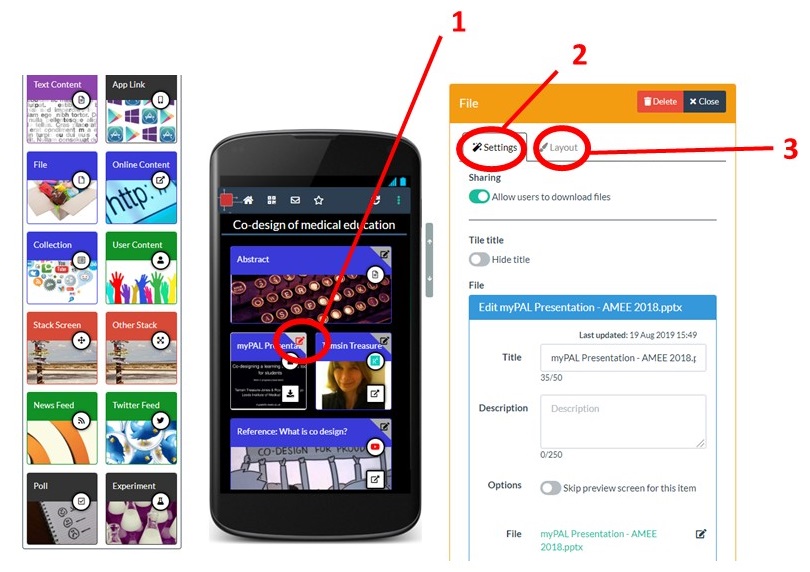
- Click on the edit icon on the tile that you want to edit. Note that the edit icon of the tile that is open for editing appears red.
- You can now make any changes you want to the content of the tile in the Settings tab
- And you can make any changes you want to the appearance of the tile in the Layout tab
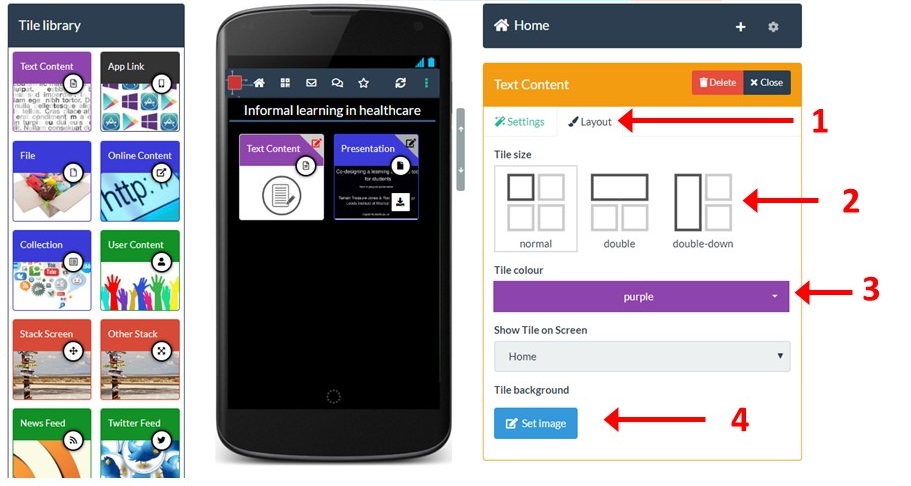
You can can change the size, title bar colour and tile background image.
Click on the tile’s edit icon to show its settings then:
- Click on the Layout tab
- Within the Layout tab you can change the tile size
- tile colour
- and set or change the background image
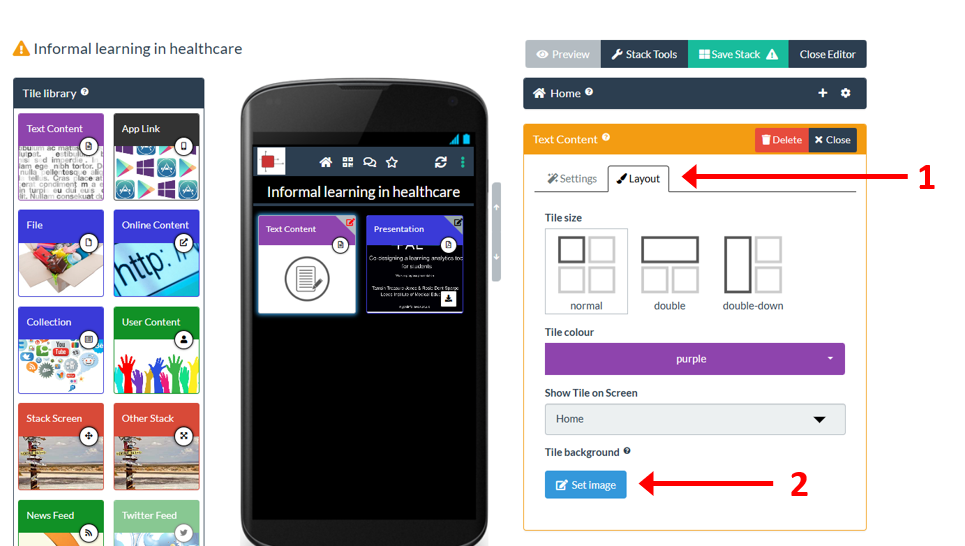
Click on the tile’s edit icon to show its settings and layout tabs, then:
- Click on the Layout tab
- Click on the Set Image button.
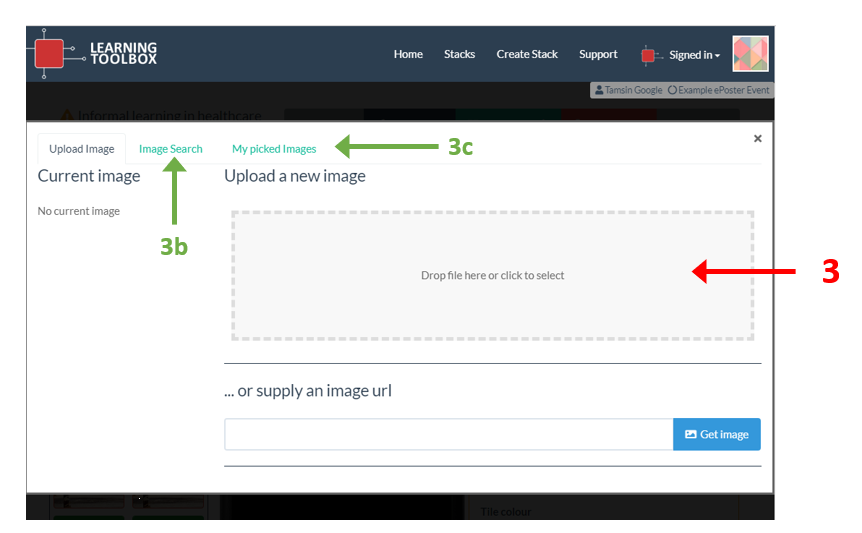
This opens the image selector. Here you can:
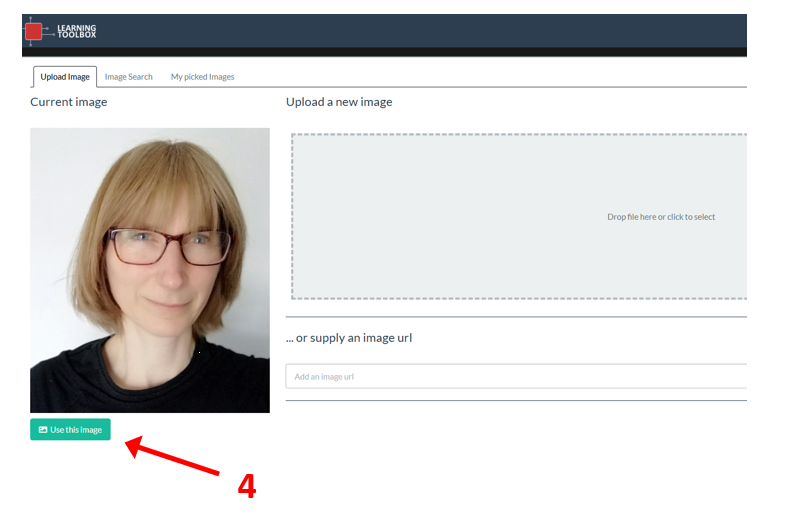
3. Upload an image from your computer. If you do not have a suitable image to upload then you can also use the image search (3b) which connects to Pixabay to find an image. This is a repository of copy-right free images that are available for you to use. You can also choose from images you have previously picked from Pixabay (3c).
4. After uploading your image, click on the Use this image button.
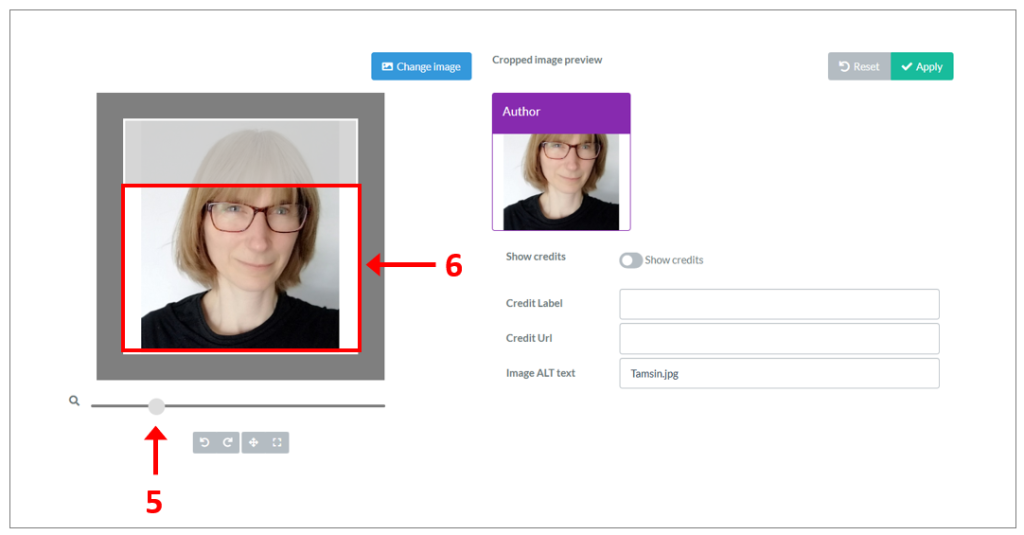
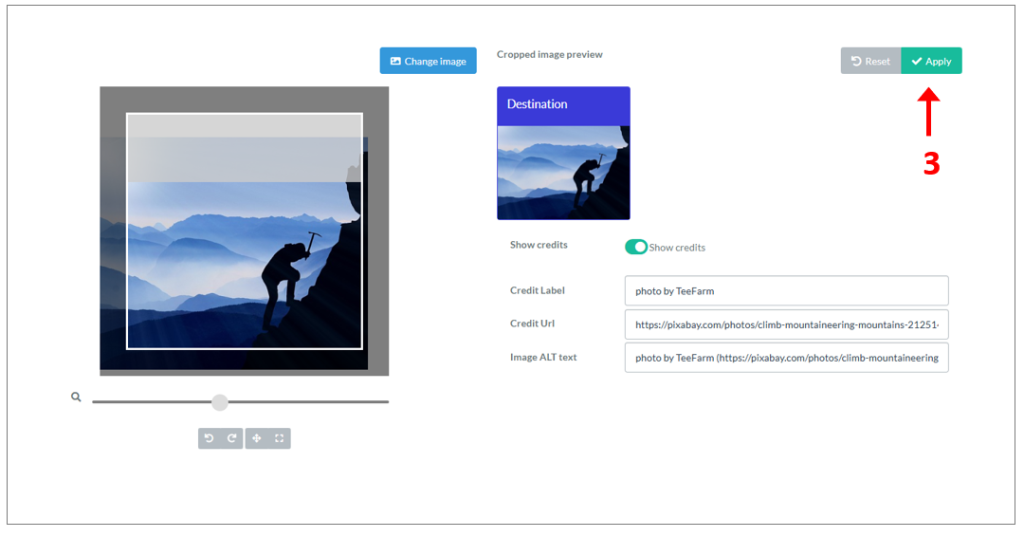
This will open your image in the image cropping tool. Here you can:
5. Resize the image using the resize scrollbar
6. Move the image (drag and drop it) so that the part you want to appear is showing in the focus area.
7. Click on Apply when you are happy with the cropped image preview.
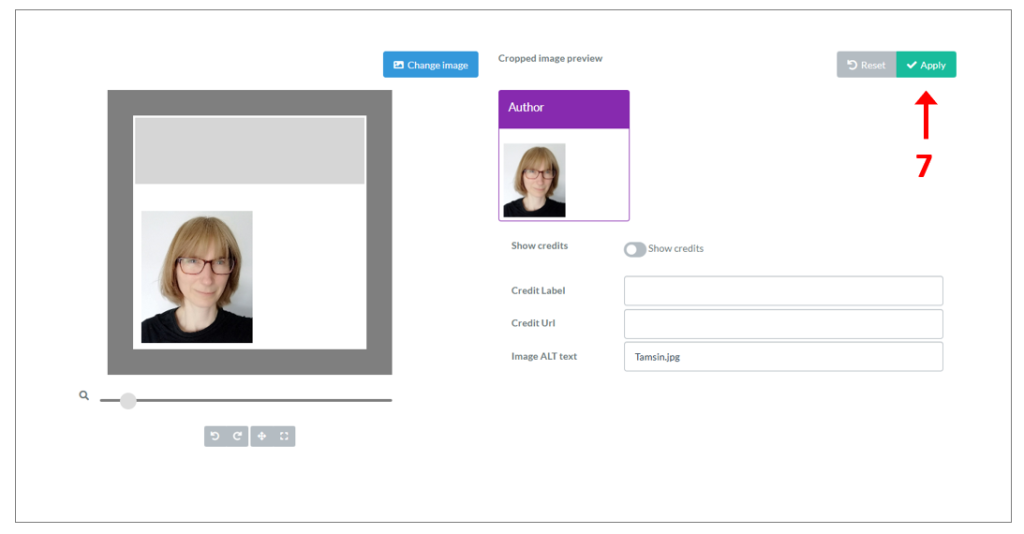
You will then return to the Editor.
When you pick an image then you will have the chance to crop and resize it.
1. You can resize the image using the resize scrollbar.
2. You can crop it by dragging and moving the image so that the area you want appears within the focus area.
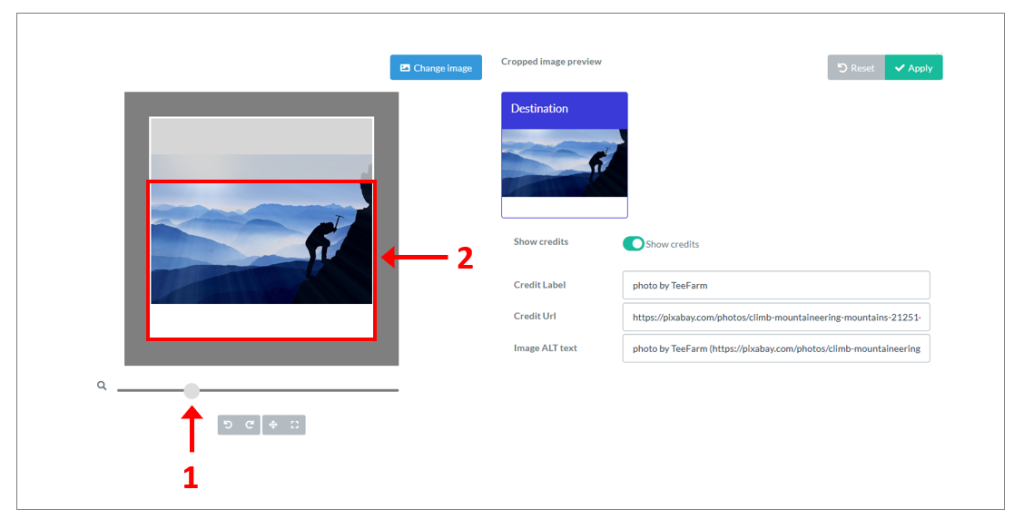
3. Click on Apply when you are happy with the cropped image preview.
You will then return to the Editor.
Creating and returning to edit your stack
You can always return to a tile that you have previously added to your stack and edit it. Open your stack in the editor then:
- Click on the edit icon on the tile that you want to edit. Note that the edit icon of the tile that is open for editing appears red.
- You can now make any changes you want to the content of the tile in the Settings tab
- And you can make any changes you want to the appearance of the tile in the Layout tab
You can can change the size, title bar colour and tile background image.
Click on the tile’s edit icon to show its settings then:
- Click on the Layout tab
- Within the Layout tab you can change the tile size
- tile colour
- and set or change the background image
Click on the tile’s edit icon to show its settings and layout tabs, then:
- Click on the Layout tab
- Click on the Set Image button.
This opens the image selector. Here you can:
3. Upload an image from your computer. If you do not have a suitable image to upload then you can also use the image search (3b) which connects to Pixabay to find an image. This is a repository of copy-right free images that are available for you to use. You can also choose from images you have previously picked from Pixabay (3c).
4. After uploading your image, click on the Use this image button.
This will open your image in the image cropping tool. Here you can:
5. Resize the image using the resize scrollbar
6. Move the image (drag and drop it) so that the part you want to appear is showing in the focus area.
7. Click on Apply when you are happy with the cropped image preview.
You will then return to the Editor.
When you pick an image then you will have the chance to crop and resize it.
1. You can resize the image using the resize scrollbar.
2. You can crop it by dragging and moving the image so that the area you want appears within the focus area.
3. Click on Apply when you are happy with the cropped image preview.
You will then return to the Editor.
Adding content to your stack using the Tile Library
You can always return to a tile that you have previously added to your stack and edit it. Open your stack in the editor then:
- Click on the edit icon on the tile that you want to edit. Note that the edit icon of the tile that is open for editing appears red.
- You can now make any changes you want to the content of the tile in the Settings tab
- And you can make any changes you want to the appearance of the tile in the Layout tab
You can can change the size, title bar colour and tile background image.
Click on the tile’s edit icon to show its settings then:
- Click on the Layout tab
- Within the Layout tab you can change the tile size
- tile colour
- and set or change the background image
Click on the tile’s edit icon to show its settings and layout tabs, then:
- Click on the Layout tab
- Click on the Set Image button.
This opens the image selector. Here you can:
3. Upload an image from your computer. If you do not have a suitable image to upload then you can also use the image search (3b) which connects to Pixabay to find an image. This is a repository of copy-right free images that are available for you to use. You can also choose from images you have previously picked from Pixabay (3c).
4. After uploading your image, click on the Use this image button.
This will open your image in the image cropping tool. Here you can:
5. Resize the image using the resize scrollbar
6. Move the image (drag and drop it) so that the part you want to appear is showing in the focus area.
7. Click on Apply when you are happy with the cropped image preview.
You will then return to the Editor.
When you pick an image then you will have the chance to crop and resize it.
1. You can resize the image using the resize scrollbar.
2. You can crop it by dragging and moving the image so that the area you want appears within the focus area.
3. Click on Apply when you are happy with the cropped image preview.
You will then return to the Editor.
Commonly used Tiles
You can always return to a tile that you have previously added to your stack and edit it. Open your stack in the editor then:
- Click on the edit icon on the tile that you want to edit. Note that the edit icon of the tile that is open for editing appears red.
- You can now make any changes you want to the content of the tile in the Settings tab
- And you can make any changes you want to the appearance of the tile in the Layout tab
You can can change the size, title bar colour and tile background image.
Click on the tile’s edit icon to show its settings then:
- Click on the Layout tab
- Within the Layout tab you can change the tile size
- tile colour
- and set or change the background image
Click on the tile’s edit icon to show its settings and layout tabs, then:
- Click on the Layout tab
- Click on the Set Image button.
This opens the image selector. Here you can:
3. Upload an image from your computer. If you do not have a suitable image to upload then you can also use the image search (3b) which connects to Pixabay to find an image. This is a repository of copy-right free images that are available for you to use. You can also choose from images you have previously picked from Pixabay (3c).
4. After uploading your image, click on the Use this image button.
This will open your image in the image cropping tool. Here you can:
5. Resize the image using the resize scrollbar
6. Move the image (drag and drop it) so that the part you want to appear is showing in the focus area.
7. Click on Apply when you are happy with the cropped image preview.
You will then return to the Editor.
When you pick an image then you will have the chance to crop and resize it.
1. You can resize the image using the resize scrollbar.
2. You can crop it by dragging and moving the image so that the area you want appears within the focus area.
3. Click on Apply when you are happy with the cropped image preview.
You will then return to the Editor.
Advanced Tiles
You can always return to a tile that you have previously added to your stack and edit it. Open your stack in the editor then:
- Click on the edit icon on the tile that you want to edit. Note that the edit icon of the tile that is open for editing appears red.
- You can now make any changes you want to the content of the tile in the Settings tab
- And you can make any changes you want to the appearance of the tile in the Layout tab
You can can change the size, title bar colour and tile background image.
Click on the tile’s edit icon to show its settings then:
- Click on the Layout tab
- Within the Layout tab you can change the tile size
- tile colour
- and set or change the background image
Click on the tile’s edit icon to show its settings and layout tabs, then:
- Click on the Layout tab
- Click on the Set Image button.
This opens the image selector. Here you can:
3. Upload an image from your computer. If you do not have a suitable image to upload then you can also use the image search (3b) which connects to Pixabay to find an image. This is a repository of copy-right free images that are available for you to use. You can also choose from images you have previously picked from Pixabay (3c).
4. After uploading your image, click on the Use this image button.
This will open your image in the image cropping tool. Here you can:
5. Resize the image using the resize scrollbar
6. Move the image (drag and drop it) so that the part you want to appear is showing in the focus area.
7. Click on Apply when you are happy with the cropped image preview.
You will then return to the Editor.
When you pick an image then you will have the chance to crop and resize it.
1. You can resize the image using the resize scrollbar.
2. You can crop it by dragging and moving the image so that the area you want appears within the focus area.
3. Click on Apply when you are happy with the cropped image preview.
You will then return to the Editor.
Editing Tiles
You can always return to a tile that you have previously added to your stack and edit it. Open your stack in the editor then:
- Click on the edit icon on the tile that you want to edit. Note that the edit icon of the tile that is open for editing appears red.
- You can now make any changes you want to the content of the tile in the Settings tab
- And you can make any changes you want to the appearance of the tile in the Layout tab
You can can change the size, title bar colour and tile background image.
Click on the tile’s edit icon to show its settings then:
- Click on the Layout tab
- Within the Layout tab you can change the tile size
- tile colour
- and set or change the background image
Click on the tile’s edit icon to show its settings and layout tabs, then:
- Click on the Layout tab
- Click on the Set Image button.
This opens the image selector. Here you can:
3. Upload an image from your computer. If you do not have a suitable image to upload then you can also use the image search (3b) which connects to Pixabay to find an image. This is a repository of copy-right free images that are available for you to use. You can also choose from images you have previously picked from Pixabay (3c).
4. After uploading your image, click on the Use this image button.
This will open your image in the image cropping tool. Here you can:
5. Resize the image using the resize scrollbar
6. Move the image (drag and drop it) so that the part you want to appear is showing in the focus area.
7. Click on Apply when you are happy with the cropped image preview.
You will then return to the Editor.
When you pick an image then you will have the chance to crop and resize it.
1. You can resize the image using the resize scrollbar.
2. You can crop it by dragging and moving the image so that the area you want appears within the focus area.
3. Click on Apply when you are happy with the cropped image preview.
You will then return to the Editor.
Changing the layout and appearance of a tile
You can always return to a tile that you have previously added to your stack and edit it. Open your stack in the editor then:
- Click on the edit icon on the tile that you want to edit. Note that the edit icon of the tile that is open for editing appears red.
- You can now make any changes you want to the content of the tile in the Settings tab
- And you can make any changes you want to the appearance of the tile in the Layout tab
You can can change the size, title bar colour and tile background image.
Click on the tile’s edit icon to show its settings then:
- Click on the Layout tab
- Within the Layout tab you can change the tile size
- tile colour
- and set or change the background image
Click on the tile’s edit icon to show its settings and layout tabs, then:
- Click on the Layout tab
- Click on the Set Image button.
This opens the image selector. Here you can:
3. Upload an image from your computer. If you do not have a suitable image to upload then you can also use the image search (3b) which connects to Pixabay to find an image. This is a repository of copy-right free images that are available for you to use. You can also choose from images you have previously picked from Pixabay (3c).
4. After uploading your image, click on the Use this image button.
This will open your image in the image cropping tool. Here you can:
5. Resize the image using the resize scrollbar
6. Move the image (drag and drop it) so that the part you want to appear is showing in the focus area.
7. Click on Apply when you are happy with the cropped image preview.
You will then return to the Editor.
When you pick an image then you will have the chance to crop and resize it.
1. You can resize the image using the resize scrollbar.
2. You can crop it by dragging and moving the image so that the area you want appears within the focus area.
3. Click on Apply when you are happy with the cropped image preview.
You will then return to the Editor.
Adding a PowerPoint file to your stack
You can always return to a tile that you have previously added to your stack and edit it. Open your stack in the editor then:
- Click on the edit icon on the tile that you want to edit. Note that the edit icon of the tile that is open for editing appears red.
- You can now make any changes you want to the content of the tile in the Settings tab
- And you can make any changes you want to the appearance of the tile in the Layout tab
You can can change the size, title bar colour and tile background image.
Click on the tile’s edit icon to show its settings then:
- Click on the Layout tab
- Within the Layout tab you can change the tile size
- tile colour
- and set or change the background image
Click on the tile’s edit icon to show its settings and layout tabs, then:
- Click on the Layout tab
- Click on the Set Image button.
This opens the image selector. Here you can:
3. Upload an image from your computer. If you do not have a suitable image to upload then you can also use the image search (3b) which connects to Pixabay to find an image. This is a repository of copy-right free images that are available for you to use. You can also choose from images you have previously picked from Pixabay (3c).
4. After uploading your image, click on the Use this image button.
This will open your image in the image cropping tool. Here you can:
5. Resize the image using the resize scrollbar
6. Move the image (drag and drop it) so that the part you want to appear is showing in the focus area.
7. Click on Apply when you are happy with the cropped image preview.
You will then return to the Editor.
When you pick an image then you will have the chance to crop and resize it.
1. You can resize the image using the resize scrollbar.
2. You can crop it by dragging and moving the image so that the area you want appears within the focus area.
3. Click on Apply when you are happy with the cropped image preview.
You will then return to the Editor.
Adding a video to your stack
You can always return to a tile that you have previously added to your stack and edit it. Open your stack in the editor then:
- Click on the edit icon on the tile that you want to edit. Note that the edit icon of the tile that is open for editing appears red.
- You can now make any changes you want to the content of the tile in the Settings tab
- And you can make any changes you want to the appearance of the tile in the Layout tab
You can can change the size, title bar colour and tile background image.
Click on the tile’s edit icon to show its settings then:
- Click on the Layout tab
- Within the Layout tab you can change the tile size
- tile colour
- and set or change the background image
Click on the tile’s edit icon to show its settings and layout tabs, then:
- Click on the Layout tab
- Click on the Set Image button.
This opens the image selector. Here you can:
3. Upload an image from your computer. If you do not have a suitable image to upload then you can also use the image search (3b) which connects to Pixabay to find an image. This is a repository of copy-right free images that are available for you to use. You can also choose from images you have previously picked from Pixabay (3c).
4. After uploading your image, click on the Use this image button.
This will open your image in the image cropping tool. Here you can:
5. Resize the image using the resize scrollbar
6. Move the image (drag and drop it) so that the part you want to appear is showing in the focus area.
7. Click on Apply when you are happy with the cropped image preview.
You will then return to the Editor.
When you pick an image then you will have the chance to crop and resize it.
1. You can resize the image using the resize scrollbar.
2. You can crop it by dragging and moving the image so that the area you want appears within the focus area.
3. Click on Apply when you are happy with the cropped image preview.
You will then return to the Editor.
Adding an extra screen/layer to your stack
You can always return to a tile that you have previously added to your stack and edit it. Open your stack in the editor then:
- Click on the edit icon on the tile that you want to edit. Note that the edit icon of the tile that is open for editing appears red.
- You can now make any changes you want to the content of the tile in the Settings tab
- And you can make any changes you want to the appearance of the tile in the Layout tab
You can can change the size, title bar colour and tile background image.
Click on the tile’s edit icon to show its settings then:
- Click on the Layout tab
- Within the Layout tab you can change the tile size
- tile colour
- and set or change the background image
Click on the tile’s edit icon to show its settings and layout tabs, then:
- Click on the Layout tab
- Click on the Set Image button.
This opens the image selector. Here you can:
3. Upload an image from your computer. If you do not have a suitable image to upload then you can also use the image search (3b) which connects to Pixabay to find an image. This is a repository of copy-right free images that are available for you to use. You can also choose from images you have previously picked from Pixabay (3c).
4. After uploading your image, click on the Use this image button.
This will open your image in the image cropping tool. Here you can:
5. Resize the image using the resize scrollbar
6. Move the image (drag and drop it) so that the part you want to appear is showing in the focus area.
7. Click on Apply when you are happy with the cropped image preview.
You will then return to the Editor.
When you pick an image then you will have the chance to crop and resize it.
1. You can resize the image using the resize scrollbar.
2. You can crop it by dragging and moving the image so that the area you want appears within the focus area.
3. Click on Apply when you are happy with the cropped image preview.
You will then return to the Editor.
Restrictions on what can be included in your stack
You can always return to a tile that you have previously added to your stack and edit it. Open your stack in the editor then:
- Click on the edit icon on the tile that you want to edit. Note that the edit icon of the tile that is open for editing appears red.
- You can now make any changes you want to the content of the tile in the Settings tab
- And you can make any changes you want to the appearance of the tile in the Layout tab
You can can change the size, title bar colour and tile background image.
Click on the tile’s edit icon to show its settings then:
- Click on the Layout tab
- Within the Layout tab you can change the tile size
- tile colour
- and set or change the background image
Click on the tile’s edit icon to show its settings and layout tabs, then:
- Click on the Layout tab
- Click on the Set Image button.
This opens the image selector. Here you can:
3. Upload an image from your computer. If you do not have a suitable image to upload then you can also use the image search (3b) which connects to Pixabay to find an image. This is a repository of copy-right free images that are available for you to use. You can also choose from images you have previously picked from Pixabay (3c).
4. After uploading your image, click on the Use this image button.
This will open your image in the image cropping tool. Here you can:
5. Resize the image using the resize scrollbar
6. Move the image (drag and drop it) so that the part you want to appear is showing in the focus area.
7. Click on Apply when you are happy with the cropped image preview.
You will then return to the Editor.
When you pick an image then you will have the chance to crop and resize it.
1. You can resize the image using the resize scrollbar.
2. You can crop it by dragging and moving the image so that the area you want appears within the focus area.
3. Click on Apply when you are happy with the cropped image preview.
You will then return to the Editor.
Restoring your deleted stack
You can always return to a tile that you have previously added to your stack and edit it. Open your stack in the editor then:
- Click on the edit icon on the tile that you want to edit. Note that the edit icon of the tile that is open for editing appears red.
- You can now make any changes you want to the content of the tile in the Settings tab
- And you can make any changes you want to the appearance of the tile in the Layout tab
You can can change the size, title bar colour and tile background image.
Click on the tile’s edit icon to show its settings then:
- Click on the Layout tab
- Within the Layout tab you can change the tile size
- tile colour
- and set or change the background image
Click on the tile’s edit icon to show its settings and layout tabs, then:
- Click on the Layout tab
- Click on the Set Image button.
This opens the image selector. Here you can:
3. Upload an image from your computer. If you do not have a suitable image to upload then you can also use the image search (3b) which connects to Pixabay to find an image. This is a repository of copy-right free images that are available for you to use. You can also choose from images you have previously picked from Pixabay (3c).
4. After uploading your image, click on the Use this image button.
This will open your image in the image cropping tool. Here you can:
5. Resize the image using the resize scrollbar
6. Move the image (drag and drop it) so that the part you want to appear is showing in the focus area.
7. Click on Apply when you are happy with the cropped image preview.
You will then return to the Editor.
When you pick an image then you will have the chance to crop and resize it.
1. You can resize the image using the resize scrollbar.
2. You can crop it by dragging and moving the image so that the area you want appears within the focus area.
3. Click on Apply when you are happy with the cropped image preview.
You will then return to the Editor.
Previewing and checking your stack
You can always return to a tile that you have previously added to your stack and edit it. Open your stack in the editor then:
- Click on the edit icon on the tile that you want to edit. Note that the edit icon of the tile that is open for editing appears red.
- You can now make any changes you want to the content of the tile in the Settings tab
- And you can make any changes you want to the appearance of the tile in the Layout tab
You can can change the size, title bar colour and tile background image.
Click on the tile’s edit icon to show its settings then:
- Click on the Layout tab
- Within the Layout tab you can change the tile size
- tile colour
- and set or change the background image
Click on the tile’s edit icon to show its settings and layout tabs, then:
- Click on the Layout tab
- Click on the Set Image button.
This opens the image selector. Here you can:
3. Upload an image from your computer. If you do not have a suitable image to upload then you can also use the image search (3b) which connects to Pixabay to find an image. This is a repository of copy-right free images that are available for you to use. You can also choose from images you have previously picked from Pixabay (3c).
4. After uploading your image, click on the Use this image button.
This will open your image in the image cropping tool. Here you can:
5. Resize the image using the resize scrollbar
6. Move the image (drag and drop it) so that the part you want to appear is showing in the focus area.
7. Click on Apply when you are happy with the cropped image preview.
You will then return to the Editor.
When you pick an image then you will have the chance to crop and resize it.
1. You can resize the image using the resize scrollbar.
2. You can crop it by dragging and moving the image so that the area you want appears within the focus area.
3. Click on Apply when you are happy with the cropped image preview.
You will then return to the Editor.
Creating the summary poster
An option often used by onsite conferences to promote your ePoster / stack onsite.
You can always return to a tile that you have previously added to your stack and edit it. Open your stack in the editor then:
- Click on the edit icon on the tile that you want to edit. Note that the edit icon of the tile that is open for editing appears red.
- You can now make any changes you want to the content of the tile in the Settings tab
- And you can make any changes you want to the appearance of the tile in the Layout tab
You can can change the size, title bar colour and tile background image.
Click on the tile’s edit icon to show its settings then:
- Click on the Layout tab
- Within the Layout tab you can change the tile size
- tile colour
- and set or change the background image
Click on the tile’s edit icon to show its settings and layout tabs, then:
- Click on the Layout tab
- Click on the Set Image button.
This opens the image selector. Here you can:
3. Upload an image from your computer. If you do not have a suitable image to upload then you can also use the image search (3b) which connects to Pixabay to find an image. This is a repository of copy-right free images that are available for you to use. You can also choose from images you have previously picked from Pixabay (3c).
4. After uploading your image, click on the Use this image button.
This will open your image in the image cropping tool. Here you can:
5. Resize the image using the resize scrollbar
6. Move the image (drag and drop it) so that the part you want to appear is showing in the focus area.
7. Click on Apply when you are happy with the cropped image preview.
You will then return to the Editor.
When you pick an image then you will have the chance to crop and resize it.
1. You can resize the image using the resize scrollbar.
2. You can crop it by dragging and moving the image so that the area you want appears within the focus area.
3. Click on Apply when you are happy with the cropped image preview.
You will then return to the Editor.
Your stack on the showcase website
You can always return to a tile that you have previously added to your stack and edit it. Open your stack in the editor then:
- Click on the edit icon on the tile that you want to edit. Note that the edit icon of the tile that is open for editing appears red.
- You can now make any changes you want to the content of the tile in the Settings tab
- And you can make any changes you want to the appearance of the tile in the Layout tab
You can can change the size, title bar colour and tile background image.
Click on the tile’s edit icon to show its settings then:
- Click on the Layout tab
- Within the Layout tab you can change the tile size
- tile colour
- and set or change the background image
Click on the tile’s edit icon to show its settings and layout tabs, then:
- Click on the Layout tab
- Click on the Set Image button.
This opens the image selector. Here you can:
3. Upload an image from your computer. If you do not have a suitable image to upload then you can also use the image search (3b) which connects to Pixabay to find an image. This is a repository of copy-right free images that are available for you to use. You can also choose from images you have previously picked from Pixabay (3c).
4. After uploading your image, click on the Use this image button.
This will open your image in the image cropping tool. Here you can:
5. Resize the image using the resize scrollbar
6. Move the image (drag and drop it) so that the part you want to appear is showing in the focus area.
7. Click on Apply when you are happy with the cropped image preview.
You will then return to the Editor.
When you pick an image then you will have the chance to crop and resize it.
1. You can resize the image using the resize scrollbar.
2. You can crop it by dragging and moving the image so that the area you want appears within the focus area.
3. Click on Apply when you are happy with the cropped image preview.
You will then return to the Editor.
Marking your stack as ready to publish to the showcase
You can always return to a tile that you have previously added to your stack and edit it. Open your stack in the editor then:
- Click on the edit icon on the tile that you want to edit. Note that the edit icon of the tile that is open for editing appears red.
- You can now make any changes you want to the content of the tile in the Settings tab
- And you can make any changes you want to the appearance of the tile in the Layout tab
You can can change the size, title bar colour and tile background image.
Click on the tile’s edit icon to show its settings then:
- Click on the Layout tab
- Within the Layout tab you can change the tile size
- tile colour
- and set or change the background image
Click on the tile’s edit icon to show its settings and layout tabs, then:
- Click on the Layout tab
- Click on the Set Image button.
This opens the image selector. Here you can:
3. Upload an image from your computer. If you do not have a suitable image to upload then you can also use the image search (3b) which connects to Pixabay to find an image. This is a repository of copy-right free images that are available for you to use. You can also choose from images you have previously picked from Pixabay (3c).
4. After uploading your image, click on the Use this image button.
This will open your image in the image cropping tool. Here you can:
5. Resize the image using the resize scrollbar
6. Move the image (drag and drop it) so that the part you want to appear is showing in the focus area.
7. Click on Apply when you are happy with the cropped image preview.
You will then return to the Editor.
When you pick an image then you will have the chance to crop and resize it.
1. You can resize the image using the resize scrollbar.
2. You can crop it by dragging and moving the image so that the area you want appears within the focus area.
3. Click on Apply when you are happy with the cropped image preview.
You will then return to the Editor.
Presenting your stack (General advice)
You can always return to a tile that you have previously added to your stack and edit it. Open your stack in the editor then:
- Click on the edit icon on the tile that you want to edit. Note that the edit icon of the tile that is open for editing appears red.
- You can now make any changes you want to the content of the tile in the Settings tab
- And you can make any changes you want to the appearance of the tile in the Layout tab
You can can change the size, title bar colour and tile background image.
Click on the tile’s edit icon to show its settings then:
- Click on the Layout tab
- Within the Layout tab you can change the tile size
- tile colour
- and set or change the background image
Click on the tile’s edit icon to show its settings and layout tabs, then:
- Click on the Layout tab
- Click on the Set Image button.
This opens the image selector. Here you can:
3. Upload an image from your computer. If you do not have a suitable image to upload then you can also use the image search (3b) which connects to Pixabay to find an image. This is a repository of copy-right free images that are available for you to use. You can also choose from images you have previously picked from Pixabay (3c).
4. After uploading your image, click on the Use this image button.
This will open your image in the image cropping tool. Here you can:
5. Resize the image using the resize scrollbar
6. Move the image (drag and drop it) so that the part you want to appear is showing in the focus area.
7. Click on Apply when you are happy with the cropped image preview.
You will then return to the Editor.
When you pick an image then you will have the chance to crop and resize it.
1. You can resize the image using the resize scrollbar.
2. You can crop it by dragging and moving the image so that the area you want appears within the focus area.
3. Click on Apply when you are happy with the cropped image preview.
You will then return to the Editor.
Engaging with the viewers of your stacks
You can always return to a tile that you have previously added to your stack and edit it. Open your stack in the editor then:
- Click on the edit icon on the tile that you want to edit. Note that the edit icon of the tile that is open for editing appears red.
- You can now make any changes you want to the content of the tile in the Settings tab
- And you can make any changes you want to the appearance of the tile in the Layout tab
You can can change the size, title bar colour and tile background image.
Click on the tile’s edit icon to show its settings then:
- Click on the Layout tab
- Within the Layout tab you can change the tile size
- tile colour
- and set or change the background image
Click on the tile’s edit icon to show its settings and layout tabs, then:
- Click on the Layout tab
- Click on the Set Image button.
This opens the image selector. Here you can:
3. Upload an image from your computer. If you do not have a suitable image to upload then you can also use the image search (3b) which connects to Pixabay to find an image. This is a repository of copy-right free images that are available for you to use. You can also choose from images you have previously picked from Pixabay (3c).
4. After uploading your image, click on the Use this image button.
This will open your image in the image cropping tool. Here you can:
5. Resize the image using the resize scrollbar
6. Move the image (drag and drop it) so that the part you want to appear is showing in the focus area.
7. Click on Apply when you are happy with the cropped image preview.
You will then return to the Editor.
When you pick an image then you will have the chance to crop and resize it.
1. You can resize the image using the resize scrollbar.
2. You can crop it by dragging and moving the image so that the area you want appears within the focus area.
3. Click on Apply when you are happy with the cropped image preview.
You will then return to the Editor.
Using templates
You can always return to a tile that you have previously added to your stack and edit it. Open your stack in the editor then:
- Click on the edit icon on the tile that you want to edit. Note that the edit icon of the tile that is open for editing appears red.
- You can now make any changes you want to the content of the tile in the Settings tab
- And you can make any changes you want to the appearance of the tile in the Layout tab
You can can change the size, title bar colour and tile background image.
Click on the tile’s edit icon to show its settings then:
- Click on the Layout tab
- Within the Layout tab you can change the tile size
- tile colour
- and set or change the background image
Click on the tile’s edit icon to show its settings and layout tabs, then:
- Click on the Layout tab
- Click on the Set Image button.
This opens the image selector. Here you can:
3. Upload an image from your computer. If you do not have a suitable image to upload then you can also use the image search (3b) which connects to Pixabay to find an image. This is a repository of copy-right free images that are available for you to use. You can also choose from images you have previously picked from Pixabay (3c).
4. After uploading your image, click on the Use this image button.
This will open your image in the image cropping tool. Here you can:
5. Resize the image using the resize scrollbar
6. Move the image (drag and drop it) so that the part you want to appear is showing in the focus area.
7. Click on Apply when you are happy with the cropped image preview.
You will then return to the Editor.
When you pick an image then you will have the chance to crop and resize it.
1. You can resize the image using the resize scrollbar.
2. You can crop it by dragging and moving the image so that the area you want appears within the focus area.
3. Click on Apply when you are happy with the cropped image preview.
You will then return to the Editor.
Editing your account
You can always return to a tile that you have previously added to your stack and edit it. Open your stack in the editor then:
- Click on the edit icon on the tile that you want to edit. Note that the edit icon of the tile that is open for editing appears red.
- You can now make any changes you want to the content of the tile in the Settings tab
- And you can make any changes you want to the appearance of the tile in the Layout tab
You can can change the size, title bar colour and tile background image.
Click on the tile’s edit icon to show its settings then:
- Click on the Layout tab
- Within the Layout tab you can change the tile size
- tile colour
- and set or change the background image
Click on the tile’s edit icon to show its settings and layout tabs, then:
- Click on the Layout tab
- Click on the Set Image button.
This opens the image selector. Here you can:
3. Upload an image from your computer. If you do not have a suitable image to upload then you can also use the image search (3b) which connects to Pixabay to find an image. This is a repository of copy-right free images that are available for you to use. You can also choose from images you have previously picked from Pixabay (3c).
4. After uploading your image, click on the Use this image button.
This will open your image in the image cropping tool. Here you can:
5. Resize the image using the resize scrollbar
6. Move the image (drag and drop it) so that the part you want to appear is showing in the focus area.
7. Click on Apply when you are happy with the cropped image preview.
You will then return to the Editor.
When you pick an image then you will have the chance to crop and resize it.
1. You can resize the image using the resize scrollbar.
2. You can crop it by dragging and moving the image so that the area you want appears within the focus area.
3. Click on Apply when you are happy with the cropped image preview.
You will then return to the Editor.
Managing your stack
You can always return to a tile that you have previously added to your stack and edit it. Open your stack in the editor then:
- Click on the edit icon on the tile that you want to edit. Note that the edit icon of the tile that is open for editing appears red.
- You can now make any changes you want to the content of the tile in the Settings tab
- And you can make any changes you want to the appearance of the tile in the Layout tab
You can can change the size, title bar colour and tile background image.
Click on the tile’s edit icon to show its settings then:
- Click on the Layout tab
- Within the Layout tab you can change the tile size
- tile colour
- and set or change the background image
Click on the tile’s edit icon to show its settings and layout tabs, then:
- Click on the Layout tab
- Click on the Set Image button.
This opens the image selector. Here you can:
3. Upload an image from your computer. If you do not have a suitable image to upload then you can also use the image search (3b) which connects to Pixabay to find an image. This is a repository of copy-right free images that are available for you to use. You can also choose from images you have previously picked from Pixabay (3c).
4. After uploading your image, click on the Use this image button.
This will open your image in the image cropping tool. Here you can:
5. Resize the image using the resize scrollbar
6. Move the image (drag and drop it) so that the part you want to appear is showing in the focus area.
7. Click on Apply when you are happy with the cropped image preview.
You will then return to the Editor.
When you pick an image then you will have the chance to crop and resize it.
1. You can resize the image using the resize scrollbar.
2. You can crop it by dragging and moving the image so that the area you want appears within the focus area.
3. Click on Apply when you are happy with the cropped image preview.
You will then return to the Editor.