Contents
- Invitation links and getting started
- Creating and returning to edit your stack
- Adding content to your stack using the Tile Library
- Co-authors
- Editing a Tile
- Changing the layout and appearance of a Tile
- Adding a PowerPoint to your stack
- Adding a video to your stack
- Adding an extra screen to your stack
- Restoring a deleted stack
- Previewing and checking your stack
- Restrictions on what can be included in your stack
- Creating the summary poster
- Your stack on the showcase website
- Marking your stack as ready to publish
- Presenting your stack (general guidance)
- Exploring and sharing published stacks
- Engaging with the viewers of your stack
- Using templates
- Editing your account
- Managing your stack
Invitation links and getting started
The File Tile is used to add a file to your stack.
Why use the File Tile?
Authors often use the File Tile to add files that help to present their work (powerpoint, video or PDF) or documents that give background material on their work (report, survey, guidelines, case study, handbook). The tile titled Presentation in this example stack is a File Tile.
What file types can be added?
The file types that can be added include: PowerPoint files (.pptx .ppt), Word documents (.docx .doc), PDF files (.pdf), videos (most formats), audio files (most formats), image files (most formats).
Restrictions
Please note that uploaded PowerPoint and Word files are converted into PDF files so that they can be viewed within the in-built PDF viewer. This does mean that animations, narrations and embedded videos in a PowerPoint file will not work when viewed in the in-built PDF viewer, since it is showing the PDF version of the file. However, viewers can download the original file from the tile (if you have allowed that) and open it outside Learning Toolbox. See this FAQ for more advice on how to turn your narrated PowerPoint file into an MP4 video file that can then be added and played in Learning Toolbox.
Please note there is a 400MB file size limit on files uploaded using the File Tile. If your file is a video and is above this size then we recommend that you upload it to a video sharing site such as YouTube or Vimeo and then use the Online Content Tile to link to it.
Using the File Tile
Drag and drop a File Tile from the Tile Library into your stack (1). In the Settings tab, give your tile a title (2) and then click in the Add File box (3) and choose the file to add from your computer.
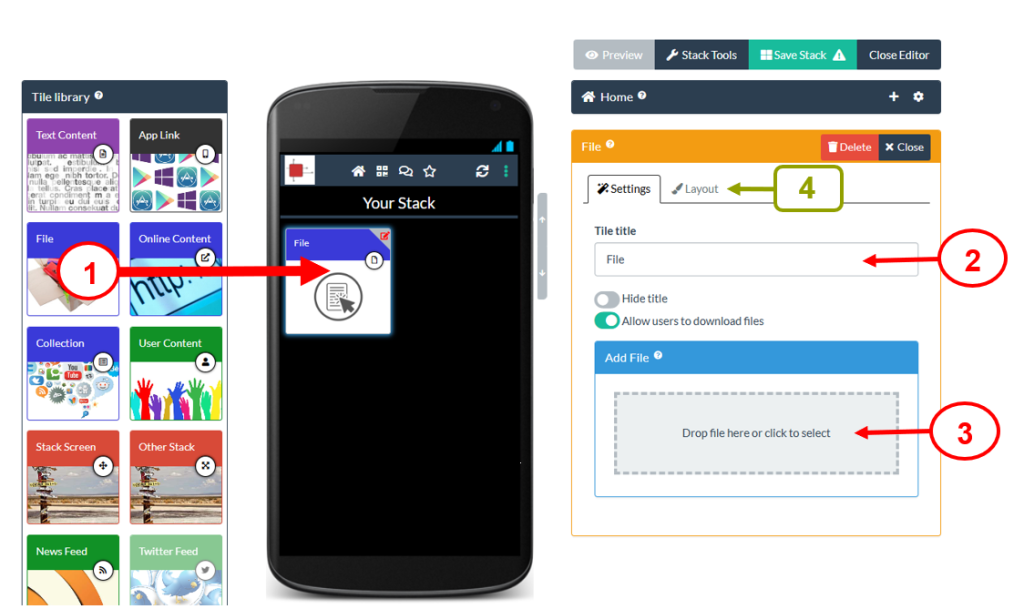
The file will be uploaded and will be processed. This processing makes sure that your file is viewable and produces a background image for your tile.
If you only want viewers to view the file but do not want them to be able to download it then you should switch off the download button.
If you want to use a different background image for your tile or make any other appearance changes to your tile then you can do that in the Layout Tab (4).
Remember to Save your stack after you have added new information.
The Online Content Tile is used to link to a web page or online resource.
Why use the Online Content Tile?
Authors often use the Online Content Tile to link to their professional profile (LinkedIn, ResearchGate or staff page), their organisation or project’s web page, a video they have uploaded to YouTube or Vimeo, online references and papers related to their work or to link to another online resource that they have created. The Tiles titled University of Leeds and LRF19 Keynote in this example stack are both Online Content Tiles.
Using the Online Content Tile
Drag and drop an Online Content Tile from the Tile Library into your stack (1). In the Settings tab, give your tile a title (2) and and then type (or paste in) the link to the webpage you want to use and click Add (3).

The tile will be linked to that webpage and (if the website passes us this information) a background image and description will be added to the tile.
If you want to use a different background image for your tile or make any other appearance changes to your tile then you can do that in the Layout Tab (3).
Remember to Save your stack after you have added new information.
The Text Content Tile is used to add text content to your stack. It also allows you to do some basic formatting of that text and include images and weblinks in the text.
Why use the Text Content Tile?
Authors often use the Text Tile add an abstract, introduction or key messages to their stack. The tile titled Abstract in this example stack is a Text Content Tile.
Using the Text Content Tile
Drag and drop an Text Content Tile from the Tile Library into your stack (1) and in the content box (2) you can then add your text. The formatting buttons (at the top of content box) allow you to format the text and even add images or weblinks.
You should give the Tile a meaningful title (3). You can also change the layout of the tile (size, colour and background image) by clicking on the Layout tab (4).
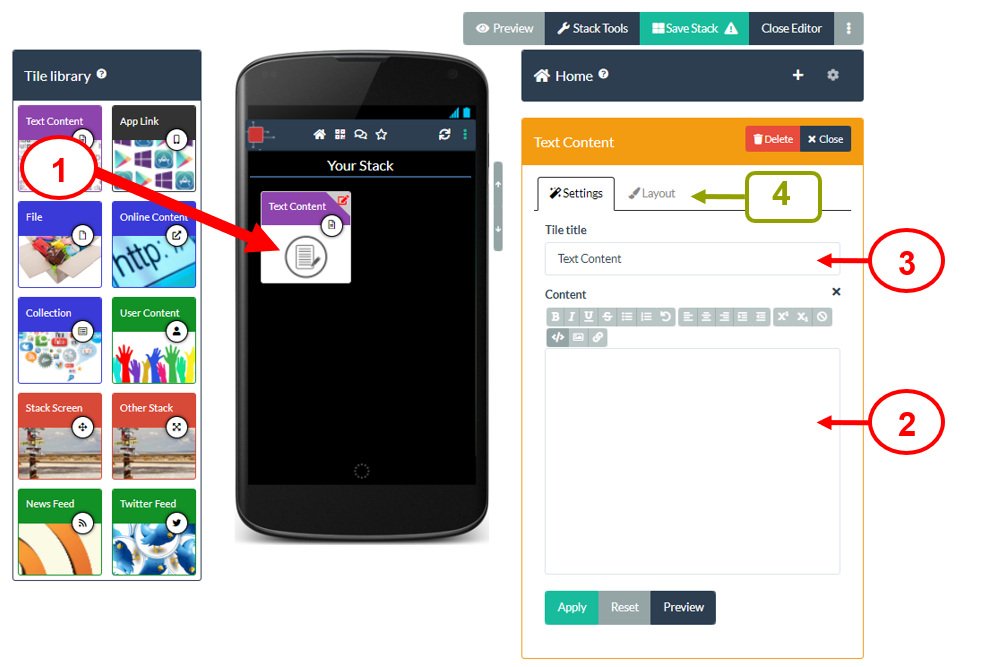
Remember to Save your stack after you have added new content.
Creating and returning to edit your stack
The File Tile is used to add a file to your stack.
Why use the File Tile?
Authors often use the File Tile to add files that help to present their work (powerpoint, video or PDF) or documents that give background material on their work (report, survey, guidelines, case study, handbook). The tile titled Presentation in this example stack is a File Tile.
What file types can be added?
The file types that can be added include: PowerPoint files (.pptx .ppt), Word documents (.docx .doc), PDF files (.pdf), videos (most formats), audio files (most formats), image files (most formats).
Restrictions
Please note that uploaded PowerPoint and Word files are converted into PDF files so that they can be viewed within the in-built PDF viewer. This does mean that animations, narrations and embedded videos in a PowerPoint file will not work when viewed in the in-built PDF viewer, since it is showing the PDF version of the file. However, viewers can download the original file from the tile (if you have allowed that) and open it outside Learning Toolbox. See this FAQ for more advice on how to turn your narrated PowerPoint file into an MP4 video file that can then be added and played in Learning Toolbox.
Please note there is a 400MB file size limit on files uploaded using the File Tile. If your file is a video and is above this size then we recommend that you upload it to a video sharing site such as YouTube or Vimeo and then use the Online Content Tile to link to it.
Using the File Tile
Drag and drop a File Tile from the Tile Library into your stack (1). In the Settings tab, give your tile a title (2) and then click in the Add File box (3) and choose the file to add from your computer.
The file will be uploaded and will be processed. This processing makes sure that your file is viewable and produces a background image for your tile.
If you only want viewers to view the file but do not want them to be able to download it then you should switch off the download button.
If you want to use a different background image for your tile or make any other appearance changes to your tile then you can do that in the Layout Tab (4).
Remember to Save your stack after you have added new information.
The Online Content Tile is used to link to a web page or online resource.
Why use the Online Content Tile?
Authors often use the Online Content Tile to link to their professional profile (LinkedIn, ResearchGate or staff page), their organisation or project’s web page, a video they have uploaded to YouTube or Vimeo, online references and papers related to their work or to link to another online resource that they have created. The Tiles titled University of Leeds and LRF19 Keynote in this example stack are both Online Content Tiles.
Using the Online Content Tile
Drag and drop an Online Content Tile from the Tile Library into your stack (1). In the Settings tab, give your tile a title (2) and and then type (or paste in) the link to the webpage you want to use and click Add (3).
The tile will be linked to that webpage and (if the website passes us this information) a background image and description will be added to the tile.
If you want to use a different background image for your tile or make any other appearance changes to your tile then you can do that in the Layout Tab (3).
Remember to Save your stack after you have added new information.
The Text Content Tile is used to add text content to your stack. It also allows you to do some basic formatting of that text and include images and weblinks in the text.
Why use the Text Content Tile?
Authors often use the Text Tile add an abstract, introduction or key messages to their stack. The tile titled Abstract in this example stack is a Text Content Tile.
Using the Text Content Tile
Drag and drop an Text Content Tile from the Tile Library into your stack (1) and in the content box (2) you can then add your text. The formatting buttons (at the top of content box) allow you to format the text and even add images or weblinks.
You should give the Tile a meaningful title (3). You can also change the layout of the tile (size, colour and background image) by clicking on the Layout tab (4).
Remember to Save your stack after you have added new content.
Adding content to your stack using the Tile Library
The File Tile is used to add a file to your stack.
Why use the File Tile?
Authors often use the File Tile to add files that help to present their work (powerpoint, video or PDF) or documents that give background material on their work (report, survey, guidelines, case study, handbook). The tile titled Presentation in this example stack is a File Tile.
What file types can be added?
The file types that can be added include: PowerPoint files (.pptx .ppt), Word documents (.docx .doc), PDF files (.pdf), videos (most formats), audio files (most formats), image files (most formats).
Restrictions
Please note that uploaded PowerPoint and Word files are converted into PDF files so that they can be viewed within the in-built PDF viewer. This does mean that animations, narrations and embedded videos in a PowerPoint file will not work when viewed in the in-built PDF viewer, since it is showing the PDF version of the file. However, viewers can download the original file from the tile (if you have allowed that) and open it outside Learning Toolbox. See this FAQ for more advice on how to turn your narrated PowerPoint file into an MP4 video file that can then be added and played in Learning Toolbox.
Please note there is a 400MB file size limit on files uploaded using the File Tile. If your file is a video and is above this size then we recommend that you upload it to a video sharing site such as YouTube or Vimeo and then use the Online Content Tile to link to it.
Using the File Tile
Drag and drop a File Tile from the Tile Library into your stack (1). In the Settings tab, give your tile a title (2) and then click in the Add File box (3) and choose the file to add from your computer.
The file will be uploaded and will be processed. This processing makes sure that your file is viewable and produces a background image for your tile.
If you only want viewers to view the file but do not want them to be able to download it then you should switch off the download button.
If you want to use a different background image for your tile or make any other appearance changes to your tile then you can do that in the Layout Tab (4).
Remember to Save your stack after you have added new information.
The Online Content Tile is used to link to a web page or online resource.
Why use the Online Content Tile?
Authors often use the Online Content Tile to link to their professional profile (LinkedIn, ResearchGate or staff page), their organisation or project’s web page, a video they have uploaded to YouTube or Vimeo, online references and papers related to their work or to link to another online resource that they have created. The Tiles titled University of Leeds and LRF19 Keynote in this example stack are both Online Content Tiles.
Using the Online Content Tile
Drag and drop an Online Content Tile from the Tile Library into your stack (1). In the Settings tab, give your tile a title (2) and and then type (or paste in) the link to the webpage you want to use and click Add (3).
The tile will be linked to that webpage and (if the website passes us this information) a background image and description will be added to the tile.
If you want to use a different background image for your tile or make any other appearance changes to your tile then you can do that in the Layout Tab (3).
Remember to Save your stack after you have added new information.
The Text Content Tile is used to add text content to your stack. It also allows you to do some basic formatting of that text and include images and weblinks in the text.
Why use the Text Content Tile?
Authors often use the Text Tile add an abstract, introduction or key messages to their stack. The tile titled Abstract in this example stack is a Text Content Tile.
Using the Text Content Tile
Drag and drop an Text Content Tile from the Tile Library into your stack (1) and in the content box (2) you can then add your text. The formatting buttons (at the top of content box) allow you to format the text and even add images or weblinks.
You should give the Tile a meaningful title (3). You can also change the layout of the tile (size, colour and background image) by clicking on the Layout tab (4).
Remember to Save your stack after you have added new content.
Commonly used Tiles
The File Tile is used to add a file to your stack.
Why use the File Tile?
Authors often use the File Tile to add files that help to present their work (powerpoint, video or PDF) or documents that give background material on their work (report, survey, guidelines, case study, handbook). The tile titled Presentation in this example stack is a File Tile.
What file types can be added?
The file types that can be added include: PowerPoint files (.pptx .ppt), Word documents (.docx .doc), PDF files (.pdf), videos (most formats), audio files (most formats), image files (most formats).
Restrictions
Please note that uploaded PowerPoint and Word files are converted into PDF files so that they can be viewed within the in-built PDF viewer. This does mean that animations, narrations and embedded videos in a PowerPoint file will not work when viewed in the in-built PDF viewer, since it is showing the PDF version of the file. However, viewers can download the original file from the tile (if you have allowed that) and open it outside Learning Toolbox. See this FAQ for more advice on how to turn your narrated PowerPoint file into an MP4 video file that can then be added and played in Learning Toolbox.
Please note there is a 400MB file size limit on files uploaded using the File Tile. If your file is a video and is above this size then we recommend that you upload it to a video sharing site such as YouTube or Vimeo and then use the Online Content Tile to link to it.
Using the File Tile
Drag and drop a File Tile from the Tile Library into your stack (1). In the Settings tab, give your tile a title (2) and then click in the Add File box (3) and choose the file to add from your computer.
The file will be uploaded and will be processed. This processing makes sure that your file is viewable and produces a background image for your tile.
If you only want viewers to view the file but do not want them to be able to download it then you should switch off the download button.
If you want to use a different background image for your tile or make any other appearance changes to your tile then you can do that in the Layout Tab (4).
Remember to Save your stack after you have added new information.
The Online Content Tile is used to link to a web page or online resource.
Why use the Online Content Tile?
Authors often use the Online Content Tile to link to their professional profile (LinkedIn, ResearchGate or staff page), their organisation or project’s web page, a video they have uploaded to YouTube or Vimeo, online references and papers related to their work or to link to another online resource that they have created. The Tiles titled University of Leeds and LRF19 Keynote in this example stack are both Online Content Tiles.
Using the Online Content Tile
Drag and drop an Online Content Tile from the Tile Library into your stack (1). In the Settings tab, give your tile a title (2) and and then type (or paste in) the link to the webpage you want to use and click Add (3).
The tile will be linked to that webpage and (if the website passes us this information) a background image and description will be added to the tile.
If you want to use a different background image for your tile or make any other appearance changes to your tile then you can do that in the Layout Tab (3).
Remember to Save your stack after you have added new information.
The Text Content Tile is used to add text content to your stack. It also allows you to do some basic formatting of that text and include images and weblinks in the text.
Why use the Text Content Tile?
Authors often use the Text Tile add an abstract, introduction or key messages to their stack. The tile titled Abstract in this example stack is a Text Content Tile.
Using the Text Content Tile
Drag and drop an Text Content Tile from the Tile Library into your stack (1) and in the content box (2) you can then add your text. The formatting buttons (at the top of content box) allow you to format the text and even add images or weblinks.
You should give the Tile a meaningful title (3). You can also change the layout of the tile (size, colour and background image) by clicking on the Layout tab (4).
Remember to Save your stack after you have added new content.
Advanced Tiles
The File Tile is used to add a file to your stack.
Why use the File Tile?
Authors often use the File Tile to add files that help to present their work (powerpoint, video or PDF) or documents that give background material on their work (report, survey, guidelines, case study, handbook). The tile titled Presentation in this example stack is a File Tile.
What file types can be added?
The file types that can be added include: PowerPoint files (.pptx .ppt), Word documents (.docx .doc), PDF files (.pdf), videos (most formats), audio files (most formats), image files (most formats).
Restrictions
Please note that uploaded PowerPoint and Word files are converted into PDF files so that they can be viewed within the in-built PDF viewer. This does mean that animations, narrations and embedded videos in a PowerPoint file will not work when viewed in the in-built PDF viewer, since it is showing the PDF version of the file. However, viewers can download the original file from the tile (if you have allowed that) and open it outside Learning Toolbox. See this FAQ for more advice on how to turn your narrated PowerPoint file into an MP4 video file that can then be added and played in Learning Toolbox.
Please note there is a 400MB file size limit on files uploaded using the File Tile. If your file is a video and is above this size then we recommend that you upload it to a video sharing site such as YouTube or Vimeo and then use the Online Content Tile to link to it.
Using the File Tile
Drag and drop a File Tile from the Tile Library into your stack (1). In the Settings tab, give your tile a title (2) and then click in the Add File box (3) and choose the file to add from your computer.
The file will be uploaded and will be processed. This processing makes sure that your file is viewable and produces a background image for your tile.
If you only want viewers to view the file but do not want them to be able to download it then you should switch off the download button.
If you want to use a different background image for your tile or make any other appearance changes to your tile then you can do that in the Layout Tab (4).
Remember to Save your stack after you have added new information.
The Online Content Tile is used to link to a web page or online resource.
Why use the Online Content Tile?
Authors often use the Online Content Tile to link to their professional profile (LinkedIn, ResearchGate or staff page), their organisation or project’s web page, a video they have uploaded to YouTube or Vimeo, online references and papers related to their work or to link to another online resource that they have created. The Tiles titled University of Leeds and LRF19 Keynote in this example stack are both Online Content Tiles.
Using the Online Content Tile
Drag and drop an Online Content Tile from the Tile Library into your stack (1). In the Settings tab, give your tile a title (2) and and then type (or paste in) the link to the webpage you want to use and click Add (3).
The tile will be linked to that webpage and (if the website passes us this information) a background image and description will be added to the tile.
If you want to use a different background image for your tile or make any other appearance changes to your tile then you can do that in the Layout Tab (3).
Remember to Save your stack after you have added new information.
The Text Content Tile is used to add text content to your stack. It also allows you to do some basic formatting of that text and include images and weblinks in the text.
Why use the Text Content Tile?
Authors often use the Text Tile add an abstract, introduction or key messages to their stack. The tile titled Abstract in this example stack is a Text Content Tile.
Using the Text Content Tile
Drag and drop an Text Content Tile from the Tile Library into your stack (1) and in the content box (2) you can then add your text. The formatting buttons (at the top of content box) allow you to format the text and even add images or weblinks.
You should give the Tile a meaningful title (3). You can also change the layout of the tile (size, colour and background image) by clicking on the Layout tab (4).
Remember to Save your stack after you have added new content.
Editing Tiles
The File Tile is used to add a file to your stack.
Why use the File Tile?
Authors often use the File Tile to add files that help to present their work (powerpoint, video or PDF) or documents that give background material on their work (report, survey, guidelines, case study, handbook). The tile titled Presentation in this example stack is a File Tile.
What file types can be added?
The file types that can be added include: PowerPoint files (.pptx .ppt), Word documents (.docx .doc), PDF files (.pdf), videos (most formats), audio files (most formats), image files (most formats).
Restrictions
Please note that uploaded PowerPoint and Word files are converted into PDF files so that they can be viewed within the in-built PDF viewer. This does mean that animations, narrations and embedded videos in a PowerPoint file will not work when viewed in the in-built PDF viewer, since it is showing the PDF version of the file. However, viewers can download the original file from the tile (if you have allowed that) and open it outside Learning Toolbox. See this FAQ for more advice on how to turn your narrated PowerPoint file into an MP4 video file that can then be added and played in Learning Toolbox.
Please note there is a 400MB file size limit on files uploaded using the File Tile. If your file is a video and is above this size then we recommend that you upload it to a video sharing site such as YouTube or Vimeo and then use the Online Content Tile to link to it.
Using the File Tile
Drag and drop a File Tile from the Tile Library into your stack (1). In the Settings tab, give your tile a title (2) and then click in the Add File box (3) and choose the file to add from your computer.
The file will be uploaded and will be processed. This processing makes sure that your file is viewable and produces a background image for your tile.
If you only want viewers to view the file but do not want them to be able to download it then you should switch off the download button.
If you want to use a different background image for your tile or make any other appearance changes to your tile then you can do that in the Layout Tab (4).
Remember to Save your stack after you have added new information.
The Online Content Tile is used to link to a web page or online resource.
Why use the Online Content Tile?
Authors often use the Online Content Tile to link to their professional profile (LinkedIn, ResearchGate or staff page), their organisation or project’s web page, a video they have uploaded to YouTube or Vimeo, online references and papers related to their work or to link to another online resource that they have created. The Tiles titled University of Leeds and LRF19 Keynote in this example stack are both Online Content Tiles.
Using the Online Content Tile
Drag and drop an Online Content Tile from the Tile Library into your stack (1). In the Settings tab, give your tile a title (2) and and then type (or paste in) the link to the webpage you want to use and click Add (3).
The tile will be linked to that webpage and (if the website passes us this information) a background image and description will be added to the tile.
If you want to use a different background image for your tile or make any other appearance changes to your tile then you can do that in the Layout Tab (3).
Remember to Save your stack after you have added new information.
The Text Content Tile is used to add text content to your stack. It also allows you to do some basic formatting of that text and include images and weblinks in the text.
Why use the Text Content Tile?
Authors often use the Text Tile add an abstract, introduction or key messages to their stack. The tile titled Abstract in this example stack is a Text Content Tile.
Using the Text Content Tile
Drag and drop an Text Content Tile from the Tile Library into your stack (1) and in the content box (2) you can then add your text. The formatting buttons (at the top of content box) allow you to format the text and even add images or weblinks.
You should give the Tile a meaningful title (3). You can also change the layout of the tile (size, colour and background image) by clicking on the Layout tab (4).
Remember to Save your stack after you have added new content.
Changing the layout and appearance of a tile
The File Tile is used to add a file to your stack.
Why use the File Tile?
Authors often use the File Tile to add files that help to present their work (powerpoint, video or PDF) or documents that give background material on their work (report, survey, guidelines, case study, handbook). The tile titled Presentation in this example stack is a File Tile.
What file types can be added?
The file types that can be added include: PowerPoint files (.pptx .ppt), Word documents (.docx .doc), PDF files (.pdf), videos (most formats), audio files (most formats), image files (most formats).
Restrictions
Please note that uploaded PowerPoint and Word files are converted into PDF files so that they can be viewed within the in-built PDF viewer. This does mean that animations, narrations and embedded videos in a PowerPoint file will not work when viewed in the in-built PDF viewer, since it is showing the PDF version of the file. However, viewers can download the original file from the tile (if you have allowed that) and open it outside Learning Toolbox. See this FAQ for more advice on how to turn your narrated PowerPoint file into an MP4 video file that can then be added and played in Learning Toolbox.
Please note there is a 400MB file size limit on files uploaded using the File Tile. If your file is a video and is above this size then we recommend that you upload it to a video sharing site such as YouTube or Vimeo and then use the Online Content Tile to link to it.
Using the File Tile
Drag and drop a File Tile from the Tile Library into your stack (1). In the Settings tab, give your tile a title (2) and then click in the Add File box (3) and choose the file to add from your computer.
The file will be uploaded and will be processed. This processing makes sure that your file is viewable and produces a background image for your tile.
If you only want viewers to view the file but do not want them to be able to download it then you should switch off the download button.
If you want to use a different background image for your tile or make any other appearance changes to your tile then you can do that in the Layout Tab (4).
Remember to Save your stack after you have added new information.
The Online Content Tile is used to link to a web page or online resource.
Why use the Online Content Tile?
Authors often use the Online Content Tile to link to their professional profile (LinkedIn, ResearchGate or staff page), their organisation or project’s web page, a video they have uploaded to YouTube or Vimeo, online references and papers related to their work or to link to another online resource that they have created. The Tiles titled University of Leeds and LRF19 Keynote in this example stack are both Online Content Tiles.
Using the Online Content Tile
Drag and drop an Online Content Tile from the Tile Library into your stack (1). In the Settings tab, give your tile a title (2) and and then type (or paste in) the link to the webpage you want to use and click Add (3).
The tile will be linked to that webpage and (if the website passes us this information) a background image and description will be added to the tile.
If you want to use a different background image for your tile or make any other appearance changes to your tile then you can do that in the Layout Tab (3).
Remember to Save your stack after you have added new information.
The Text Content Tile is used to add text content to your stack. It also allows you to do some basic formatting of that text and include images and weblinks in the text.
Why use the Text Content Tile?
Authors often use the Text Tile add an abstract, introduction or key messages to their stack. The tile titled Abstract in this example stack is a Text Content Tile.
Using the Text Content Tile
Drag and drop an Text Content Tile from the Tile Library into your stack (1) and in the content box (2) you can then add your text. The formatting buttons (at the top of content box) allow you to format the text and even add images or weblinks.
You should give the Tile a meaningful title (3). You can also change the layout of the tile (size, colour and background image) by clicking on the Layout tab (4).
Remember to Save your stack after you have added new content.
Adding a PowerPoint file to your stack
The File Tile is used to add a file to your stack.
Why use the File Tile?
Authors often use the File Tile to add files that help to present their work (powerpoint, video or PDF) or documents that give background material on their work (report, survey, guidelines, case study, handbook). The tile titled Presentation in this example stack is a File Tile.
What file types can be added?
The file types that can be added include: PowerPoint files (.pptx .ppt), Word documents (.docx .doc), PDF files (.pdf), videos (most formats), audio files (most formats), image files (most formats).
Restrictions
Please note that uploaded PowerPoint and Word files are converted into PDF files so that they can be viewed within the in-built PDF viewer. This does mean that animations, narrations and embedded videos in a PowerPoint file will not work when viewed in the in-built PDF viewer, since it is showing the PDF version of the file. However, viewers can download the original file from the tile (if you have allowed that) and open it outside Learning Toolbox. See this FAQ for more advice on how to turn your narrated PowerPoint file into an MP4 video file that can then be added and played in Learning Toolbox.
Please note there is a 400MB file size limit on files uploaded using the File Tile. If your file is a video and is above this size then we recommend that you upload it to a video sharing site such as YouTube or Vimeo and then use the Online Content Tile to link to it.
Using the File Tile
Drag and drop a File Tile from the Tile Library into your stack (1). In the Settings tab, give your tile a title (2) and then click in the Add File box (3) and choose the file to add from your computer.
The file will be uploaded and will be processed. This processing makes sure that your file is viewable and produces a background image for your tile.
If you only want viewers to view the file but do not want them to be able to download it then you should switch off the download button.
If you want to use a different background image for your tile or make any other appearance changes to your tile then you can do that in the Layout Tab (4).
Remember to Save your stack after you have added new information.
The Online Content Tile is used to link to a web page or online resource.
Why use the Online Content Tile?
Authors often use the Online Content Tile to link to their professional profile (LinkedIn, ResearchGate or staff page), their organisation or project’s web page, a video they have uploaded to YouTube or Vimeo, online references and papers related to their work or to link to another online resource that they have created. The Tiles titled University of Leeds and LRF19 Keynote in this example stack are both Online Content Tiles.
Using the Online Content Tile
Drag and drop an Online Content Tile from the Tile Library into your stack (1). In the Settings tab, give your tile a title (2) and and then type (or paste in) the link to the webpage you want to use and click Add (3).
The tile will be linked to that webpage and (if the website passes us this information) a background image and description will be added to the tile.
If you want to use a different background image for your tile or make any other appearance changes to your tile then you can do that in the Layout Tab (3).
Remember to Save your stack after you have added new information.
The Text Content Tile is used to add text content to your stack. It also allows you to do some basic formatting of that text and include images and weblinks in the text.
Why use the Text Content Tile?
Authors often use the Text Tile add an abstract, introduction or key messages to their stack. The tile titled Abstract in this example stack is a Text Content Tile.
Using the Text Content Tile
Drag and drop an Text Content Tile from the Tile Library into your stack (1) and in the content box (2) you can then add your text. The formatting buttons (at the top of content box) allow you to format the text and even add images or weblinks.
You should give the Tile a meaningful title (3). You can also change the layout of the tile (size, colour and background image) by clicking on the Layout tab (4).
Remember to Save your stack after you have added new content.
Adding a video to your stack
The File Tile is used to add a file to your stack.
Why use the File Tile?
Authors often use the File Tile to add files that help to present their work (powerpoint, video or PDF) or documents that give background material on their work (report, survey, guidelines, case study, handbook). The tile titled Presentation in this example stack is a File Tile.
What file types can be added?
The file types that can be added include: PowerPoint files (.pptx .ppt), Word documents (.docx .doc), PDF files (.pdf), videos (most formats), audio files (most formats), image files (most formats).
Restrictions
Please note that uploaded PowerPoint and Word files are converted into PDF files so that they can be viewed within the in-built PDF viewer. This does mean that animations, narrations and embedded videos in a PowerPoint file will not work when viewed in the in-built PDF viewer, since it is showing the PDF version of the file. However, viewers can download the original file from the tile (if you have allowed that) and open it outside Learning Toolbox. See this FAQ for more advice on how to turn your narrated PowerPoint file into an MP4 video file that can then be added and played in Learning Toolbox.
Please note there is a 400MB file size limit on files uploaded using the File Tile. If your file is a video and is above this size then we recommend that you upload it to a video sharing site such as YouTube or Vimeo and then use the Online Content Tile to link to it.
Using the File Tile
Drag and drop a File Tile from the Tile Library into your stack (1). In the Settings tab, give your tile a title (2) and then click in the Add File box (3) and choose the file to add from your computer.
The file will be uploaded and will be processed. This processing makes sure that your file is viewable and produces a background image for your tile.
If you only want viewers to view the file but do not want them to be able to download it then you should switch off the download button.
If you want to use a different background image for your tile or make any other appearance changes to your tile then you can do that in the Layout Tab (4).
Remember to Save your stack after you have added new information.
The Online Content Tile is used to link to a web page or online resource.
Why use the Online Content Tile?
Authors often use the Online Content Tile to link to their professional profile (LinkedIn, ResearchGate or staff page), their organisation or project’s web page, a video they have uploaded to YouTube or Vimeo, online references and papers related to their work or to link to another online resource that they have created. The Tiles titled University of Leeds and LRF19 Keynote in this example stack are both Online Content Tiles.
Using the Online Content Tile
Drag and drop an Online Content Tile from the Tile Library into your stack (1). In the Settings tab, give your tile a title (2) and and then type (or paste in) the link to the webpage you want to use and click Add (3).
The tile will be linked to that webpage and (if the website passes us this information) a background image and description will be added to the tile.
If you want to use a different background image for your tile or make any other appearance changes to your tile then you can do that in the Layout Tab (3).
Remember to Save your stack after you have added new information.
The Text Content Tile is used to add text content to your stack. It also allows you to do some basic formatting of that text and include images and weblinks in the text.
Why use the Text Content Tile?
Authors often use the Text Tile add an abstract, introduction or key messages to their stack. The tile titled Abstract in this example stack is a Text Content Tile.
Using the Text Content Tile
Drag and drop an Text Content Tile from the Tile Library into your stack (1) and in the content box (2) you can then add your text. The formatting buttons (at the top of content box) allow you to format the text and even add images or weblinks.
You should give the Tile a meaningful title (3). You can also change the layout of the tile (size, colour and background image) by clicking on the Layout tab (4).
Remember to Save your stack after you have added new content.
Adding an extra screen/layer to your stack
The File Tile is used to add a file to your stack.
Why use the File Tile?
Authors often use the File Tile to add files that help to present their work (powerpoint, video or PDF) or documents that give background material on their work (report, survey, guidelines, case study, handbook). The tile titled Presentation in this example stack is a File Tile.
What file types can be added?
The file types that can be added include: PowerPoint files (.pptx .ppt), Word documents (.docx .doc), PDF files (.pdf), videos (most formats), audio files (most formats), image files (most formats).
Restrictions
Please note that uploaded PowerPoint and Word files are converted into PDF files so that they can be viewed within the in-built PDF viewer. This does mean that animations, narrations and embedded videos in a PowerPoint file will not work when viewed in the in-built PDF viewer, since it is showing the PDF version of the file. However, viewers can download the original file from the tile (if you have allowed that) and open it outside Learning Toolbox. See this FAQ for more advice on how to turn your narrated PowerPoint file into an MP4 video file that can then be added and played in Learning Toolbox.
Please note there is a 400MB file size limit on files uploaded using the File Tile. If your file is a video and is above this size then we recommend that you upload it to a video sharing site such as YouTube or Vimeo and then use the Online Content Tile to link to it.
Using the File Tile
Drag and drop a File Tile from the Tile Library into your stack (1). In the Settings tab, give your tile a title (2) and then click in the Add File box (3) and choose the file to add from your computer.
The file will be uploaded and will be processed. This processing makes sure that your file is viewable and produces a background image for your tile.
If you only want viewers to view the file but do not want them to be able to download it then you should switch off the download button.
If you want to use a different background image for your tile or make any other appearance changes to your tile then you can do that in the Layout Tab (4).
Remember to Save your stack after you have added new information.
The Online Content Tile is used to link to a web page or online resource.
Why use the Online Content Tile?
Authors often use the Online Content Tile to link to their professional profile (LinkedIn, ResearchGate or staff page), their organisation or project’s web page, a video they have uploaded to YouTube or Vimeo, online references and papers related to their work or to link to another online resource that they have created. The Tiles titled University of Leeds and LRF19 Keynote in this example stack are both Online Content Tiles.
Using the Online Content Tile
Drag and drop an Online Content Tile from the Tile Library into your stack (1). In the Settings tab, give your tile a title (2) and and then type (or paste in) the link to the webpage you want to use and click Add (3).
The tile will be linked to that webpage and (if the website passes us this information) a background image and description will be added to the tile.
If you want to use a different background image for your tile or make any other appearance changes to your tile then you can do that in the Layout Tab (3).
Remember to Save your stack after you have added new information.
The Text Content Tile is used to add text content to your stack. It also allows you to do some basic formatting of that text and include images and weblinks in the text.
Why use the Text Content Tile?
Authors often use the Text Tile add an abstract, introduction or key messages to their stack. The tile titled Abstract in this example stack is a Text Content Tile.
Using the Text Content Tile
Drag and drop an Text Content Tile from the Tile Library into your stack (1) and in the content box (2) you can then add your text. The formatting buttons (at the top of content box) allow you to format the text and even add images or weblinks.
You should give the Tile a meaningful title (3). You can also change the layout of the tile (size, colour and background image) by clicking on the Layout tab (4).
Remember to Save your stack after you have added new content.
Restrictions on what can be included in your stack
The File Tile is used to add a file to your stack.
Why use the File Tile?
Authors often use the File Tile to add files that help to present their work (powerpoint, video or PDF) or documents that give background material on their work (report, survey, guidelines, case study, handbook). The tile titled Presentation in this example stack is a File Tile.
What file types can be added?
The file types that can be added include: PowerPoint files (.pptx .ppt), Word documents (.docx .doc), PDF files (.pdf), videos (most formats), audio files (most formats), image files (most formats).
Restrictions
Please note that uploaded PowerPoint and Word files are converted into PDF files so that they can be viewed within the in-built PDF viewer. This does mean that animations, narrations and embedded videos in a PowerPoint file will not work when viewed in the in-built PDF viewer, since it is showing the PDF version of the file. However, viewers can download the original file from the tile (if you have allowed that) and open it outside Learning Toolbox. See this FAQ for more advice on how to turn your narrated PowerPoint file into an MP4 video file that can then be added and played in Learning Toolbox.
Please note there is a 400MB file size limit on files uploaded using the File Tile. If your file is a video and is above this size then we recommend that you upload it to a video sharing site such as YouTube or Vimeo and then use the Online Content Tile to link to it.
Using the File Tile
Drag and drop a File Tile from the Tile Library into your stack (1). In the Settings tab, give your tile a title (2) and then click in the Add File box (3) and choose the file to add from your computer.
The file will be uploaded and will be processed. This processing makes sure that your file is viewable and produces a background image for your tile.
If you only want viewers to view the file but do not want them to be able to download it then you should switch off the download button.
If you want to use a different background image for your tile or make any other appearance changes to your tile then you can do that in the Layout Tab (4).
Remember to Save your stack after you have added new information.
The Online Content Tile is used to link to a web page or online resource.
Why use the Online Content Tile?
Authors often use the Online Content Tile to link to their professional profile (LinkedIn, ResearchGate or staff page), their organisation or project’s web page, a video they have uploaded to YouTube or Vimeo, online references and papers related to their work or to link to another online resource that they have created. The Tiles titled University of Leeds and LRF19 Keynote in this example stack are both Online Content Tiles.
Using the Online Content Tile
Drag and drop an Online Content Tile from the Tile Library into your stack (1). In the Settings tab, give your tile a title (2) and and then type (or paste in) the link to the webpage you want to use and click Add (3).
The tile will be linked to that webpage and (if the website passes us this information) a background image and description will be added to the tile.
If you want to use a different background image for your tile or make any other appearance changes to your tile then you can do that in the Layout Tab (3).
Remember to Save your stack after you have added new information.
The Text Content Tile is used to add text content to your stack. It also allows you to do some basic formatting of that text and include images and weblinks in the text.
Why use the Text Content Tile?
Authors often use the Text Tile add an abstract, introduction or key messages to their stack. The tile titled Abstract in this example stack is a Text Content Tile.
Using the Text Content Tile
Drag and drop an Text Content Tile from the Tile Library into your stack (1) and in the content box (2) you can then add your text. The formatting buttons (at the top of content box) allow you to format the text and even add images or weblinks.
You should give the Tile a meaningful title (3). You can also change the layout of the tile (size, colour and background image) by clicking on the Layout tab (4).
Remember to Save your stack after you have added new content.
Restoring your deleted stack
The File Tile is used to add a file to your stack.
Why use the File Tile?
Authors often use the File Tile to add files that help to present their work (powerpoint, video or PDF) or documents that give background material on their work (report, survey, guidelines, case study, handbook). The tile titled Presentation in this example stack is a File Tile.
What file types can be added?
The file types that can be added include: PowerPoint files (.pptx .ppt), Word documents (.docx .doc), PDF files (.pdf), videos (most formats), audio files (most formats), image files (most formats).
Restrictions
Please note that uploaded PowerPoint and Word files are converted into PDF files so that they can be viewed within the in-built PDF viewer. This does mean that animations, narrations and embedded videos in a PowerPoint file will not work when viewed in the in-built PDF viewer, since it is showing the PDF version of the file. However, viewers can download the original file from the tile (if you have allowed that) and open it outside Learning Toolbox. See this FAQ for more advice on how to turn your narrated PowerPoint file into an MP4 video file that can then be added and played in Learning Toolbox.
Please note there is a 400MB file size limit on files uploaded using the File Tile. If your file is a video and is above this size then we recommend that you upload it to a video sharing site such as YouTube or Vimeo and then use the Online Content Tile to link to it.
Using the File Tile
Drag and drop a File Tile from the Tile Library into your stack (1). In the Settings tab, give your tile a title (2) and then click in the Add File box (3) and choose the file to add from your computer.
The file will be uploaded and will be processed. This processing makes sure that your file is viewable and produces a background image for your tile.
If you only want viewers to view the file but do not want them to be able to download it then you should switch off the download button.
If you want to use a different background image for your tile or make any other appearance changes to your tile then you can do that in the Layout Tab (4).
Remember to Save your stack after you have added new information.
The Online Content Tile is used to link to a web page or online resource.
Why use the Online Content Tile?
Authors often use the Online Content Tile to link to their professional profile (LinkedIn, ResearchGate or staff page), their organisation or project’s web page, a video they have uploaded to YouTube or Vimeo, online references and papers related to their work or to link to another online resource that they have created. The Tiles titled University of Leeds and LRF19 Keynote in this example stack are both Online Content Tiles.
Using the Online Content Tile
Drag and drop an Online Content Tile from the Tile Library into your stack (1). In the Settings tab, give your tile a title (2) and and then type (or paste in) the link to the webpage you want to use and click Add (3).
The tile will be linked to that webpage and (if the website passes us this information) a background image and description will be added to the tile.
If you want to use a different background image for your tile or make any other appearance changes to your tile then you can do that in the Layout Tab (3).
Remember to Save your stack after you have added new information.
The Text Content Tile is used to add text content to your stack. It also allows you to do some basic formatting of that text and include images and weblinks in the text.
Why use the Text Content Tile?
Authors often use the Text Tile add an abstract, introduction or key messages to their stack. The tile titled Abstract in this example stack is a Text Content Tile.
Using the Text Content Tile
Drag and drop an Text Content Tile from the Tile Library into your stack (1) and in the content box (2) you can then add your text. The formatting buttons (at the top of content box) allow you to format the text and even add images or weblinks.
You should give the Tile a meaningful title (3). You can also change the layout of the tile (size, colour and background image) by clicking on the Layout tab (4).
Remember to Save your stack after you have added new content.
Previewing and checking your stack
The File Tile is used to add a file to your stack.
Why use the File Tile?
Authors often use the File Tile to add files that help to present their work (powerpoint, video or PDF) or documents that give background material on their work (report, survey, guidelines, case study, handbook). The tile titled Presentation in this example stack is a File Tile.
What file types can be added?
The file types that can be added include: PowerPoint files (.pptx .ppt), Word documents (.docx .doc), PDF files (.pdf), videos (most formats), audio files (most formats), image files (most formats).
Restrictions
Please note that uploaded PowerPoint and Word files are converted into PDF files so that they can be viewed within the in-built PDF viewer. This does mean that animations, narrations and embedded videos in a PowerPoint file will not work when viewed in the in-built PDF viewer, since it is showing the PDF version of the file. However, viewers can download the original file from the tile (if you have allowed that) and open it outside Learning Toolbox. See this FAQ for more advice on how to turn your narrated PowerPoint file into an MP4 video file that can then be added and played in Learning Toolbox.
Please note there is a 400MB file size limit on files uploaded using the File Tile. If your file is a video and is above this size then we recommend that you upload it to a video sharing site such as YouTube or Vimeo and then use the Online Content Tile to link to it.
Using the File Tile
Drag and drop a File Tile from the Tile Library into your stack (1). In the Settings tab, give your tile a title (2) and then click in the Add File box (3) and choose the file to add from your computer.
The file will be uploaded and will be processed. This processing makes sure that your file is viewable and produces a background image for your tile.
If you only want viewers to view the file but do not want them to be able to download it then you should switch off the download button.
If you want to use a different background image for your tile or make any other appearance changes to your tile then you can do that in the Layout Tab (4).
Remember to Save your stack after you have added new information.
The Online Content Tile is used to link to a web page or online resource.
Why use the Online Content Tile?
Authors often use the Online Content Tile to link to their professional profile (LinkedIn, ResearchGate or staff page), their organisation or project’s web page, a video they have uploaded to YouTube or Vimeo, online references and papers related to their work or to link to another online resource that they have created. The Tiles titled University of Leeds and LRF19 Keynote in this example stack are both Online Content Tiles.
Using the Online Content Tile
Drag and drop an Online Content Tile from the Tile Library into your stack (1). In the Settings tab, give your tile a title (2) and and then type (or paste in) the link to the webpage you want to use and click Add (3).
The tile will be linked to that webpage and (if the website passes us this information) a background image and description will be added to the tile.
If you want to use a different background image for your tile or make any other appearance changes to your tile then you can do that in the Layout Tab (3).
Remember to Save your stack after you have added new information.
The Text Content Tile is used to add text content to your stack. It also allows you to do some basic formatting of that text and include images and weblinks in the text.
Why use the Text Content Tile?
Authors often use the Text Tile add an abstract, introduction or key messages to their stack. The tile titled Abstract in this example stack is a Text Content Tile.
Using the Text Content Tile
Drag and drop an Text Content Tile from the Tile Library into your stack (1) and in the content box (2) you can then add your text. The formatting buttons (at the top of content box) allow you to format the text and even add images or weblinks.
You should give the Tile a meaningful title (3). You can also change the layout of the tile (size, colour and background image) by clicking on the Layout tab (4).
Remember to Save your stack after you have added new content.
Creating the summary poster
An option often used by onsite conferences to promote your ePoster / stack onsite.
The File Tile is used to add a file to your stack.
Why use the File Tile?
Authors often use the File Tile to add files that help to present their work (powerpoint, video or PDF) or documents that give background material on their work (report, survey, guidelines, case study, handbook). The tile titled Presentation in this example stack is a File Tile.
What file types can be added?
The file types that can be added include: PowerPoint files (.pptx .ppt), Word documents (.docx .doc), PDF files (.pdf), videos (most formats), audio files (most formats), image files (most formats).
Restrictions
Please note that uploaded PowerPoint and Word files are converted into PDF files so that they can be viewed within the in-built PDF viewer. This does mean that animations, narrations and embedded videos in a PowerPoint file will not work when viewed in the in-built PDF viewer, since it is showing the PDF version of the file. However, viewers can download the original file from the tile (if you have allowed that) and open it outside Learning Toolbox. See this FAQ for more advice on how to turn your narrated PowerPoint file into an MP4 video file that can then be added and played in Learning Toolbox.
Please note there is a 400MB file size limit on files uploaded using the File Tile. If your file is a video and is above this size then we recommend that you upload it to a video sharing site such as YouTube or Vimeo and then use the Online Content Tile to link to it.
Using the File Tile
Drag and drop a File Tile from the Tile Library into your stack (1). In the Settings tab, give your tile a title (2) and then click in the Add File box (3) and choose the file to add from your computer.
The file will be uploaded and will be processed. This processing makes sure that your file is viewable and produces a background image for your tile.
If you only want viewers to view the file but do not want them to be able to download it then you should switch off the download button.
If you want to use a different background image for your tile or make any other appearance changes to your tile then you can do that in the Layout Tab (4).
Remember to Save your stack after you have added new information.
The Online Content Tile is used to link to a web page or online resource.
Why use the Online Content Tile?
Authors often use the Online Content Tile to link to their professional profile (LinkedIn, ResearchGate or staff page), their organisation or project’s web page, a video they have uploaded to YouTube or Vimeo, online references and papers related to their work or to link to another online resource that they have created. The Tiles titled University of Leeds and LRF19 Keynote in this example stack are both Online Content Tiles.
Using the Online Content Tile
Drag and drop an Online Content Tile from the Tile Library into your stack (1). In the Settings tab, give your tile a title (2) and and then type (or paste in) the link to the webpage you want to use and click Add (3).
The tile will be linked to that webpage and (if the website passes us this information) a background image and description will be added to the tile.
If you want to use a different background image for your tile or make any other appearance changes to your tile then you can do that in the Layout Tab (3).
Remember to Save your stack after you have added new information.
The Text Content Tile is used to add text content to your stack. It also allows you to do some basic formatting of that text and include images and weblinks in the text.
Why use the Text Content Tile?
Authors often use the Text Tile add an abstract, introduction or key messages to their stack. The tile titled Abstract in this example stack is a Text Content Tile.
Using the Text Content Tile
Drag and drop an Text Content Tile from the Tile Library into your stack (1) and in the content box (2) you can then add your text. The formatting buttons (at the top of content box) allow you to format the text and even add images or weblinks.
You should give the Tile a meaningful title (3). You can also change the layout of the tile (size, colour and background image) by clicking on the Layout tab (4).
Remember to Save your stack after you have added new content.
Your stack on the showcase website
The File Tile is used to add a file to your stack.
Why use the File Tile?
Authors often use the File Tile to add files that help to present their work (powerpoint, video or PDF) or documents that give background material on their work (report, survey, guidelines, case study, handbook). The tile titled Presentation in this example stack is a File Tile.
What file types can be added?
The file types that can be added include: PowerPoint files (.pptx .ppt), Word documents (.docx .doc), PDF files (.pdf), videos (most formats), audio files (most formats), image files (most formats).
Restrictions
Please note that uploaded PowerPoint and Word files are converted into PDF files so that they can be viewed within the in-built PDF viewer. This does mean that animations, narrations and embedded videos in a PowerPoint file will not work when viewed in the in-built PDF viewer, since it is showing the PDF version of the file. However, viewers can download the original file from the tile (if you have allowed that) and open it outside Learning Toolbox. See this FAQ for more advice on how to turn your narrated PowerPoint file into an MP4 video file that can then be added and played in Learning Toolbox.
Please note there is a 400MB file size limit on files uploaded using the File Tile. If your file is a video and is above this size then we recommend that you upload it to a video sharing site such as YouTube or Vimeo and then use the Online Content Tile to link to it.
Using the File Tile
Drag and drop a File Tile from the Tile Library into your stack (1). In the Settings tab, give your tile a title (2) and then click in the Add File box (3) and choose the file to add from your computer.
The file will be uploaded and will be processed. This processing makes sure that your file is viewable and produces a background image for your tile.
If you only want viewers to view the file but do not want them to be able to download it then you should switch off the download button.
If you want to use a different background image for your tile or make any other appearance changes to your tile then you can do that in the Layout Tab (4).
Remember to Save your stack after you have added new information.
The Online Content Tile is used to link to a web page or online resource.
Why use the Online Content Tile?
Authors often use the Online Content Tile to link to their professional profile (LinkedIn, ResearchGate or staff page), their organisation or project’s web page, a video they have uploaded to YouTube or Vimeo, online references and papers related to their work or to link to another online resource that they have created. The Tiles titled University of Leeds and LRF19 Keynote in this example stack are both Online Content Tiles.
Using the Online Content Tile
Drag and drop an Online Content Tile from the Tile Library into your stack (1). In the Settings tab, give your tile a title (2) and and then type (or paste in) the link to the webpage you want to use and click Add (3).
The tile will be linked to that webpage and (if the website passes us this information) a background image and description will be added to the tile.
If you want to use a different background image for your tile or make any other appearance changes to your tile then you can do that in the Layout Tab (3).
Remember to Save your stack after you have added new information.
The Text Content Tile is used to add text content to your stack. It also allows you to do some basic formatting of that text and include images and weblinks in the text.
Why use the Text Content Tile?
Authors often use the Text Tile add an abstract, introduction or key messages to their stack. The tile titled Abstract in this example stack is a Text Content Tile.
Using the Text Content Tile
Drag and drop an Text Content Tile from the Tile Library into your stack (1) and in the content box (2) you can then add your text. The formatting buttons (at the top of content box) allow you to format the text and even add images or weblinks.
You should give the Tile a meaningful title (3). You can also change the layout of the tile (size, colour and background image) by clicking on the Layout tab (4).
Remember to Save your stack after you have added new content.
Marking your stack as ready to publish to the showcase
The File Tile is used to add a file to your stack.
Why use the File Tile?
Authors often use the File Tile to add files that help to present their work (powerpoint, video or PDF) or documents that give background material on their work (report, survey, guidelines, case study, handbook). The tile titled Presentation in this example stack is a File Tile.
What file types can be added?
The file types that can be added include: PowerPoint files (.pptx .ppt), Word documents (.docx .doc), PDF files (.pdf), videos (most formats), audio files (most formats), image files (most formats).
Restrictions
Please note that uploaded PowerPoint and Word files are converted into PDF files so that they can be viewed within the in-built PDF viewer. This does mean that animations, narrations and embedded videos in a PowerPoint file will not work when viewed in the in-built PDF viewer, since it is showing the PDF version of the file. However, viewers can download the original file from the tile (if you have allowed that) and open it outside Learning Toolbox. See this FAQ for more advice on how to turn your narrated PowerPoint file into an MP4 video file that can then be added and played in Learning Toolbox.
Please note there is a 400MB file size limit on files uploaded using the File Tile. If your file is a video and is above this size then we recommend that you upload it to a video sharing site such as YouTube or Vimeo and then use the Online Content Tile to link to it.
Using the File Tile
Drag and drop a File Tile from the Tile Library into your stack (1). In the Settings tab, give your tile a title (2) and then click in the Add File box (3) and choose the file to add from your computer.
The file will be uploaded and will be processed. This processing makes sure that your file is viewable and produces a background image for your tile.
If you only want viewers to view the file but do not want them to be able to download it then you should switch off the download button.
If you want to use a different background image for your tile or make any other appearance changes to your tile then you can do that in the Layout Tab (4).
Remember to Save your stack after you have added new information.
The Online Content Tile is used to link to a web page or online resource.
Why use the Online Content Tile?
Authors often use the Online Content Tile to link to their professional profile (LinkedIn, ResearchGate or staff page), their organisation or project’s web page, a video they have uploaded to YouTube or Vimeo, online references and papers related to their work or to link to another online resource that they have created. The Tiles titled University of Leeds and LRF19 Keynote in this example stack are both Online Content Tiles.
Using the Online Content Tile
Drag and drop an Online Content Tile from the Tile Library into your stack (1). In the Settings tab, give your tile a title (2) and and then type (or paste in) the link to the webpage you want to use and click Add (3).
The tile will be linked to that webpage and (if the website passes us this information) a background image and description will be added to the tile.
If you want to use a different background image for your tile or make any other appearance changes to your tile then you can do that in the Layout Tab (3).
Remember to Save your stack after you have added new information.
The Text Content Tile is used to add text content to your stack. It also allows you to do some basic formatting of that text and include images and weblinks in the text.
Why use the Text Content Tile?
Authors often use the Text Tile add an abstract, introduction or key messages to their stack. The tile titled Abstract in this example stack is a Text Content Tile.
Using the Text Content Tile
Drag and drop an Text Content Tile from the Tile Library into your stack (1) and in the content box (2) you can then add your text. The formatting buttons (at the top of content box) allow you to format the text and even add images or weblinks.
You should give the Tile a meaningful title (3). You can also change the layout of the tile (size, colour and background image) by clicking on the Layout tab (4).
Remember to Save your stack after you have added new content.
Presenting your stack (General advice)
The File Tile is used to add a file to your stack.
Why use the File Tile?
Authors often use the File Tile to add files that help to present their work (powerpoint, video or PDF) or documents that give background material on their work (report, survey, guidelines, case study, handbook). The tile titled Presentation in this example stack is a File Tile.
What file types can be added?
The file types that can be added include: PowerPoint files (.pptx .ppt), Word documents (.docx .doc), PDF files (.pdf), videos (most formats), audio files (most formats), image files (most formats).
Restrictions
Please note that uploaded PowerPoint and Word files are converted into PDF files so that they can be viewed within the in-built PDF viewer. This does mean that animations, narrations and embedded videos in a PowerPoint file will not work when viewed in the in-built PDF viewer, since it is showing the PDF version of the file. However, viewers can download the original file from the tile (if you have allowed that) and open it outside Learning Toolbox. See this FAQ for more advice on how to turn your narrated PowerPoint file into an MP4 video file that can then be added and played in Learning Toolbox.
Please note there is a 400MB file size limit on files uploaded using the File Tile. If your file is a video and is above this size then we recommend that you upload it to a video sharing site such as YouTube or Vimeo and then use the Online Content Tile to link to it.
Using the File Tile
Drag and drop a File Tile from the Tile Library into your stack (1). In the Settings tab, give your tile a title (2) and then click in the Add File box (3) and choose the file to add from your computer.
The file will be uploaded and will be processed. This processing makes sure that your file is viewable and produces a background image for your tile.
If you only want viewers to view the file but do not want them to be able to download it then you should switch off the download button.
If you want to use a different background image for your tile or make any other appearance changes to your tile then you can do that in the Layout Tab (4).
Remember to Save your stack after you have added new information.
The Online Content Tile is used to link to a web page or online resource.
Why use the Online Content Tile?
Authors often use the Online Content Tile to link to their professional profile (LinkedIn, ResearchGate or staff page), their organisation or project’s web page, a video they have uploaded to YouTube or Vimeo, online references and papers related to their work or to link to another online resource that they have created. The Tiles titled University of Leeds and LRF19 Keynote in this example stack are both Online Content Tiles.
Using the Online Content Tile
Drag and drop an Online Content Tile from the Tile Library into your stack (1). In the Settings tab, give your tile a title (2) and and then type (or paste in) the link to the webpage you want to use and click Add (3).
The tile will be linked to that webpage and (if the website passes us this information) a background image and description will be added to the tile.
If you want to use a different background image for your tile or make any other appearance changes to your tile then you can do that in the Layout Tab (3).
Remember to Save your stack after you have added new information.
The Text Content Tile is used to add text content to your stack. It also allows you to do some basic formatting of that text and include images and weblinks in the text.
Why use the Text Content Tile?
Authors often use the Text Tile add an abstract, introduction or key messages to their stack. The tile titled Abstract in this example stack is a Text Content Tile.
Using the Text Content Tile
Drag and drop an Text Content Tile from the Tile Library into your stack (1) and in the content box (2) you can then add your text. The formatting buttons (at the top of content box) allow you to format the text and even add images or weblinks.
You should give the Tile a meaningful title (3). You can also change the layout of the tile (size, colour and background image) by clicking on the Layout tab (4).
Remember to Save your stack after you have added new content.
Engaging with the viewers of your stacks
The File Tile is used to add a file to your stack.
Why use the File Tile?
Authors often use the File Tile to add files that help to present their work (powerpoint, video or PDF) or documents that give background material on their work (report, survey, guidelines, case study, handbook). The tile titled Presentation in this example stack is a File Tile.
What file types can be added?
The file types that can be added include: PowerPoint files (.pptx .ppt), Word documents (.docx .doc), PDF files (.pdf), videos (most formats), audio files (most formats), image files (most formats).
Restrictions
Please note that uploaded PowerPoint and Word files are converted into PDF files so that they can be viewed within the in-built PDF viewer. This does mean that animations, narrations and embedded videos in a PowerPoint file will not work when viewed in the in-built PDF viewer, since it is showing the PDF version of the file. However, viewers can download the original file from the tile (if you have allowed that) and open it outside Learning Toolbox. See this FAQ for more advice on how to turn your narrated PowerPoint file into an MP4 video file that can then be added and played in Learning Toolbox.
Please note there is a 400MB file size limit on files uploaded using the File Tile. If your file is a video and is above this size then we recommend that you upload it to a video sharing site such as YouTube or Vimeo and then use the Online Content Tile to link to it.
Using the File Tile
Drag and drop a File Tile from the Tile Library into your stack (1). In the Settings tab, give your tile a title (2) and then click in the Add File box (3) and choose the file to add from your computer.
The file will be uploaded and will be processed. This processing makes sure that your file is viewable and produces a background image for your tile.
If you only want viewers to view the file but do not want them to be able to download it then you should switch off the download button.
If you want to use a different background image for your tile or make any other appearance changes to your tile then you can do that in the Layout Tab (4).
Remember to Save your stack after you have added new information.
The Online Content Tile is used to link to a web page or online resource.
Why use the Online Content Tile?
Authors often use the Online Content Tile to link to their professional profile (LinkedIn, ResearchGate or staff page), their organisation or project’s web page, a video they have uploaded to YouTube or Vimeo, online references and papers related to their work or to link to another online resource that they have created. The Tiles titled University of Leeds and LRF19 Keynote in this example stack are both Online Content Tiles.
Using the Online Content Tile
Drag and drop an Online Content Tile from the Tile Library into your stack (1). In the Settings tab, give your tile a title (2) and and then type (or paste in) the link to the webpage you want to use and click Add (3).
The tile will be linked to that webpage and (if the website passes us this information) a background image and description will be added to the tile.
If you want to use a different background image for your tile or make any other appearance changes to your tile then you can do that in the Layout Tab (3).
Remember to Save your stack after you have added new information.
The Text Content Tile is used to add text content to your stack. It also allows you to do some basic formatting of that text and include images and weblinks in the text.
Why use the Text Content Tile?
Authors often use the Text Tile add an abstract, introduction or key messages to their stack. The tile titled Abstract in this example stack is a Text Content Tile.
Using the Text Content Tile
Drag and drop an Text Content Tile from the Tile Library into your stack (1) and in the content box (2) you can then add your text. The formatting buttons (at the top of content box) allow you to format the text and even add images or weblinks.
You should give the Tile a meaningful title (3). You can also change the layout of the tile (size, colour and background image) by clicking on the Layout tab (4).
Remember to Save your stack after you have added new content.
Using templates
The File Tile is used to add a file to your stack.
Why use the File Tile?
Authors often use the File Tile to add files that help to present their work (powerpoint, video or PDF) or documents that give background material on their work (report, survey, guidelines, case study, handbook). The tile titled Presentation in this example stack is a File Tile.
What file types can be added?
The file types that can be added include: PowerPoint files (.pptx .ppt), Word documents (.docx .doc), PDF files (.pdf), videos (most formats), audio files (most formats), image files (most formats).
Restrictions
Please note that uploaded PowerPoint and Word files are converted into PDF files so that they can be viewed within the in-built PDF viewer. This does mean that animations, narrations and embedded videos in a PowerPoint file will not work when viewed in the in-built PDF viewer, since it is showing the PDF version of the file. However, viewers can download the original file from the tile (if you have allowed that) and open it outside Learning Toolbox. See this FAQ for more advice on how to turn your narrated PowerPoint file into an MP4 video file that can then be added and played in Learning Toolbox.
Please note there is a 400MB file size limit on files uploaded using the File Tile. If your file is a video and is above this size then we recommend that you upload it to a video sharing site such as YouTube or Vimeo and then use the Online Content Tile to link to it.
Using the File Tile
Drag and drop a File Tile from the Tile Library into your stack (1). In the Settings tab, give your tile a title (2) and then click in the Add File box (3) and choose the file to add from your computer.
The file will be uploaded and will be processed. This processing makes sure that your file is viewable and produces a background image for your tile.
If you only want viewers to view the file but do not want them to be able to download it then you should switch off the download button.
If you want to use a different background image for your tile or make any other appearance changes to your tile then you can do that in the Layout Tab (4).
Remember to Save your stack after you have added new information.
The Online Content Tile is used to link to a web page or online resource.
Why use the Online Content Tile?
Authors often use the Online Content Tile to link to their professional profile (LinkedIn, ResearchGate or staff page), their organisation or project’s web page, a video they have uploaded to YouTube or Vimeo, online references and papers related to their work or to link to another online resource that they have created. The Tiles titled University of Leeds and LRF19 Keynote in this example stack are both Online Content Tiles.
Using the Online Content Tile
Drag and drop an Online Content Tile from the Tile Library into your stack (1). In the Settings tab, give your tile a title (2) and and then type (or paste in) the link to the webpage you want to use and click Add (3).
The tile will be linked to that webpage and (if the website passes us this information) a background image and description will be added to the tile.
If you want to use a different background image for your tile or make any other appearance changes to your tile then you can do that in the Layout Tab (3).
Remember to Save your stack after you have added new information.
The Text Content Tile is used to add text content to your stack. It also allows you to do some basic formatting of that text and include images and weblinks in the text.
Why use the Text Content Tile?
Authors often use the Text Tile add an abstract, introduction or key messages to their stack. The tile titled Abstract in this example stack is a Text Content Tile.
Using the Text Content Tile
Drag and drop an Text Content Tile from the Tile Library into your stack (1) and in the content box (2) you can then add your text. The formatting buttons (at the top of content box) allow you to format the text and even add images or weblinks.
You should give the Tile a meaningful title (3). You can also change the layout of the tile (size, colour and background image) by clicking on the Layout tab (4).
Remember to Save your stack after you have added new content.
Editing your account
The File Tile is used to add a file to your stack.
Why use the File Tile?
Authors often use the File Tile to add files that help to present their work (powerpoint, video or PDF) or documents that give background material on their work (report, survey, guidelines, case study, handbook). The tile titled Presentation in this example stack is a File Tile.
What file types can be added?
The file types that can be added include: PowerPoint files (.pptx .ppt), Word documents (.docx .doc), PDF files (.pdf), videos (most formats), audio files (most formats), image files (most formats).
Restrictions
Please note that uploaded PowerPoint and Word files are converted into PDF files so that they can be viewed within the in-built PDF viewer. This does mean that animations, narrations and embedded videos in a PowerPoint file will not work when viewed in the in-built PDF viewer, since it is showing the PDF version of the file. However, viewers can download the original file from the tile (if you have allowed that) and open it outside Learning Toolbox. See this FAQ for more advice on how to turn your narrated PowerPoint file into an MP4 video file that can then be added and played in Learning Toolbox.
Please note there is a 400MB file size limit on files uploaded using the File Tile. If your file is a video and is above this size then we recommend that you upload it to a video sharing site such as YouTube or Vimeo and then use the Online Content Tile to link to it.
Using the File Tile
Drag and drop a File Tile from the Tile Library into your stack (1). In the Settings tab, give your tile a title (2) and then click in the Add File box (3) and choose the file to add from your computer.
The file will be uploaded and will be processed. This processing makes sure that your file is viewable and produces a background image for your tile.
If you only want viewers to view the file but do not want them to be able to download it then you should switch off the download button.
If you want to use a different background image for your tile or make any other appearance changes to your tile then you can do that in the Layout Tab (4).
Remember to Save your stack after you have added new information.
The Online Content Tile is used to link to a web page or online resource.
Why use the Online Content Tile?
Authors often use the Online Content Tile to link to their professional profile (LinkedIn, ResearchGate or staff page), their organisation or project’s web page, a video they have uploaded to YouTube or Vimeo, online references and papers related to their work or to link to another online resource that they have created. The Tiles titled University of Leeds and LRF19 Keynote in this example stack are both Online Content Tiles.
Using the Online Content Tile
Drag and drop an Online Content Tile from the Tile Library into your stack (1). In the Settings tab, give your tile a title (2) and and then type (or paste in) the link to the webpage you want to use and click Add (3).
The tile will be linked to that webpage and (if the website passes us this information) a background image and description will be added to the tile.
If you want to use a different background image for your tile or make any other appearance changes to your tile then you can do that in the Layout Tab (3).
Remember to Save your stack after you have added new information.
The Text Content Tile is used to add text content to your stack. It also allows you to do some basic formatting of that text and include images and weblinks in the text.
Why use the Text Content Tile?
Authors often use the Text Tile add an abstract, introduction or key messages to their stack. The tile titled Abstract in this example stack is a Text Content Tile.
Using the Text Content Tile
Drag and drop an Text Content Tile from the Tile Library into your stack (1) and in the content box (2) you can then add your text. The formatting buttons (at the top of content box) allow you to format the text and even add images or weblinks.
You should give the Tile a meaningful title (3). You can also change the layout of the tile (size, colour and background image) by clicking on the Layout tab (4).
Remember to Save your stack after you have added new content.
Managing your stack
The File Tile is used to add a file to your stack.
Why use the File Tile?
Authors often use the File Tile to add files that help to present their work (powerpoint, video or PDF) or documents that give background material on their work (report, survey, guidelines, case study, handbook). The tile titled Presentation in this example stack is a File Tile.
What file types can be added?
The file types that can be added include: PowerPoint files (.pptx .ppt), Word documents (.docx .doc), PDF files (.pdf), videos (most formats), audio files (most formats), image files (most formats).
Restrictions
Please note that uploaded PowerPoint and Word files are converted into PDF files so that they can be viewed within the in-built PDF viewer. This does mean that animations, narrations and embedded videos in a PowerPoint file will not work when viewed in the in-built PDF viewer, since it is showing the PDF version of the file. However, viewers can download the original file from the tile (if you have allowed that) and open it outside Learning Toolbox. See this FAQ for more advice on how to turn your narrated PowerPoint file into an MP4 video file that can then be added and played in Learning Toolbox.
Please note there is a 400MB file size limit on files uploaded using the File Tile. If your file is a video and is above this size then we recommend that you upload it to a video sharing site such as YouTube or Vimeo and then use the Online Content Tile to link to it.
Using the File Tile
Drag and drop a File Tile from the Tile Library into your stack (1). In the Settings tab, give your tile a title (2) and then click in the Add File box (3) and choose the file to add from your computer.
The file will be uploaded and will be processed. This processing makes sure that your file is viewable and produces a background image for your tile.
If you only want viewers to view the file but do not want them to be able to download it then you should switch off the download button.
If you want to use a different background image for your tile or make any other appearance changes to your tile then you can do that in the Layout Tab (4).
Remember to Save your stack after you have added new information.
The Online Content Tile is used to link to a web page or online resource.
Why use the Online Content Tile?
Authors often use the Online Content Tile to link to their professional profile (LinkedIn, ResearchGate or staff page), their organisation or project’s web page, a video they have uploaded to YouTube or Vimeo, online references and papers related to their work or to link to another online resource that they have created. The Tiles titled University of Leeds and LRF19 Keynote in this example stack are both Online Content Tiles.
Using the Online Content Tile
Drag and drop an Online Content Tile from the Tile Library into your stack (1). In the Settings tab, give your tile a title (2) and and then type (or paste in) the link to the webpage you want to use and click Add (3).
The tile will be linked to that webpage and (if the website passes us this information) a background image and description will be added to the tile.
If you want to use a different background image for your tile or make any other appearance changes to your tile then you can do that in the Layout Tab (3).
Remember to Save your stack after you have added new information.
The Text Content Tile is used to add text content to your stack. It also allows you to do some basic formatting of that text and include images and weblinks in the text.
Why use the Text Content Tile?
Authors often use the Text Tile add an abstract, introduction or key messages to their stack. The tile titled Abstract in this example stack is a Text Content Tile.
Using the Text Content Tile
Drag and drop an Text Content Tile from the Tile Library into your stack (1) and in the content box (2) you can then add your text. The formatting buttons (at the top of content box) allow you to format the text and even add images or weblinks.
You should give the Tile a meaningful title (3). You can also change the layout of the tile (size, colour and background image) by clicking on the Layout tab (4).
Remember to Save your stack after you have added new content.