Contents
- Invitation links and getting started
- Creating and returning to edit your stack
- Adding content to your stack using the Tile Library
- Co-authors
- Editing a Tile
- Changing the layout and appearance of a Tile
- Adding a PowerPoint to your stack
- Adding a video to your stack
- Adding an extra screen to your stack
- Restoring a deleted stack
- Previewing and checking your stack
- Restrictions on what can be included in your stack
- Creating the summary poster
- Your stack on the showcase website
- Marking your stack as ready to publish
- Presenting your stack (general guidance)
- Exploring and sharing published stacks
- Engaging with the viewers of your stack
- Using templates
- Editing your account
- Managing your stack
Invitation links and getting started
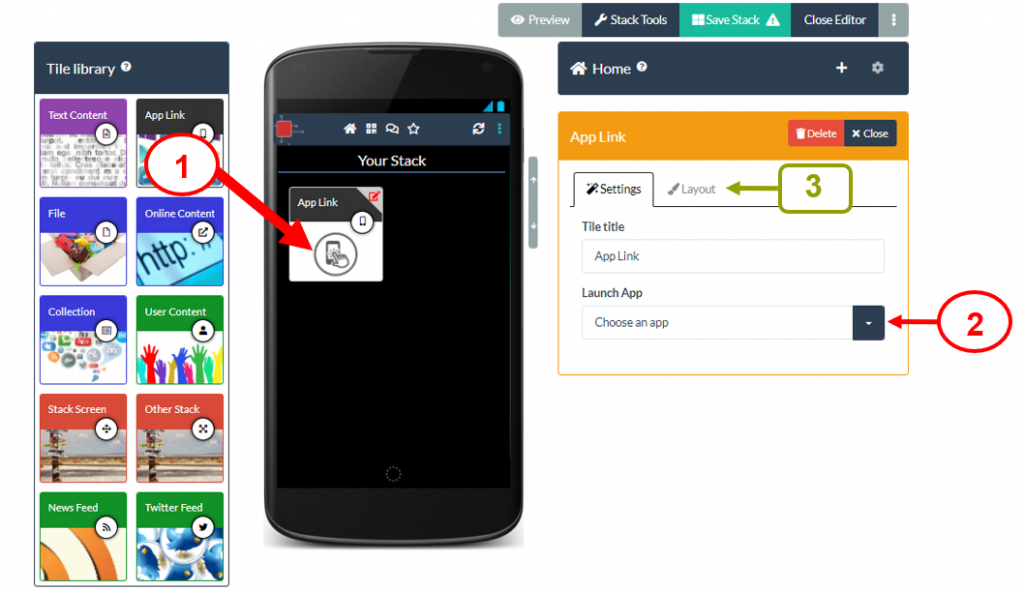
The App Link Tile is used to link to an App.
Why use the App Link Tile?
Authors often use the App Link Tile if they have developed an App as part of their work or if they have used or evaluated an App as part of their work. The App link tile will direct a viewer to that App (or the relevant place in the App store) when they click on the tile whilst viewing the stack on a suitable device (e.g. smartphone or tablet).
Using the App Link Tile
Drag and drop an App Link Tile from the Tile Library into your stack (1). Then click on the drop down menu to choose the App that you want to include (2). If you cannot find the App that you want to include in the list then please email support@stack.services and if possible we will add it to the list. A title will automatically be added to the Tile, but you can change this. You can also change the layout of the tile (size, colour and background image) by clicking on the Layout tab (3).
Remember to Save your stack after you have added new content.
The Collection Tile is used to a collection of files or links to your stack.
Why use the Collection Tile?
Authors often use the Collection Tile if they have a set of related material that they want to group together in their stack (such as references or background study materials). The Collection Tile allows you to do this with files and web links. If you want more flexibility over what to include in your set of materials and how it appears onscreen then you should use a Stack Screen Tile instead. The tile titled Related Papers in this example stack is a Collection Tile.
Using the Collection Tile
Drag and drop a Collection Tile from the Tile Library into your stack (1). Type in a Title for your Tile (2). Then click on the drop down menu and choose to Add new collection (3).
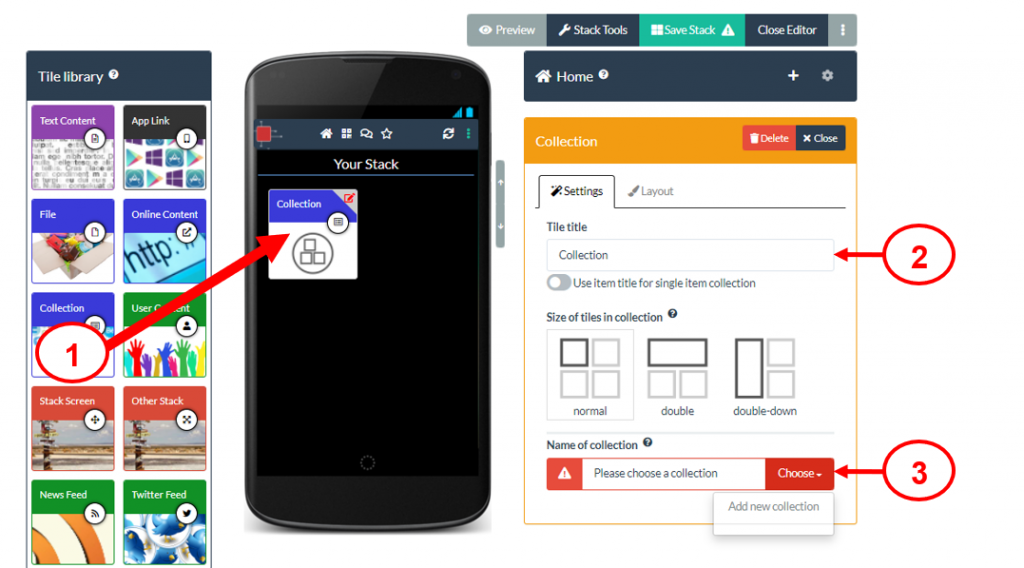
Type in a name for your collection and click on the tick button (4).

Buttons will now appear onscreen allowing you to click and Add a Link or Add a File (5). Click on the appropriate button and then follow the prompts to upload a file or add your weblink. Once it is added then you can click on the appropriate button again to add your next link or file.
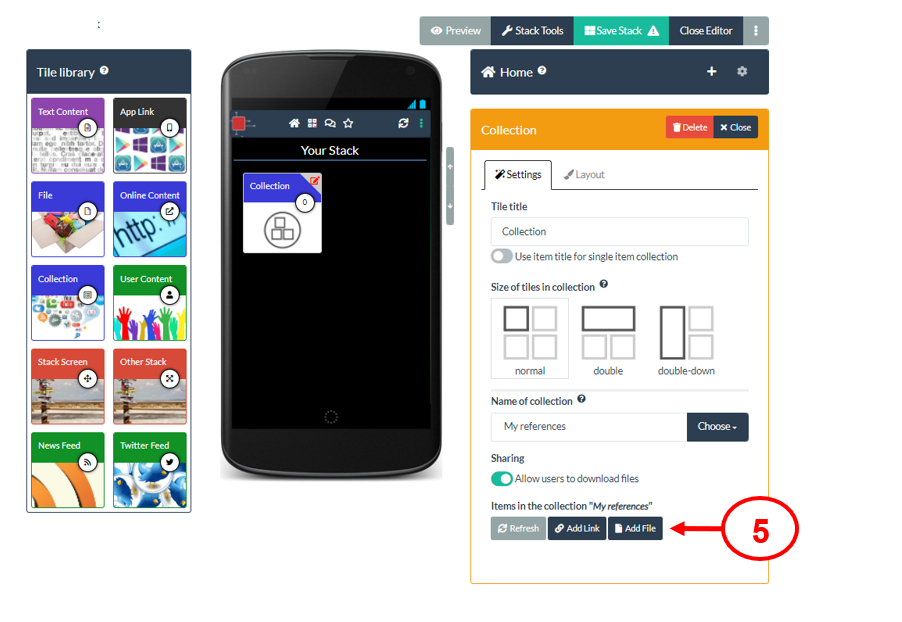
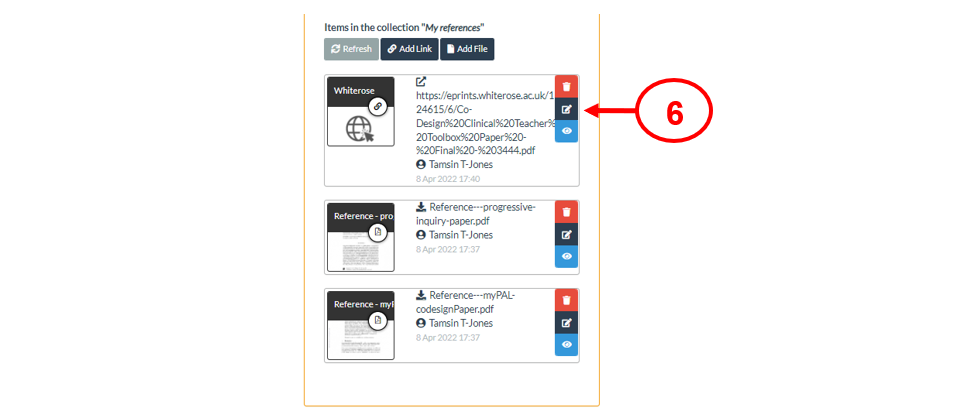
Onscreen you will see a list of the links and files that you have added to this collection. If you need to then you can edit or delete an item by clicking on its edit or delete button (6). It is also possible to drag and drop the items in the list to change the order in which they will appear.
Remember to Save your stack after you have added new content.
The News Feed Tile is used to connect to an RSS news feed and show the most recent posts from that feed in your stack.
Why use the News Feed Tile?
Authors can use the News Feed tile if they want to link to an RSS news feed service that provides up-to-date information on a particular topic related to their work. For example this news feed from BMC Medical Education (https://bmcmededuc.biomedcentral.com/articles/most-recent/rss.xml) provides links to recent articles on medical education. An author may know of a news feed that is particularly relevant to their work and can use the News Feed Tile to link to that.
Using the News Feed Tile
Drag and drop a News Feed Tile from the Tile Library into your stack (1). Type or paste in the URL (web address) to the news feed that you want to connect with and click on the Get Feed button (2).
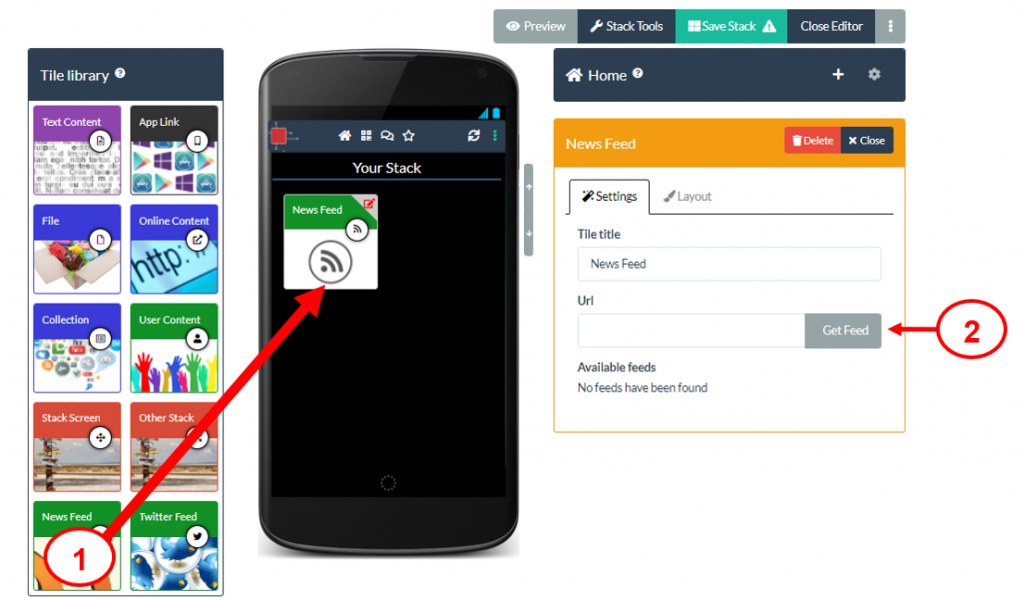
This creates a live link, so that when viewers click on this Tile they will see the most recent updates sent by that news feed service.
Remember to Save your stack after you have added new content.
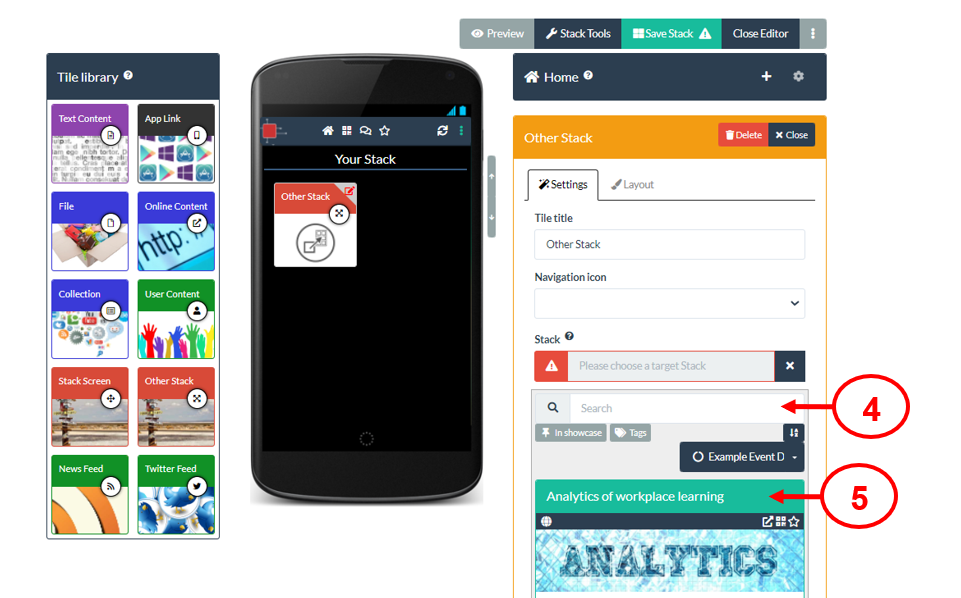
The Other Stack Tile is used to add a link to another stack.
Why use the Other Stack Tile?
Authors often use the Other Stack Tile if they have more than one ePoster stack in a conference and they want to add a direct link from one of their ePoster stacks to the other ePoster stack. Authors also use the Other Stack Tile if they want to link to another ePoster stack by their research group or if they want to link to an ePoster stack that they made for a previous year’s conference. The tile titled Explore an ePoster in this example stack is an Other Stack tile.
Using the Other Stack Tile
Drag and drop an Other Stack Tile from the Tile Library into your stack (1). Type in a Title for your Tile (2). Then click on the target stack edit icon to choose the stack you want to connect to this Tile (3).
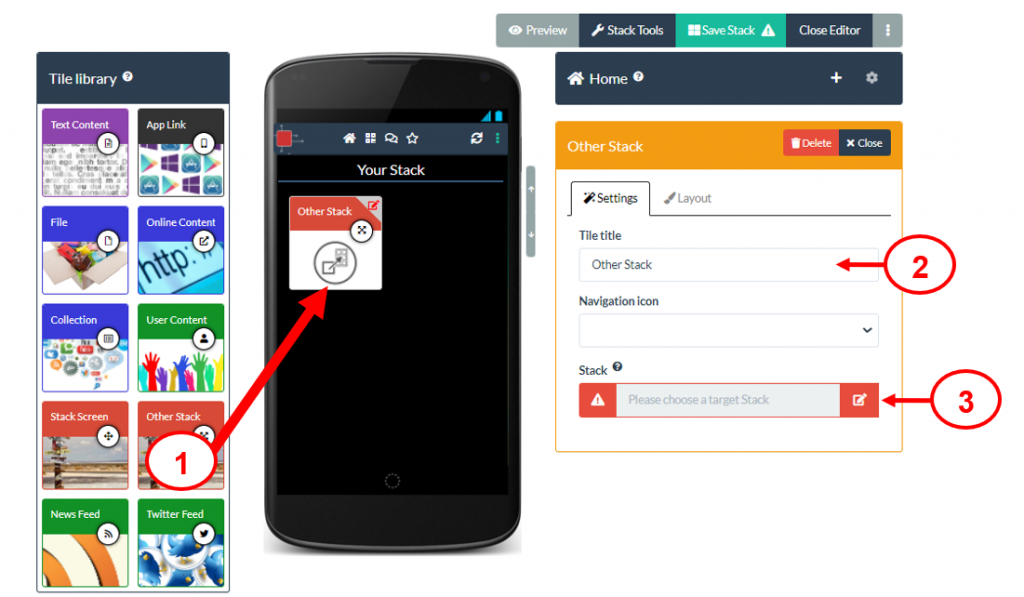
A search box will appear. Type in here to search for the stack you want (4). When you find the stack you want click on its title bar (5) to link it to this Tile.
Remember to Save your stack after you have added new content.
The Stack Screen Tile is used to link to a new screen to your stack and you can then add more content into this new screen.
Why use the Stack Screen Tile?
Authors use the Stack Screen Tile when they want to add structure to their stack. It allows them to create a new screen into which they can add new content. Authors often use the Stack Screen Tile if they have a lot of content and want to separate it into different spaces – e.g. a screen for authors’ information, a screen for presentations, a screen for background material, a screen for references. The tile titled Authors in this example stack is a Stack Screen tile.
Using the Stack Screen Tile
Drag and drop a Stack Screen Tile from the Tile Library into your stack (1). This Tile will be used as the link to your new screen. Type in a Title for your Tile (2). Then click on the drop down menu and choose to Create new screen (3).
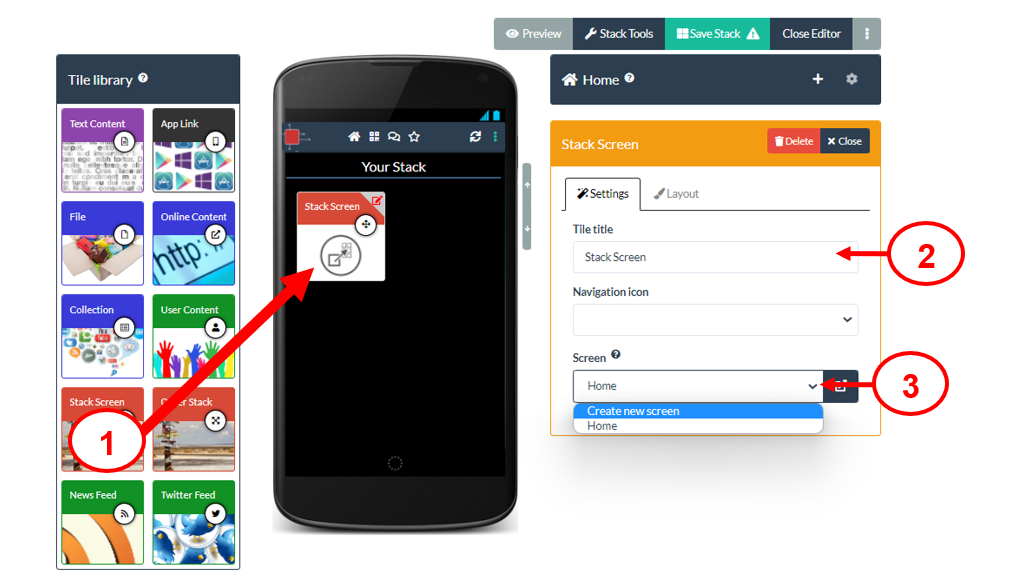
A new empty screen is now created and you can add new content to this screen by dragging in Tiles from the Tile Library as normal (4). Your new screen is automatically called Screen 2. If you want to give it a new name (to help you remember the type of content you have added to this screen) then click on the screen settings icon (5) and add the new name. When you have finished adding content to your new screen then you can return to your stack’s Home screen by clicking drop down menu and choosing Home (6).

Remember to Save your stack after you have added new content.
Status of the ‘Twitter Feed’ tile
5 July 2023
We’re sorry to announce that due to a recent change in Twitter’s policy, we have had to make the ‘Twitter Feed’ tile unavailable.
Since 30 June 2023 Twitter has put in place access restrictions to their platform to no longer allow access for anyone not logged into their platform. This was an unannounced change by Twitter that means that the ‘Twitter Feed’ tile no longer works as expected. Unfortunately this is out of our control.
Read more in this CNN article.
We’re keeping an eye on any developments around this, but in the meantime the ‘Twitter Feed’ tile is unavailable.
If you have already added a ‘Twitter feed’ tile to your stack then when viewers click on it they will get a message explaining why it is not currently working and giving them directions for how to get to your Twitter account or hashtag.
The Learning Toolbox Team
The User Content Tile is used to allow viewers to add content to your stack.
Why use the User Content Tile?
Authors use the User Content Tile if they want to collect information from the viewers of their stack. For example they could be asking viewers to add links to research or reports that are related to the work reported in the stack. They could be asking viewers to share images or sounds related to the work reported in the stack. Another example is when the author has created the the stack to support a round table discussion; the author may then use the User Content tile to allow all participants in the round table discussion to add materials for inclusion in the discussion. The tile titled Your Ideas in this example stack is a User Content tile.
Using the User Content Tile
Drag and drop a User Content Tile from the Tile Library into your stack (1). Type in a Title for your Tile (2). Then click on the drop down menu and choose to Add new collection (3).
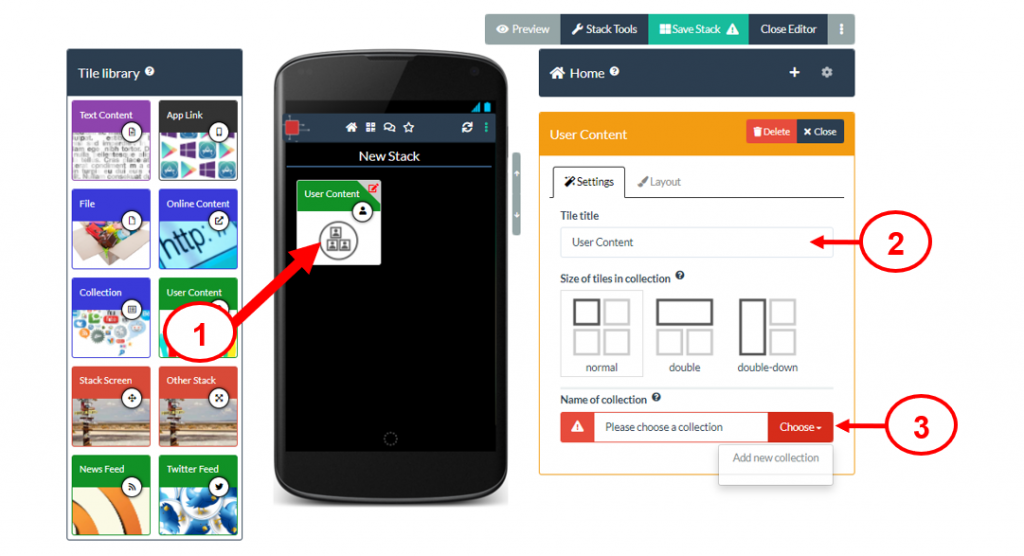
Type in a name for your user content collection and click on the tick button (4).
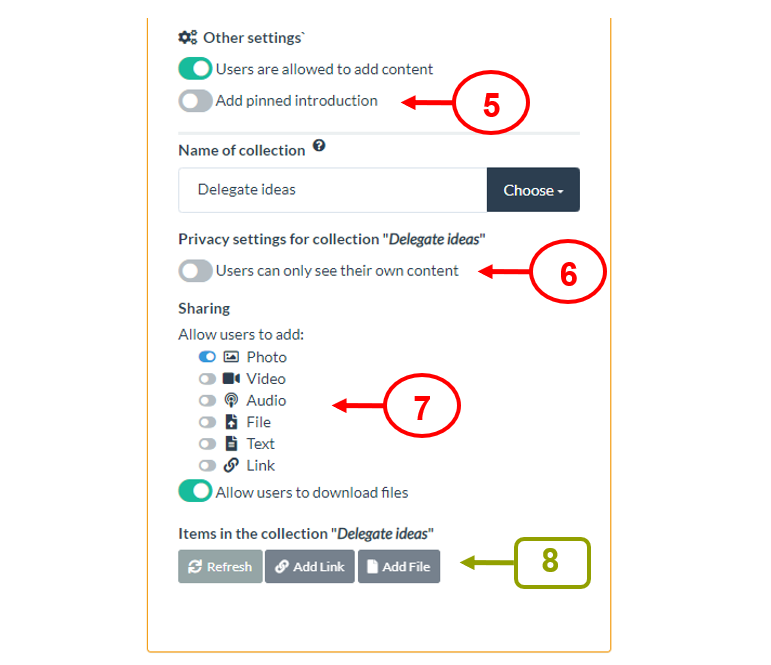
You can turn on the switch (5) and add some introduction text to explain to viewers what you want them to add. You can also choose the privacy settings for your user content collection (6). If you want every viewer to be able to see all the added material then you should leave this setting in its default position. You can also choose what type of content users can add to the user collection (7). If you want to then you can also choose to add some content (a link or a file) to the collection yourself (8).
Remember to Save your stack after you have added new content.
Creating and returning to edit your stack
The App Link Tile is used to link to an App.
Why use the App Link Tile?
Authors often use the App Link Tile if they have developed an App as part of their work or if they have used or evaluated an App as part of their work. The App link tile will direct a viewer to that App (or the relevant place in the App store) when they click on the tile whilst viewing the stack on a suitable device (e.g. smartphone or tablet).
Using the App Link Tile
Drag and drop an App Link Tile from the Tile Library into your stack (1). Then click on the drop down menu to choose the App that you want to include (2). If you cannot find the App that you want to include in the list then please email support@stack.services and if possible we will add it to the list. A title will automatically be added to the Tile, but you can change this. You can also change the layout of the tile (size, colour and background image) by clicking on the Layout tab (3).
Remember to Save your stack after you have added new content.
The Collection Tile is used to a collection of files or links to your stack.
Why use the Collection Tile?
Authors often use the Collection Tile if they have a set of related material that they want to group together in their stack (such as references or background study materials). The Collection Tile allows you to do this with files and web links. If you want more flexibility over what to include in your set of materials and how it appears onscreen then you should use a Stack Screen Tile instead. The tile titled Related Papers in this example stack is a Collection Tile.
Using the Collection Tile
Drag and drop a Collection Tile from the Tile Library into your stack (1). Type in a Title for your Tile (2). Then click on the drop down menu and choose to Add new collection (3).
Type in a name for your collection and click on the tick button (4).
Buttons will now appear onscreen allowing you to click and Add a Link or Add a File (5). Click on the appropriate button and then follow the prompts to upload a file or add your weblink. Once it is added then you can click on the appropriate button again to add your next link or file.
Onscreen you will see a list of the links and files that you have added to this collection. If you need to then you can edit or delete an item by clicking on its edit or delete button (6). It is also possible to drag and drop the items in the list to change the order in which they will appear.
Remember to Save your stack after you have added new content.
The News Feed Tile is used to connect to an RSS news feed and show the most recent posts from that feed in your stack.
Why use the News Feed Tile?
Authors can use the News Feed tile if they want to link to an RSS news feed service that provides up-to-date information on a particular topic related to their work. For example this news feed from BMC Medical Education (https://bmcmededuc.biomedcentral.com/articles/most-recent/rss.xml) provides links to recent articles on medical education. An author may know of a news feed that is particularly relevant to their work and can use the News Feed Tile to link to that.
Using the News Feed Tile
Drag and drop a News Feed Tile from the Tile Library into your stack (1). Type or paste in the URL (web address) to the news feed that you want to connect with and click on the Get Feed button (2).
This creates a live link, so that when viewers click on this Tile they will see the most recent updates sent by that news feed service.
Remember to Save your stack after you have added new content.
The Other Stack Tile is used to add a link to another stack.
Why use the Other Stack Tile?
Authors often use the Other Stack Tile if they have more than one ePoster stack in a conference and they want to add a direct link from one of their ePoster stacks to the other ePoster stack. Authors also use the Other Stack Tile if they want to link to another ePoster stack by their research group or if they want to link to an ePoster stack that they made for a previous year’s conference. The tile titled Explore an ePoster in this example stack is an Other Stack tile.
Using the Other Stack Tile
Drag and drop an Other Stack Tile from the Tile Library into your stack (1). Type in a Title for your Tile (2). Then click on the target stack edit icon to choose the stack you want to connect to this Tile (3).
A search box will appear. Type in here to search for the stack you want (4). When you find the stack you want click on its title bar (5) to link it to this Tile.
Remember to Save your stack after you have added new content.
The Stack Screen Tile is used to link to a new screen to your stack and you can then add more content into this new screen.
Why use the Stack Screen Tile?
Authors use the Stack Screen Tile when they want to add structure to their stack. It allows them to create a new screen into which they can add new content. Authors often use the Stack Screen Tile if they have a lot of content and want to separate it into different spaces – e.g. a screen for authors’ information, a screen for presentations, a screen for background material, a screen for references. The tile titled Authors in this example stack is a Stack Screen tile.
Using the Stack Screen Tile
Drag and drop a Stack Screen Tile from the Tile Library into your stack (1). This Tile will be used as the link to your new screen. Type in a Title for your Tile (2). Then click on the drop down menu and choose to Create new screen (3).
A new empty screen is now created and you can add new content to this screen by dragging in Tiles from the Tile Library as normal (4). Your new screen is automatically called Screen 2. If you want to give it a new name (to help you remember the type of content you have added to this screen) then click on the screen settings icon (5) and add the new name. When you have finished adding content to your new screen then you can return to your stack’s Home screen by clicking drop down menu and choosing Home (6).
Remember to Save your stack after you have added new content.
Status of the ‘Twitter Feed’ tile
5 July 2023
We’re sorry to announce that due to a recent change in Twitter’s policy, we have had to make the ‘Twitter Feed’ tile unavailable.
Since 30 June 2023 Twitter has put in place access restrictions to their platform to no longer allow access for anyone not logged into their platform. This was an unannounced change by Twitter that means that the ‘Twitter Feed’ tile no longer works as expected. Unfortunately this is out of our control.
Read more in this CNN article.
We’re keeping an eye on any developments around this, but in the meantime the ‘Twitter Feed’ tile is unavailable.
If you have already added a ‘Twitter feed’ tile to your stack then when viewers click on it they will get a message explaining why it is not currently working and giving them directions for how to get to your Twitter account or hashtag.
The Learning Toolbox Team
The User Content Tile is used to allow viewers to add content to your stack.
Why use the User Content Tile?
Authors use the User Content Tile if they want to collect information from the viewers of their stack. For example they could be asking viewers to add links to research or reports that are related to the work reported in the stack. They could be asking viewers to share images or sounds related to the work reported in the stack. Another example is when the author has created the the stack to support a round table discussion; the author may then use the User Content tile to allow all participants in the round table discussion to add materials for inclusion in the discussion. The tile titled Your Ideas in this example stack is a User Content tile.
Using the User Content Tile
Drag and drop a User Content Tile from the Tile Library into your stack (1). Type in a Title for your Tile (2). Then click on the drop down menu and choose to Add new collection (3).
Type in a name for your user content collection and click on the tick button (4).
You can turn on the switch (5) and add some introduction text to explain to viewers what you want them to add. You can also choose the privacy settings for your user content collection (6). If you want every viewer to be able to see all the added material then you should leave this setting in its default position. You can also choose what type of content users can add to the user collection (7). If you want to then you can also choose to add some content (a link or a file) to the collection yourself (8).
Remember to Save your stack after you have added new content.
Adding content to your stack using the Tile Library
The App Link Tile is used to link to an App.
Why use the App Link Tile?
Authors often use the App Link Tile if they have developed an App as part of their work or if they have used or evaluated an App as part of their work. The App link tile will direct a viewer to that App (or the relevant place in the App store) when they click on the tile whilst viewing the stack on a suitable device (e.g. smartphone or tablet).
Using the App Link Tile
Drag and drop an App Link Tile from the Tile Library into your stack (1). Then click on the drop down menu to choose the App that you want to include (2). If you cannot find the App that you want to include in the list then please email support@stack.services and if possible we will add it to the list. A title will automatically be added to the Tile, but you can change this. You can also change the layout of the tile (size, colour and background image) by clicking on the Layout tab (3).
Remember to Save your stack after you have added new content.
The Collection Tile is used to a collection of files or links to your stack.
Why use the Collection Tile?
Authors often use the Collection Tile if they have a set of related material that they want to group together in their stack (such as references or background study materials). The Collection Tile allows you to do this with files and web links. If you want more flexibility over what to include in your set of materials and how it appears onscreen then you should use a Stack Screen Tile instead. The tile titled Related Papers in this example stack is a Collection Tile.
Using the Collection Tile
Drag and drop a Collection Tile from the Tile Library into your stack (1). Type in a Title for your Tile (2). Then click on the drop down menu and choose to Add new collection (3).
Type in a name for your collection and click on the tick button (4).
Buttons will now appear onscreen allowing you to click and Add a Link or Add a File (5). Click on the appropriate button and then follow the prompts to upload a file or add your weblink. Once it is added then you can click on the appropriate button again to add your next link or file.
Onscreen you will see a list of the links and files that you have added to this collection. If you need to then you can edit or delete an item by clicking on its edit or delete button (6). It is also possible to drag and drop the items in the list to change the order in which they will appear.
Remember to Save your stack after you have added new content.
The News Feed Tile is used to connect to an RSS news feed and show the most recent posts from that feed in your stack.
Why use the News Feed Tile?
Authors can use the News Feed tile if they want to link to an RSS news feed service that provides up-to-date information on a particular topic related to their work. For example this news feed from BMC Medical Education (https://bmcmededuc.biomedcentral.com/articles/most-recent/rss.xml) provides links to recent articles on medical education. An author may know of a news feed that is particularly relevant to their work and can use the News Feed Tile to link to that.
Using the News Feed Tile
Drag and drop a News Feed Tile from the Tile Library into your stack (1). Type or paste in the URL (web address) to the news feed that you want to connect with and click on the Get Feed button (2).
This creates a live link, so that when viewers click on this Tile they will see the most recent updates sent by that news feed service.
Remember to Save your stack after you have added new content.
The Other Stack Tile is used to add a link to another stack.
Why use the Other Stack Tile?
Authors often use the Other Stack Tile if they have more than one ePoster stack in a conference and they want to add a direct link from one of their ePoster stacks to the other ePoster stack. Authors also use the Other Stack Tile if they want to link to another ePoster stack by their research group or if they want to link to an ePoster stack that they made for a previous year’s conference. The tile titled Explore an ePoster in this example stack is an Other Stack tile.
Using the Other Stack Tile
Drag and drop an Other Stack Tile from the Tile Library into your stack (1). Type in a Title for your Tile (2). Then click on the target stack edit icon to choose the stack you want to connect to this Tile (3).
A search box will appear. Type in here to search for the stack you want (4). When you find the stack you want click on its title bar (5) to link it to this Tile.
Remember to Save your stack after you have added new content.
The Stack Screen Tile is used to link to a new screen to your stack and you can then add more content into this new screen.
Why use the Stack Screen Tile?
Authors use the Stack Screen Tile when they want to add structure to their stack. It allows them to create a new screen into which they can add new content. Authors often use the Stack Screen Tile if they have a lot of content and want to separate it into different spaces – e.g. a screen for authors’ information, a screen for presentations, a screen for background material, a screen for references. The tile titled Authors in this example stack is a Stack Screen tile.
Using the Stack Screen Tile
Drag and drop a Stack Screen Tile from the Tile Library into your stack (1). This Tile will be used as the link to your new screen. Type in a Title for your Tile (2). Then click on the drop down menu and choose to Create new screen (3).
A new empty screen is now created and you can add new content to this screen by dragging in Tiles from the Tile Library as normal (4). Your new screen is automatically called Screen 2. If you want to give it a new name (to help you remember the type of content you have added to this screen) then click on the screen settings icon (5) and add the new name. When you have finished adding content to your new screen then you can return to your stack’s Home screen by clicking drop down menu and choosing Home (6).
Remember to Save your stack after you have added new content.
Status of the ‘Twitter Feed’ tile
5 July 2023
We’re sorry to announce that due to a recent change in Twitter’s policy, we have had to make the ‘Twitter Feed’ tile unavailable.
Since 30 June 2023 Twitter has put in place access restrictions to their platform to no longer allow access for anyone not logged into their platform. This was an unannounced change by Twitter that means that the ‘Twitter Feed’ tile no longer works as expected. Unfortunately this is out of our control.
Read more in this CNN article.
We’re keeping an eye on any developments around this, but in the meantime the ‘Twitter Feed’ tile is unavailable.
If you have already added a ‘Twitter feed’ tile to your stack then when viewers click on it they will get a message explaining why it is not currently working and giving them directions for how to get to your Twitter account or hashtag.
The Learning Toolbox Team
The User Content Tile is used to allow viewers to add content to your stack.
Why use the User Content Tile?
Authors use the User Content Tile if they want to collect information from the viewers of their stack. For example they could be asking viewers to add links to research or reports that are related to the work reported in the stack. They could be asking viewers to share images or sounds related to the work reported in the stack. Another example is when the author has created the the stack to support a round table discussion; the author may then use the User Content tile to allow all participants in the round table discussion to add materials for inclusion in the discussion. The tile titled Your Ideas in this example stack is a User Content tile.
Using the User Content Tile
Drag and drop a User Content Tile from the Tile Library into your stack (1). Type in a Title for your Tile (2). Then click on the drop down menu and choose to Add new collection (3).
Type in a name for your user content collection and click on the tick button (4).
You can turn on the switch (5) and add some introduction text to explain to viewers what you want them to add. You can also choose the privacy settings for your user content collection (6). If you want every viewer to be able to see all the added material then you should leave this setting in its default position. You can also choose what type of content users can add to the user collection (7). If you want to then you can also choose to add some content (a link or a file) to the collection yourself (8).
Remember to Save your stack after you have added new content.
Commonly used Tiles
The App Link Tile is used to link to an App.
Why use the App Link Tile?
Authors often use the App Link Tile if they have developed an App as part of their work or if they have used or evaluated an App as part of their work. The App link tile will direct a viewer to that App (or the relevant place in the App store) when they click on the tile whilst viewing the stack on a suitable device (e.g. smartphone or tablet).
Using the App Link Tile
Drag and drop an App Link Tile from the Tile Library into your stack (1). Then click on the drop down menu to choose the App that you want to include (2). If you cannot find the App that you want to include in the list then please email support@stack.services and if possible we will add it to the list. A title will automatically be added to the Tile, but you can change this. You can also change the layout of the tile (size, colour and background image) by clicking on the Layout tab (3).
Remember to Save your stack after you have added new content.
The Collection Tile is used to a collection of files or links to your stack.
Why use the Collection Tile?
Authors often use the Collection Tile if they have a set of related material that they want to group together in their stack (such as references or background study materials). The Collection Tile allows you to do this with files and web links. If you want more flexibility over what to include in your set of materials and how it appears onscreen then you should use a Stack Screen Tile instead. The tile titled Related Papers in this example stack is a Collection Tile.
Using the Collection Tile
Drag and drop a Collection Tile from the Tile Library into your stack (1). Type in a Title for your Tile (2). Then click on the drop down menu and choose to Add new collection (3).
Type in a name for your collection and click on the tick button (4).
Buttons will now appear onscreen allowing you to click and Add a Link or Add a File (5). Click on the appropriate button and then follow the prompts to upload a file or add your weblink. Once it is added then you can click on the appropriate button again to add your next link or file.
Onscreen you will see a list of the links and files that you have added to this collection. If you need to then you can edit or delete an item by clicking on its edit or delete button (6). It is also possible to drag and drop the items in the list to change the order in which they will appear.
Remember to Save your stack after you have added new content.
The News Feed Tile is used to connect to an RSS news feed and show the most recent posts from that feed in your stack.
Why use the News Feed Tile?
Authors can use the News Feed tile if they want to link to an RSS news feed service that provides up-to-date information on a particular topic related to their work. For example this news feed from BMC Medical Education (https://bmcmededuc.biomedcentral.com/articles/most-recent/rss.xml) provides links to recent articles on medical education. An author may know of a news feed that is particularly relevant to their work and can use the News Feed Tile to link to that.
Using the News Feed Tile
Drag and drop a News Feed Tile from the Tile Library into your stack (1). Type or paste in the URL (web address) to the news feed that you want to connect with and click on the Get Feed button (2).
This creates a live link, so that when viewers click on this Tile they will see the most recent updates sent by that news feed service.
Remember to Save your stack after you have added new content.
The Other Stack Tile is used to add a link to another stack.
Why use the Other Stack Tile?
Authors often use the Other Stack Tile if they have more than one ePoster stack in a conference and they want to add a direct link from one of their ePoster stacks to the other ePoster stack. Authors also use the Other Stack Tile if they want to link to another ePoster stack by their research group or if they want to link to an ePoster stack that they made for a previous year’s conference. The tile titled Explore an ePoster in this example stack is an Other Stack tile.
Using the Other Stack Tile
Drag and drop an Other Stack Tile from the Tile Library into your stack (1). Type in a Title for your Tile (2). Then click on the target stack edit icon to choose the stack you want to connect to this Tile (3).
A search box will appear. Type in here to search for the stack you want (4). When you find the stack you want click on its title bar (5) to link it to this Tile.
Remember to Save your stack after you have added new content.
The Stack Screen Tile is used to link to a new screen to your stack and you can then add more content into this new screen.
Why use the Stack Screen Tile?
Authors use the Stack Screen Tile when they want to add structure to their stack. It allows them to create a new screen into which they can add new content. Authors often use the Stack Screen Tile if they have a lot of content and want to separate it into different spaces – e.g. a screen for authors’ information, a screen for presentations, a screen for background material, a screen for references. The tile titled Authors in this example stack is a Stack Screen tile.
Using the Stack Screen Tile
Drag and drop a Stack Screen Tile from the Tile Library into your stack (1). This Tile will be used as the link to your new screen. Type in a Title for your Tile (2). Then click on the drop down menu and choose to Create new screen (3).
A new empty screen is now created and you can add new content to this screen by dragging in Tiles from the Tile Library as normal (4). Your new screen is automatically called Screen 2. If you want to give it a new name (to help you remember the type of content you have added to this screen) then click on the screen settings icon (5) and add the new name. When you have finished adding content to your new screen then you can return to your stack’s Home screen by clicking drop down menu and choosing Home (6).
Remember to Save your stack after you have added new content.
Status of the ‘Twitter Feed’ tile
5 July 2023
We’re sorry to announce that due to a recent change in Twitter’s policy, we have had to make the ‘Twitter Feed’ tile unavailable.
Since 30 June 2023 Twitter has put in place access restrictions to their platform to no longer allow access for anyone not logged into their platform. This was an unannounced change by Twitter that means that the ‘Twitter Feed’ tile no longer works as expected. Unfortunately this is out of our control.
Read more in this CNN article.
We’re keeping an eye on any developments around this, but in the meantime the ‘Twitter Feed’ tile is unavailable.
If you have already added a ‘Twitter feed’ tile to your stack then when viewers click on it they will get a message explaining why it is not currently working and giving them directions for how to get to your Twitter account or hashtag.
The Learning Toolbox Team
The User Content Tile is used to allow viewers to add content to your stack.
Why use the User Content Tile?
Authors use the User Content Tile if they want to collect information from the viewers of their stack. For example they could be asking viewers to add links to research or reports that are related to the work reported in the stack. They could be asking viewers to share images or sounds related to the work reported in the stack. Another example is when the author has created the the stack to support a round table discussion; the author may then use the User Content tile to allow all participants in the round table discussion to add materials for inclusion in the discussion. The tile titled Your Ideas in this example stack is a User Content tile.
Using the User Content Tile
Drag and drop a User Content Tile from the Tile Library into your stack (1). Type in a Title for your Tile (2). Then click on the drop down menu and choose to Add new collection (3).
Type in a name for your user content collection and click on the tick button (4).
You can turn on the switch (5) and add some introduction text to explain to viewers what you want them to add. You can also choose the privacy settings for your user content collection (6). If you want every viewer to be able to see all the added material then you should leave this setting in its default position. You can also choose what type of content users can add to the user collection (7). If you want to then you can also choose to add some content (a link or a file) to the collection yourself (8).
Remember to Save your stack after you have added new content.
Advanced Tiles
The App Link Tile is used to link to an App.
Why use the App Link Tile?
Authors often use the App Link Tile if they have developed an App as part of their work or if they have used or evaluated an App as part of their work. The App link tile will direct a viewer to that App (or the relevant place in the App store) when they click on the tile whilst viewing the stack on a suitable device (e.g. smartphone or tablet).
Using the App Link Tile
Drag and drop an App Link Tile from the Tile Library into your stack (1). Then click on the drop down menu to choose the App that you want to include (2). If you cannot find the App that you want to include in the list then please email support@stack.services and if possible we will add it to the list. A title will automatically be added to the Tile, but you can change this. You can also change the layout of the tile (size, colour and background image) by clicking on the Layout tab (3).
Remember to Save your stack after you have added new content.
The Collection Tile is used to a collection of files or links to your stack.
Why use the Collection Tile?
Authors often use the Collection Tile if they have a set of related material that they want to group together in their stack (such as references or background study materials). The Collection Tile allows you to do this with files and web links. If you want more flexibility over what to include in your set of materials and how it appears onscreen then you should use a Stack Screen Tile instead. The tile titled Related Papers in this example stack is a Collection Tile.
Using the Collection Tile
Drag and drop a Collection Tile from the Tile Library into your stack (1). Type in a Title for your Tile (2). Then click on the drop down menu and choose to Add new collection (3).
Type in a name for your collection and click on the tick button (4).
Buttons will now appear onscreen allowing you to click and Add a Link or Add a File (5). Click on the appropriate button and then follow the prompts to upload a file or add your weblink. Once it is added then you can click on the appropriate button again to add your next link or file.
Onscreen you will see a list of the links and files that you have added to this collection. If you need to then you can edit or delete an item by clicking on its edit or delete button (6). It is also possible to drag and drop the items in the list to change the order in which they will appear.
Remember to Save your stack after you have added new content.
The News Feed Tile is used to connect to an RSS news feed and show the most recent posts from that feed in your stack.
Why use the News Feed Tile?
Authors can use the News Feed tile if they want to link to an RSS news feed service that provides up-to-date information on a particular topic related to their work. For example this news feed from BMC Medical Education (https://bmcmededuc.biomedcentral.com/articles/most-recent/rss.xml) provides links to recent articles on medical education. An author may know of a news feed that is particularly relevant to their work and can use the News Feed Tile to link to that.
Using the News Feed Tile
Drag and drop a News Feed Tile from the Tile Library into your stack (1). Type or paste in the URL (web address) to the news feed that you want to connect with and click on the Get Feed button (2).
This creates a live link, so that when viewers click on this Tile they will see the most recent updates sent by that news feed service.
Remember to Save your stack after you have added new content.
The Other Stack Tile is used to add a link to another stack.
Why use the Other Stack Tile?
Authors often use the Other Stack Tile if they have more than one ePoster stack in a conference and they want to add a direct link from one of their ePoster stacks to the other ePoster stack. Authors also use the Other Stack Tile if they want to link to another ePoster stack by their research group or if they want to link to an ePoster stack that they made for a previous year’s conference. The tile titled Explore an ePoster in this example stack is an Other Stack tile.
Using the Other Stack Tile
Drag and drop an Other Stack Tile from the Tile Library into your stack (1). Type in a Title for your Tile (2). Then click on the target stack edit icon to choose the stack you want to connect to this Tile (3).
A search box will appear. Type in here to search for the stack you want (4). When you find the stack you want click on its title bar (5) to link it to this Tile.
Remember to Save your stack after you have added new content.
The Stack Screen Tile is used to link to a new screen to your stack and you can then add more content into this new screen.
Why use the Stack Screen Tile?
Authors use the Stack Screen Tile when they want to add structure to their stack. It allows them to create a new screen into which they can add new content. Authors often use the Stack Screen Tile if they have a lot of content and want to separate it into different spaces – e.g. a screen for authors’ information, a screen for presentations, a screen for background material, a screen for references. The tile titled Authors in this example stack is a Stack Screen tile.
Using the Stack Screen Tile
Drag and drop a Stack Screen Tile from the Tile Library into your stack (1). This Tile will be used as the link to your new screen. Type in a Title for your Tile (2). Then click on the drop down menu and choose to Create new screen (3).
A new empty screen is now created and you can add new content to this screen by dragging in Tiles from the Tile Library as normal (4). Your new screen is automatically called Screen 2. If you want to give it a new name (to help you remember the type of content you have added to this screen) then click on the screen settings icon (5) and add the new name. When you have finished adding content to your new screen then you can return to your stack’s Home screen by clicking drop down menu and choosing Home (6).
Remember to Save your stack after you have added new content.
Status of the ‘Twitter Feed’ tile
5 July 2023
We’re sorry to announce that due to a recent change in Twitter’s policy, we have had to make the ‘Twitter Feed’ tile unavailable.
Since 30 June 2023 Twitter has put in place access restrictions to their platform to no longer allow access for anyone not logged into their platform. This was an unannounced change by Twitter that means that the ‘Twitter Feed’ tile no longer works as expected. Unfortunately this is out of our control.
Read more in this CNN article.
We’re keeping an eye on any developments around this, but in the meantime the ‘Twitter Feed’ tile is unavailable.
If you have already added a ‘Twitter feed’ tile to your stack then when viewers click on it they will get a message explaining why it is not currently working and giving them directions for how to get to your Twitter account or hashtag.
The Learning Toolbox Team
The User Content Tile is used to allow viewers to add content to your stack.
Why use the User Content Tile?
Authors use the User Content Tile if they want to collect information from the viewers of their stack. For example they could be asking viewers to add links to research or reports that are related to the work reported in the stack. They could be asking viewers to share images or sounds related to the work reported in the stack. Another example is when the author has created the the stack to support a round table discussion; the author may then use the User Content tile to allow all participants in the round table discussion to add materials for inclusion in the discussion. The tile titled Your Ideas in this example stack is a User Content tile.
Using the User Content Tile
Drag and drop a User Content Tile from the Tile Library into your stack (1). Type in a Title for your Tile (2). Then click on the drop down menu and choose to Add new collection (3).
Type in a name for your user content collection and click on the tick button (4).
You can turn on the switch (5) and add some introduction text to explain to viewers what you want them to add. You can also choose the privacy settings for your user content collection (6). If you want every viewer to be able to see all the added material then you should leave this setting in its default position. You can also choose what type of content users can add to the user collection (7). If you want to then you can also choose to add some content (a link or a file) to the collection yourself (8).
Remember to Save your stack after you have added new content.
Editing Tiles
The App Link Tile is used to link to an App.
Why use the App Link Tile?
Authors often use the App Link Tile if they have developed an App as part of their work or if they have used or evaluated an App as part of their work. The App link tile will direct a viewer to that App (or the relevant place in the App store) when they click on the tile whilst viewing the stack on a suitable device (e.g. smartphone or tablet).
Using the App Link Tile
Drag and drop an App Link Tile from the Tile Library into your stack (1). Then click on the drop down menu to choose the App that you want to include (2). If you cannot find the App that you want to include in the list then please email support@stack.services and if possible we will add it to the list. A title will automatically be added to the Tile, but you can change this. You can also change the layout of the tile (size, colour and background image) by clicking on the Layout tab (3).
Remember to Save your stack after you have added new content.
The Collection Tile is used to a collection of files or links to your stack.
Why use the Collection Tile?
Authors often use the Collection Tile if they have a set of related material that they want to group together in their stack (such as references or background study materials). The Collection Tile allows you to do this with files and web links. If you want more flexibility over what to include in your set of materials and how it appears onscreen then you should use a Stack Screen Tile instead. The tile titled Related Papers in this example stack is a Collection Tile.
Using the Collection Tile
Drag and drop a Collection Tile from the Tile Library into your stack (1). Type in a Title for your Tile (2). Then click on the drop down menu and choose to Add new collection (3).
Type in a name for your collection and click on the tick button (4).
Buttons will now appear onscreen allowing you to click and Add a Link or Add a File (5). Click on the appropriate button and then follow the prompts to upload a file or add your weblink. Once it is added then you can click on the appropriate button again to add your next link or file.
Onscreen you will see a list of the links and files that you have added to this collection. If you need to then you can edit or delete an item by clicking on its edit or delete button (6). It is also possible to drag and drop the items in the list to change the order in which they will appear.
Remember to Save your stack after you have added new content.
The News Feed Tile is used to connect to an RSS news feed and show the most recent posts from that feed in your stack.
Why use the News Feed Tile?
Authors can use the News Feed tile if they want to link to an RSS news feed service that provides up-to-date information on a particular topic related to their work. For example this news feed from BMC Medical Education (https://bmcmededuc.biomedcentral.com/articles/most-recent/rss.xml) provides links to recent articles on medical education. An author may know of a news feed that is particularly relevant to their work and can use the News Feed Tile to link to that.
Using the News Feed Tile
Drag and drop a News Feed Tile from the Tile Library into your stack (1). Type or paste in the URL (web address) to the news feed that you want to connect with and click on the Get Feed button (2).
This creates a live link, so that when viewers click on this Tile they will see the most recent updates sent by that news feed service.
Remember to Save your stack after you have added new content.
The Other Stack Tile is used to add a link to another stack.
Why use the Other Stack Tile?
Authors often use the Other Stack Tile if they have more than one ePoster stack in a conference and they want to add a direct link from one of their ePoster stacks to the other ePoster stack. Authors also use the Other Stack Tile if they want to link to another ePoster stack by their research group or if they want to link to an ePoster stack that they made for a previous year’s conference. The tile titled Explore an ePoster in this example stack is an Other Stack tile.
Using the Other Stack Tile
Drag and drop an Other Stack Tile from the Tile Library into your stack (1). Type in a Title for your Tile (2). Then click on the target stack edit icon to choose the stack you want to connect to this Tile (3).
A search box will appear. Type in here to search for the stack you want (4). When you find the stack you want click on its title bar (5) to link it to this Tile.
Remember to Save your stack after you have added new content.
The Stack Screen Tile is used to link to a new screen to your stack and you can then add more content into this new screen.
Why use the Stack Screen Tile?
Authors use the Stack Screen Tile when they want to add structure to their stack. It allows them to create a new screen into which they can add new content. Authors often use the Stack Screen Tile if they have a lot of content and want to separate it into different spaces – e.g. a screen for authors’ information, a screen for presentations, a screen for background material, a screen for references. The tile titled Authors in this example stack is a Stack Screen tile.
Using the Stack Screen Tile
Drag and drop a Stack Screen Tile from the Tile Library into your stack (1). This Tile will be used as the link to your new screen. Type in a Title for your Tile (2). Then click on the drop down menu and choose to Create new screen (3).
A new empty screen is now created and you can add new content to this screen by dragging in Tiles from the Tile Library as normal (4). Your new screen is automatically called Screen 2. If you want to give it a new name (to help you remember the type of content you have added to this screen) then click on the screen settings icon (5) and add the new name. When you have finished adding content to your new screen then you can return to your stack’s Home screen by clicking drop down menu and choosing Home (6).
Remember to Save your stack after you have added new content.
Status of the ‘Twitter Feed’ tile
5 July 2023
We’re sorry to announce that due to a recent change in Twitter’s policy, we have had to make the ‘Twitter Feed’ tile unavailable.
Since 30 June 2023 Twitter has put in place access restrictions to their platform to no longer allow access for anyone not logged into their platform. This was an unannounced change by Twitter that means that the ‘Twitter Feed’ tile no longer works as expected. Unfortunately this is out of our control.
Read more in this CNN article.
We’re keeping an eye on any developments around this, but in the meantime the ‘Twitter Feed’ tile is unavailable.
If you have already added a ‘Twitter feed’ tile to your stack then when viewers click on it they will get a message explaining why it is not currently working and giving them directions for how to get to your Twitter account or hashtag.
The Learning Toolbox Team
The User Content Tile is used to allow viewers to add content to your stack.
Why use the User Content Tile?
Authors use the User Content Tile if they want to collect information from the viewers of their stack. For example they could be asking viewers to add links to research or reports that are related to the work reported in the stack. They could be asking viewers to share images or sounds related to the work reported in the stack. Another example is when the author has created the the stack to support a round table discussion; the author may then use the User Content tile to allow all participants in the round table discussion to add materials for inclusion in the discussion. The tile titled Your Ideas in this example stack is a User Content tile.
Using the User Content Tile
Drag and drop a User Content Tile from the Tile Library into your stack (1). Type in a Title for your Tile (2). Then click on the drop down menu and choose to Add new collection (3).
Type in a name for your user content collection and click on the tick button (4).
You can turn on the switch (5) and add some introduction text to explain to viewers what you want them to add. You can also choose the privacy settings for your user content collection (6). If you want every viewer to be able to see all the added material then you should leave this setting in its default position. You can also choose what type of content users can add to the user collection (7). If you want to then you can also choose to add some content (a link or a file) to the collection yourself (8).
Remember to Save your stack after you have added new content.
Changing the layout and appearance of a tile
The App Link Tile is used to link to an App.
Why use the App Link Tile?
Authors often use the App Link Tile if they have developed an App as part of their work or if they have used or evaluated an App as part of their work. The App link tile will direct a viewer to that App (or the relevant place in the App store) when they click on the tile whilst viewing the stack on a suitable device (e.g. smartphone or tablet).
Using the App Link Tile
Drag and drop an App Link Tile from the Tile Library into your stack (1). Then click on the drop down menu to choose the App that you want to include (2). If you cannot find the App that you want to include in the list then please email support@stack.services and if possible we will add it to the list. A title will automatically be added to the Tile, but you can change this. You can also change the layout of the tile (size, colour and background image) by clicking on the Layout tab (3).
Remember to Save your stack after you have added new content.
The Collection Tile is used to a collection of files or links to your stack.
Why use the Collection Tile?
Authors often use the Collection Tile if they have a set of related material that they want to group together in their stack (such as references or background study materials). The Collection Tile allows you to do this with files and web links. If you want more flexibility over what to include in your set of materials and how it appears onscreen then you should use a Stack Screen Tile instead. The tile titled Related Papers in this example stack is a Collection Tile.
Using the Collection Tile
Drag and drop a Collection Tile from the Tile Library into your stack (1). Type in a Title for your Tile (2). Then click on the drop down menu and choose to Add new collection (3).
Type in a name for your collection and click on the tick button (4).
Buttons will now appear onscreen allowing you to click and Add a Link or Add a File (5). Click on the appropriate button and then follow the prompts to upload a file or add your weblink. Once it is added then you can click on the appropriate button again to add your next link or file.
Onscreen you will see a list of the links and files that you have added to this collection. If you need to then you can edit or delete an item by clicking on its edit or delete button (6). It is also possible to drag and drop the items in the list to change the order in which they will appear.
Remember to Save your stack after you have added new content.
The News Feed Tile is used to connect to an RSS news feed and show the most recent posts from that feed in your stack.
Why use the News Feed Tile?
Authors can use the News Feed tile if they want to link to an RSS news feed service that provides up-to-date information on a particular topic related to their work. For example this news feed from BMC Medical Education (https://bmcmededuc.biomedcentral.com/articles/most-recent/rss.xml) provides links to recent articles on medical education. An author may know of a news feed that is particularly relevant to their work and can use the News Feed Tile to link to that.
Using the News Feed Tile
Drag and drop a News Feed Tile from the Tile Library into your stack (1). Type or paste in the URL (web address) to the news feed that you want to connect with and click on the Get Feed button (2).
This creates a live link, so that when viewers click on this Tile they will see the most recent updates sent by that news feed service.
Remember to Save your stack after you have added new content.
The Other Stack Tile is used to add a link to another stack.
Why use the Other Stack Tile?
Authors often use the Other Stack Tile if they have more than one ePoster stack in a conference and they want to add a direct link from one of their ePoster stacks to the other ePoster stack. Authors also use the Other Stack Tile if they want to link to another ePoster stack by their research group or if they want to link to an ePoster stack that they made for a previous year’s conference. The tile titled Explore an ePoster in this example stack is an Other Stack tile.
Using the Other Stack Tile
Drag and drop an Other Stack Tile from the Tile Library into your stack (1). Type in a Title for your Tile (2). Then click on the target stack edit icon to choose the stack you want to connect to this Tile (3).
A search box will appear. Type in here to search for the stack you want (4). When you find the stack you want click on its title bar (5) to link it to this Tile.
Remember to Save your stack after you have added new content.
The Stack Screen Tile is used to link to a new screen to your stack and you can then add more content into this new screen.
Why use the Stack Screen Tile?
Authors use the Stack Screen Tile when they want to add structure to their stack. It allows them to create a new screen into which they can add new content. Authors often use the Stack Screen Tile if they have a lot of content and want to separate it into different spaces – e.g. a screen for authors’ information, a screen for presentations, a screen for background material, a screen for references. The tile titled Authors in this example stack is a Stack Screen tile.
Using the Stack Screen Tile
Drag and drop a Stack Screen Tile from the Tile Library into your stack (1). This Tile will be used as the link to your new screen. Type in a Title for your Tile (2). Then click on the drop down menu and choose to Create new screen (3).
A new empty screen is now created and you can add new content to this screen by dragging in Tiles from the Tile Library as normal (4). Your new screen is automatically called Screen 2. If you want to give it a new name (to help you remember the type of content you have added to this screen) then click on the screen settings icon (5) and add the new name. When you have finished adding content to your new screen then you can return to your stack’s Home screen by clicking drop down menu and choosing Home (6).
Remember to Save your stack after you have added new content.
Status of the ‘Twitter Feed’ tile
5 July 2023
We’re sorry to announce that due to a recent change in Twitter’s policy, we have had to make the ‘Twitter Feed’ tile unavailable.
Since 30 June 2023 Twitter has put in place access restrictions to their platform to no longer allow access for anyone not logged into their platform. This was an unannounced change by Twitter that means that the ‘Twitter Feed’ tile no longer works as expected. Unfortunately this is out of our control.
Read more in this CNN article.
We’re keeping an eye on any developments around this, but in the meantime the ‘Twitter Feed’ tile is unavailable.
If you have already added a ‘Twitter feed’ tile to your stack then when viewers click on it they will get a message explaining why it is not currently working and giving them directions for how to get to your Twitter account or hashtag.
The Learning Toolbox Team
The User Content Tile is used to allow viewers to add content to your stack.
Why use the User Content Tile?
Authors use the User Content Tile if they want to collect information from the viewers of their stack. For example they could be asking viewers to add links to research or reports that are related to the work reported in the stack. They could be asking viewers to share images or sounds related to the work reported in the stack. Another example is when the author has created the the stack to support a round table discussion; the author may then use the User Content tile to allow all participants in the round table discussion to add materials for inclusion in the discussion. The tile titled Your Ideas in this example stack is a User Content tile.
Using the User Content Tile
Drag and drop a User Content Tile from the Tile Library into your stack (1). Type in a Title for your Tile (2). Then click on the drop down menu and choose to Add new collection (3).
Type in a name for your user content collection and click on the tick button (4).
You can turn on the switch (5) and add some introduction text to explain to viewers what you want them to add. You can also choose the privacy settings for your user content collection (6). If you want every viewer to be able to see all the added material then you should leave this setting in its default position. You can also choose what type of content users can add to the user collection (7). If you want to then you can also choose to add some content (a link or a file) to the collection yourself (8).
Remember to Save your stack after you have added new content.
Adding a PowerPoint file to your stack
The App Link Tile is used to link to an App.
Why use the App Link Tile?
Authors often use the App Link Tile if they have developed an App as part of their work or if they have used or evaluated an App as part of their work. The App link tile will direct a viewer to that App (or the relevant place in the App store) when they click on the tile whilst viewing the stack on a suitable device (e.g. smartphone or tablet).
Using the App Link Tile
Drag and drop an App Link Tile from the Tile Library into your stack (1). Then click on the drop down menu to choose the App that you want to include (2). If you cannot find the App that you want to include in the list then please email support@stack.services and if possible we will add it to the list. A title will automatically be added to the Tile, but you can change this. You can also change the layout of the tile (size, colour and background image) by clicking on the Layout tab (3).
Remember to Save your stack after you have added new content.
The Collection Tile is used to a collection of files or links to your stack.
Why use the Collection Tile?
Authors often use the Collection Tile if they have a set of related material that they want to group together in their stack (such as references or background study materials). The Collection Tile allows you to do this with files and web links. If you want more flexibility over what to include in your set of materials and how it appears onscreen then you should use a Stack Screen Tile instead. The tile titled Related Papers in this example stack is a Collection Tile.
Using the Collection Tile
Drag and drop a Collection Tile from the Tile Library into your stack (1). Type in a Title for your Tile (2). Then click on the drop down menu and choose to Add new collection (3).
Type in a name for your collection and click on the tick button (4).
Buttons will now appear onscreen allowing you to click and Add a Link or Add a File (5). Click on the appropriate button and then follow the prompts to upload a file or add your weblink. Once it is added then you can click on the appropriate button again to add your next link or file.
Onscreen you will see a list of the links and files that you have added to this collection. If you need to then you can edit or delete an item by clicking on its edit or delete button (6). It is also possible to drag and drop the items in the list to change the order in which they will appear.
Remember to Save your stack after you have added new content.
The News Feed Tile is used to connect to an RSS news feed and show the most recent posts from that feed in your stack.
Why use the News Feed Tile?
Authors can use the News Feed tile if they want to link to an RSS news feed service that provides up-to-date information on a particular topic related to their work. For example this news feed from BMC Medical Education (https://bmcmededuc.biomedcentral.com/articles/most-recent/rss.xml) provides links to recent articles on medical education. An author may know of a news feed that is particularly relevant to their work and can use the News Feed Tile to link to that.
Using the News Feed Tile
Drag and drop a News Feed Tile from the Tile Library into your stack (1). Type or paste in the URL (web address) to the news feed that you want to connect with and click on the Get Feed button (2).
This creates a live link, so that when viewers click on this Tile they will see the most recent updates sent by that news feed service.
Remember to Save your stack after you have added new content.
The Other Stack Tile is used to add a link to another stack.
Why use the Other Stack Tile?
Authors often use the Other Stack Tile if they have more than one ePoster stack in a conference and they want to add a direct link from one of their ePoster stacks to the other ePoster stack. Authors also use the Other Stack Tile if they want to link to another ePoster stack by their research group or if they want to link to an ePoster stack that they made for a previous year’s conference. The tile titled Explore an ePoster in this example stack is an Other Stack tile.
Using the Other Stack Tile
Drag and drop an Other Stack Tile from the Tile Library into your stack (1). Type in a Title for your Tile (2). Then click on the target stack edit icon to choose the stack you want to connect to this Tile (3).
A search box will appear. Type in here to search for the stack you want (4). When you find the stack you want click on its title bar (5) to link it to this Tile.
Remember to Save your stack after you have added new content.
The Stack Screen Tile is used to link to a new screen to your stack and you can then add more content into this new screen.
Why use the Stack Screen Tile?
Authors use the Stack Screen Tile when they want to add structure to their stack. It allows them to create a new screen into which they can add new content. Authors often use the Stack Screen Tile if they have a lot of content and want to separate it into different spaces – e.g. a screen for authors’ information, a screen for presentations, a screen for background material, a screen for references. The tile titled Authors in this example stack is a Stack Screen tile.
Using the Stack Screen Tile
Drag and drop a Stack Screen Tile from the Tile Library into your stack (1). This Tile will be used as the link to your new screen. Type in a Title for your Tile (2). Then click on the drop down menu and choose to Create new screen (3).
A new empty screen is now created and you can add new content to this screen by dragging in Tiles from the Tile Library as normal (4). Your new screen is automatically called Screen 2. If you want to give it a new name (to help you remember the type of content you have added to this screen) then click on the screen settings icon (5) and add the new name. When you have finished adding content to your new screen then you can return to your stack’s Home screen by clicking drop down menu and choosing Home (6).
Remember to Save your stack after you have added new content.
Status of the ‘Twitter Feed’ tile
5 July 2023
We’re sorry to announce that due to a recent change in Twitter’s policy, we have had to make the ‘Twitter Feed’ tile unavailable.
Since 30 June 2023 Twitter has put in place access restrictions to their platform to no longer allow access for anyone not logged into their platform. This was an unannounced change by Twitter that means that the ‘Twitter Feed’ tile no longer works as expected. Unfortunately this is out of our control.
Read more in this CNN article.
We’re keeping an eye on any developments around this, but in the meantime the ‘Twitter Feed’ tile is unavailable.
If you have already added a ‘Twitter feed’ tile to your stack then when viewers click on it they will get a message explaining why it is not currently working and giving them directions for how to get to your Twitter account or hashtag.
The Learning Toolbox Team
The User Content Tile is used to allow viewers to add content to your stack.
Why use the User Content Tile?
Authors use the User Content Tile if they want to collect information from the viewers of their stack. For example they could be asking viewers to add links to research or reports that are related to the work reported in the stack. They could be asking viewers to share images or sounds related to the work reported in the stack. Another example is when the author has created the the stack to support a round table discussion; the author may then use the User Content tile to allow all participants in the round table discussion to add materials for inclusion in the discussion. The tile titled Your Ideas in this example stack is a User Content tile.
Using the User Content Tile
Drag and drop a User Content Tile from the Tile Library into your stack (1). Type in a Title for your Tile (2). Then click on the drop down menu and choose to Add new collection (3).
Type in a name for your user content collection and click on the tick button (4).
You can turn on the switch (5) and add some introduction text to explain to viewers what you want them to add. You can also choose the privacy settings for your user content collection (6). If you want every viewer to be able to see all the added material then you should leave this setting in its default position. You can also choose what type of content users can add to the user collection (7). If you want to then you can also choose to add some content (a link or a file) to the collection yourself (8).
Remember to Save your stack after you have added new content.
Adding a video to your stack
The App Link Tile is used to link to an App.
Why use the App Link Tile?
Authors often use the App Link Tile if they have developed an App as part of their work or if they have used or evaluated an App as part of their work. The App link tile will direct a viewer to that App (or the relevant place in the App store) when they click on the tile whilst viewing the stack on a suitable device (e.g. smartphone or tablet).
Using the App Link Tile
Drag and drop an App Link Tile from the Tile Library into your stack (1). Then click on the drop down menu to choose the App that you want to include (2). If you cannot find the App that you want to include in the list then please email support@stack.services and if possible we will add it to the list. A title will automatically be added to the Tile, but you can change this. You can also change the layout of the tile (size, colour and background image) by clicking on the Layout tab (3).
Remember to Save your stack after you have added new content.
The Collection Tile is used to a collection of files or links to your stack.
Why use the Collection Tile?
Authors often use the Collection Tile if they have a set of related material that they want to group together in their stack (such as references or background study materials). The Collection Tile allows you to do this with files and web links. If you want more flexibility over what to include in your set of materials and how it appears onscreen then you should use a Stack Screen Tile instead. The tile titled Related Papers in this example stack is a Collection Tile.
Using the Collection Tile
Drag and drop a Collection Tile from the Tile Library into your stack (1). Type in a Title for your Tile (2). Then click on the drop down menu and choose to Add new collection (3).
Type in a name for your collection and click on the tick button (4).
Buttons will now appear onscreen allowing you to click and Add a Link or Add a File (5). Click on the appropriate button and then follow the prompts to upload a file or add your weblink. Once it is added then you can click on the appropriate button again to add your next link or file.
Onscreen you will see a list of the links and files that you have added to this collection. If you need to then you can edit or delete an item by clicking on its edit or delete button (6). It is also possible to drag and drop the items in the list to change the order in which they will appear.
Remember to Save your stack after you have added new content.
The News Feed Tile is used to connect to an RSS news feed and show the most recent posts from that feed in your stack.
Why use the News Feed Tile?
Authors can use the News Feed tile if they want to link to an RSS news feed service that provides up-to-date information on a particular topic related to their work. For example this news feed from BMC Medical Education (https://bmcmededuc.biomedcentral.com/articles/most-recent/rss.xml) provides links to recent articles on medical education. An author may know of a news feed that is particularly relevant to their work and can use the News Feed Tile to link to that.
Using the News Feed Tile
Drag and drop a News Feed Tile from the Tile Library into your stack (1). Type or paste in the URL (web address) to the news feed that you want to connect with and click on the Get Feed button (2).
This creates a live link, so that when viewers click on this Tile they will see the most recent updates sent by that news feed service.
Remember to Save your stack after you have added new content.
The Other Stack Tile is used to add a link to another stack.
Why use the Other Stack Tile?
Authors often use the Other Stack Tile if they have more than one ePoster stack in a conference and they want to add a direct link from one of their ePoster stacks to the other ePoster stack. Authors also use the Other Stack Tile if they want to link to another ePoster stack by their research group or if they want to link to an ePoster stack that they made for a previous year’s conference. The tile titled Explore an ePoster in this example stack is an Other Stack tile.
Using the Other Stack Tile
Drag and drop an Other Stack Tile from the Tile Library into your stack (1). Type in a Title for your Tile (2). Then click on the target stack edit icon to choose the stack you want to connect to this Tile (3).
A search box will appear. Type in here to search for the stack you want (4). When you find the stack you want click on its title bar (5) to link it to this Tile.
Remember to Save your stack after you have added new content.
The Stack Screen Tile is used to link to a new screen to your stack and you can then add more content into this new screen.
Why use the Stack Screen Tile?
Authors use the Stack Screen Tile when they want to add structure to their stack. It allows them to create a new screen into which they can add new content. Authors often use the Stack Screen Tile if they have a lot of content and want to separate it into different spaces – e.g. a screen for authors’ information, a screen for presentations, a screen for background material, a screen for references. The tile titled Authors in this example stack is a Stack Screen tile.
Using the Stack Screen Tile
Drag and drop a Stack Screen Tile from the Tile Library into your stack (1). This Tile will be used as the link to your new screen. Type in a Title for your Tile (2). Then click on the drop down menu and choose to Create new screen (3).
A new empty screen is now created and you can add new content to this screen by dragging in Tiles from the Tile Library as normal (4). Your new screen is automatically called Screen 2. If you want to give it a new name (to help you remember the type of content you have added to this screen) then click on the screen settings icon (5) and add the new name. When you have finished adding content to your new screen then you can return to your stack’s Home screen by clicking drop down menu and choosing Home (6).
Remember to Save your stack after you have added new content.
Status of the ‘Twitter Feed’ tile
5 July 2023
We’re sorry to announce that due to a recent change in Twitter’s policy, we have had to make the ‘Twitter Feed’ tile unavailable.
Since 30 June 2023 Twitter has put in place access restrictions to their platform to no longer allow access for anyone not logged into their platform. This was an unannounced change by Twitter that means that the ‘Twitter Feed’ tile no longer works as expected. Unfortunately this is out of our control.
Read more in this CNN article.
We’re keeping an eye on any developments around this, but in the meantime the ‘Twitter Feed’ tile is unavailable.
If you have already added a ‘Twitter feed’ tile to your stack then when viewers click on it they will get a message explaining why it is not currently working and giving them directions for how to get to your Twitter account or hashtag.
The Learning Toolbox Team
The User Content Tile is used to allow viewers to add content to your stack.
Why use the User Content Tile?
Authors use the User Content Tile if they want to collect information from the viewers of their stack. For example they could be asking viewers to add links to research or reports that are related to the work reported in the stack. They could be asking viewers to share images or sounds related to the work reported in the stack. Another example is when the author has created the the stack to support a round table discussion; the author may then use the User Content tile to allow all participants in the round table discussion to add materials for inclusion in the discussion. The tile titled Your Ideas in this example stack is a User Content tile.
Using the User Content Tile
Drag and drop a User Content Tile from the Tile Library into your stack (1). Type in a Title for your Tile (2). Then click on the drop down menu and choose to Add new collection (3).
Type in a name for your user content collection and click on the tick button (4).
You can turn on the switch (5) and add some introduction text to explain to viewers what you want them to add. You can also choose the privacy settings for your user content collection (6). If you want every viewer to be able to see all the added material then you should leave this setting in its default position. You can also choose what type of content users can add to the user collection (7). If you want to then you can also choose to add some content (a link or a file) to the collection yourself (8).
Remember to Save your stack after you have added new content.
Adding an extra screen/layer to your stack
The App Link Tile is used to link to an App.
Why use the App Link Tile?
Authors often use the App Link Tile if they have developed an App as part of their work or if they have used or evaluated an App as part of their work. The App link tile will direct a viewer to that App (or the relevant place in the App store) when they click on the tile whilst viewing the stack on a suitable device (e.g. smartphone or tablet).
Using the App Link Tile
Drag and drop an App Link Tile from the Tile Library into your stack (1). Then click on the drop down menu to choose the App that you want to include (2). If you cannot find the App that you want to include in the list then please email support@stack.services and if possible we will add it to the list. A title will automatically be added to the Tile, but you can change this. You can also change the layout of the tile (size, colour and background image) by clicking on the Layout tab (3).
Remember to Save your stack after you have added new content.
The Collection Tile is used to a collection of files or links to your stack.
Why use the Collection Tile?
Authors often use the Collection Tile if they have a set of related material that they want to group together in their stack (such as references or background study materials). The Collection Tile allows you to do this with files and web links. If you want more flexibility over what to include in your set of materials and how it appears onscreen then you should use a Stack Screen Tile instead. The tile titled Related Papers in this example stack is a Collection Tile.
Using the Collection Tile
Drag and drop a Collection Tile from the Tile Library into your stack (1). Type in a Title for your Tile (2). Then click on the drop down menu and choose to Add new collection (3).
Type in a name for your collection and click on the tick button (4).
Buttons will now appear onscreen allowing you to click and Add a Link or Add a File (5). Click on the appropriate button and then follow the prompts to upload a file or add your weblink. Once it is added then you can click on the appropriate button again to add your next link or file.
Onscreen you will see a list of the links and files that you have added to this collection. If you need to then you can edit or delete an item by clicking on its edit or delete button (6). It is also possible to drag and drop the items in the list to change the order in which they will appear.
Remember to Save your stack after you have added new content.
The News Feed Tile is used to connect to an RSS news feed and show the most recent posts from that feed in your stack.
Why use the News Feed Tile?
Authors can use the News Feed tile if they want to link to an RSS news feed service that provides up-to-date information on a particular topic related to their work. For example this news feed from BMC Medical Education (https://bmcmededuc.biomedcentral.com/articles/most-recent/rss.xml) provides links to recent articles on medical education. An author may know of a news feed that is particularly relevant to their work and can use the News Feed Tile to link to that.
Using the News Feed Tile
Drag and drop a News Feed Tile from the Tile Library into your stack (1). Type or paste in the URL (web address) to the news feed that you want to connect with and click on the Get Feed button (2).
This creates a live link, so that when viewers click on this Tile they will see the most recent updates sent by that news feed service.
Remember to Save your stack after you have added new content.
The Other Stack Tile is used to add a link to another stack.
Why use the Other Stack Tile?
Authors often use the Other Stack Tile if they have more than one ePoster stack in a conference and they want to add a direct link from one of their ePoster stacks to the other ePoster stack. Authors also use the Other Stack Tile if they want to link to another ePoster stack by their research group or if they want to link to an ePoster stack that they made for a previous year’s conference. The tile titled Explore an ePoster in this example stack is an Other Stack tile.
Using the Other Stack Tile
Drag and drop an Other Stack Tile from the Tile Library into your stack (1). Type in a Title for your Tile (2). Then click on the target stack edit icon to choose the stack you want to connect to this Tile (3).
A search box will appear. Type in here to search for the stack you want (4). When you find the stack you want click on its title bar (5) to link it to this Tile.
Remember to Save your stack after you have added new content.
The Stack Screen Tile is used to link to a new screen to your stack and you can then add more content into this new screen.
Why use the Stack Screen Tile?
Authors use the Stack Screen Tile when they want to add structure to their stack. It allows them to create a new screen into which they can add new content. Authors often use the Stack Screen Tile if they have a lot of content and want to separate it into different spaces – e.g. a screen for authors’ information, a screen for presentations, a screen for background material, a screen for references. The tile titled Authors in this example stack is a Stack Screen tile.
Using the Stack Screen Tile
Drag and drop a Stack Screen Tile from the Tile Library into your stack (1). This Tile will be used as the link to your new screen. Type in a Title for your Tile (2). Then click on the drop down menu and choose to Create new screen (3).
A new empty screen is now created and you can add new content to this screen by dragging in Tiles from the Tile Library as normal (4). Your new screen is automatically called Screen 2. If you want to give it a new name (to help you remember the type of content you have added to this screen) then click on the screen settings icon (5) and add the new name. When you have finished adding content to your new screen then you can return to your stack’s Home screen by clicking drop down menu and choosing Home (6).
Remember to Save your stack after you have added new content.
Status of the ‘Twitter Feed’ tile
5 July 2023
We’re sorry to announce that due to a recent change in Twitter’s policy, we have had to make the ‘Twitter Feed’ tile unavailable.
Since 30 June 2023 Twitter has put in place access restrictions to their platform to no longer allow access for anyone not logged into their platform. This was an unannounced change by Twitter that means that the ‘Twitter Feed’ tile no longer works as expected. Unfortunately this is out of our control.
Read more in this CNN article.
We’re keeping an eye on any developments around this, but in the meantime the ‘Twitter Feed’ tile is unavailable.
If you have already added a ‘Twitter feed’ tile to your stack then when viewers click on it they will get a message explaining why it is not currently working and giving them directions for how to get to your Twitter account or hashtag.
The Learning Toolbox Team
The User Content Tile is used to allow viewers to add content to your stack.
Why use the User Content Tile?
Authors use the User Content Tile if they want to collect information from the viewers of their stack. For example they could be asking viewers to add links to research or reports that are related to the work reported in the stack. They could be asking viewers to share images or sounds related to the work reported in the stack. Another example is when the author has created the the stack to support a round table discussion; the author may then use the User Content tile to allow all participants in the round table discussion to add materials for inclusion in the discussion. The tile titled Your Ideas in this example stack is a User Content tile.
Using the User Content Tile
Drag and drop a User Content Tile from the Tile Library into your stack (1). Type in a Title for your Tile (2). Then click on the drop down menu and choose to Add new collection (3).
Type in a name for your user content collection and click on the tick button (4).
You can turn on the switch (5) and add some introduction text to explain to viewers what you want them to add. You can also choose the privacy settings for your user content collection (6). If you want every viewer to be able to see all the added material then you should leave this setting in its default position. You can also choose what type of content users can add to the user collection (7). If you want to then you can also choose to add some content (a link or a file) to the collection yourself (8).
Remember to Save your stack after you have added new content.
Restrictions on what can be included in your stack
The App Link Tile is used to link to an App.
Why use the App Link Tile?
Authors often use the App Link Tile if they have developed an App as part of their work or if they have used or evaluated an App as part of their work. The App link tile will direct a viewer to that App (or the relevant place in the App store) when they click on the tile whilst viewing the stack on a suitable device (e.g. smartphone or tablet).
Using the App Link Tile
Drag and drop an App Link Tile from the Tile Library into your stack (1). Then click on the drop down menu to choose the App that you want to include (2). If you cannot find the App that you want to include in the list then please email support@stack.services and if possible we will add it to the list. A title will automatically be added to the Tile, but you can change this. You can also change the layout of the tile (size, colour and background image) by clicking on the Layout tab (3).
Remember to Save your stack after you have added new content.
The Collection Tile is used to a collection of files or links to your stack.
Why use the Collection Tile?
Authors often use the Collection Tile if they have a set of related material that they want to group together in their stack (such as references or background study materials). The Collection Tile allows you to do this with files and web links. If you want more flexibility over what to include in your set of materials and how it appears onscreen then you should use a Stack Screen Tile instead. The tile titled Related Papers in this example stack is a Collection Tile.
Using the Collection Tile
Drag and drop a Collection Tile from the Tile Library into your stack (1). Type in a Title for your Tile (2). Then click on the drop down menu and choose to Add new collection (3).
Type in a name for your collection and click on the tick button (4).
Buttons will now appear onscreen allowing you to click and Add a Link or Add a File (5). Click on the appropriate button and then follow the prompts to upload a file or add your weblink. Once it is added then you can click on the appropriate button again to add your next link or file.
Onscreen you will see a list of the links and files that you have added to this collection. If you need to then you can edit or delete an item by clicking on its edit or delete button (6). It is also possible to drag and drop the items in the list to change the order in which they will appear.
Remember to Save your stack after you have added new content.
The News Feed Tile is used to connect to an RSS news feed and show the most recent posts from that feed in your stack.
Why use the News Feed Tile?
Authors can use the News Feed tile if they want to link to an RSS news feed service that provides up-to-date information on a particular topic related to their work. For example this news feed from BMC Medical Education (https://bmcmededuc.biomedcentral.com/articles/most-recent/rss.xml) provides links to recent articles on medical education. An author may know of a news feed that is particularly relevant to their work and can use the News Feed Tile to link to that.
Using the News Feed Tile
Drag and drop a News Feed Tile from the Tile Library into your stack (1). Type or paste in the URL (web address) to the news feed that you want to connect with and click on the Get Feed button (2).
This creates a live link, so that when viewers click on this Tile they will see the most recent updates sent by that news feed service.
Remember to Save your stack after you have added new content.
The Other Stack Tile is used to add a link to another stack.
Why use the Other Stack Tile?
Authors often use the Other Stack Tile if they have more than one ePoster stack in a conference and they want to add a direct link from one of their ePoster stacks to the other ePoster stack. Authors also use the Other Stack Tile if they want to link to another ePoster stack by their research group or if they want to link to an ePoster stack that they made for a previous year’s conference. The tile titled Explore an ePoster in this example stack is an Other Stack tile.
Using the Other Stack Tile
Drag and drop an Other Stack Tile from the Tile Library into your stack (1). Type in a Title for your Tile (2). Then click on the target stack edit icon to choose the stack you want to connect to this Tile (3).
A search box will appear. Type in here to search for the stack you want (4). When you find the stack you want click on its title bar (5) to link it to this Tile.
Remember to Save your stack after you have added new content.
The Stack Screen Tile is used to link to a new screen to your stack and you can then add more content into this new screen.
Why use the Stack Screen Tile?
Authors use the Stack Screen Tile when they want to add structure to their stack. It allows them to create a new screen into which they can add new content. Authors often use the Stack Screen Tile if they have a lot of content and want to separate it into different spaces – e.g. a screen for authors’ information, a screen for presentations, a screen for background material, a screen for references. The tile titled Authors in this example stack is a Stack Screen tile.
Using the Stack Screen Tile
Drag and drop a Stack Screen Tile from the Tile Library into your stack (1). This Tile will be used as the link to your new screen. Type in a Title for your Tile (2). Then click on the drop down menu and choose to Create new screen (3).
A new empty screen is now created and you can add new content to this screen by dragging in Tiles from the Tile Library as normal (4). Your new screen is automatically called Screen 2. If you want to give it a new name (to help you remember the type of content you have added to this screen) then click on the screen settings icon (5) and add the new name. When you have finished adding content to your new screen then you can return to your stack’s Home screen by clicking drop down menu and choosing Home (6).
Remember to Save your stack after you have added new content.
Status of the ‘Twitter Feed’ tile
5 July 2023
We’re sorry to announce that due to a recent change in Twitter’s policy, we have had to make the ‘Twitter Feed’ tile unavailable.
Since 30 June 2023 Twitter has put in place access restrictions to their platform to no longer allow access for anyone not logged into their platform. This was an unannounced change by Twitter that means that the ‘Twitter Feed’ tile no longer works as expected. Unfortunately this is out of our control.
Read more in this CNN article.
We’re keeping an eye on any developments around this, but in the meantime the ‘Twitter Feed’ tile is unavailable.
If you have already added a ‘Twitter feed’ tile to your stack then when viewers click on it they will get a message explaining why it is not currently working and giving them directions for how to get to your Twitter account or hashtag.
The Learning Toolbox Team
The User Content Tile is used to allow viewers to add content to your stack.
Why use the User Content Tile?
Authors use the User Content Tile if they want to collect information from the viewers of their stack. For example they could be asking viewers to add links to research or reports that are related to the work reported in the stack. They could be asking viewers to share images or sounds related to the work reported in the stack. Another example is when the author has created the the stack to support a round table discussion; the author may then use the User Content tile to allow all participants in the round table discussion to add materials for inclusion in the discussion. The tile titled Your Ideas in this example stack is a User Content tile.
Using the User Content Tile
Drag and drop a User Content Tile from the Tile Library into your stack (1). Type in a Title for your Tile (2). Then click on the drop down menu and choose to Add new collection (3).
Type in a name for your user content collection and click on the tick button (4).
You can turn on the switch (5) and add some introduction text to explain to viewers what you want them to add. You can also choose the privacy settings for your user content collection (6). If you want every viewer to be able to see all the added material then you should leave this setting in its default position. You can also choose what type of content users can add to the user collection (7). If you want to then you can also choose to add some content (a link or a file) to the collection yourself (8).
Remember to Save your stack after you have added new content.
Restoring your deleted stack
The App Link Tile is used to link to an App.
Why use the App Link Tile?
Authors often use the App Link Tile if they have developed an App as part of their work or if they have used or evaluated an App as part of their work. The App link tile will direct a viewer to that App (or the relevant place in the App store) when they click on the tile whilst viewing the stack on a suitable device (e.g. smartphone or tablet).
Using the App Link Tile
Drag and drop an App Link Tile from the Tile Library into your stack (1). Then click on the drop down menu to choose the App that you want to include (2). If you cannot find the App that you want to include in the list then please email support@stack.services and if possible we will add it to the list. A title will automatically be added to the Tile, but you can change this. You can also change the layout of the tile (size, colour and background image) by clicking on the Layout tab (3).
Remember to Save your stack after you have added new content.
The Collection Tile is used to a collection of files or links to your stack.
Why use the Collection Tile?
Authors often use the Collection Tile if they have a set of related material that they want to group together in their stack (such as references or background study materials). The Collection Tile allows you to do this with files and web links. If you want more flexibility over what to include in your set of materials and how it appears onscreen then you should use a Stack Screen Tile instead. The tile titled Related Papers in this example stack is a Collection Tile.
Using the Collection Tile
Drag and drop a Collection Tile from the Tile Library into your stack (1). Type in a Title for your Tile (2). Then click on the drop down menu and choose to Add new collection (3).
Type in a name for your collection and click on the tick button (4).
Buttons will now appear onscreen allowing you to click and Add a Link or Add a File (5). Click on the appropriate button and then follow the prompts to upload a file or add your weblink. Once it is added then you can click on the appropriate button again to add your next link or file.
Onscreen you will see a list of the links and files that you have added to this collection. If you need to then you can edit or delete an item by clicking on its edit or delete button (6). It is also possible to drag and drop the items in the list to change the order in which they will appear.
Remember to Save your stack after you have added new content.
The News Feed Tile is used to connect to an RSS news feed and show the most recent posts from that feed in your stack.
Why use the News Feed Tile?
Authors can use the News Feed tile if they want to link to an RSS news feed service that provides up-to-date information on a particular topic related to their work. For example this news feed from BMC Medical Education (https://bmcmededuc.biomedcentral.com/articles/most-recent/rss.xml) provides links to recent articles on medical education. An author may know of a news feed that is particularly relevant to their work and can use the News Feed Tile to link to that.
Using the News Feed Tile
Drag and drop a News Feed Tile from the Tile Library into your stack (1). Type or paste in the URL (web address) to the news feed that you want to connect with and click on the Get Feed button (2).
This creates a live link, so that when viewers click on this Tile they will see the most recent updates sent by that news feed service.
Remember to Save your stack after you have added new content.
The Other Stack Tile is used to add a link to another stack.
Why use the Other Stack Tile?
Authors often use the Other Stack Tile if they have more than one ePoster stack in a conference and they want to add a direct link from one of their ePoster stacks to the other ePoster stack. Authors also use the Other Stack Tile if they want to link to another ePoster stack by their research group or if they want to link to an ePoster stack that they made for a previous year’s conference. The tile titled Explore an ePoster in this example stack is an Other Stack tile.
Using the Other Stack Tile
Drag and drop an Other Stack Tile from the Tile Library into your stack (1). Type in a Title for your Tile (2). Then click on the target stack edit icon to choose the stack you want to connect to this Tile (3).
A search box will appear. Type in here to search for the stack you want (4). When you find the stack you want click on its title bar (5) to link it to this Tile.
Remember to Save your stack after you have added new content.
The Stack Screen Tile is used to link to a new screen to your stack and you can then add more content into this new screen.
Why use the Stack Screen Tile?
Authors use the Stack Screen Tile when they want to add structure to their stack. It allows them to create a new screen into which they can add new content. Authors often use the Stack Screen Tile if they have a lot of content and want to separate it into different spaces – e.g. a screen for authors’ information, a screen for presentations, a screen for background material, a screen for references. The tile titled Authors in this example stack is a Stack Screen tile.
Using the Stack Screen Tile
Drag and drop a Stack Screen Tile from the Tile Library into your stack (1). This Tile will be used as the link to your new screen. Type in a Title for your Tile (2). Then click on the drop down menu and choose to Create new screen (3).
A new empty screen is now created and you can add new content to this screen by dragging in Tiles from the Tile Library as normal (4). Your new screen is automatically called Screen 2. If you want to give it a new name (to help you remember the type of content you have added to this screen) then click on the screen settings icon (5) and add the new name. When you have finished adding content to your new screen then you can return to your stack’s Home screen by clicking drop down menu and choosing Home (6).
Remember to Save your stack after you have added new content.
Status of the ‘Twitter Feed’ tile
5 July 2023
We’re sorry to announce that due to a recent change in Twitter’s policy, we have had to make the ‘Twitter Feed’ tile unavailable.
Since 30 June 2023 Twitter has put in place access restrictions to their platform to no longer allow access for anyone not logged into their platform. This was an unannounced change by Twitter that means that the ‘Twitter Feed’ tile no longer works as expected. Unfortunately this is out of our control.
Read more in this CNN article.
We’re keeping an eye on any developments around this, but in the meantime the ‘Twitter Feed’ tile is unavailable.
If you have already added a ‘Twitter feed’ tile to your stack then when viewers click on it they will get a message explaining why it is not currently working and giving them directions for how to get to your Twitter account or hashtag.
The Learning Toolbox Team
The User Content Tile is used to allow viewers to add content to your stack.
Why use the User Content Tile?
Authors use the User Content Tile if they want to collect information from the viewers of their stack. For example they could be asking viewers to add links to research or reports that are related to the work reported in the stack. They could be asking viewers to share images or sounds related to the work reported in the stack. Another example is when the author has created the the stack to support a round table discussion; the author may then use the User Content tile to allow all participants in the round table discussion to add materials for inclusion in the discussion. The tile titled Your Ideas in this example stack is a User Content tile.
Using the User Content Tile
Drag and drop a User Content Tile from the Tile Library into your stack (1). Type in a Title for your Tile (2). Then click on the drop down menu and choose to Add new collection (3).
Type in a name for your user content collection and click on the tick button (4).
You can turn on the switch (5) and add some introduction text to explain to viewers what you want them to add. You can also choose the privacy settings for your user content collection (6). If you want every viewer to be able to see all the added material then you should leave this setting in its default position. You can also choose what type of content users can add to the user collection (7). If you want to then you can also choose to add some content (a link or a file) to the collection yourself (8).
Remember to Save your stack after you have added new content.
Previewing and checking your stack
The App Link Tile is used to link to an App.
Why use the App Link Tile?
Authors often use the App Link Tile if they have developed an App as part of their work or if they have used or evaluated an App as part of their work. The App link tile will direct a viewer to that App (or the relevant place in the App store) when they click on the tile whilst viewing the stack on a suitable device (e.g. smartphone or tablet).
Using the App Link Tile
Drag and drop an App Link Tile from the Tile Library into your stack (1). Then click on the drop down menu to choose the App that you want to include (2). If you cannot find the App that you want to include in the list then please email support@stack.services and if possible we will add it to the list. A title will automatically be added to the Tile, but you can change this. You can also change the layout of the tile (size, colour and background image) by clicking on the Layout tab (3).
Remember to Save your stack after you have added new content.
The Collection Tile is used to a collection of files or links to your stack.
Why use the Collection Tile?
Authors often use the Collection Tile if they have a set of related material that they want to group together in their stack (such as references or background study materials). The Collection Tile allows you to do this with files and web links. If you want more flexibility over what to include in your set of materials and how it appears onscreen then you should use a Stack Screen Tile instead. The tile titled Related Papers in this example stack is a Collection Tile.
Using the Collection Tile
Drag and drop a Collection Tile from the Tile Library into your stack (1). Type in a Title for your Tile (2). Then click on the drop down menu and choose to Add new collection (3).
Type in a name for your collection and click on the tick button (4).
Buttons will now appear onscreen allowing you to click and Add a Link or Add a File (5). Click on the appropriate button and then follow the prompts to upload a file or add your weblink. Once it is added then you can click on the appropriate button again to add your next link or file.
Onscreen you will see a list of the links and files that you have added to this collection. If you need to then you can edit or delete an item by clicking on its edit or delete button (6). It is also possible to drag and drop the items in the list to change the order in which they will appear.
Remember to Save your stack after you have added new content.
The News Feed Tile is used to connect to an RSS news feed and show the most recent posts from that feed in your stack.
Why use the News Feed Tile?
Authors can use the News Feed tile if they want to link to an RSS news feed service that provides up-to-date information on a particular topic related to their work. For example this news feed from BMC Medical Education (https://bmcmededuc.biomedcentral.com/articles/most-recent/rss.xml) provides links to recent articles on medical education. An author may know of a news feed that is particularly relevant to their work and can use the News Feed Tile to link to that.
Using the News Feed Tile
Drag and drop a News Feed Tile from the Tile Library into your stack (1). Type or paste in the URL (web address) to the news feed that you want to connect with and click on the Get Feed button (2).
This creates a live link, so that when viewers click on this Tile they will see the most recent updates sent by that news feed service.
Remember to Save your stack after you have added new content.
The Other Stack Tile is used to add a link to another stack.
Why use the Other Stack Tile?
Authors often use the Other Stack Tile if they have more than one ePoster stack in a conference and they want to add a direct link from one of their ePoster stacks to the other ePoster stack. Authors also use the Other Stack Tile if they want to link to another ePoster stack by their research group or if they want to link to an ePoster stack that they made for a previous year’s conference. The tile titled Explore an ePoster in this example stack is an Other Stack tile.
Using the Other Stack Tile
Drag and drop an Other Stack Tile from the Tile Library into your stack (1). Type in a Title for your Tile (2). Then click on the target stack edit icon to choose the stack you want to connect to this Tile (3).
A search box will appear. Type in here to search for the stack you want (4). When you find the stack you want click on its title bar (5) to link it to this Tile.
Remember to Save your stack after you have added new content.
The Stack Screen Tile is used to link to a new screen to your stack and you can then add more content into this new screen.
Why use the Stack Screen Tile?
Authors use the Stack Screen Tile when they want to add structure to their stack. It allows them to create a new screen into which they can add new content. Authors often use the Stack Screen Tile if they have a lot of content and want to separate it into different spaces – e.g. a screen for authors’ information, a screen for presentations, a screen for background material, a screen for references. The tile titled Authors in this example stack is a Stack Screen tile.
Using the Stack Screen Tile
Drag and drop a Stack Screen Tile from the Tile Library into your stack (1). This Tile will be used as the link to your new screen. Type in a Title for your Tile (2). Then click on the drop down menu and choose to Create new screen (3).
A new empty screen is now created and you can add new content to this screen by dragging in Tiles from the Tile Library as normal (4). Your new screen is automatically called Screen 2. If you want to give it a new name (to help you remember the type of content you have added to this screen) then click on the screen settings icon (5) and add the new name. When you have finished adding content to your new screen then you can return to your stack’s Home screen by clicking drop down menu and choosing Home (6).
Remember to Save your stack after you have added new content.
Status of the ‘Twitter Feed’ tile
5 July 2023
We’re sorry to announce that due to a recent change in Twitter’s policy, we have had to make the ‘Twitter Feed’ tile unavailable.
Since 30 June 2023 Twitter has put in place access restrictions to their platform to no longer allow access for anyone not logged into their platform. This was an unannounced change by Twitter that means that the ‘Twitter Feed’ tile no longer works as expected. Unfortunately this is out of our control.
Read more in this CNN article.
We’re keeping an eye on any developments around this, but in the meantime the ‘Twitter Feed’ tile is unavailable.
If you have already added a ‘Twitter feed’ tile to your stack then when viewers click on it they will get a message explaining why it is not currently working and giving them directions for how to get to your Twitter account or hashtag.
The Learning Toolbox Team
The User Content Tile is used to allow viewers to add content to your stack.
Why use the User Content Tile?
Authors use the User Content Tile if they want to collect information from the viewers of their stack. For example they could be asking viewers to add links to research or reports that are related to the work reported in the stack. They could be asking viewers to share images or sounds related to the work reported in the stack. Another example is when the author has created the the stack to support a round table discussion; the author may then use the User Content tile to allow all participants in the round table discussion to add materials for inclusion in the discussion. The tile titled Your Ideas in this example stack is a User Content tile.
Using the User Content Tile
Drag and drop a User Content Tile from the Tile Library into your stack (1). Type in a Title for your Tile (2). Then click on the drop down menu and choose to Add new collection (3).
Type in a name for your user content collection and click on the tick button (4).
You can turn on the switch (5) and add some introduction text to explain to viewers what you want them to add. You can also choose the privacy settings for your user content collection (6). If you want every viewer to be able to see all the added material then you should leave this setting in its default position. You can also choose what type of content users can add to the user collection (7). If you want to then you can also choose to add some content (a link or a file) to the collection yourself (8).
Remember to Save your stack after you have added new content.
Creating the summary poster
An option often used by onsite conferences to promote your ePoster / stack onsite.
The App Link Tile is used to link to an App.
Why use the App Link Tile?
Authors often use the App Link Tile if they have developed an App as part of their work or if they have used or evaluated an App as part of their work. The App link tile will direct a viewer to that App (or the relevant place in the App store) when they click on the tile whilst viewing the stack on a suitable device (e.g. smartphone or tablet).
Using the App Link Tile
Drag and drop an App Link Tile from the Tile Library into your stack (1). Then click on the drop down menu to choose the App that you want to include (2). If you cannot find the App that you want to include in the list then please email support@stack.services and if possible we will add it to the list. A title will automatically be added to the Tile, but you can change this. You can also change the layout of the tile (size, colour and background image) by clicking on the Layout tab (3).
Remember to Save your stack after you have added new content.
The Collection Tile is used to a collection of files or links to your stack.
Why use the Collection Tile?
Authors often use the Collection Tile if they have a set of related material that they want to group together in their stack (such as references or background study materials). The Collection Tile allows you to do this with files and web links. If you want more flexibility over what to include in your set of materials and how it appears onscreen then you should use a Stack Screen Tile instead. The tile titled Related Papers in this example stack is a Collection Tile.
Using the Collection Tile
Drag and drop a Collection Tile from the Tile Library into your stack (1). Type in a Title for your Tile (2). Then click on the drop down menu and choose to Add new collection (3).
Type in a name for your collection and click on the tick button (4).
Buttons will now appear onscreen allowing you to click and Add a Link or Add a File (5). Click on the appropriate button and then follow the prompts to upload a file or add your weblink. Once it is added then you can click on the appropriate button again to add your next link or file.
Onscreen you will see a list of the links and files that you have added to this collection. If you need to then you can edit or delete an item by clicking on its edit or delete button (6). It is also possible to drag and drop the items in the list to change the order in which they will appear.
Remember to Save your stack after you have added new content.
The News Feed Tile is used to connect to an RSS news feed and show the most recent posts from that feed in your stack.
Why use the News Feed Tile?
Authors can use the News Feed tile if they want to link to an RSS news feed service that provides up-to-date information on a particular topic related to their work. For example this news feed from BMC Medical Education (https://bmcmededuc.biomedcentral.com/articles/most-recent/rss.xml) provides links to recent articles on medical education. An author may know of a news feed that is particularly relevant to their work and can use the News Feed Tile to link to that.
Using the News Feed Tile
Drag and drop a News Feed Tile from the Tile Library into your stack (1). Type or paste in the URL (web address) to the news feed that you want to connect with and click on the Get Feed button (2).
This creates a live link, so that when viewers click on this Tile they will see the most recent updates sent by that news feed service.
Remember to Save your stack after you have added new content.
The Other Stack Tile is used to add a link to another stack.
Why use the Other Stack Tile?
Authors often use the Other Stack Tile if they have more than one ePoster stack in a conference and they want to add a direct link from one of their ePoster stacks to the other ePoster stack. Authors also use the Other Stack Tile if they want to link to another ePoster stack by their research group or if they want to link to an ePoster stack that they made for a previous year’s conference. The tile titled Explore an ePoster in this example stack is an Other Stack tile.
Using the Other Stack Tile
Drag and drop an Other Stack Tile from the Tile Library into your stack (1). Type in a Title for your Tile (2). Then click on the target stack edit icon to choose the stack you want to connect to this Tile (3).
A search box will appear. Type in here to search for the stack you want (4). When you find the stack you want click on its title bar (5) to link it to this Tile.
Remember to Save your stack after you have added new content.
The Stack Screen Tile is used to link to a new screen to your stack and you can then add more content into this new screen.
Why use the Stack Screen Tile?
Authors use the Stack Screen Tile when they want to add structure to their stack. It allows them to create a new screen into which they can add new content. Authors often use the Stack Screen Tile if they have a lot of content and want to separate it into different spaces – e.g. a screen for authors’ information, a screen for presentations, a screen for background material, a screen for references. The tile titled Authors in this example stack is a Stack Screen tile.
Using the Stack Screen Tile
Drag and drop a Stack Screen Tile from the Tile Library into your stack (1). This Tile will be used as the link to your new screen. Type in a Title for your Tile (2). Then click on the drop down menu and choose to Create new screen (3).
A new empty screen is now created and you can add new content to this screen by dragging in Tiles from the Tile Library as normal (4). Your new screen is automatically called Screen 2. If you want to give it a new name (to help you remember the type of content you have added to this screen) then click on the screen settings icon (5) and add the new name. When you have finished adding content to your new screen then you can return to your stack’s Home screen by clicking drop down menu and choosing Home (6).
Remember to Save your stack after you have added new content.
Status of the ‘Twitter Feed’ tile
5 July 2023
We’re sorry to announce that due to a recent change in Twitter’s policy, we have had to make the ‘Twitter Feed’ tile unavailable.
Since 30 June 2023 Twitter has put in place access restrictions to their platform to no longer allow access for anyone not logged into their platform. This was an unannounced change by Twitter that means that the ‘Twitter Feed’ tile no longer works as expected. Unfortunately this is out of our control.
Read more in this CNN article.
We’re keeping an eye on any developments around this, but in the meantime the ‘Twitter Feed’ tile is unavailable.
If you have already added a ‘Twitter feed’ tile to your stack then when viewers click on it they will get a message explaining why it is not currently working and giving them directions for how to get to your Twitter account or hashtag.
The Learning Toolbox Team
The User Content Tile is used to allow viewers to add content to your stack.
Why use the User Content Tile?
Authors use the User Content Tile if they want to collect information from the viewers of their stack. For example they could be asking viewers to add links to research or reports that are related to the work reported in the stack. They could be asking viewers to share images or sounds related to the work reported in the stack. Another example is when the author has created the the stack to support a round table discussion; the author may then use the User Content tile to allow all participants in the round table discussion to add materials for inclusion in the discussion. The tile titled Your Ideas in this example stack is a User Content tile.
Using the User Content Tile
Drag and drop a User Content Tile from the Tile Library into your stack (1). Type in a Title for your Tile (2). Then click on the drop down menu and choose to Add new collection (3).
Type in a name for your user content collection and click on the tick button (4).
You can turn on the switch (5) and add some introduction text to explain to viewers what you want them to add. You can also choose the privacy settings for your user content collection (6). If you want every viewer to be able to see all the added material then you should leave this setting in its default position. You can also choose what type of content users can add to the user collection (7). If you want to then you can also choose to add some content (a link or a file) to the collection yourself (8).
Remember to Save your stack after you have added new content.
Your stack on the showcase website
The App Link Tile is used to link to an App.
Why use the App Link Tile?
Authors often use the App Link Tile if they have developed an App as part of their work or if they have used or evaluated an App as part of their work. The App link tile will direct a viewer to that App (or the relevant place in the App store) when they click on the tile whilst viewing the stack on a suitable device (e.g. smartphone or tablet).
Using the App Link Tile
Drag and drop an App Link Tile from the Tile Library into your stack (1). Then click on the drop down menu to choose the App that you want to include (2). If you cannot find the App that you want to include in the list then please email support@stack.services and if possible we will add it to the list. A title will automatically be added to the Tile, but you can change this. You can also change the layout of the tile (size, colour and background image) by clicking on the Layout tab (3).
Remember to Save your stack after you have added new content.
The Collection Tile is used to a collection of files or links to your stack.
Why use the Collection Tile?
Authors often use the Collection Tile if they have a set of related material that they want to group together in their stack (such as references or background study materials). The Collection Tile allows you to do this with files and web links. If you want more flexibility over what to include in your set of materials and how it appears onscreen then you should use a Stack Screen Tile instead. The tile titled Related Papers in this example stack is a Collection Tile.
Using the Collection Tile
Drag and drop a Collection Tile from the Tile Library into your stack (1). Type in a Title for your Tile (2). Then click on the drop down menu and choose to Add new collection (3).
Type in a name for your collection and click on the tick button (4).
Buttons will now appear onscreen allowing you to click and Add a Link or Add a File (5). Click on the appropriate button and then follow the prompts to upload a file or add your weblink. Once it is added then you can click on the appropriate button again to add your next link or file.
Onscreen you will see a list of the links and files that you have added to this collection. If you need to then you can edit or delete an item by clicking on its edit or delete button (6). It is also possible to drag and drop the items in the list to change the order in which they will appear.
Remember to Save your stack after you have added new content.
The News Feed Tile is used to connect to an RSS news feed and show the most recent posts from that feed in your stack.
Why use the News Feed Tile?
Authors can use the News Feed tile if they want to link to an RSS news feed service that provides up-to-date information on a particular topic related to their work. For example this news feed from BMC Medical Education (https://bmcmededuc.biomedcentral.com/articles/most-recent/rss.xml) provides links to recent articles on medical education. An author may know of a news feed that is particularly relevant to their work and can use the News Feed Tile to link to that.
Using the News Feed Tile
Drag and drop a News Feed Tile from the Tile Library into your stack (1). Type or paste in the URL (web address) to the news feed that you want to connect with and click on the Get Feed button (2).
This creates a live link, so that when viewers click on this Tile they will see the most recent updates sent by that news feed service.
Remember to Save your stack after you have added new content.
The Other Stack Tile is used to add a link to another stack.
Why use the Other Stack Tile?
Authors often use the Other Stack Tile if they have more than one ePoster stack in a conference and they want to add a direct link from one of their ePoster stacks to the other ePoster stack. Authors also use the Other Stack Tile if they want to link to another ePoster stack by their research group or if they want to link to an ePoster stack that they made for a previous year’s conference. The tile titled Explore an ePoster in this example stack is an Other Stack tile.
Using the Other Stack Tile
Drag and drop an Other Stack Tile from the Tile Library into your stack (1). Type in a Title for your Tile (2). Then click on the target stack edit icon to choose the stack you want to connect to this Tile (3).
A search box will appear. Type in here to search for the stack you want (4). When you find the stack you want click on its title bar (5) to link it to this Tile.
Remember to Save your stack after you have added new content.
The Stack Screen Tile is used to link to a new screen to your stack and you can then add more content into this new screen.
Why use the Stack Screen Tile?
Authors use the Stack Screen Tile when they want to add structure to their stack. It allows them to create a new screen into which they can add new content. Authors often use the Stack Screen Tile if they have a lot of content and want to separate it into different spaces – e.g. a screen for authors’ information, a screen for presentations, a screen for background material, a screen for references. The tile titled Authors in this example stack is a Stack Screen tile.
Using the Stack Screen Tile
Drag and drop a Stack Screen Tile from the Tile Library into your stack (1). This Tile will be used as the link to your new screen. Type in a Title for your Tile (2). Then click on the drop down menu and choose to Create new screen (3).
A new empty screen is now created and you can add new content to this screen by dragging in Tiles from the Tile Library as normal (4). Your new screen is automatically called Screen 2. If you want to give it a new name (to help you remember the type of content you have added to this screen) then click on the screen settings icon (5) and add the new name. When you have finished adding content to your new screen then you can return to your stack’s Home screen by clicking drop down menu and choosing Home (6).
Remember to Save your stack after you have added new content.
Status of the ‘Twitter Feed’ tile
5 July 2023
We’re sorry to announce that due to a recent change in Twitter’s policy, we have had to make the ‘Twitter Feed’ tile unavailable.
Since 30 June 2023 Twitter has put in place access restrictions to their platform to no longer allow access for anyone not logged into their platform. This was an unannounced change by Twitter that means that the ‘Twitter Feed’ tile no longer works as expected. Unfortunately this is out of our control.
Read more in this CNN article.
We’re keeping an eye on any developments around this, but in the meantime the ‘Twitter Feed’ tile is unavailable.
If you have already added a ‘Twitter feed’ tile to your stack then when viewers click on it they will get a message explaining why it is not currently working and giving them directions for how to get to your Twitter account or hashtag.
The Learning Toolbox Team
The User Content Tile is used to allow viewers to add content to your stack.
Why use the User Content Tile?
Authors use the User Content Tile if they want to collect information from the viewers of their stack. For example they could be asking viewers to add links to research or reports that are related to the work reported in the stack. They could be asking viewers to share images or sounds related to the work reported in the stack. Another example is when the author has created the the stack to support a round table discussion; the author may then use the User Content tile to allow all participants in the round table discussion to add materials for inclusion in the discussion. The tile titled Your Ideas in this example stack is a User Content tile.
Using the User Content Tile
Drag and drop a User Content Tile from the Tile Library into your stack (1). Type in a Title for your Tile (2). Then click on the drop down menu and choose to Add new collection (3).
Type in a name for your user content collection and click on the tick button (4).
You can turn on the switch (5) and add some introduction text to explain to viewers what you want them to add. You can also choose the privacy settings for your user content collection (6). If you want every viewer to be able to see all the added material then you should leave this setting in its default position. You can also choose what type of content users can add to the user collection (7). If you want to then you can also choose to add some content (a link or a file) to the collection yourself (8).
Remember to Save your stack after you have added new content.
Marking your stack as ready to publish to the showcase
The App Link Tile is used to link to an App.
Why use the App Link Tile?
Authors often use the App Link Tile if they have developed an App as part of their work or if they have used or evaluated an App as part of their work. The App link tile will direct a viewer to that App (or the relevant place in the App store) when they click on the tile whilst viewing the stack on a suitable device (e.g. smartphone or tablet).
Using the App Link Tile
Drag and drop an App Link Tile from the Tile Library into your stack (1). Then click on the drop down menu to choose the App that you want to include (2). If you cannot find the App that you want to include in the list then please email support@stack.services and if possible we will add it to the list. A title will automatically be added to the Tile, but you can change this. You can also change the layout of the tile (size, colour and background image) by clicking on the Layout tab (3).
Remember to Save your stack after you have added new content.
The Collection Tile is used to a collection of files or links to your stack.
Why use the Collection Tile?
Authors often use the Collection Tile if they have a set of related material that they want to group together in their stack (such as references or background study materials). The Collection Tile allows you to do this with files and web links. If you want more flexibility over what to include in your set of materials and how it appears onscreen then you should use a Stack Screen Tile instead. The tile titled Related Papers in this example stack is a Collection Tile.
Using the Collection Tile
Drag and drop a Collection Tile from the Tile Library into your stack (1). Type in a Title for your Tile (2). Then click on the drop down menu and choose to Add new collection (3).
Type in a name for your collection and click on the tick button (4).
Buttons will now appear onscreen allowing you to click and Add a Link or Add a File (5). Click on the appropriate button and then follow the prompts to upload a file or add your weblink. Once it is added then you can click on the appropriate button again to add your next link or file.
Onscreen you will see a list of the links and files that you have added to this collection. If you need to then you can edit or delete an item by clicking on its edit or delete button (6). It is also possible to drag and drop the items in the list to change the order in which they will appear.
Remember to Save your stack after you have added new content.
The News Feed Tile is used to connect to an RSS news feed and show the most recent posts from that feed in your stack.
Why use the News Feed Tile?
Authors can use the News Feed tile if they want to link to an RSS news feed service that provides up-to-date information on a particular topic related to their work. For example this news feed from BMC Medical Education (https://bmcmededuc.biomedcentral.com/articles/most-recent/rss.xml) provides links to recent articles on medical education. An author may know of a news feed that is particularly relevant to their work and can use the News Feed Tile to link to that.
Using the News Feed Tile
Drag and drop a News Feed Tile from the Tile Library into your stack (1). Type or paste in the URL (web address) to the news feed that you want to connect with and click on the Get Feed button (2).
This creates a live link, so that when viewers click on this Tile they will see the most recent updates sent by that news feed service.
Remember to Save your stack after you have added new content.
The Other Stack Tile is used to add a link to another stack.
Why use the Other Stack Tile?
Authors often use the Other Stack Tile if they have more than one ePoster stack in a conference and they want to add a direct link from one of their ePoster stacks to the other ePoster stack. Authors also use the Other Stack Tile if they want to link to another ePoster stack by their research group or if they want to link to an ePoster stack that they made for a previous year’s conference. The tile titled Explore an ePoster in this example stack is an Other Stack tile.
Using the Other Stack Tile
Drag and drop an Other Stack Tile from the Tile Library into your stack (1). Type in a Title for your Tile (2). Then click on the target stack edit icon to choose the stack you want to connect to this Tile (3).
A search box will appear. Type in here to search for the stack you want (4). When you find the stack you want click on its title bar (5) to link it to this Tile.
Remember to Save your stack after you have added new content.
The Stack Screen Tile is used to link to a new screen to your stack and you can then add more content into this new screen.
Why use the Stack Screen Tile?
Authors use the Stack Screen Tile when they want to add structure to their stack. It allows them to create a new screen into which they can add new content. Authors often use the Stack Screen Tile if they have a lot of content and want to separate it into different spaces – e.g. a screen for authors’ information, a screen for presentations, a screen for background material, a screen for references. The tile titled Authors in this example stack is a Stack Screen tile.
Using the Stack Screen Tile
Drag and drop a Stack Screen Tile from the Tile Library into your stack (1). This Tile will be used as the link to your new screen. Type in a Title for your Tile (2). Then click on the drop down menu and choose to Create new screen (3).
A new empty screen is now created and you can add new content to this screen by dragging in Tiles from the Tile Library as normal (4). Your new screen is automatically called Screen 2. If you want to give it a new name (to help you remember the type of content you have added to this screen) then click on the screen settings icon (5) and add the new name. When you have finished adding content to your new screen then you can return to your stack’s Home screen by clicking drop down menu and choosing Home (6).
Remember to Save your stack after you have added new content.
Status of the ‘Twitter Feed’ tile
5 July 2023
We’re sorry to announce that due to a recent change in Twitter’s policy, we have had to make the ‘Twitter Feed’ tile unavailable.
Since 30 June 2023 Twitter has put in place access restrictions to their platform to no longer allow access for anyone not logged into their platform. This was an unannounced change by Twitter that means that the ‘Twitter Feed’ tile no longer works as expected. Unfortunately this is out of our control.
Read more in this CNN article.
We’re keeping an eye on any developments around this, but in the meantime the ‘Twitter Feed’ tile is unavailable.
If you have already added a ‘Twitter feed’ tile to your stack then when viewers click on it they will get a message explaining why it is not currently working and giving them directions for how to get to your Twitter account or hashtag.
The Learning Toolbox Team
The User Content Tile is used to allow viewers to add content to your stack.
Why use the User Content Tile?
Authors use the User Content Tile if they want to collect information from the viewers of their stack. For example they could be asking viewers to add links to research or reports that are related to the work reported in the stack. They could be asking viewers to share images or sounds related to the work reported in the stack. Another example is when the author has created the the stack to support a round table discussion; the author may then use the User Content tile to allow all participants in the round table discussion to add materials for inclusion in the discussion. The tile titled Your Ideas in this example stack is a User Content tile.
Using the User Content Tile
Drag and drop a User Content Tile from the Tile Library into your stack (1). Type in a Title for your Tile (2). Then click on the drop down menu and choose to Add new collection (3).
Type in a name for your user content collection and click on the tick button (4).
You can turn on the switch (5) and add some introduction text to explain to viewers what you want them to add. You can also choose the privacy settings for your user content collection (6). If you want every viewer to be able to see all the added material then you should leave this setting in its default position. You can also choose what type of content users can add to the user collection (7). If you want to then you can also choose to add some content (a link or a file) to the collection yourself (8).
Remember to Save your stack after you have added new content.
Presenting your stack (General advice)
The App Link Tile is used to link to an App.
Why use the App Link Tile?
Authors often use the App Link Tile if they have developed an App as part of their work or if they have used or evaluated an App as part of their work. The App link tile will direct a viewer to that App (or the relevant place in the App store) when they click on the tile whilst viewing the stack on a suitable device (e.g. smartphone or tablet).
Using the App Link Tile
Drag and drop an App Link Tile from the Tile Library into your stack (1). Then click on the drop down menu to choose the App that you want to include (2). If you cannot find the App that you want to include in the list then please email support@stack.services and if possible we will add it to the list. A title will automatically be added to the Tile, but you can change this. You can also change the layout of the tile (size, colour and background image) by clicking on the Layout tab (3).
Remember to Save your stack after you have added new content.
The Collection Tile is used to a collection of files or links to your stack.
Why use the Collection Tile?
Authors often use the Collection Tile if they have a set of related material that they want to group together in their stack (such as references or background study materials). The Collection Tile allows you to do this with files and web links. If you want more flexibility over what to include in your set of materials and how it appears onscreen then you should use a Stack Screen Tile instead. The tile titled Related Papers in this example stack is a Collection Tile.
Using the Collection Tile
Drag and drop a Collection Tile from the Tile Library into your stack (1). Type in a Title for your Tile (2). Then click on the drop down menu and choose to Add new collection (3).
Type in a name for your collection and click on the tick button (4).
Buttons will now appear onscreen allowing you to click and Add a Link or Add a File (5). Click on the appropriate button and then follow the prompts to upload a file or add your weblink. Once it is added then you can click on the appropriate button again to add your next link or file.
Onscreen you will see a list of the links and files that you have added to this collection. If you need to then you can edit or delete an item by clicking on its edit or delete button (6). It is also possible to drag and drop the items in the list to change the order in which they will appear.
Remember to Save your stack after you have added new content.
The News Feed Tile is used to connect to an RSS news feed and show the most recent posts from that feed in your stack.
Why use the News Feed Tile?
Authors can use the News Feed tile if they want to link to an RSS news feed service that provides up-to-date information on a particular topic related to their work. For example this news feed from BMC Medical Education (https://bmcmededuc.biomedcentral.com/articles/most-recent/rss.xml) provides links to recent articles on medical education. An author may know of a news feed that is particularly relevant to their work and can use the News Feed Tile to link to that.
Using the News Feed Tile
Drag and drop a News Feed Tile from the Tile Library into your stack (1). Type or paste in the URL (web address) to the news feed that you want to connect with and click on the Get Feed button (2).
This creates a live link, so that when viewers click on this Tile they will see the most recent updates sent by that news feed service.
Remember to Save your stack after you have added new content.
The Other Stack Tile is used to add a link to another stack.
Why use the Other Stack Tile?
Authors often use the Other Stack Tile if they have more than one ePoster stack in a conference and they want to add a direct link from one of their ePoster stacks to the other ePoster stack. Authors also use the Other Stack Tile if they want to link to another ePoster stack by their research group or if they want to link to an ePoster stack that they made for a previous year’s conference. The tile titled Explore an ePoster in this example stack is an Other Stack tile.
Using the Other Stack Tile
Drag and drop an Other Stack Tile from the Tile Library into your stack (1). Type in a Title for your Tile (2). Then click on the target stack edit icon to choose the stack you want to connect to this Tile (3).
A search box will appear. Type in here to search for the stack you want (4). When you find the stack you want click on its title bar (5) to link it to this Tile.
Remember to Save your stack after you have added new content.
The Stack Screen Tile is used to link to a new screen to your stack and you can then add more content into this new screen.
Why use the Stack Screen Tile?
Authors use the Stack Screen Tile when they want to add structure to their stack. It allows them to create a new screen into which they can add new content. Authors often use the Stack Screen Tile if they have a lot of content and want to separate it into different spaces – e.g. a screen for authors’ information, a screen for presentations, a screen for background material, a screen for references. The tile titled Authors in this example stack is a Stack Screen tile.
Using the Stack Screen Tile
Drag and drop a Stack Screen Tile from the Tile Library into your stack (1). This Tile will be used as the link to your new screen. Type in a Title for your Tile (2). Then click on the drop down menu and choose to Create new screen (3).
A new empty screen is now created and you can add new content to this screen by dragging in Tiles from the Tile Library as normal (4). Your new screen is automatically called Screen 2. If you want to give it a new name (to help you remember the type of content you have added to this screen) then click on the screen settings icon (5) and add the new name. When you have finished adding content to your new screen then you can return to your stack’s Home screen by clicking drop down menu and choosing Home (6).
Remember to Save your stack after you have added new content.
Status of the ‘Twitter Feed’ tile
5 July 2023
We’re sorry to announce that due to a recent change in Twitter’s policy, we have had to make the ‘Twitter Feed’ tile unavailable.
Since 30 June 2023 Twitter has put in place access restrictions to their platform to no longer allow access for anyone not logged into their platform. This was an unannounced change by Twitter that means that the ‘Twitter Feed’ tile no longer works as expected. Unfortunately this is out of our control.
Read more in this CNN article.
We’re keeping an eye on any developments around this, but in the meantime the ‘Twitter Feed’ tile is unavailable.
If you have already added a ‘Twitter feed’ tile to your stack then when viewers click on it they will get a message explaining why it is not currently working and giving them directions for how to get to your Twitter account or hashtag.
The Learning Toolbox Team
The User Content Tile is used to allow viewers to add content to your stack.
Why use the User Content Tile?
Authors use the User Content Tile if they want to collect information from the viewers of their stack. For example they could be asking viewers to add links to research or reports that are related to the work reported in the stack. They could be asking viewers to share images or sounds related to the work reported in the stack. Another example is when the author has created the the stack to support a round table discussion; the author may then use the User Content tile to allow all participants in the round table discussion to add materials for inclusion in the discussion. The tile titled Your Ideas in this example stack is a User Content tile.
Using the User Content Tile
Drag and drop a User Content Tile from the Tile Library into your stack (1). Type in a Title for your Tile (2). Then click on the drop down menu and choose to Add new collection (3).
Type in a name for your user content collection and click on the tick button (4).
You can turn on the switch (5) and add some introduction text to explain to viewers what you want them to add. You can also choose the privacy settings for your user content collection (6). If you want every viewer to be able to see all the added material then you should leave this setting in its default position. You can also choose what type of content users can add to the user collection (7). If you want to then you can also choose to add some content (a link or a file) to the collection yourself (8).
Remember to Save your stack after you have added new content.
Engaging with the viewers of your stacks
The App Link Tile is used to link to an App.
Why use the App Link Tile?
Authors often use the App Link Tile if they have developed an App as part of their work or if they have used or evaluated an App as part of their work. The App link tile will direct a viewer to that App (or the relevant place in the App store) when they click on the tile whilst viewing the stack on a suitable device (e.g. smartphone or tablet).
Using the App Link Tile
Drag and drop an App Link Tile from the Tile Library into your stack (1). Then click on the drop down menu to choose the App that you want to include (2). If you cannot find the App that you want to include in the list then please email support@stack.services and if possible we will add it to the list. A title will automatically be added to the Tile, but you can change this. You can also change the layout of the tile (size, colour and background image) by clicking on the Layout tab (3).
Remember to Save your stack after you have added new content.
The Collection Tile is used to a collection of files or links to your stack.
Why use the Collection Tile?
Authors often use the Collection Tile if they have a set of related material that they want to group together in their stack (such as references or background study materials). The Collection Tile allows you to do this with files and web links. If you want more flexibility over what to include in your set of materials and how it appears onscreen then you should use a Stack Screen Tile instead. The tile titled Related Papers in this example stack is a Collection Tile.
Using the Collection Tile
Drag and drop a Collection Tile from the Tile Library into your stack (1). Type in a Title for your Tile (2). Then click on the drop down menu and choose to Add new collection (3).
Type in a name for your collection and click on the tick button (4).
Buttons will now appear onscreen allowing you to click and Add a Link or Add a File (5). Click on the appropriate button and then follow the prompts to upload a file or add your weblink. Once it is added then you can click on the appropriate button again to add your next link or file.
Onscreen you will see a list of the links and files that you have added to this collection. If you need to then you can edit or delete an item by clicking on its edit or delete button (6). It is also possible to drag and drop the items in the list to change the order in which they will appear.
Remember to Save your stack after you have added new content.
The News Feed Tile is used to connect to an RSS news feed and show the most recent posts from that feed in your stack.
Why use the News Feed Tile?
Authors can use the News Feed tile if they want to link to an RSS news feed service that provides up-to-date information on a particular topic related to their work. For example this news feed from BMC Medical Education (https://bmcmededuc.biomedcentral.com/articles/most-recent/rss.xml) provides links to recent articles on medical education. An author may know of a news feed that is particularly relevant to their work and can use the News Feed Tile to link to that.
Using the News Feed Tile
Drag and drop a News Feed Tile from the Tile Library into your stack (1). Type or paste in the URL (web address) to the news feed that you want to connect with and click on the Get Feed button (2).
This creates a live link, so that when viewers click on this Tile they will see the most recent updates sent by that news feed service.
Remember to Save your stack after you have added new content.
The Other Stack Tile is used to add a link to another stack.
Why use the Other Stack Tile?
Authors often use the Other Stack Tile if they have more than one ePoster stack in a conference and they want to add a direct link from one of their ePoster stacks to the other ePoster stack. Authors also use the Other Stack Tile if they want to link to another ePoster stack by their research group or if they want to link to an ePoster stack that they made for a previous year’s conference. The tile titled Explore an ePoster in this example stack is an Other Stack tile.
Using the Other Stack Tile
Drag and drop an Other Stack Tile from the Tile Library into your stack (1). Type in a Title for your Tile (2). Then click on the target stack edit icon to choose the stack you want to connect to this Tile (3).
A search box will appear. Type in here to search for the stack you want (4). When you find the stack you want click on its title bar (5) to link it to this Tile.
Remember to Save your stack after you have added new content.
The Stack Screen Tile is used to link to a new screen to your stack and you can then add more content into this new screen.
Why use the Stack Screen Tile?
Authors use the Stack Screen Tile when they want to add structure to their stack. It allows them to create a new screen into which they can add new content. Authors often use the Stack Screen Tile if they have a lot of content and want to separate it into different spaces – e.g. a screen for authors’ information, a screen for presentations, a screen for background material, a screen for references. The tile titled Authors in this example stack is a Stack Screen tile.
Using the Stack Screen Tile
Drag and drop a Stack Screen Tile from the Tile Library into your stack (1). This Tile will be used as the link to your new screen. Type in a Title for your Tile (2). Then click on the drop down menu and choose to Create new screen (3).
A new empty screen is now created and you can add new content to this screen by dragging in Tiles from the Tile Library as normal (4). Your new screen is automatically called Screen 2. If you want to give it a new name (to help you remember the type of content you have added to this screen) then click on the screen settings icon (5) and add the new name. When you have finished adding content to your new screen then you can return to your stack’s Home screen by clicking drop down menu and choosing Home (6).
Remember to Save your stack after you have added new content.
Status of the ‘Twitter Feed’ tile
5 July 2023
We’re sorry to announce that due to a recent change in Twitter’s policy, we have had to make the ‘Twitter Feed’ tile unavailable.
Since 30 June 2023 Twitter has put in place access restrictions to their platform to no longer allow access for anyone not logged into their platform. This was an unannounced change by Twitter that means that the ‘Twitter Feed’ tile no longer works as expected. Unfortunately this is out of our control.
Read more in this CNN article.
We’re keeping an eye on any developments around this, but in the meantime the ‘Twitter Feed’ tile is unavailable.
If you have already added a ‘Twitter feed’ tile to your stack then when viewers click on it they will get a message explaining why it is not currently working and giving them directions for how to get to your Twitter account or hashtag.
The Learning Toolbox Team
The User Content Tile is used to allow viewers to add content to your stack.
Why use the User Content Tile?
Authors use the User Content Tile if they want to collect information from the viewers of their stack. For example they could be asking viewers to add links to research or reports that are related to the work reported in the stack. They could be asking viewers to share images or sounds related to the work reported in the stack. Another example is when the author has created the the stack to support a round table discussion; the author may then use the User Content tile to allow all participants in the round table discussion to add materials for inclusion in the discussion. The tile titled Your Ideas in this example stack is a User Content tile.
Using the User Content Tile
Drag and drop a User Content Tile from the Tile Library into your stack (1). Type in a Title for your Tile (2). Then click on the drop down menu and choose to Add new collection (3).
Type in a name for your user content collection and click on the tick button (4).
You can turn on the switch (5) and add some introduction text to explain to viewers what you want them to add. You can also choose the privacy settings for your user content collection (6). If you want every viewer to be able to see all the added material then you should leave this setting in its default position. You can also choose what type of content users can add to the user collection (7). If you want to then you can also choose to add some content (a link or a file) to the collection yourself (8).
Remember to Save your stack after you have added new content.
Using templates
The App Link Tile is used to link to an App.
Why use the App Link Tile?
Authors often use the App Link Tile if they have developed an App as part of their work or if they have used or evaluated an App as part of their work. The App link tile will direct a viewer to that App (or the relevant place in the App store) when they click on the tile whilst viewing the stack on a suitable device (e.g. smartphone or tablet).
Using the App Link Tile
Drag and drop an App Link Tile from the Tile Library into your stack (1). Then click on the drop down menu to choose the App that you want to include (2). If you cannot find the App that you want to include in the list then please email support@stack.services and if possible we will add it to the list. A title will automatically be added to the Tile, but you can change this. You can also change the layout of the tile (size, colour and background image) by clicking on the Layout tab (3).
Remember to Save your stack after you have added new content.
The Collection Tile is used to a collection of files or links to your stack.
Why use the Collection Tile?
Authors often use the Collection Tile if they have a set of related material that they want to group together in their stack (such as references or background study materials). The Collection Tile allows you to do this with files and web links. If you want more flexibility over what to include in your set of materials and how it appears onscreen then you should use a Stack Screen Tile instead. The tile titled Related Papers in this example stack is a Collection Tile.
Using the Collection Tile
Drag and drop a Collection Tile from the Tile Library into your stack (1). Type in a Title for your Tile (2). Then click on the drop down menu and choose to Add new collection (3).
Type in a name for your collection and click on the tick button (4).
Buttons will now appear onscreen allowing you to click and Add a Link or Add a File (5). Click on the appropriate button and then follow the prompts to upload a file or add your weblink. Once it is added then you can click on the appropriate button again to add your next link or file.
Onscreen you will see a list of the links and files that you have added to this collection. If you need to then you can edit or delete an item by clicking on its edit or delete button (6). It is also possible to drag and drop the items in the list to change the order in which they will appear.
Remember to Save your stack after you have added new content.
The News Feed Tile is used to connect to an RSS news feed and show the most recent posts from that feed in your stack.
Why use the News Feed Tile?
Authors can use the News Feed tile if they want to link to an RSS news feed service that provides up-to-date information on a particular topic related to their work. For example this news feed from BMC Medical Education (https://bmcmededuc.biomedcentral.com/articles/most-recent/rss.xml) provides links to recent articles on medical education. An author may know of a news feed that is particularly relevant to their work and can use the News Feed Tile to link to that.
Using the News Feed Tile
Drag and drop a News Feed Tile from the Tile Library into your stack (1). Type or paste in the URL (web address) to the news feed that you want to connect with and click on the Get Feed button (2).
This creates a live link, so that when viewers click on this Tile they will see the most recent updates sent by that news feed service.
Remember to Save your stack after you have added new content.
The Other Stack Tile is used to add a link to another stack.
Why use the Other Stack Tile?
Authors often use the Other Stack Tile if they have more than one ePoster stack in a conference and they want to add a direct link from one of their ePoster stacks to the other ePoster stack. Authors also use the Other Stack Tile if they want to link to another ePoster stack by their research group or if they want to link to an ePoster stack that they made for a previous year’s conference. The tile titled Explore an ePoster in this example stack is an Other Stack tile.
Using the Other Stack Tile
Drag and drop an Other Stack Tile from the Tile Library into your stack (1). Type in a Title for your Tile (2). Then click on the target stack edit icon to choose the stack you want to connect to this Tile (3).
A search box will appear. Type in here to search for the stack you want (4). When you find the stack you want click on its title bar (5) to link it to this Tile.
Remember to Save your stack after you have added new content.
The Stack Screen Tile is used to link to a new screen to your stack and you can then add more content into this new screen.
Why use the Stack Screen Tile?
Authors use the Stack Screen Tile when they want to add structure to their stack. It allows them to create a new screen into which they can add new content. Authors often use the Stack Screen Tile if they have a lot of content and want to separate it into different spaces – e.g. a screen for authors’ information, a screen for presentations, a screen for background material, a screen for references. The tile titled Authors in this example stack is a Stack Screen tile.
Using the Stack Screen Tile
Drag and drop a Stack Screen Tile from the Tile Library into your stack (1). This Tile will be used as the link to your new screen. Type in a Title for your Tile (2). Then click on the drop down menu and choose to Create new screen (3).
A new empty screen is now created and you can add new content to this screen by dragging in Tiles from the Tile Library as normal (4). Your new screen is automatically called Screen 2. If you want to give it a new name (to help you remember the type of content you have added to this screen) then click on the screen settings icon (5) and add the new name. When you have finished adding content to your new screen then you can return to your stack’s Home screen by clicking drop down menu and choosing Home (6).
Remember to Save your stack after you have added new content.
Status of the ‘Twitter Feed’ tile
5 July 2023
We’re sorry to announce that due to a recent change in Twitter’s policy, we have had to make the ‘Twitter Feed’ tile unavailable.
Since 30 June 2023 Twitter has put in place access restrictions to their platform to no longer allow access for anyone not logged into their platform. This was an unannounced change by Twitter that means that the ‘Twitter Feed’ tile no longer works as expected. Unfortunately this is out of our control.
Read more in this CNN article.
We’re keeping an eye on any developments around this, but in the meantime the ‘Twitter Feed’ tile is unavailable.
If you have already added a ‘Twitter feed’ tile to your stack then when viewers click on it they will get a message explaining why it is not currently working and giving them directions for how to get to your Twitter account or hashtag.
The Learning Toolbox Team
The User Content Tile is used to allow viewers to add content to your stack.
Why use the User Content Tile?
Authors use the User Content Tile if they want to collect information from the viewers of their stack. For example they could be asking viewers to add links to research or reports that are related to the work reported in the stack. They could be asking viewers to share images or sounds related to the work reported in the stack. Another example is when the author has created the the stack to support a round table discussion; the author may then use the User Content tile to allow all participants in the round table discussion to add materials for inclusion in the discussion. The tile titled Your Ideas in this example stack is a User Content tile.
Using the User Content Tile
Drag and drop a User Content Tile from the Tile Library into your stack (1). Type in a Title for your Tile (2). Then click on the drop down menu and choose to Add new collection (3).
Type in a name for your user content collection and click on the tick button (4).
You can turn on the switch (5) and add some introduction text to explain to viewers what you want them to add. You can also choose the privacy settings for your user content collection (6). If you want every viewer to be able to see all the added material then you should leave this setting in its default position. You can also choose what type of content users can add to the user collection (7). If you want to then you can also choose to add some content (a link or a file) to the collection yourself (8).
Remember to Save your stack after you have added new content.
Editing your account
The App Link Tile is used to link to an App.
Why use the App Link Tile?
Authors often use the App Link Tile if they have developed an App as part of their work or if they have used or evaluated an App as part of their work. The App link tile will direct a viewer to that App (or the relevant place in the App store) when they click on the tile whilst viewing the stack on a suitable device (e.g. smartphone or tablet).
Using the App Link Tile
Drag and drop an App Link Tile from the Tile Library into your stack (1). Then click on the drop down menu to choose the App that you want to include (2). If you cannot find the App that you want to include in the list then please email support@stack.services and if possible we will add it to the list. A title will automatically be added to the Tile, but you can change this. You can also change the layout of the tile (size, colour and background image) by clicking on the Layout tab (3).
Remember to Save your stack after you have added new content.
The Collection Tile is used to a collection of files or links to your stack.
Why use the Collection Tile?
Authors often use the Collection Tile if they have a set of related material that they want to group together in their stack (such as references or background study materials). The Collection Tile allows you to do this with files and web links. If you want more flexibility over what to include in your set of materials and how it appears onscreen then you should use a Stack Screen Tile instead. The tile titled Related Papers in this example stack is a Collection Tile.
Using the Collection Tile
Drag and drop a Collection Tile from the Tile Library into your stack (1). Type in a Title for your Tile (2). Then click on the drop down menu and choose to Add new collection (3).
Type in a name for your collection and click on the tick button (4).
Buttons will now appear onscreen allowing you to click and Add a Link or Add a File (5). Click on the appropriate button and then follow the prompts to upload a file or add your weblink. Once it is added then you can click on the appropriate button again to add your next link or file.
Onscreen you will see a list of the links and files that you have added to this collection. If you need to then you can edit or delete an item by clicking on its edit or delete button (6). It is also possible to drag and drop the items in the list to change the order in which they will appear.
Remember to Save your stack after you have added new content.
The News Feed Tile is used to connect to an RSS news feed and show the most recent posts from that feed in your stack.
Why use the News Feed Tile?
Authors can use the News Feed tile if they want to link to an RSS news feed service that provides up-to-date information on a particular topic related to their work. For example this news feed from BMC Medical Education (https://bmcmededuc.biomedcentral.com/articles/most-recent/rss.xml) provides links to recent articles on medical education. An author may know of a news feed that is particularly relevant to their work and can use the News Feed Tile to link to that.
Using the News Feed Tile
Drag and drop a News Feed Tile from the Tile Library into your stack (1). Type or paste in the URL (web address) to the news feed that you want to connect with and click on the Get Feed button (2).
This creates a live link, so that when viewers click on this Tile they will see the most recent updates sent by that news feed service.
Remember to Save your stack after you have added new content.
The Other Stack Tile is used to add a link to another stack.
Why use the Other Stack Tile?
Authors often use the Other Stack Tile if they have more than one ePoster stack in a conference and they want to add a direct link from one of their ePoster stacks to the other ePoster stack. Authors also use the Other Stack Tile if they want to link to another ePoster stack by their research group or if they want to link to an ePoster stack that they made for a previous year’s conference. The tile titled Explore an ePoster in this example stack is an Other Stack tile.
Using the Other Stack Tile
Drag and drop an Other Stack Tile from the Tile Library into your stack (1). Type in a Title for your Tile (2). Then click on the target stack edit icon to choose the stack you want to connect to this Tile (3).
A search box will appear. Type in here to search for the stack you want (4). When you find the stack you want click on its title bar (5) to link it to this Tile.
Remember to Save your stack after you have added new content.
The Stack Screen Tile is used to link to a new screen to your stack and you can then add more content into this new screen.
Why use the Stack Screen Tile?
Authors use the Stack Screen Tile when they want to add structure to their stack. It allows them to create a new screen into which they can add new content. Authors often use the Stack Screen Tile if they have a lot of content and want to separate it into different spaces – e.g. a screen for authors’ information, a screen for presentations, a screen for background material, a screen for references. The tile titled Authors in this example stack is a Stack Screen tile.
Using the Stack Screen Tile
Drag and drop a Stack Screen Tile from the Tile Library into your stack (1). This Tile will be used as the link to your new screen. Type in a Title for your Tile (2). Then click on the drop down menu and choose to Create new screen (3).
A new empty screen is now created and you can add new content to this screen by dragging in Tiles from the Tile Library as normal (4). Your new screen is automatically called Screen 2. If you want to give it a new name (to help you remember the type of content you have added to this screen) then click on the screen settings icon (5) and add the new name. When you have finished adding content to your new screen then you can return to your stack’s Home screen by clicking drop down menu and choosing Home (6).
Remember to Save your stack after you have added new content.
Status of the ‘Twitter Feed’ tile
5 July 2023
We’re sorry to announce that due to a recent change in Twitter’s policy, we have had to make the ‘Twitter Feed’ tile unavailable.
Since 30 June 2023 Twitter has put in place access restrictions to their platform to no longer allow access for anyone not logged into their platform. This was an unannounced change by Twitter that means that the ‘Twitter Feed’ tile no longer works as expected. Unfortunately this is out of our control.
Read more in this CNN article.
We’re keeping an eye on any developments around this, but in the meantime the ‘Twitter Feed’ tile is unavailable.
If you have already added a ‘Twitter feed’ tile to your stack then when viewers click on it they will get a message explaining why it is not currently working and giving them directions for how to get to your Twitter account or hashtag.
The Learning Toolbox Team
The User Content Tile is used to allow viewers to add content to your stack.
Why use the User Content Tile?
Authors use the User Content Tile if they want to collect information from the viewers of their stack. For example they could be asking viewers to add links to research or reports that are related to the work reported in the stack. They could be asking viewers to share images or sounds related to the work reported in the stack. Another example is when the author has created the the stack to support a round table discussion; the author may then use the User Content tile to allow all participants in the round table discussion to add materials for inclusion in the discussion. The tile titled Your Ideas in this example stack is a User Content tile.
Using the User Content Tile
Drag and drop a User Content Tile from the Tile Library into your stack (1). Type in a Title for your Tile (2). Then click on the drop down menu and choose to Add new collection (3).
Type in a name for your user content collection and click on the tick button (4).
You can turn on the switch (5) and add some introduction text to explain to viewers what you want them to add. You can also choose the privacy settings for your user content collection (6). If you want every viewer to be able to see all the added material then you should leave this setting in its default position. You can also choose what type of content users can add to the user collection (7). If you want to then you can also choose to add some content (a link or a file) to the collection yourself (8).
Remember to Save your stack after you have added new content.
Managing your stack
The App Link Tile is used to link to an App.
Why use the App Link Tile?
Authors often use the App Link Tile if they have developed an App as part of their work or if they have used or evaluated an App as part of their work. The App link tile will direct a viewer to that App (or the relevant place in the App store) when they click on the tile whilst viewing the stack on a suitable device (e.g. smartphone or tablet).
Using the App Link Tile
Drag and drop an App Link Tile from the Tile Library into your stack (1). Then click on the drop down menu to choose the App that you want to include (2). If you cannot find the App that you want to include in the list then please email support@stack.services and if possible we will add it to the list. A title will automatically be added to the Tile, but you can change this. You can also change the layout of the tile (size, colour and background image) by clicking on the Layout tab (3).
Remember to Save your stack after you have added new content.
The Collection Tile is used to a collection of files or links to your stack.
Why use the Collection Tile?
Authors often use the Collection Tile if they have a set of related material that they want to group together in their stack (such as references or background study materials). The Collection Tile allows you to do this with files and web links. If you want more flexibility over what to include in your set of materials and how it appears onscreen then you should use a Stack Screen Tile instead. The tile titled Related Papers in this example stack is a Collection Tile.
Using the Collection Tile
Drag and drop a Collection Tile from the Tile Library into your stack (1). Type in a Title for your Tile (2). Then click on the drop down menu and choose to Add new collection (3).
Type in a name for your collection and click on the tick button (4).
Buttons will now appear onscreen allowing you to click and Add a Link or Add a File (5). Click on the appropriate button and then follow the prompts to upload a file or add your weblink. Once it is added then you can click on the appropriate button again to add your next link or file.
Onscreen you will see a list of the links and files that you have added to this collection. If you need to then you can edit or delete an item by clicking on its edit or delete button (6). It is also possible to drag and drop the items in the list to change the order in which they will appear.
Remember to Save your stack after you have added new content.
The News Feed Tile is used to connect to an RSS news feed and show the most recent posts from that feed in your stack.
Why use the News Feed Tile?
Authors can use the News Feed tile if they want to link to an RSS news feed service that provides up-to-date information on a particular topic related to their work. For example this news feed from BMC Medical Education (https://bmcmededuc.biomedcentral.com/articles/most-recent/rss.xml) provides links to recent articles on medical education. An author may know of a news feed that is particularly relevant to their work and can use the News Feed Tile to link to that.
Using the News Feed Tile
Drag and drop a News Feed Tile from the Tile Library into your stack (1). Type or paste in the URL (web address) to the news feed that you want to connect with and click on the Get Feed button (2).
This creates a live link, so that when viewers click on this Tile they will see the most recent updates sent by that news feed service.
Remember to Save your stack after you have added new content.
The Other Stack Tile is used to add a link to another stack.
Why use the Other Stack Tile?
Authors often use the Other Stack Tile if they have more than one ePoster stack in a conference and they want to add a direct link from one of their ePoster stacks to the other ePoster stack. Authors also use the Other Stack Tile if they want to link to another ePoster stack by their research group or if they want to link to an ePoster stack that they made for a previous year’s conference. The tile titled Explore an ePoster in this example stack is an Other Stack tile.
Using the Other Stack Tile
Drag and drop an Other Stack Tile from the Tile Library into your stack (1). Type in a Title for your Tile (2). Then click on the target stack edit icon to choose the stack you want to connect to this Tile (3).
A search box will appear. Type in here to search for the stack you want (4). When you find the stack you want click on its title bar (5) to link it to this Tile.
Remember to Save your stack after you have added new content.
The Stack Screen Tile is used to link to a new screen to your stack and you can then add more content into this new screen.
Why use the Stack Screen Tile?
Authors use the Stack Screen Tile when they want to add structure to their stack. It allows them to create a new screen into which they can add new content. Authors often use the Stack Screen Tile if they have a lot of content and want to separate it into different spaces – e.g. a screen for authors’ information, a screen for presentations, a screen for background material, a screen for references. The tile titled Authors in this example stack is a Stack Screen tile.
Using the Stack Screen Tile
Drag and drop a Stack Screen Tile from the Tile Library into your stack (1). This Tile will be used as the link to your new screen. Type in a Title for your Tile (2). Then click on the drop down menu and choose to Create new screen (3).
A new empty screen is now created and you can add new content to this screen by dragging in Tiles from the Tile Library as normal (4). Your new screen is automatically called Screen 2. If you want to give it a new name (to help you remember the type of content you have added to this screen) then click on the screen settings icon (5) and add the new name. When you have finished adding content to your new screen then you can return to your stack’s Home screen by clicking drop down menu and choosing Home (6).
Remember to Save your stack after you have added new content.
Status of the ‘Twitter Feed’ tile
5 July 2023
We’re sorry to announce that due to a recent change in Twitter’s policy, we have had to make the ‘Twitter Feed’ tile unavailable.
Since 30 June 2023 Twitter has put in place access restrictions to their platform to no longer allow access for anyone not logged into their platform. This was an unannounced change by Twitter that means that the ‘Twitter Feed’ tile no longer works as expected. Unfortunately this is out of our control.
Read more in this CNN article.
We’re keeping an eye on any developments around this, but in the meantime the ‘Twitter Feed’ tile is unavailable.
If you have already added a ‘Twitter feed’ tile to your stack then when viewers click on it they will get a message explaining why it is not currently working and giving them directions for how to get to your Twitter account or hashtag.
The Learning Toolbox Team
The User Content Tile is used to allow viewers to add content to your stack.
Why use the User Content Tile?
Authors use the User Content Tile if they want to collect information from the viewers of their stack. For example they could be asking viewers to add links to research or reports that are related to the work reported in the stack. They could be asking viewers to share images or sounds related to the work reported in the stack. Another example is when the author has created the the stack to support a round table discussion; the author may then use the User Content tile to allow all participants in the round table discussion to add materials for inclusion in the discussion. The tile titled Your Ideas in this example stack is a User Content tile.
Using the User Content Tile
Drag and drop a User Content Tile from the Tile Library into your stack (1). Type in a Title for your Tile (2). Then click on the drop down menu and choose to Add new collection (3).
Type in a name for your user content collection and click on the tick button (4).
You can turn on the switch (5) and add some introduction text to explain to viewers what you want them to add. You can also choose the privacy settings for your user content collection (6). If you want every viewer to be able to see all the added material then you should leave this setting in its default position. You can also choose what type of content users can add to the user collection (7). If you want to then you can also choose to add some content (a link or a file) to the collection yourself (8).
Remember to Save your stack after you have added new content.