Contents
- Invitation links and getting started
- Creating and returning to edit your stack
- Adding content to your stack using the Tile Library
- Co-authors
- Editing a Tile
- Changing the layout and appearance of a Tile
- Adding a PowerPoint to your stack
- Adding a video to your stack
- Adding an extra screen to your stack
- Restoring a deleted stack
- Previewing and checking your stack
- Restrictions on what can be included in your stack
- Creating the summary poster
- Your stack on the showcase website
- Marking your stack as ready to publish
- Presenting your stack (general guidance)
- Exploring and sharing published stacks
- Engaging with the viewers of your stack
- Using templates
- Editing your account
- Managing your stack
Invitation links and getting started
The information you provide in the Stack Summary area is used to create the summary view of your stack. This summary view is used on the the showcase. It can also be used to create a printable summary poster for your stack. Onsite conferences often print these summary posters and display them onsite helping to promote your ePoster / stack to delegates.
1. Edit your stack and click on the Stack Summary tab.
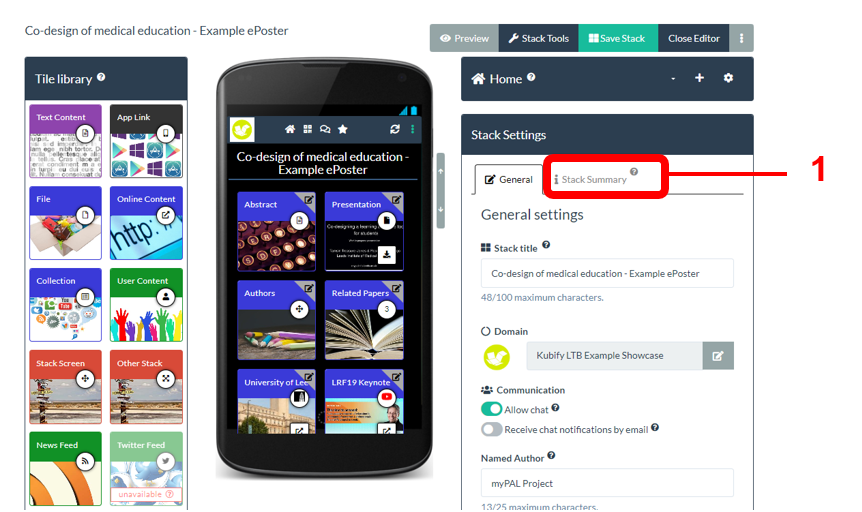
Enter all the information requested in the Stack Summary area.
Stack Title: The title of your stack.
Event or Context: If you are creating this for an event then this information will already have been filled in by the event organiser.
Authors: Your name will already appear here, but you can also add your co-authors names. There is limited space (110 characters) so you may need to use only last names (e.g. Jones and Elferink instead of Tamsin Jones and Raymond Elferink). If your list of co-authors is very long then you could choose to use the academic convention et al (e.g. Jones et. al.) and then make sure that you do include all the co-authors names within the main content of your stack.
Author Affiliations: List where the co-authors work.
Stack Summary: Give a summary of your work. This summary text will appear in the summary view or your stack in the showcase and on the printable summary poster for your stack.
Summary Image: Click on the Set Image button to add an image to illustrate your stack’s summary. This image will be used in the summary view of your stack on the showcase and on the printable summary poster. The space available for the image is a wide rectangle.
Tags: Add any tags that help people to find your work. We recommend adding a maximum of 10 tags.
Extra Information Heading: If you want to include some extra information (such as Key Messages or Conclusions) to be added to the printable summary poster then add a heading for that extra information here.
Extra Information: Type in your extra information here if you are using it. This information will only appear on the printable summary poster.
2. Remember to Save when you have added all your summary information.
3. You can then Close the Editor to see the results of the information you have added.
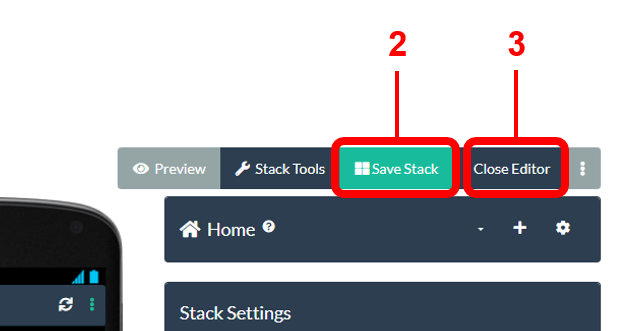
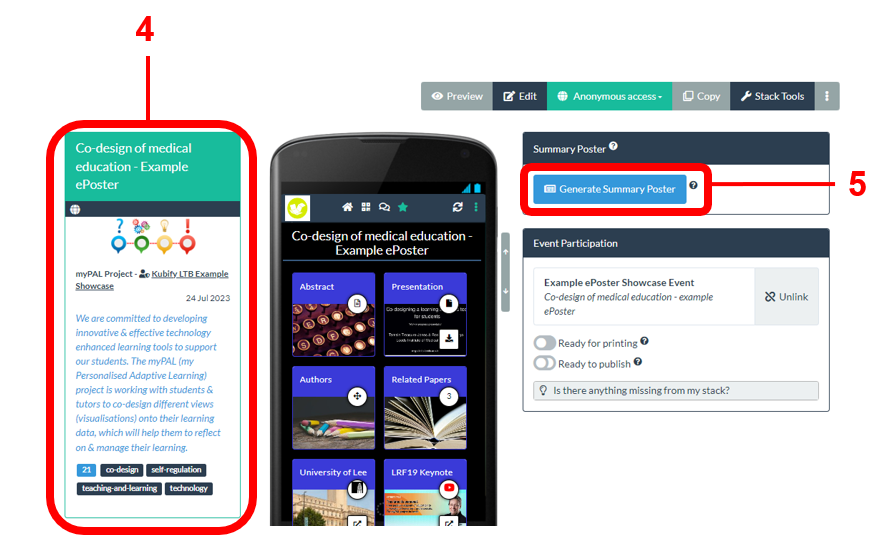
4. You can now see the summary view of your stack. This is how it will appear when viewers are browsing the showcase. When they click on its title then it will open to show them the contents of your stack.
5. You can also generate and view the printable summary poster for your stack.
If you want to make changes to either then just return to edit your stack and edit the information that you provided in the Stack Summary area.
This is an important step if your conference is using the printed summary posters. Printed summary posters are usually used by onsite conferences as way to advertise and provide access to your ePoster/stack at the venue.
Marking your stack as ready for printing will let the administrators know that you are happy for them to generate and print your summary poster.
To mark your ePoster as ready for printing, first close the editor if you have been editing the stack.
1. Then click on the button marked ‘Ready for printing‘ to turn it on.
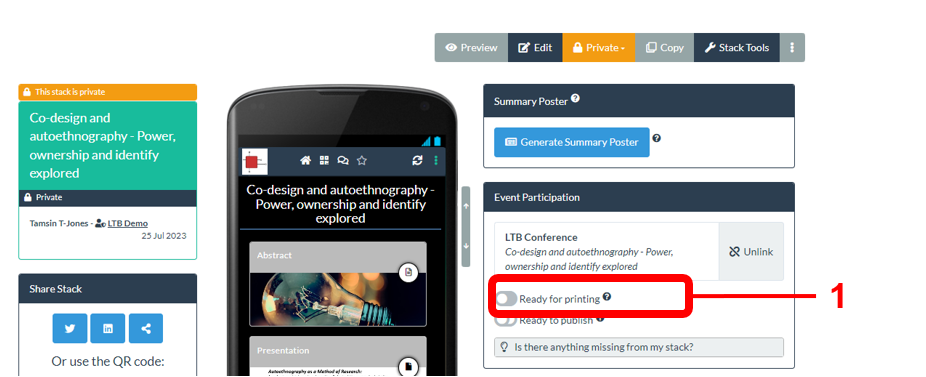
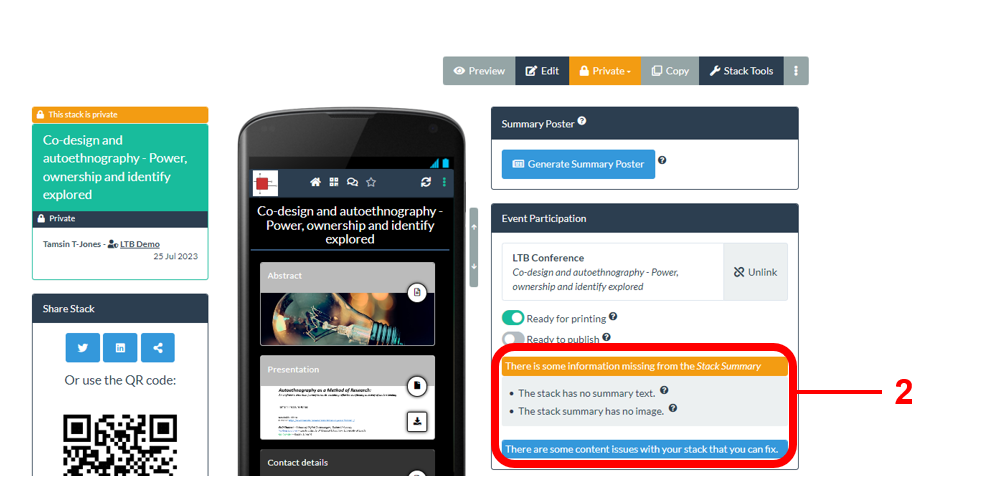
2. When you mark your stack as ready then we will run some basic checks and if we identify any issues then you will see a message onscreen telling you what issues we have found. Just click on the help icon (?) next to any issue to find out more about it and how to fix it.
1. You can view and check your summary poster by clicking on the Generate Summary Poster button.
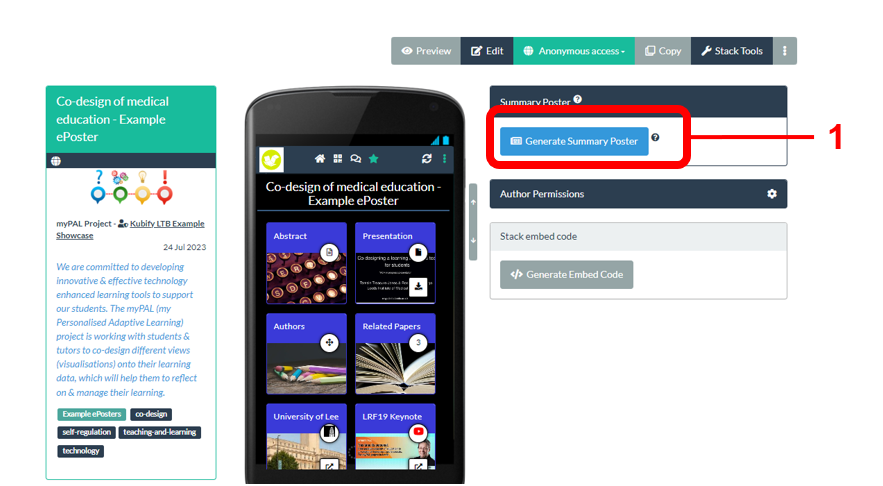
The summary poster will be generated as a PDF file and downloaded to your computer. You can open and view it to check that it looks as you expect.
Your summary poster should look something like the example shown below:
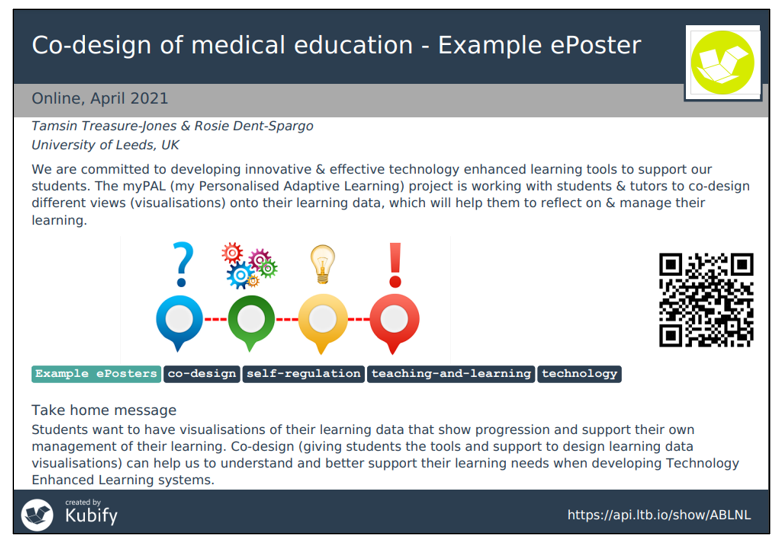
If your summary poster does not look as you expected, then return to edit your stack and add the information you want to appear in the Stack Summary area.
The image on the summary poster is intended to be illustrative. It is not an image that it is intended the viewer will look at in detail, because if they want more detail about your work then they can scan the QR code on your summary poster and open and explore your stack.
The ideal dimensions of the image for your summary poster are 1200 x 280 pixels or any ratio 30:7.
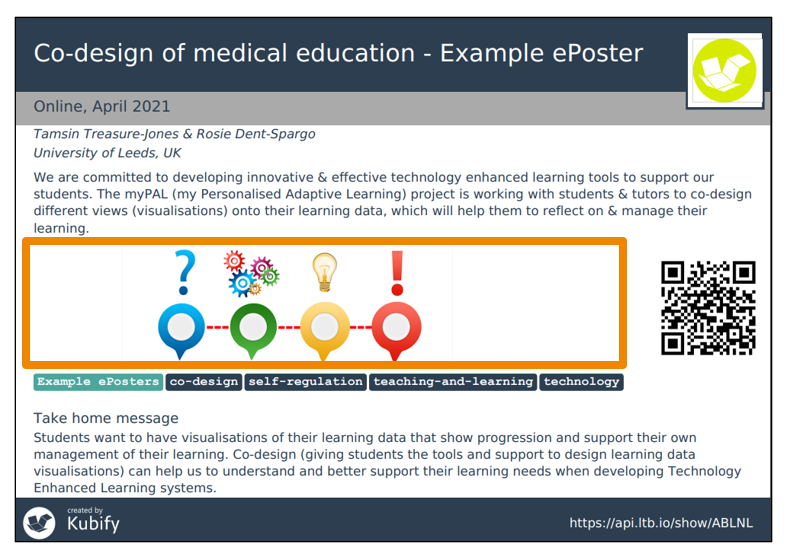
When you add an image you can also choose to crop it to these dimensions or zoom in or out to make the key parts of the image fit into these dimensions. This FAQ answer provides more information about cropping and adjusting the size of the image within Learning Toolbox.
Creating and returning to edit your stack
The information you provide in the Stack Summary area is used to create the summary view of your stack. This summary view is used on the the showcase. It can also be used to create a printable summary poster for your stack. Onsite conferences often print these summary posters and display them onsite helping to promote your ePoster / stack to delegates.
1. Edit your stack and click on the Stack Summary tab.
Enter all the information requested in the Stack Summary area.
Stack Title: The title of your stack.
Event or Context: If you are creating this for an event then this information will already have been filled in by the event organiser.
Authors: Your name will already appear here, but you can also add your co-authors names. There is limited space (110 characters) so you may need to use only last names (e.g. Jones and Elferink instead of Tamsin Jones and Raymond Elferink). If your list of co-authors is very long then you could choose to use the academic convention et al (e.g. Jones et. al.) and then make sure that you do include all the co-authors names within the main content of your stack.
Author Affiliations: List where the co-authors work.
Stack Summary: Give a summary of your work. This summary text will appear in the summary view or your stack in the showcase and on the printable summary poster for your stack.
Summary Image: Click on the Set Image button to add an image to illustrate your stack’s summary. This image will be used in the summary view of your stack on the showcase and on the printable summary poster. The space available for the image is a wide rectangle.
Tags: Add any tags that help people to find your work. We recommend adding a maximum of 10 tags.
Extra Information Heading: If you want to include some extra information (such as Key Messages or Conclusions) to be added to the printable summary poster then add a heading for that extra information here.
Extra Information: Type in your extra information here if you are using it. This information will only appear on the printable summary poster.
2. Remember to Save when you have added all your summary information.
3. You can then Close the Editor to see the results of the information you have added.
4. You can now see the summary view of your stack. This is how it will appear when viewers are browsing the showcase. When they click on its title then it will open to show them the contents of your stack.
5. You can also generate and view the printable summary poster for your stack.
If you want to make changes to either then just return to edit your stack and edit the information that you provided in the Stack Summary area.
This is an important step if your conference is using the printed summary posters. Printed summary posters are usually used by onsite conferences as way to advertise and provide access to your ePoster/stack at the venue.
Marking your stack as ready for printing will let the administrators know that you are happy for them to generate and print your summary poster.
To mark your ePoster as ready for printing, first close the editor if you have been editing the stack.
1. Then click on the button marked ‘Ready for printing‘ to turn it on.
2. When you mark your stack as ready then we will run some basic checks and if we identify any issues then you will see a message onscreen telling you what issues we have found. Just click on the help icon (?) next to any issue to find out more about it and how to fix it.
1. You can view and check your summary poster by clicking on the Generate Summary Poster button.
The summary poster will be generated as a PDF file and downloaded to your computer. You can open and view it to check that it looks as you expect.
Your summary poster should look something like the example shown below:
If your summary poster does not look as you expected, then return to edit your stack and add the information you want to appear in the Stack Summary area.
The image on the summary poster is intended to be illustrative. It is not an image that it is intended the viewer will look at in detail, because if they want more detail about your work then they can scan the QR code on your summary poster and open and explore your stack.
The ideal dimensions of the image for your summary poster are 1200 x 280 pixels or any ratio 30:7.
When you add an image you can also choose to crop it to these dimensions or zoom in or out to make the key parts of the image fit into these dimensions. This FAQ answer provides more information about cropping and adjusting the size of the image within Learning Toolbox.
Adding content to your stack using the Tile Library
The information you provide in the Stack Summary area is used to create the summary view of your stack. This summary view is used on the the showcase. It can also be used to create a printable summary poster for your stack. Onsite conferences often print these summary posters and display them onsite helping to promote your ePoster / stack to delegates.
1. Edit your stack and click on the Stack Summary tab.
Enter all the information requested in the Stack Summary area.
Stack Title: The title of your stack.
Event or Context: If you are creating this for an event then this information will already have been filled in by the event organiser.
Authors: Your name will already appear here, but you can also add your co-authors names. There is limited space (110 characters) so you may need to use only last names (e.g. Jones and Elferink instead of Tamsin Jones and Raymond Elferink). If your list of co-authors is very long then you could choose to use the academic convention et al (e.g. Jones et. al.) and then make sure that you do include all the co-authors names within the main content of your stack.
Author Affiliations: List where the co-authors work.
Stack Summary: Give a summary of your work. This summary text will appear in the summary view or your stack in the showcase and on the printable summary poster for your stack.
Summary Image: Click on the Set Image button to add an image to illustrate your stack’s summary. This image will be used in the summary view of your stack on the showcase and on the printable summary poster. The space available for the image is a wide rectangle.
Tags: Add any tags that help people to find your work. We recommend adding a maximum of 10 tags.
Extra Information Heading: If you want to include some extra information (such as Key Messages or Conclusions) to be added to the printable summary poster then add a heading for that extra information here.
Extra Information: Type in your extra information here if you are using it. This information will only appear on the printable summary poster.
2. Remember to Save when you have added all your summary information.
3. You can then Close the Editor to see the results of the information you have added.
4. You can now see the summary view of your stack. This is how it will appear when viewers are browsing the showcase. When they click on its title then it will open to show them the contents of your stack.
5. You can also generate and view the printable summary poster for your stack.
If you want to make changes to either then just return to edit your stack and edit the information that you provided in the Stack Summary area.
This is an important step if your conference is using the printed summary posters. Printed summary posters are usually used by onsite conferences as way to advertise and provide access to your ePoster/stack at the venue.
Marking your stack as ready for printing will let the administrators know that you are happy for them to generate and print your summary poster.
To mark your ePoster as ready for printing, first close the editor if you have been editing the stack.
1. Then click on the button marked ‘Ready for printing‘ to turn it on.
2. When you mark your stack as ready then we will run some basic checks and if we identify any issues then you will see a message onscreen telling you what issues we have found. Just click on the help icon (?) next to any issue to find out more about it and how to fix it.
1. You can view and check your summary poster by clicking on the Generate Summary Poster button.
The summary poster will be generated as a PDF file and downloaded to your computer. You can open and view it to check that it looks as you expect.
Your summary poster should look something like the example shown below:
If your summary poster does not look as you expected, then return to edit your stack and add the information you want to appear in the Stack Summary area.
The image on the summary poster is intended to be illustrative. It is not an image that it is intended the viewer will look at in detail, because if they want more detail about your work then they can scan the QR code on your summary poster and open and explore your stack.
The ideal dimensions of the image for your summary poster are 1200 x 280 pixels or any ratio 30:7.
When you add an image you can also choose to crop it to these dimensions or zoom in or out to make the key parts of the image fit into these dimensions. This FAQ answer provides more information about cropping and adjusting the size of the image within Learning Toolbox.
Commonly used Tiles
The information you provide in the Stack Summary area is used to create the summary view of your stack. This summary view is used on the the showcase. It can also be used to create a printable summary poster for your stack. Onsite conferences often print these summary posters and display them onsite helping to promote your ePoster / stack to delegates.
1. Edit your stack and click on the Stack Summary tab.
Enter all the information requested in the Stack Summary area.
Stack Title: The title of your stack.
Event or Context: If you are creating this for an event then this information will already have been filled in by the event organiser.
Authors: Your name will already appear here, but you can also add your co-authors names. There is limited space (110 characters) so you may need to use only last names (e.g. Jones and Elferink instead of Tamsin Jones and Raymond Elferink). If your list of co-authors is very long then you could choose to use the academic convention et al (e.g. Jones et. al.) and then make sure that you do include all the co-authors names within the main content of your stack.
Author Affiliations: List where the co-authors work.
Stack Summary: Give a summary of your work. This summary text will appear in the summary view or your stack in the showcase and on the printable summary poster for your stack.
Summary Image: Click on the Set Image button to add an image to illustrate your stack’s summary. This image will be used in the summary view of your stack on the showcase and on the printable summary poster. The space available for the image is a wide rectangle.
Tags: Add any tags that help people to find your work. We recommend adding a maximum of 10 tags.
Extra Information Heading: If you want to include some extra information (such as Key Messages or Conclusions) to be added to the printable summary poster then add a heading for that extra information here.
Extra Information: Type in your extra information here if you are using it. This information will only appear on the printable summary poster.
2. Remember to Save when you have added all your summary information.
3. You can then Close the Editor to see the results of the information you have added.
4. You can now see the summary view of your stack. This is how it will appear when viewers are browsing the showcase. When they click on its title then it will open to show them the contents of your stack.
5. You can also generate and view the printable summary poster for your stack.
If you want to make changes to either then just return to edit your stack and edit the information that you provided in the Stack Summary area.
This is an important step if your conference is using the printed summary posters. Printed summary posters are usually used by onsite conferences as way to advertise and provide access to your ePoster/stack at the venue.
Marking your stack as ready for printing will let the administrators know that you are happy for them to generate and print your summary poster.
To mark your ePoster as ready for printing, first close the editor if you have been editing the stack.
1. Then click on the button marked ‘Ready for printing‘ to turn it on.
2. When you mark your stack as ready then we will run some basic checks and if we identify any issues then you will see a message onscreen telling you what issues we have found. Just click on the help icon (?) next to any issue to find out more about it and how to fix it.
1. You can view and check your summary poster by clicking on the Generate Summary Poster button.
The summary poster will be generated as a PDF file and downloaded to your computer. You can open and view it to check that it looks as you expect.
Your summary poster should look something like the example shown below:
If your summary poster does not look as you expected, then return to edit your stack and add the information you want to appear in the Stack Summary area.
The image on the summary poster is intended to be illustrative. It is not an image that it is intended the viewer will look at in detail, because if they want more detail about your work then they can scan the QR code on your summary poster and open and explore your stack.
The ideal dimensions of the image for your summary poster are 1200 x 280 pixels or any ratio 30:7.
When you add an image you can also choose to crop it to these dimensions or zoom in or out to make the key parts of the image fit into these dimensions. This FAQ answer provides more information about cropping and adjusting the size of the image within Learning Toolbox.
Advanced Tiles
The information you provide in the Stack Summary area is used to create the summary view of your stack. This summary view is used on the the showcase. It can also be used to create a printable summary poster for your stack. Onsite conferences often print these summary posters and display them onsite helping to promote your ePoster / stack to delegates.
1. Edit your stack and click on the Stack Summary tab.
Enter all the information requested in the Stack Summary area.
Stack Title: The title of your stack.
Event or Context: If you are creating this for an event then this information will already have been filled in by the event organiser.
Authors: Your name will already appear here, but you can also add your co-authors names. There is limited space (110 characters) so you may need to use only last names (e.g. Jones and Elferink instead of Tamsin Jones and Raymond Elferink). If your list of co-authors is very long then you could choose to use the academic convention et al (e.g. Jones et. al.) and then make sure that you do include all the co-authors names within the main content of your stack.
Author Affiliations: List where the co-authors work.
Stack Summary: Give a summary of your work. This summary text will appear in the summary view or your stack in the showcase and on the printable summary poster for your stack.
Summary Image: Click on the Set Image button to add an image to illustrate your stack’s summary. This image will be used in the summary view of your stack on the showcase and on the printable summary poster. The space available for the image is a wide rectangle.
Tags: Add any tags that help people to find your work. We recommend adding a maximum of 10 tags.
Extra Information Heading: If you want to include some extra information (such as Key Messages or Conclusions) to be added to the printable summary poster then add a heading for that extra information here.
Extra Information: Type in your extra information here if you are using it. This information will only appear on the printable summary poster.
2. Remember to Save when you have added all your summary information.
3. You can then Close the Editor to see the results of the information you have added.
4. You can now see the summary view of your stack. This is how it will appear when viewers are browsing the showcase. When they click on its title then it will open to show them the contents of your stack.
5. You can also generate and view the printable summary poster for your stack.
If you want to make changes to either then just return to edit your stack and edit the information that you provided in the Stack Summary area.
This is an important step if your conference is using the printed summary posters. Printed summary posters are usually used by onsite conferences as way to advertise and provide access to your ePoster/stack at the venue.
Marking your stack as ready for printing will let the administrators know that you are happy for them to generate and print your summary poster.
To mark your ePoster as ready for printing, first close the editor if you have been editing the stack.
1. Then click on the button marked ‘Ready for printing‘ to turn it on.
2. When you mark your stack as ready then we will run some basic checks and if we identify any issues then you will see a message onscreen telling you what issues we have found. Just click on the help icon (?) next to any issue to find out more about it and how to fix it.
1. You can view and check your summary poster by clicking on the Generate Summary Poster button.
The summary poster will be generated as a PDF file and downloaded to your computer. You can open and view it to check that it looks as you expect.
Your summary poster should look something like the example shown below:
If your summary poster does not look as you expected, then return to edit your stack and add the information you want to appear in the Stack Summary area.
The image on the summary poster is intended to be illustrative. It is not an image that it is intended the viewer will look at in detail, because if they want more detail about your work then they can scan the QR code on your summary poster and open and explore your stack.
The ideal dimensions of the image for your summary poster are 1200 x 280 pixels or any ratio 30:7.
When you add an image you can also choose to crop it to these dimensions or zoom in or out to make the key parts of the image fit into these dimensions. This FAQ answer provides more information about cropping and adjusting the size of the image within Learning Toolbox.
Editing Tiles
The information you provide in the Stack Summary area is used to create the summary view of your stack. This summary view is used on the the showcase. It can also be used to create a printable summary poster for your stack. Onsite conferences often print these summary posters and display them onsite helping to promote your ePoster / stack to delegates.
1. Edit your stack and click on the Stack Summary tab.
Enter all the information requested in the Stack Summary area.
Stack Title: The title of your stack.
Event or Context: If you are creating this for an event then this information will already have been filled in by the event organiser.
Authors: Your name will already appear here, but you can also add your co-authors names. There is limited space (110 characters) so you may need to use only last names (e.g. Jones and Elferink instead of Tamsin Jones and Raymond Elferink). If your list of co-authors is very long then you could choose to use the academic convention et al (e.g. Jones et. al.) and then make sure that you do include all the co-authors names within the main content of your stack.
Author Affiliations: List where the co-authors work.
Stack Summary: Give a summary of your work. This summary text will appear in the summary view or your stack in the showcase and on the printable summary poster for your stack.
Summary Image: Click on the Set Image button to add an image to illustrate your stack’s summary. This image will be used in the summary view of your stack on the showcase and on the printable summary poster. The space available for the image is a wide rectangle.
Tags: Add any tags that help people to find your work. We recommend adding a maximum of 10 tags.
Extra Information Heading: If you want to include some extra information (such as Key Messages or Conclusions) to be added to the printable summary poster then add a heading for that extra information here.
Extra Information: Type in your extra information here if you are using it. This information will only appear on the printable summary poster.
2. Remember to Save when you have added all your summary information.
3. You can then Close the Editor to see the results of the information you have added.
4. You can now see the summary view of your stack. This is how it will appear when viewers are browsing the showcase. When they click on its title then it will open to show them the contents of your stack.
5. You can also generate and view the printable summary poster for your stack.
If you want to make changes to either then just return to edit your stack and edit the information that you provided in the Stack Summary area.
This is an important step if your conference is using the printed summary posters. Printed summary posters are usually used by onsite conferences as way to advertise and provide access to your ePoster/stack at the venue.
Marking your stack as ready for printing will let the administrators know that you are happy for them to generate and print your summary poster.
To mark your ePoster as ready for printing, first close the editor if you have been editing the stack.
1. Then click on the button marked ‘Ready for printing‘ to turn it on.
2. When you mark your stack as ready then we will run some basic checks and if we identify any issues then you will see a message onscreen telling you what issues we have found. Just click on the help icon (?) next to any issue to find out more about it and how to fix it.
1. You can view and check your summary poster by clicking on the Generate Summary Poster button.
The summary poster will be generated as a PDF file and downloaded to your computer. You can open and view it to check that it looks as you expect.
Your summary poster should look something like the example shown below:
If your summary poster does not look as you expected, then return to edit your stack and add the information you want to appear in the Stack Summary area.
The image on the summary poster is intended to be illustrative. It is not an image that it is intended the viewer will look at in detail, because if they want more detail about your work then they can scan the QR code on your summary poster and open and explore your stack.
The ideal dimensions of the image for your summary poster are 1200 x 280 pixels or any ratio 30:7.
When you add an image you can also choose to crop it to these dimensions or zoom in or out to make the key parts of the image fit into these dimensions. This FAQ answer provides more information about cropping and adjusting the size of the image within Learning Toolbox.
Changing the layout and appearance of a tile
The information you provide in the Stack Summary area is used to create the summary view of your stack. This summary view is used on the the showcase. It can also be used to create a printable summary poster for your stack. Onsite conferences often print these summary posters and display them onsite helping to promote your ePoster / stack to delegates.
1. Edit your stack and click on the Stack Summary tab.
Enter all the information requested in the Stack Summary area.
Stack Title: The title of your stack.
Event or Context: If you are creating this for an event then this information will already have been filled in by the event organiser.
Authors: Your name will already appear here, but you can also add your co-authors names. There is limited space (110 characters) so you may need to use only last names (e.g. Jones and Elferink instead of Tamsin Jones and Raymond Elferink). If your list of co-authors is very long then you could choose to use the academic convention et al (e.g. Jones et. al.) and then make sure that you do include all the co-authors names within the main content of your stack.
Author Affiliations: List where the co-authors work.
Stack Summary: Give a summary of your work. This summary text will appear in the summary view or your stack in the showcase and on the printable summary poster for your stack.
Summary Image: Click on the Set Image button to add an image to illustrate your stack’s summary. This image will be used in the summary view of your stack on the showcase and on the printable summary poster. The space available for the image is a wide rectangle.
Tags: Add any tags that help people to find your work. We recommend adding a maximum of 10 tags.
Extra Information Heading: If you want to include some extra information (such as Key Messages or Conclusions) to be added to the printable summary poster then add a heading for that extra information here.
Extra Information: Type in your extra information here if you are using it. This information will only appear on the printable summary poster.
2. Remember to Save when you have added all your summary information.
3. You can then Close the Editor to see the results of the information you have added.
4. You can now see the summary view of your stack. This is how it will appear when viewers are browsing the showcase. When they click on its title then it will open to show them the contents of your stack.
5. You can also generate and view the printable summary poster for your stack.
If you want to make changes to either then just return to edit your stack and edit the information that you provided in the Stack Summary area.
This is an important step if your conference is using the printed summary posters. Printed summary posters are usually used by onsite conferences as way to advertise and provide access to your ePoster/stack at the venue.
Marking your stack as ready for printing will let the administrators know that you are happy for them to generate and print your summary poster.
To mark your ePoster as ready for printing, first close the editor if you have been editing the stack.
1. Then click on the button marked ‘Ready for printing‘ to turn it on.
2. When you mark your stack as ready then we will run some basic checks and if we identify any issues then you will see a message onscreen telling you what issues we have found. Just click on the help icon (?) next to any issue to find out more about it and how to fix it.
1. You can view and check your summary poster by clicking on the Generate Summary Poster button.
The summary poster will be generated as a PDF file and downloaded to your computer. You can open and view it to check that it looks as you expect.
Your summary poster should look something like the example shown below:
If your summary poster does not look as you expected, then return to edit your stack and add the information you want to appear in the Stack Summary area.
The image on the summary poster is intended to be illustrative. It is not an image that it is intended the viewer will look at in detail, because if they want more detail about your work then they can scan the QR code on your summary poster and open and explore your stack.
The ideal dimensions of the image for your summary poster are 1200 x 280 pixels or any ratio 30:7.
When you add an image you can also choose to crop it to these dimensions or zoom in or out to make the key parts of the image fit into these dimensions. This FAQ answer provides more information about cropping and adjusting the size of the image within Learning Toolbox.
Adding a PowerPoint file to your stack
The information you provide in the Stack Summary area is used to create the summary view of your stack. This summary view is used on the the showcase. It can also be used to create a printable summary poster for your stack. Onsite conferences often print these summary posters and display them onsite helping to promote your ePoster / stack to delegates.
1. Edit your stack and click on the Stack Summary tab.
Enter all the information requested in the Stack Summary area.
Stack Title: The title of your stack.
Event or Context: If you are creating this for an event then this information will already have been filled in by the event organiser.
Authors: Your name will already appear here, but you can also add your co-authors names. There is limited space (110 characters) so you may need to use only last names (e.g. Jones and Elferink instead of Tamsin Jones and Raymond Elferink). If your list of co-authors is very long then you could choose to use the academic convention et al (e.g. Jones et. al.) and then make sure that you do include all the co-authors names within the main content of your stack.
Author Affiliations: List where the co-authors work.
Stack Summary: Give a summary of your work. This summary text will appear in the summary view or your stack in the showcase and on the printable summary poster for your stack.
Summary Image: Click on the Set Image button to add an image to illustrate your stack’s summary. This image will be used in the summary view of your stack on the showcase and on the printable summary poster. The space available for the image is a wide rectangle.
Tags: Add any tags that help people to find your work. We recommend adding a maximum of 10 tags.
Extra Information Heading: If you want to include some extra information (such as Key Messages or Conclusions) to be added to the printable summary poster then add a heading for that extra information here.
Extra Information: Type in your extra information here if you are using it. This information will only appear on the printable summary poster.
2. Remember to Save when you have added all your summary information.
3. You can then Close the Editor to see the results of the information you have added.
4. You can now see the summary view of your stack. This is how it will appear when viewers are browsing the showcase. When they click on its title then it will open to show them the contents of your stack.
5. You can also generate and view the printable summary poster for your stack.
If you want to make changes to either then just return to edit your stack and edit the information that you provided in the Stack Summary area.
This is an important step if your conference is using the printed summary posters. Printed summary posters are usually used by onsite conferences as way to advertise and provide access to your ePoster/stack at the venue.
Marking your stack as ready for printing will let the administrators know that you are happy for them to generate and print your summary poster.
To mark your ePoster as ready for printing, first close the editor if you have been editing the stack.
1. Then click on the button marked ‘Ready for printing‘ to turn it on.
2. When you mark your stack as ready then we will run some basic checks and if we identify any issues then you will see a message onscreen telling you what issues we have found. Just click on the help icon (?) next to any issue to find out more about it and how to fix it.
1. You can view and check your summary poster by clicking on the Generate Summary Poster button.
The summary poster will be generated as a PDF file and downloaded to your computer. You can open and view it to check that it looks as you expect.
Your summary poster should look something like the example shown below:
If your summary poster does not look as you expected, then return to edit your stack and add the information you want to appear in the Stack Summary area.
The image on the summary poster is intended to be illustrative. It is not an image that it is intended the viewer will look at in detail, because if they want more detail about your work then they can scan the QR code on your summary poster and open and explore your stack.
The ideal dimensions of the image for your summary poster are 1200 x 280 pixels or any ratio 30:7.
When you add an image you can also choose to crop it to these dimensions or zoom in or out to make the key parts of the image fit into these dimensions. This FAQ answer provides more information about cropping and adjusting the size of the image within Learning Toolbox.
Adding a video to your stack
The information you provide in the Stack Summary area is used to create the summary view of your stack. This summary view is used on the the showcase. It can also be used to create a printable summary poster for your stack. Onsite conferences often print these summary posters and display them onsite helping to promote your ePoster / stack to delegates.
1. Edit your stack and click on the Stack Summary tab.
Enter all the information requested in the Stack Summary area.
Stack Title: The title of your stack.
Event or Context: If you are creating this for an event then this information will already have been filled in by the event organiser.
Authors: Your name will already appear here, but you can also add your co-authors names. There is limited space (110 characters) so you may need to use only last names (e.g. Jones and Elferink instead of Tamsin Jones and Raymond Elferink). If your list of co-authors is very long then you could choose to use the academic convention et al (e.g. Jones et. al.) and then make sure that you do include all the co-authors names within the main content of your stack.
Author Affiliations: List where the co-authors work.
Stack Summary: Give a summary of your work. This summary text will appear in the summary view or your stack in the showcase and on the printable summary poster for your stack.
Summary Image: Click on the Set Image button to add an image to illustrate your stack’s summary. This image will be used in the summary view of your stack on the showcase and on the printable summary poster. The space available for the image is a wide rectangle.
Tags: Add any tags that help people to find your work. We recommend adding a maximum of 10 tags.
Extra Information Heading: If you want to include some extra information (such as Key Messages or Conclusions) to be added to the printable summary poster then add a heading for that extra information here.
Extra Information: Type in your extra information here if you are using it. This information will only appear on the printable summary poster.
2. Remember to Save when you have added all your summary information.
3. You can then Close the Editor to see the results of the information you have added.
4. You can now see the summary view of your stack. This is how it will appear when viewers are browsing the showcase. When they click on its title then it will open to show them the contents of your stack.
5. You can also generate and view the printable summary poster for your stack.
If you want to make changes to either then just return to edit your stack and edit the information that you provided in the Stack Summary area.
This is an important step if your conference is using the printed summary posters. Printed summary posters are usually used by onsite conferences as way to advertise and provide access to your ePoster/stack at the venue.
Marking your stack as ready for printing will let the administrators know that you are happy for them to generate and print your summary poster.
To mark your ePoster as ready for printing, first close the editor if you have been editing the stack.
1. Then click on the button marked ‘Ready for printing‘ to turn it on.
2. When you mark your stack as ready then we will run some basic checks and if we identify any issues then you will see a message onscreen telling you what issues we have found. Just click on the help icon (?) next to any issue to find out more about it and how to fix it.
1. You can view and check your summary poster by clicking on the Generate Summary Poster button.
The summary poster will be generated as a PDF file and downloaded to your computer. You can open and view it to check that it looks as you expect.
Your summary poster should look something like the example shown below:
If your summary poster does not look as you expected, then return to edit your stack and add the information you want to appear in the Stack Summary area.
The image on the summary poster is intended to be illustrative. It is not an image that it is intended the viewer will look at in detail, because if they want more detail about your work then they can scan the QR code on your summary poster and open and explore your stack.
The ideal dimensions of the image for your summary poster are 1200 x 280 pixels or any ratio 30:7.
When you add an image you can also choose to crop it to these dimensions or zoom in or out to make the key parts of the image fit into these dimensions. This FAQ answer provides more information about cropping and adjusting the size of the image within Learning Toolbox.
Adding an extra screen/layer to your stack
The information you provide in the Stack Summary area is used to create the summary view of your stack. This summary view is used on the the showcase. It can also be used to create a printable summary poster for your stack. Onsite conferences often print these summary posters and display them onsite helping to promote your ePoster / stack to delegates.
1. Edit your stack and click on the Stack Summary tab.
Enter all the information requested in the Stack Summary area.
Stack Title: The title of your stack.
Event or Context: If you are creating this for an event then this information will already have been filled in by the event organiser.
Authors: Your name will already appear here, but you can also add your co-authors names. There is limited space (110 characters) so you may need to use only last names (e.g. Jones and Elferink instead of Tamsin Jones and Raymond Elferink). If your list of co-authors is very long then you could choose to use the academic convention et al (e.g. Jones et. al.) and then make sure that you do include all the co-authors names within the main content of your stack.
Author Affiliations: List where the co-authors work.
Stack Summary: Give a summary of your work. This summary text will appear in the summary view or your stack in the showcase and on the printable summary poster for your stack.
Summary Image: Click on the Set Image button to add an image to illustrate your stack’s summary. This image will be used in the summary view of your stack on the showcase and on the printable summary poster. The space available for the image is a wide rectangle.
Tags: Add any tags that help people to find your work. We recommend adding a maximum of 10 tags.
Extra Information Heading: If you want to include some extra information (such as Key Messages or Conclusions) to be added to the printable summary poster then add a heading for that extra information here.
Extra Information: Type in your extra information here if you are using it. This information will only appear on the printable summary poster.
2. Remember to Save when you have added all your summary information.
3. You can then Close the Editor to see the results of the information you have added.
4. You can now see the summary view of your stack. This is how it will appear when viewers are browsing the showcase. When they click on its title then it will open to show them the contents of your stack.
5. You can also generate and view the printable summary poster for your stack.
If you want to make changes to either then just return to edit your stack and edit the information that you provided in the Stack Summary area.
This is an important step if your conference is using the printed summary posters. Printed summary posters are usually used by onsite conferences as way to advertise and provide access to your ePoster/stack at the venue.
Marking your stack as ready for printing will let the administrators know that you are happy for them to generate and print your summary poster.
To mark your ePoster as ready for printing, first close the editor if you have been editing the stack.
1. Then click on the button marked ‘Ready for printing‘ to turn it on.
2. When you mark your stack as ready then we will run some basic checks and if we identify any issues then you will see a message onscreen telling you what issues we have found. Just click on the help icon (?) next to any issue to find out more about it and how to fix it.
1. You can view and check your summary poster by clicking on the Generate Summary Poster button.
The summary poster will be generated as a PDF file and downloaded to your computer. You can open and view it to check that it looks as you expect.
Your summary poster should look something like the example shown below:
If your summary poster does not look as you expected, then return to edit your stack and add the information you want to appear in the Stack Summary area.
The image on the summary poster is intended to be illustrative. It is not an image that it is intended the viewer will look at in detail, because if they want more detail about your work then they can scan the QR code on your summary poster and open and explore your stack.
The ideal dimensions of the image for your summary poster are 1200 x 280 pixels or any ratio 30:7.
When you add an image you can also choose to crop it to these dimensions or zoom in or out to make the key parts of the image fit into these dimensions. This FAQ answer provides more information about cropping and adjusting the size of the image within Learning Toolbox.
Restrictions on what can be included in your stack
The information you provide in the Stack Summary area is used to create the summary view of your stack. This summary view is used on the the showcase. It can also be used to create a printable summary poster for your stack. Onsite conferences often print these summary posters and display them onsite helping to promote your ePoster / stack to delegates.
1. Edit your stack and click on the Stack Summary tab.
Enter all the information requested in the Stack Summary area.
Stack Title: The title of your stack.
Event or Context: If you are creating this for an event then this information will already have been filled in by the event organiser.
Authors: Your name will already appear here, but you can also add your co-authors names. There is limited space (110 characters) so you may need to use only last names (e.g. Jones and Elferink instead of Tamsin Jones and Raymond Elferink). If your list of co-authors is very long then you could choose to use the academic convention et al (e.g. Jones et. al.) and then make sure that you do include all the co-authors names within the main content of your stack.
Author Affiliations: List where the co-authors work.
Stack Summary: Give a summary of your work. This summary text will appear in the summary view or your stack in the showcase and on the printable summary poster for your stack.
Summary Image: Click on the Set Image button to add an image to illustrate your stack’s summary. This image will be used in the summary view of your stack on the showcase and on the printable summary poster. The space available for the image is a wide rectangle.
Tags: Add any tags that help people to find your work. We recommend adding a maximum of 10 tags.
Extra Information Heading: If you want to include some extra information (such as Key Messages or Conclusions) to be added to the printable summary poster then add a heading for that extra information here.
Extra Information: Type in your extra information here if you are using it. This information will only appear on the printable summary poster.
2. Remember to Save when you have added all your summary information.
3. You can then Close the Editor to see the results of the information you have added.
4. You can now see the summary view of your stack. This is how it will appear when viewers are browsing the showcase. When they click on its title then it will open to show them the contents of your stack.
5. You can also generate and view the printable summary poster for your stack.
If you want to make changes to either then just return to edit your stack and edit the information that you provided in the Stack Summary area.
This is an important step if your conference is using the printed summary posters. Printed summary posters are usually used by onsite conferences as way to advertise and provide access to your ePoster/stack at the venue.
Marking your stack as ready for printing will let the administrators know that you are happy for them to generate and print your summary poster.
To mark your ePoster as ready for printing, first close the editor if you have been editing the stack.
1. Then click on the button marked ‘Ready for printing‘ to turn it on.
2. When you mark your stack as ready then we will run some basic checks and if we identify any issues then you will see a message onscreen telling you what issues we have found. Just click on the help icon (?) next to any issue to find out more about it and how to fix it.
1. You can view and check your summary poster by clicking on the Generate Summary Poster button.
The summary poster will be generated as a PDF file and downloaded to your computer. You can open and view it to check that it looks as you expect.
Your summary poster should look something like the example shown below:
If your summary poster does not look as you expected, then return to edit your stack and add the information you want to appear in the Stack Summary area.
The image on the summary poster is intended to be illustrative. It is not an image that it is intended the viewer will look at in detail, because if they want more detail about your work then they can scan the QR code on your summary poster and open and explore your stack.
The ideal dimensions of the image for your summary poster are 1200 x 280 pixels or any ratio 30:7.
When you add an image you can also choose to crop it to these dimensions or zoom in or out to make the key parts of the image fit into these dimensions. This FAQ answer provides more information about cropping and adjusting the size of the image within Learning Toolbox.
Restoring your deleted stack
The information you provide in the Stack Summary area is used to create the summary view of your stack. This summary view is used on the the showcase. It can also be used to create a printable summary poster for your stack. Onsite conferences often print these summary posters and display them onsite helping to promote your ePoster / stack to delegates.
1. Edit your stack and click on the Stack Summary tab.
Enter all the information requested in the Stack Summary area.
Stack Title: The title of your stack.
Event or Context: If you are creating this for an event then this information will already have been filled in by the event organiser.
Authors: Your name will already appear here, but you can also add your co-authors names. There is limited space (110 characters) so you may need to use only last names (e.g. Jones and Elferink instead of Tamsin Jones and Raymond Elferink). If your list of co-authors is very long then you could choose to use the academic convention et al (e.g. Jones et. al.) and then make sure that you do include all the co-authors names within the main content of your stack.
Author Affiliations: List where the co-authors work.
Stack Summary: Give a summary of your work. This summary text will appear in the summary view or your stack in the showcase and on the printable summary poster for your stack.
Summary Image: Click on the Set Image button to add an image to illustrate your stack’s summary. This image will be used in the summary view of your stack on the showcase and on the printable summary poster. The space available for the image is a wide rectangle.
Tags: Add any tags that help people to find your work. We recommend adding a maximum of 10 tags.
Extra Information Heading: If you want to include some extra information (such as Key Messages or Conclusions) to be added to the printable summary poster then add a heading for that extra information here.
Extra Information: Type in your extra information here if you are using it. This information will only appear on the printable summary poster.
2. Remember to Save when you have added all your summary information.
3. You can then Close the Editor to see the results of the information you have added.
4. You can now see the summary view of your stack. This is how it will appear when viewers are browsing the showcase. When they click on its title then it will open to show them the contents of your stack.
5. You can also generate and view the printable summary poster for your stack.
If you want to make changes to either then just return to edit your stack and edit the information that you provided in the Stack Summary area.
This is an important step if your conference is using the printed summary posters. Printed summary posters are usually used by onsite conferences as way to advertise and provide access to your ePoster/stack at the venue.
Marking your stack as ready for printing will let the administrators know that you are happy for them to generate and print your summary poster.
To mark your ePoster as ready for printing, first close the editor if you have been editing the stack.
1. Then click on the button marked ‘Ready for printing‘ to turn it on.
2. When you mark your stack as ready then we will run some basic checks and if we identify any issues then you will see a message onscreen telling you what issues we have found. Just click on the help icon (?) next to any issue to find out more about it and how to fix it.
1. You can view and check your summary poster by clicking on the Generate Summary Poster button.
The summary poster will be generated as a PDF file and downloaded to your computer. You can open and view it to check that it looks as you expect.
Your summary poster should look something like the example shown below:
If your summary poster does not look as you expected, then return to edit your stack and add the information you want to appear in the Stack Summary area.
The image on the summary poster is intended to be illustrative. It is not an image that it is intended the viewer will look at in detail, because if they want more detail about your work then they can scan the QR code on your summary poster and open and explore your stack.
The ideal dimensions of the image for your summary poster are 1200 x 280 pixels or any ratio 30:7.
When you add an image you can also choose to crop it to these dimensions or zoom in or out to make the key parts of the image fit into these dimensions. This FAQ answer provides more information about cropping and adjusting the size of the image within Learning Toolbox.
Previewing and checking your stack
The information you provide in the Stack Summary area is used to create the summary view of your stack. This summary view is used on the the showcase. It can also be used to create a printable summary poster for your stack. Onsite conferences often print these summary posters and display them onsite helping to promote your ePoster / stack to delegates.
1. Edit your stack and click on the Stack Summary tab.
Enter all the information requested in the Stack Summary area.
Stack Title: The title of your stack.
Event or Context: If you are creating this for an event then this information will already have been filled in by the event organiser.
Authors: Your name will already appear here, but you can also add your co-authors names. There is limited space (110 characters) so you may need to use only last names (e.g. Jones and Elferink instead of Tamsin Jones and Raymond Elferink). If your list of co-authors is very long then you could choose to use the academic convention et al (e.g. Jones et. al.) and then make sure that you do include all the co-authors names within the main content of your stack.
Author Affiliations: List where the co-authors work.
Stack Summary: Give a summary of your work. This summary text will appear in the summary view or your stack in the showcase and on the printable summary poster for your stack.
Summary Image: Click on the Set Image button to add an image to illustrate your stack’s summary. This image will be used in the summary view of your stack on the showcase and on the printable summary poster. The space available for the image is a wide rectangle.
Tags: Add any tags that help people to find your work. We recommend adding a maximum of 10 tags.
Extra Information Heading: If you want to include some extra information (such as Key Messages or Conclusions) to be added to the printable summary poster then add a heading for that extra information here.
Extra Information: Type in your extra information here if you are using it. This information will only appear on the printable summary poster.
2. Remember to Save when you have added all your summary information.
3. You can then Close the Editor to see the results of the information you have added.
4. You can now see the summary view of your stack. This is how it will appear when viewers are browsing the showcase. When they click on its title then it will open to show them the contents of your stack.
5. You can also generate and view the printable summary poster for your stack.
If you want to make changes to either then just return to edit your stack and edit the information that you provided in the Stack Summary area.
This is an important step if your conference is using the printed summary posters. Printed summary posters are usually used by onsite conferences as way to advertise and provide access to your ePoster/stack at the venue.
Marking your stack as ready for printing will let the administrators know that you are happy for them to generate and print your summary poster.
To mark your ePoster as ready for printing, first close the editor if you have been editing the stack.
1. Then click on the button marked ‘Ready for printing‘ to turn it on.
2. When you mark your stack as ready then we will run some basic checks and if we identify any issues then you will see a message onscreen telling you what issues we have found. Just click on the help icon (?) next to any issue to find out more about it and how to fix it.
1. You can view and check your summary poster by clicking on the Generate Summary Poster button.
The summary poster will be generated as a PDF file and downloaded to your computer. You can open and view it to check that it looks as you expect.
Your summary poster should look something like the example shown below:
If your summary poster does not look as you expected, then return to edit your stack and add the information you want to appear in the Stack Summary area.
The image on the summary poster is intended to be illustrative. It is not an image that it is intended the viewer will look at in detail, because if they want more detail about your work then they can scan the QR code on your summary poster and open and explore your stack.
The ideal dimensions of the image for your summary poster are 1200 x 280 pixels or any ratio 30:7.
When you add an image you can also choose to crop it to these dimensions or zoom in or out to make the key parts of the image fit into these dimensions. This FAQ answer provides more information about cropping and adjusting the size of the image within Learning Toolbox.
Creating the summary poster
An option often used by onsite conferences to promote your ePoster / stack onsite.
The information you provide in the Stack Summary area is used to create the summary view of your stack. This summary view is used on the the showcase. It can also be used to create a printable summary poster for your stack. Onsite conferences often print these summary posters and display them onsite helping to promote your ePoster / stack to delegates.
1. Edit your stack and click on the Stack Summary tab.
Enter all the information requested in the Stack Summary area.
Stack Title: The title of your stack.
Event or Context: If you are creating this for an event then this information will already have been filled in by the event organiser.
Authors: Your name will already appear here, but you can also add your co-authors names. There is limited space (110 characters) so you may need to use only last names (e.g. Jones and Elferink instead of Tamsin Jones and Raymond Elferink). If your list of co-authors is very long then you could choose to use the academic convention et al (e.g. Jones et. al.) and then make sure that you do include all the co-authors names within the main content of your stack.
Author Affiliations: List where the co-authors work.
Stack Summary: Give a summary of your work. This summary text will appear in the summary view or your stack in the showcase and on the printable summary poster for your stack.
Summary Image: Click on the Set Image button to add an image to illustrate your stack’s summary. This image will be used in the summary view of your stack on the showcase and on the printable summary poster. The space available for the image is a wide rectangle.
Tags: Add any tags that help people to find your work. We recommend adding a maximum of 10 tags.
Extra Information Heading: If you want to include some extra information (such as Key Messages or Conclusions) to be added to the printable summary poster then add a heading for that extra information here.
Extra Information: Type in your extra information here if you are using it. This information will only appear on the printable summary poster.
2. Remember to Save when you have added all your summary information.
3. You can then Close the Editor to see the results of the information you have added.
4. You can now see the summary view of your stack. This is how it will appear when viewers are browsing the showcase. When they click on its title then it will open to show them the contents of your stack.
5. You can also generate and view the printable summary poster for your stack.
If you want to make changes to either then just return to edit your stack and edit the information that you provided in the Stack Summary area.
This is an important step if your conference is using the printed summary posters. Printed summary posters are usually used by onsite conferences as way to advertise and provide access to your ePoster/stack at the venue.
Marking your stack as ready for printing will let the administrators know that you are happy for them to generate and print your summary poster.
To mark your ePoster as ready for printing, first close the editor if you have been editing the stack.
1. Then click on the button marked ‘Ready for printing‘ to turn it on.
2. When you mark your stack as ready then we will run some basic checks and if we identify any issues then you will see a message onscreen telling you what issues we have found. Just click on the help icon (?) next to any issue to find out more about it and how to fix it.
1. You can view and check your summary poster by clicking on the Generate Summary Poster button.
The summary poster will be generated as a PDF file and downloaded to your computer. You can open and view it to check that it looks as you expect.
Your summary poster should look something like the example shown below:
If your summary poster does not look as you expected, then return to edit your stack and add the information you want to appear in the Stack Summary area.
The image on the summary poster is intended to be illustrative. It is not an image that it is intended the viewer will look at in detail, because if they want more detail about your work then they can scan the QR code on your summary poster and open and explore your stack.
The ideal dimensions of the image for your summary poster are 1200 x 280 pixels or any ratio 30:7.
When you add an image you can also choose to crop it to these dimensions or zoom in or out to make the key parts of the image fit into these dimensions. This FAQ answer provides more information about cropping and adjusting the size of the image within Learning Toolbox.
Your stack on the showcase website
The information you provide in the Stack Summary area is used to create the summary view of your stack. This summary view is used on the the showcase. It can also be used to create a printable summary poster for your stack. Onsite conferences often print these summary posters and display them onsite helping to promote your ePoster / stack to delegates.
1. Edit your stack and click on the Stack Summary tab.
Enter all the information requested in the Stack Summary area.
Stack Title: The title of your stack.
Event or Context: If you are creating this for an event then this information will already have been filled in by the event organiser.
Authors: Your name will already appear here, but you can also add your co-authors names. There is limited space (110 characters) so you may need to use only last names (e.g. Jones and Elferink instead of Tamsin Jones and Raymond Elferink). If your list of co-authors is very long then you could choose to use the academic convention et al (e.g. Jones et. al.) and then make sure that you do include all the co-authors names within the main content of your stack.
Author Affiliations: List where the co-authors work.
Stack Summary: Give a summary of your work. This summary text will appear in the summary view or your stack in the showcase and on the printable summary poster for your stack.
Summary Image: Click on the Set Image button to add an image to illustrate your stack’s summary. This image will be used in the summary view of your stack on the showcase and on the printable summary poster. The space available for the image is a wide rectangle.
Tags: Add any tags that help people to find your work. We recommend adding a maximum of 10 tags.
Extra Information Heading: If you want to include some extra information (such as Key Messages or Conclusions) to be added to the printable summary poster then add a heading for that extra information here.
Extra Information: Type in your extra information here if you are using it. This information will only appear on the printable summary poster.
2. Remember to Save when you have added all your summary information.
3. You can then Close the Editor to see the results of the information you have added.
4. You can now see the summary view of your stack. This is how it will appear when viewers are browsing the showcase. When they click on its title then it will open to show them the contents of your stack.
5. You can also generate and view the printable summary poster for your stack.
If you want to make changes to either then just return to edit your stack and edit the information that you provided in the Stack Summary area.
This is an important step if your conference is using the printed summary posters. Printed summary posters are usually used by onsite conferences as way to advertise and provide access to your ePoster/stack at the venue.
Marking your stack as ready for printing will let the administrators know that you are happy for them to generate and print your summary poster.
To mark your ePoster as ready for printing, first close the editor if you have been editing the stack.
1. Then click on the button marked ‘Ready for printing‘ to turn it on.
2. When you mark your stack as ready then we will run some basic checks and if we identify any issues then you will see a message onscreen telling you what issues we have found. Just click on the help icon (?) next to any issue to find out more about it and how to fix it.
1. You can view and check your summary poster by clicking on the Generate Summary Poster button.
The summary poster will be generated as a PDF file and downloaded to your computer. You can open and view it to check that it looks as you expect.
Your summary poster should look something like the example shown below:
If your summary poster does not look as you expected, then return to edit your stack and add the information you want to appear in the Stack Summary area.
The image on the summary poster is intended to be illustrative. It is not an image that it is intended the viewer will look at in detail, because if they want more detail about your work then they can scan the QR code on your summary poster and open and explore your stack.
The ideal dimensions of the image for your summary poster are 1200 x 280 pixels or any ratio 30:7.
When you add an image you can also choose to crop it to these dimensions or zoom in or out to make the key parts of the image fit into these dimensions. This FAQ answer provides more information about cropping and adjusting the size of the image within Learning Toolbox.
Marking your stack as ready to publish to the showcase
The information you provide in the Stack Summary area is used to create the summary view of your stack. This summary view is used on the the showcase. It can also be used to create a printable summary poster for your stack. Onsite conferences often print these summary posters and display them onsite helping to promote your ePoster / stack to delegates.
1. Edit your stack and click on the Stack Summary tab.
Enter all the information requested in the Stack Summary area.
Stack Title: The title of your stack.
Event or Context: If you are creating this for an event then this information will already have been filled in by the event organiser.
Authors: Your name will already appear here, but you can also add your co-authors names. There is limited space (110 characters) so you may need to use only last names (e.g. Jones and Elferink instead of Tamsin Jones and Raymond Elferink). If your list of co-authors is very long then you could choose to use the academic convention et al (e.g. Jones et. al.) and then make sure that you do include all the co-authors names within the main content of your stack.
Author Affiliations: List where the co-authors work.
Stack Summary: Give a summary of your work. This summary text will appear in the summary view or your stack in the showcase and on the printable summary poster for your stack.
Summary Image: Click on the Set Image button to add an image to illustrate your stack’s summary. This image will be used in the summary view of your stack on the showcase and on the printable summary poster. The space available for the image is a wide rectangle.
Tags: Add any tags that help people to find your work. We recommend adding a maximum of 10 tags.
Extra Information Heading: If you want to include some extra information (such as Key Messages or Conclusions) to be added to the printable summary poster then add a heading for that extra information here.
Extra Information: Type in your extra information here if you are using it. This information will only appear on the printable summary poster.
2. Remember to Save when you have added all your summary information.
3. You can then Close the Editor to see the results of the information you have added.
4. You can now see the summary view of your stack. This is how it will appear when viewers are browsing the showcase. When they click on its title then it will open to show them the contents of your stack.
5. You can also generate and view the printable summary poster for your stack.
If you want to make changes to either then just return to edit your stack and edit the information that you provided in the Stack Summary area.
This is an important step if your conference is using the printed summary posters. Printed summary posters are usually used by onsite conferences as way to advertise and provide access to your ePoster/stack at the venue.
Marking your stack as ready for printing will let the administrators know that you are happy for them to generate and print your summary poster.
To mark your ePoster as ready for printing, first close the editor if you have been editing the stack.
1. Then click on the button marked ‘Ready for printing‘ to turn it on.
2. When you mark your stack as ready then we will run some basic checks and if we identify any issues then you will see a message onscreen telling you what issues we have found. Just click on the help icon (?) next to any issue to find out more about it and how to fix it.
1. You can view and check your summary poster by clicking on the Generate Summary Poster button.
The summary poster will be generated as a PDF file and downloaded to your computer. You can open and view it to check that it looks as you expect.
Your summary poster should look something like the example shown below:
If your summary poster does not look as you expected, then return to edit your stack and add the information you want to appear in the Stack Summary area.
The image on the summary poster is intended to be illustrative. It is not an image that it is intended the viewer will look at in detail, because if they want more detail about your work then they can scan the QR code on your summary poster and open and explore your stack.
The ideal dimensions of the image for your summary poster are 1200 x 280 pixels or any ratio 30:7.
When you add an image you can also choose to crop it to these dimensions or zoom in or out to make the key parts of the image fit into these dimensions. This FAQ answer provides more information about cropping and adjusting the size of the image within Learning Toolbox.
Presenting your stack (General advice)
The information you provide in the Stack Summary area is used to create the summary view of your stack. This summary view is used on the the showcase. It can also be used to create a printable summary poster for your stack. Onsite conferences often print these summary posters and display them onsite helping to promote your ePoster / stack to delegates.
1. Edit your stack and click on the Stack Summary tab.
Enter all the information requested in the Stack Summary area.
Stack Title: The title of your stack.
Event or Context: If you are creating this for an event then this information will already have been filled in by the event organiser.
Authors: Your name will already appear here, but you can also add your co-authors names. There is limited space (110 characters) so you may need to use only last names (e.g. Jones and Elferink instead of Tamsin Jones and Raymond Elferink). If your list of co-authors is very long then you could choose to use the academic convention et al (e.g. Jones et. al.) and then make sure that you do include all the co-authors names within the main content of your stack.
Author Affiliations: List where the co-authors work.
Stack Summary: Give a summary of your work. This summary text will appear in the summary view or your stack in the showcase and on the printable summary poster for your stack.
Summary Image: Click on the Set Image button to add an image to illustrate your stack’s summary. This image will be used in the summary view of your stack on the showcase and on the printable summary poster. The space available for the image is a wide rectangle.
Tags: Add any tags that help people to find your work. We recommend adding a maximum of 10 tags.
Extra Information Heading: If you want to include some extra information (such as Key Messages or Conclusions) to be added to the printable summary poster then add a heading for that extra information here.
Extra Information: Type in your extra information here if you are using it. This information will only appear on the printable summary poster.
2. Remember to Save when you have added all your summary information.
3. You can then Close the Editor to see the results of the information you have added.
4. You can now see the summary view of your stack. This is how it will appear when viewers are browsing the showcase. When they click on its title then it will open to show them the contents of your stack.
5. You can also generate and view the printable summary poster for your stack.
If you want to make changes to either then just return to edit your stack and edit the information that you provided in the Stack Summary area.
This is an important step if your conference is using the printed summary posters. Printed summary posters are usually used by onsite conferences as way to advertise and provide access to your ePoster/stack at the venue.
Marking your stack as ready for printing will let the administrators know that you are happy for them to generate and print your summary poster.
To mark your ePoster as ready for printing, first close the editor if you have been editing the stack.
1. Then click on the button marked ‘Ready for printing‘ to turn it on.
2. When you mark your stack as ready then we will run some basic checks and if we identify any issues then you will see a message onscreen telling you what issues we have found. Just click on the help icon (?) next to any issue to find out more about it and how to fix it.
1. You can view and check your summary poster by clicking on the Generate Summary Poster button.
The summary poster will be generated as a PDF file and downloaded to your computer. You can open and view it to check that it looks as you expect.
Your summary poster should look something like the example shown below:
If your summary poster does not look as you expected, then return to edit your stack and add the information you want to appear in the Stack Summary area.
The image on the summary poster is intended to be illustrative. It is not an image that it is intended the viewer will look at in detail, because if they want more detail about your work then they can scan the QR code on your summary poster and open and explore your stack.
The ideal dimensions of the image for your summary poster are 1200 x 280 pixels or any ratio 30:7.
When you add an image you can also choose to crop it to these dimensions or zoom in or out to make the key parts of the image fit into these dimensions. This FAQ answer provides more information about cropping and adjusting the size of the image within Learning Toolbox.
Engaging with the viewers of your stacks
The information you provide in the Stack Summary area is used to create the summary view of your stack. This summary view is used on the the showcase. It can also be used to create a printable summary poster for your stack. Onsite conferences often print these summary posters and display them onsite helping to promote your ePoster / stack to delegates.
1. Edit your stack and click on the Stack Summary tab.
Enter all the information requested in the Stack Summary area.
Stack Title: The title of your stack.
Event or Context: If you are creating this for an event then this information will already have been filled in by the event organiser.
Authors: Your name will already appear here, but you can also add your co-authors names. There is limited space (110 characters) so you may need to use only last names (e.g. Jones and Elferink instead of Tamsin Jones and Raymond Elferink). If your list of co-authors is very long then you could choose to use the academic convention et al (e.g. Jones et. al.) and then make sure that you do include all the co-authors names within the main content of your stack.
Author Affiliations: List where the co-authors work.
Stack Summary: Give a summary of your work. This summary text will appear in the summary view or your stack in the showcase and on the printable summary poster for your stack.
Summary Image: Click on the Set Image button to add an image to illustrate your stack’s summary. This image will be used in the summary view of your stack on the showcase and on the printable summary poster. The space available for the image is a wide rectangle.
Tags: Add any tags that help people to find your work. We recommend adding a maximum of 10 tags.
Extra Information Heading: If you want to include some extra information (such as Key Messages or Conclusions) to be added to the printable summary poster then add a heading for that extra information here.
Extra Information: Type in your extra information here if you are using it. This information will only appear on the printable summary poster.
2. Remember to Save when you have added all your summary information.
3. You can then Close the Editor to see the results of the information you have added.
4. You can now see the summary view of your stack. This is how it will appear when viewers are browsing the showcase. When they click on its title then it will open to show them the contents of your stack.
5. You can also generate and view the printable summary poster for your stack.
If you want to make changes to either then just return to edit your stack and edit the information that you provided in the Stack Summary area.
This is an important step if your conference is using the printed summary posters. Printed summary posters are usually used by onsite conferences as way to advertise and provide access to your ePoster/stack at the venue.
Marking your stack as ready for printing will let the administrators know that you are happy for them to generate and print your summary poster.
To mark your ePoster as ready for printing, first close the editor if you have been editing the stack.
1. Then click on the button marked ‘Ready for printing‘ to turn it on.
2. When you mark your stack as ready then we will run some basic checks and if we identify any issues then you will see a message onscreen telling you what issues we have found. Just click on the help icon (?) next to any issue to find out more about it and how to fix it.
1. You can view and check your summary poster by clicking on the Generate Summary Poster button.
The summary poster will be generated as a PDF file and downloaded to your computer. You can open and view it to check that it looks as you expect.
Your summary poster should look something like the example shown below:
If your summary poster does not look as you expected, then return to edit your stack and add the information you want to appear in the Stack Summary area.
The image on the summary poster is intended to be illustrative. It is not an image that it is intended the viewer will look at in detail, because if they want more detail about your work then they can scan the QR code on your summary poster and open and explore your stack.
The ideal dimensions of the image for your summary poster are 1200 x 280 pixels or any ratio 30:7.
When you add an image you can also choose to crop it to these dimensions or zoom in or out to make the key parts of the image fit into these dimensions. This FAQ answer provides more information about cropping and adjusting the size of the image within Learning Toolbox.
Using templates
The information you provide in the Stack Summary area is used to create the summary view of your stack. This summary view is used on the the showcase. It can also be used to create a printable summary poster for your stack. Onsite conferences often print these summary posters and display them onsite helping to promote your ePoster / stack to delegates.
1. Edit your stack and click on the Stack Summary tab.
Enter all the information requested in the Stack Summary area.
Stack Title: The title of your stack.
Event or Context: If you are creating this for an event then this information will already have been filled in by the event organiser.
Authors: Your name will already appear here, but you can also add your co-authors names. There is limited space (110 characters) so you may need to use only last names (e.g. Jones and Elferink instead of Tamsin Jones and Raymond Elferink). If your list of co-authors is very long then you could choose to use the academic convention et al (e.g. Jones et. al.) and then make sure that you do include all the co-authors names within the main content of your stack.
Author Affiliations: List where the co-authors work.
Stack Summary: Give a summary of your work. This summary text will appear in the summary view or your stack in the showcase and on the printable summary poster for your stack.
Summary Image: Click on the Set Image button to add an image to illustrate your stack’s summary. This image will be used in the summary view of your stack on the showcase and on the printable summary poster. The space available for the image is a wide rectangle.
Tags: Add any tags that help people to find your work. We recommend adding a maximum of 10 tags.
Extra Information Heading: If you want to include some extra information (such as Key Messages or Conclusions) to be added to the printable summary poster then add a heading for that extra information here.
Extra Information: Type in your extra information here if you are using it. This information will only appear on the printable summary poster.
2. Remember to Save when you have added all your summary information.
3. You can then Close the Editor to see the results of the information you have added.
4. You can now see the summary view of your stack. This is how it will appear when viewers are browsing the showcase. When they click on its title then it will open to show them the contents of your stack.
5. You can also generate and view the printable summary poster for your stack.
If you want to make changes to either then just return to edit your stack and edit the information that you provided in the Stack Summary area.
This is an important step if your conference is using the printed summary posters. Printed summary posters are usually used by onsite conferences as way to advertise and provide access to your ePoster/stack at the venue.
Marking your stack as ready for printing will let the administrators know that you are happy for them to generate and print your summary poster.
To mark your ePoster as ready for printing, first close the editor if you have been editing the stack.
1. Then click on the button marked ‘Ready for printing‘ to turn it on.
2. When you mark your stack as ready then we will run some basic checks and if we identify any issues then you will see a message onscreen telling you what issues we have found. Just click on the help icon (?) next to any issue to find out more about it and how to fix it.
1. You can view and check your summary poster by clicking on the Generate Summary Poster button.
The summary poster will be generated as a PDF file and downloaded to your computer. You can open and view it to check that it looks as you expect.
Your summary poster should look something like the example shown below:
If your summary poster does not look as you expected, then return to edit your stack and add the information you want to appear in the Stack Summary area.
The image on the summary poster is intended to be illustrative. It is not an image that it is intended the viewer will look at in detail, because if they want more detail about your work then they can scan the QR code on your summary poster and open and explore your stack.
The ideal dimensions of the image for your summary poster are 1200 x 280 pixels or any ratio 30:7.
When you add an image you can also choose to crop it to these dimensions or zoom in or out to make the key parts of the image fit into these dimensions. This FAQ answer provides more information about cropping and adjusting the size of the image within Learning Toolbox.
Editing your account
The information you provide in the Stack Summary area is used to create the summary view of your stack. This summary view is used on the the showcase. It can also be used to create a printable summary poster for your stack. Onsite conferences often print these summary posters and display them onsite helping to promote your ePoster / stack to delegates.
1. Edit your stack and click on the Stack Summary tab.
Enter all the information requested in the Stack Summary area.
Stack Title: The title of your stack.
Event or Context: If you are creating this for an event then this information will already have been filled in by the event organiser.
Authors: Your name will already appear here, but you can also add your co-authors names. There is limited space (110 characters) so you may need to use only last names (e.g. Jones and Elferink instead of Tamsin Jones and Raymond Elferink). If your list of co-authors is very long then you could choose to use the academic convention et al (e.g. Jones et. al.) and then make sure that you do include all the co-authors names within the main content of your stack.
Author Affiliations: List where the co-authors work.
Stack Summary: Give a summary of your work. This summary text will appear in the summary view or your stack in the showcase and on the printable summary poster for your stack.
Summary Image: Click on the Set Image button to add an image to illustrate your stack’s summary. This image will be used in the summary view of your stack on the showcase and on the printable summary poster. The space available for the image is a wide rectangle.
Tags: Add any tags that help people to find your work. We recommend adding a maximum of 10 tags.
Extra Information Heading: If you want to include some extra information (such as Key Messages or Conclusions) to be added to the printable summary poster then add a heading for that extra information here.
Extra Information: Type in your extra information here if you are using it. This information will only appear on the printable summary poster.
2. Remember to Save when you have added all your summary information.
3. You can then Close the Editor to see the results of the information you have added.
4. You can now see the summary view of your stack. This is how it will appear when viewers are browsing the showcase. When they click on its title then it will open to show them the contents of your stack.
5. You can also generate and view the printable summary poster for your stack.
If you want to make changes to either then just return to edit your stack and edit the information that you provided in the Stack Summary area.
This is an important step if your conference is using the printed summary posters. Printed summary posters are usually used by onsite conferences as way to advertise and provide access to your ePoster/stack at the venue.
Marking your stack as ready for printing will let the administrators know that you are happy for them to generate and print your summary poster.
To mark your ePoster as ready for printing, first close the editor if you have been editing the stack.
1. Then click on the button marked ‘Ready for printing‘ to turn it on.
2. When you mark your stack as ready then we will run some basic checks and if we identify any issues then you will see a message onscreen telling you what issues we have found. Just click on the help icon (?) next to any issue to find out more about it and how to fix it.
1. You can view and check your summary poster by clicking on the Generate Summary Poster button.
The summary poster will be generated as a PDF file and downloaded to your computer. You can open and view it to check that it looks as you expect.
Your summary poster should look something like the example shown below:
If your summary poster does not look as you expected, then return to edit your stack and add the information you want to appear in the Stack Summary area.
The image on the summary poster is intended to be illustrative. It is not an image that it is intended the viewer will look at in detail, because if they want more detail about your work then they can scan the QR code on your summary poster and open and explore your stack.
The ideal dimensions of the image for your summary poster are 1200 x 280 pixels or any ratio 30:7.
When you add an image you can also choose to crop it to these dimensions or zoom in or out to make the key parts of the image fit into these dimensions. This FAQ answer provides more information about cropping and adjusting the size of the image within Learning Toolbox.
Managing your stack
The information you provide in the Stack Summary area is used to create the summary view of your stack. This summary view is used on the the showcase. It can also be used to create a printable summary poster for your stack. Onsite conferences often print these summary posters and display them onsite helping to promote your ePoster / stack to delegates.
1. Edit your stack and click on the Stack Summary tab.
Enter all the information requested in the Stack Summary area.
Stack Title: The title of your stack.
Event or Context: If you are creating this for an event then this information will already have been filled in by the event organiser.
Authors: Your name will already appear here, but you can also add your co-authors names. There is limited space (110 characters) so you may need to use only last names (e.g. Jones and Elferink instead of Tamsin Jones and Raymond Elferink). If your list of co-authors is very long then you could choose to use the academic convention et al (e.g. Jones et. al.) and then make sure that you do include all the co-authors names within the main content of your stack.
Author Affiliations: List where the co-authors work.
Stack Summary: Give a summary of your work. This summary text will appear in the summary view or your stack in the showcase and on the printable summary poster for your stack.
Summary Image: Click on the Set Image button to add an image to illustrate your stack’s summary. This image will be used in the summary view of your stack on the showcase and on the printable summary poster. The space available for the image is a wide rectangle.
Tags: Add any tags that help people to find your work. We recommend adding a maximum of 10 tags.
Extra Information Heading: If you want to include some extra information (such as Key Messages or Conclusions) to be added to the printable summary poster then add a heading for that extra information here.
Extra Information: Type in your extra information here if you are using it. This information will only appear on the printable summary poster.
2. Remember to Save when you have added all your summary information.
3. You can then Close the Editor to see the results of the information you have added.
4. You can now see the summary view of your stack. This is how it will appear when viewers are browsing the showcase. When they click on its title then it will open to show them the contents of your stack.
5. You can also generate and view the printable summary poster for your stack.
If you want to make changes to either then just return to edit your stack and edit the information that you provided in the Stack Summary area.
This is an important step if your conference is using the printed summary posters. Printed summary posters are usually used by onsite conferences as way to advertise and provide access to your ePoster/stack at the venue.
Marking your stack as ready for printing will let the administrators know that you are happy for them to generate and print your summary poster.
To mark your ePoster as ready for printing, first close the editor if you have been editing the stack.
1. Then click on the button marked ‘Ready for printing‘ to turn it on.
2. When you mark your stack as ready then we will run some basic checks and if we identify any issues then you will see a message onscreen telling you what issues we have found. Just click on the help icon (?) next to any issue to find out more about it and how to fix it.
1. You can view and check your summary poster by clicking on the Generate Summary Poster button.
The summary poster will be generated as a PDF file and downloaded to your computer. You can open and view it to check that it looks as you expect.
Your summary poster should look something like the example shown below:
If your summary poster does not look as you expected, then return to edit your stack and add the information you want to appear in the Stack Summary area.
The image on the summary poster is intended to be illustrative. It is not an image that it is intended the viewer will look at in detail, because if they want more detail about your work then they can scan the QR code on your summary poster and open and explore your stack.
The ideal dimensions of the image for your summary poster are 1200 x 280 pixels or any ratio 30:7.
When you add an image you can also choose to crop it to these dimensions or zoom in or out to make the key parts of the image fit into these dimensions. This FAQ answer provides more information about cropping and adjusting the size of the image within Learning Toolbox.