Key Information (Información Clave)
If you can’t find the answer to your question in the support items below then please contact gcfi73@gcfi.org
Si no encuentra la contestación a su pregunta en los temas de apoyo a continuación, por favor comuníquese con gcfi73@gcfi.org
General Overview
Learning Toolbox supports an exciting new approach to ePosters (and more generally content sharing) at online, hybrid and onsite conferences and events.
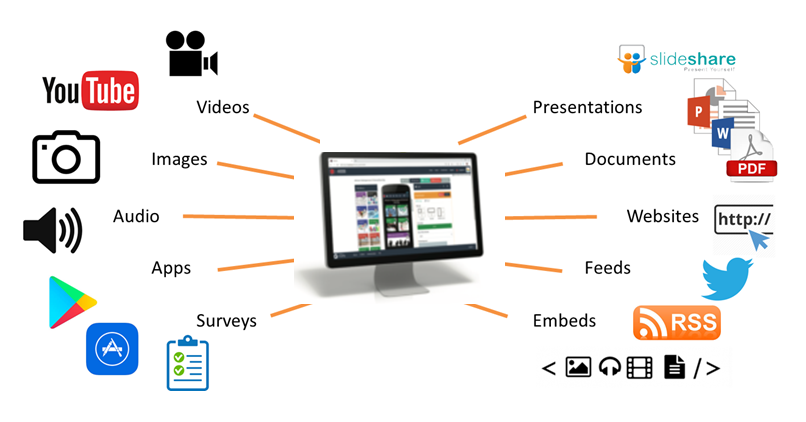
Using Learning Toolbox you will create a Stack/ePoster (a collection of material that could include a presentation, video, weblinks and more) that you can use to present and share your work at the event.
People will be able to easily view and interact with your ePoster by browsing the online ePoster showcase. Your ePosters will be available for people to explore throughout the event and can also be presented in a scheduled session if your event supports this.
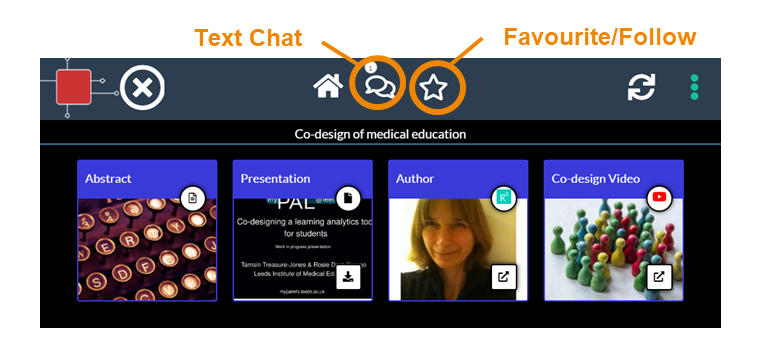
Viewers can open your ePoster and explore all the rich content you have added. Viewers can also post questions or comments to your ePoster, to which you can respond. This text chat discussion will be attached to your ePoster and can continue after the event. Viewers can also favourite your ePoster so that they can return to it more easily.
Your ePoster will also live beyond the event, as you can continue to share it and (in some cases) even add to it after the event.
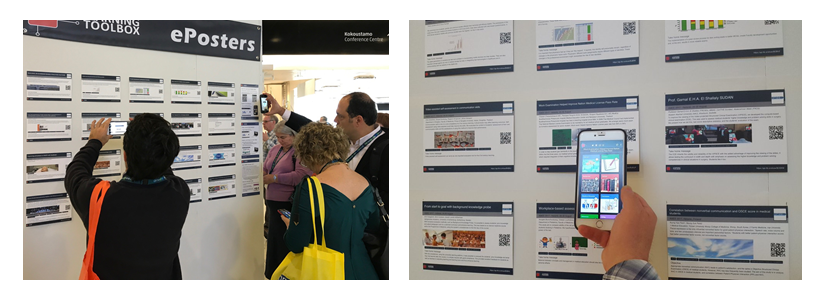
Your ePoster can even have a physical presence in the real world. Within Learning Toolbox you can create a summary poster that acts as an advert for and gateway into your interactive ePoster. People can simply scan the QR code on the summary poster and your interactive ePoster will open on their phone/tablet.

Some onsite and hybrid conferences print these summary posters and use them as a way of promoting the ePosters onsite. You can of course print the summary poster yourself and use it wherever you want to promote your work and provide access to it.
Many conferences are now using Learning Toolbox to present, share and discuss research. We have seen some great examples of ePosters/stacks created by authors attending these conferences. The 3 minute video below explores some of the great ePosters made by authors using Learning Toolbox.
If your country does not allow access to the Vimeo video streaming service then you can access this video here instead.
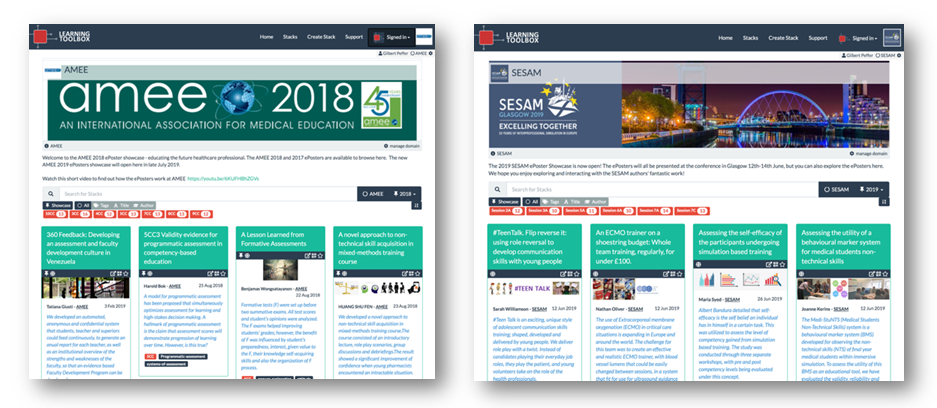
You can see and interact with these great ePosters (and more) on the Learning Toolbox Showcase. These ePosters are live and still being used by authors to present and share their work. You will see that they vary in terms of what content they include and how they are structured, but they have all made great use of the platform to present their work.
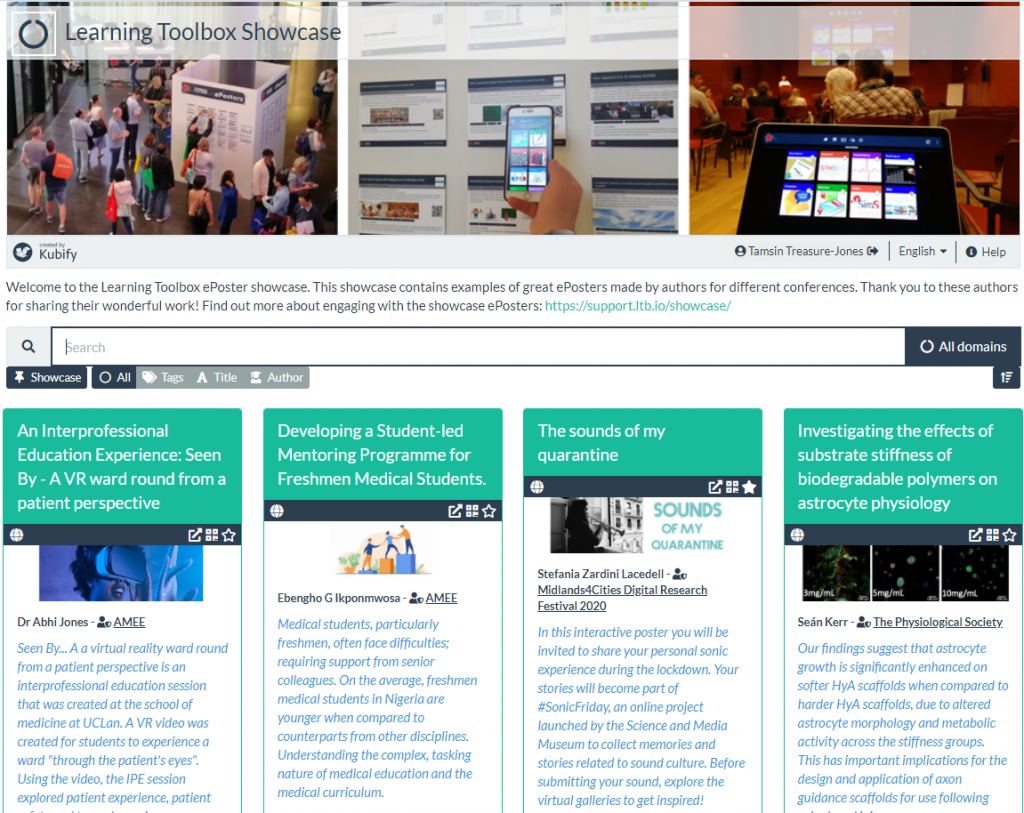
Of course your own ePoster/stack does not need to be as sophisticated as these examples – a simple and effective ePoster/stack may just contain the abstract, a presentation and a link to a website for example. But we hope these examples may give you an idea of what is possible and some ideas of the type of material you could include to give people a richer view of your work.
We would like to thank the authors of these ePosters/stacks for agreeing to their excellent work being showcased here. If you have come across any brilliant Learning Toolbox ePosters that you would like to see added to this showcase then please let us know so that we can contact the author and ask for their permission to add them.
Thousands of ePoster authors are using Learning Toolbox to share and present their work at conferences and events. The ePosters can be as simple as an uploaded PDF file, but can also include more interactive and engaging material, as well as background information.
Below are short videos with 4 of our authors in which they talk about what they chose to include in their ePosters. Thank you very much to Amy, Komal, Nathan and Sytske for making these videos. We hope they inspire and help new authors.
Quick overview of what Amy, Komal, Nathan and Sytkse found useful about using Learning Toolbox
This 5 minute video highlights what Amy, Komal, Nathan and Sytske found most useful about using Learning Toolbox. It helps to show the different ways in which authors and conferences are using Learning Toolbox to help present and share research work effectively.
If your country does not allow access to the Vimeo video streaming service then you can access this video here instead.
Amy Creaser’s ePoster for Future Physiology
Amy gives a short introduction to her work (on wearable activity trackers use by children and adolescents) and shows us her ePoster. In the ePoster tour Amy explains what she chose to include in her ePoster and why. The ePoster tour starts at 2:10
If your country does not allow access to the Vimeo video streaming service then you can access this video here instead.
Komal Atta’s ePoster for AMEE
Komal gives a short introduction to her work (on the impact of social media on professional identity) and shows us her ePoster. In the ePoster tour Komal explains what she chose to include in the ePoster and why. The ePoster tour starts at 2:20
If your country does not allow access to the Vimeo video streaming service then you can access this video here instead.
Nathan Kucko’s ePoster for NASS
Nathan gives a short introduction to his work (on developing a bone graft for spinal fusion surgery) and shows us his ePoster. In the ePoster tour Nathan explains what he chose to include in the ePoster and why. The ePoster tour starts at 2:03
If your country does not allow access to the Vimeo video streaming service then you can access this video here instead.
Sytske Lub’s ePoster for AMEE
Sytske gives a short introduction to her work (on science communication when talking about genetics) and shows us her ePoster. In the ePoster tour Sytske explains what she chose to include in the ePoster and why. The ePoster tour starts at 4:06
If your country does not allow access to the Vimeo video streaming service then you can access this video here instead.
Creating an ePoster/Stack (Crear pila en LTB para una conferencia)
This video is a longer introduction to Learning Toolbox which shows a fuller ePoster being created.
Press the full-screen icon ![]() at the end of the play bar to play in full-screen.
at the end of the play bar to play in full-screen.
If your country does not allow access to the Vimeo video streaming service then you can also access the video here.
We know that some people prefer to follow a written guide, so we have produced this short guide that takes you through the key steps involved in making a simple ePoster/stack for a conference.
Algunas personas prefieren seguir una guía escrita por tanto hemos producido una corta guía que le llevará a través de los pasos claves para crear un poster-e (afiche-e) o la pila para una conferencia.
Answers to Frequently Asked Questions (FAQs)
Co-authors
Adding content and resources to my ePoster/stack
This video gives you a very quick introduction to the Learning Toolbox editor. We recommend that you play this video in full screen.
Press the full-screen icon ![]() at the end of the play bar to play in full-screen.
at the end of the play bar to play in full-screen.
If your country does not allow access to the Vimeo video streaming service then you can access this video here instead.
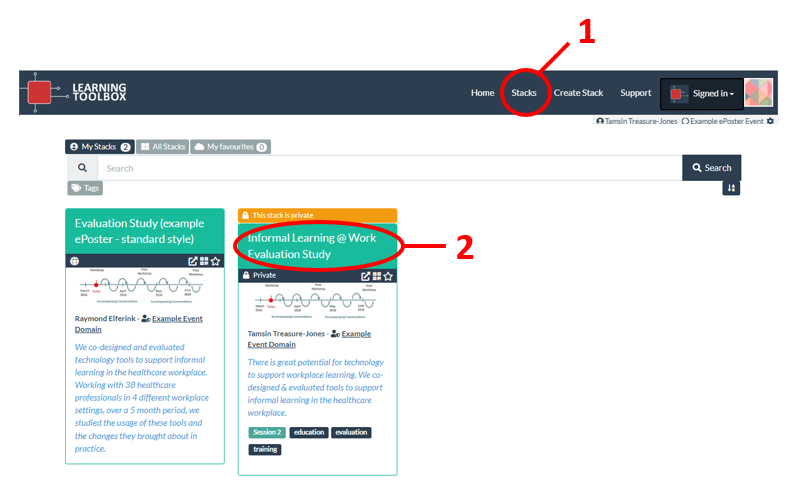
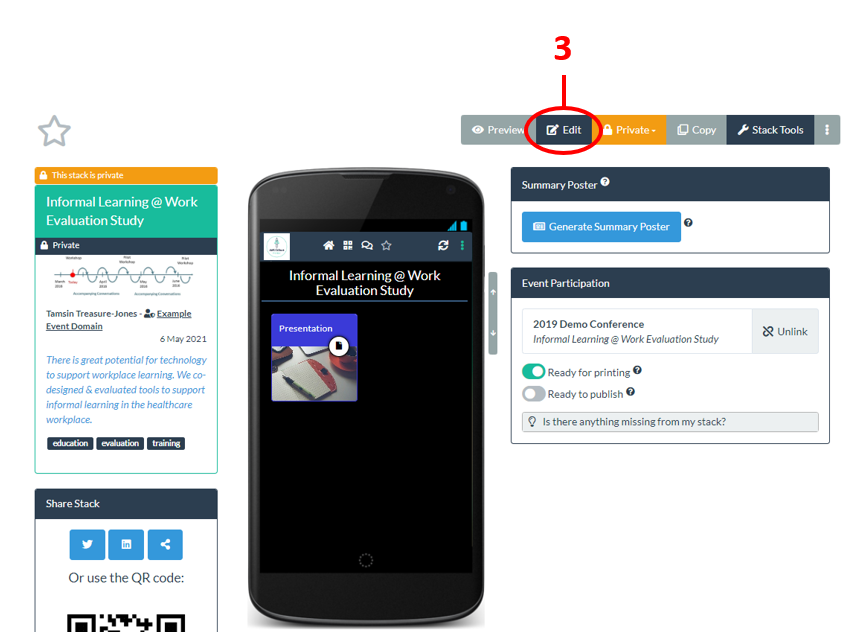
Sign in to the Learning Toolbox website https://my.ltb.io/ and then:
- Click on the Stacks menu
- Click on the title bar of your stack to open it
- Click on the Edit button to open the editor
- You can now edit it as normal. Remember to Save regularly.
These steps are shown in the annotated screenshots below.

In order to create a stack in Learning Toolbox for a conference or event you must have activated the Learning Toolbox invite link you were sent for that ePoster or stack and you must have signed in using the same account you used when you activated your invite link. If you have not received and activated your invite link then read this FAQ answer [How do I find my invite link].
After you have signed into Learning Toolbox (https://my.ltb.io/) do you see the Getting Started Page (image below) when you click on Create Stack?
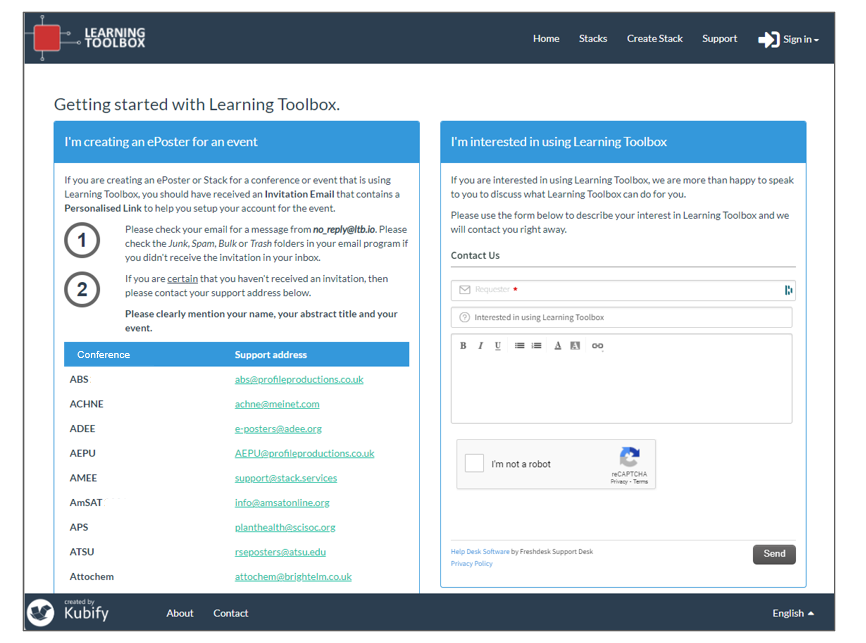
If you see the Getting Started Page then this means your account does not have permission to make a stack. There are two possible reasons for this:
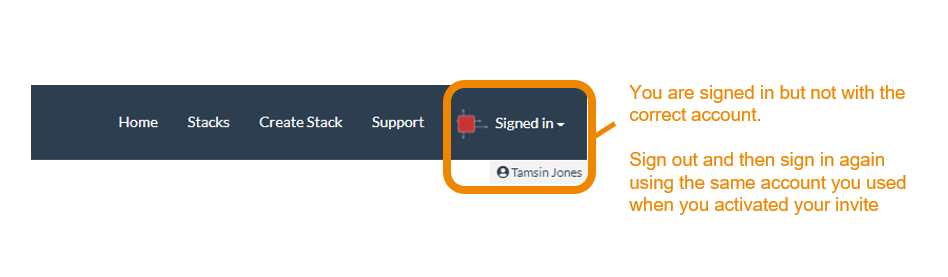
You are not signed in. Check that you are signed in. If you are not signed in then click on Sign In and make sure to sign in using the same account as you used when you activated your invite.

You are signed in but not with the account that you used when you activated your invite. Please sign out and then sign back in again making sure you use the same account that you used when you activated your invite. You will have received an email from Learning Toolbox (no_reply@ltb.io) when you activated your invite reminding you what account you used to do this.
In order to create a stack in Learning Toolbox for a conference or event you must have activated the invite link you were sent for that ePoster/stack and you must have signed in using the same account you used when you activated your invite link.
If you click on Create Stack then you will see the list of the invites that you have activated (as shown in the example screenshot below).
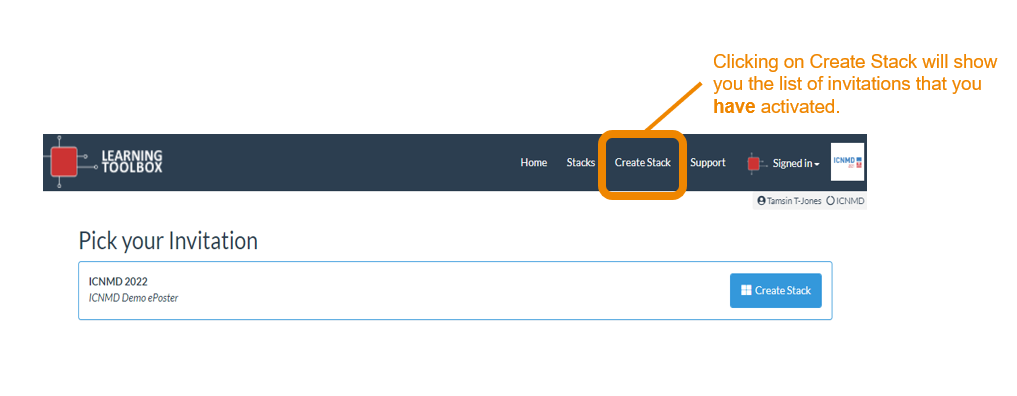
If you do not see the name or title you are expecting in the list then this indicates that the account you are using does not yet have permission to create that ePoster/stack. There are two possible reasons for this:
You have not yet activated that ePoster/stack’s invite. If you are making more than one ePoster/stack for an event then you will have been sent a separate invite email for each of your ePosters/stacks. You need to activate each one. If you have not yet activated this ePoster/stack’s invite then find the invite email (it will have been sent to you by no_reply@ltb.io) and click on the invite link and sign-in.
You activated that ePoster/stack with a different account. Sometimes authors accidentally activate their ePoster/stack invites with different accounts (e.g. activating their first ePoster/stack invite by signing in using Google and activating their second ePoster/stack invite by making a local account). If you have done this by accident and you want all your invites connected to the same account then please contact your conference support team (click on Support to see the email address or look for their address on the Getting Started Page) and they should be able to sort that out for you.
If you are creating (or have created) stacks for more than one conference or event (e.g. AMEE and NASS) then you will be an author in more than one domain in Learning Toolbox (e.g. both AMEE and NASS).
When you sign-in to Learning Toolbox you will automatically be in the domain that you most recently accessed. If you click on Create Stack or Stacks then it will only show you your activated invitations or stacks that are part of that domain.
You can see which domain you are in by looking at the top right hand corner of the screen. Next to your name it will show you the name of the domain. Next to the Signed In button it will show you the logo of that domain.

To switch to another domain you click on the Signed In button and choose the domain from the drop-down menu.
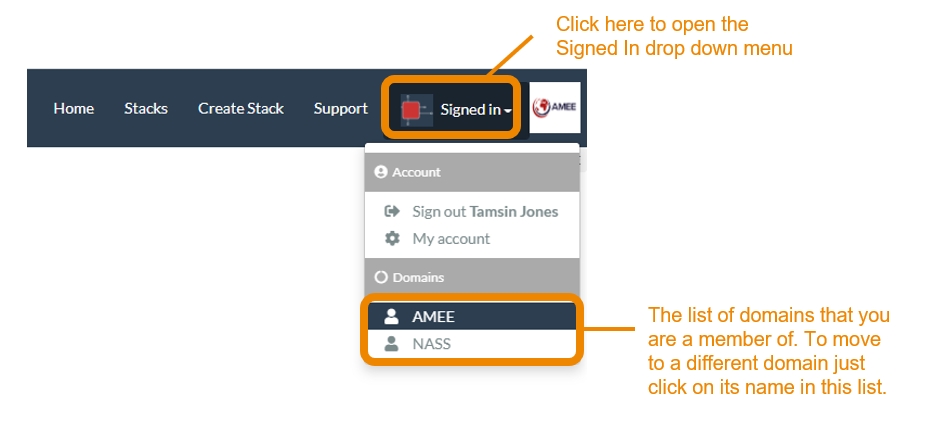
You will then see that the domain name and the domain logo change to the new domain. If you click on Create Stack or Stacks then it will show you your activated invitations or stacks within this domain.
Changing the layout and appearance of a tile
Adding an extra screen/layer to my ePoster/stack
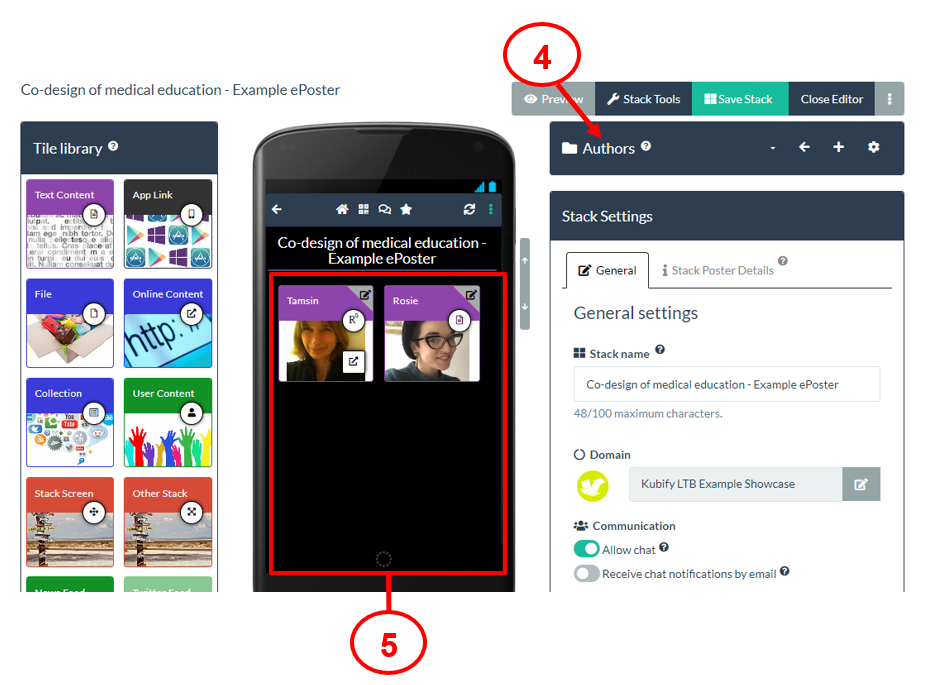
If you are adding a lot of material to your stack then you may find it useful to create an extra screen. You can do this by using the Stack Screen tile. This will allow you to add a tile that creates and opens a new screen.
To create an extra screen:
- Add a Stack Screen tile to your stack (1)
- The settings area will show which screen that tile is currently pointing at. Click on the down arrow (2) next to the target screen name and then choose “Create New Screen” from the menu that appears.
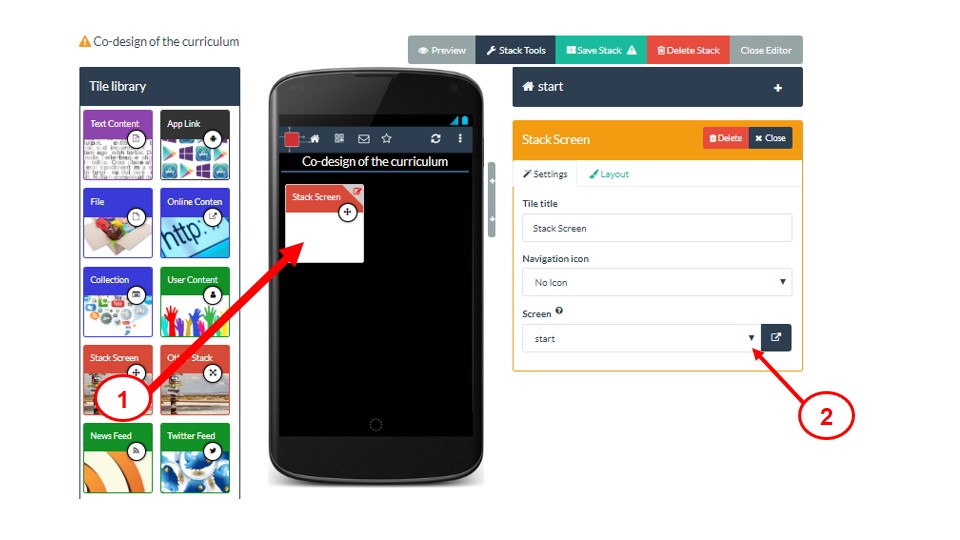
- This will immediately create a new empty screen (which will be connected to the stack screen tile you added) and move you to that empty screen
- It will give it a default screen name (3) which you can edit and change to something more meaningful
- You can now add new tiles to this screen as normal
- Note that there is always a bar visible in the window that shows you the name of the current screen you are editing (4)
- When you want to move to another screen (e.g. back to the start screen) you can just click on the menu next to the current screen name (5) and choose the name of the screen you want to move to
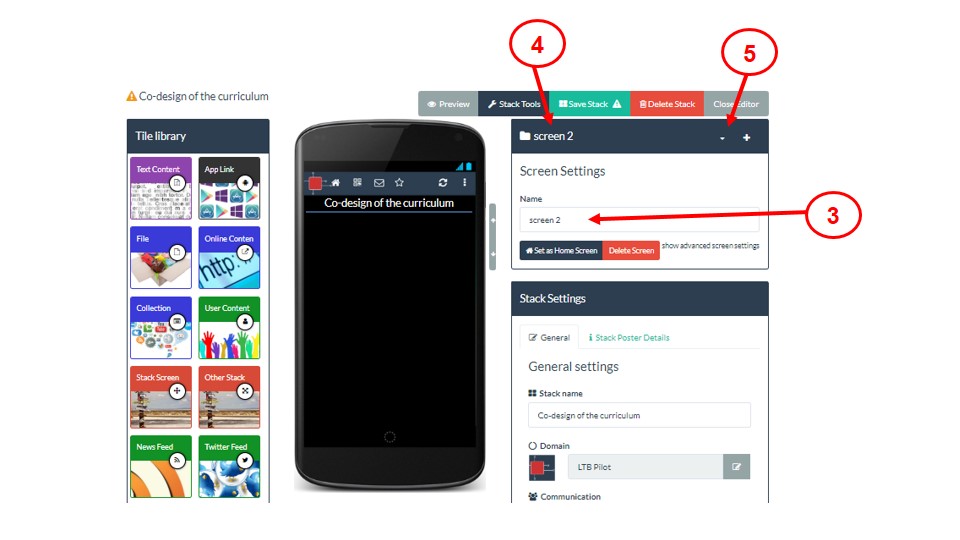
If you have created different screens in your stack then this FAQ explains how you can move between them when you are editing your stack.
There is a bar (1) in the editor that shows the name of the screen that is currently showing in the mobile view or your stack.
If you want to move to a different screen then click on the drop-down menu icon (2) in that bar.
The drop-down menu will show you the names of the different screens in your stack (3). Choose the name of the screen you want to move to.
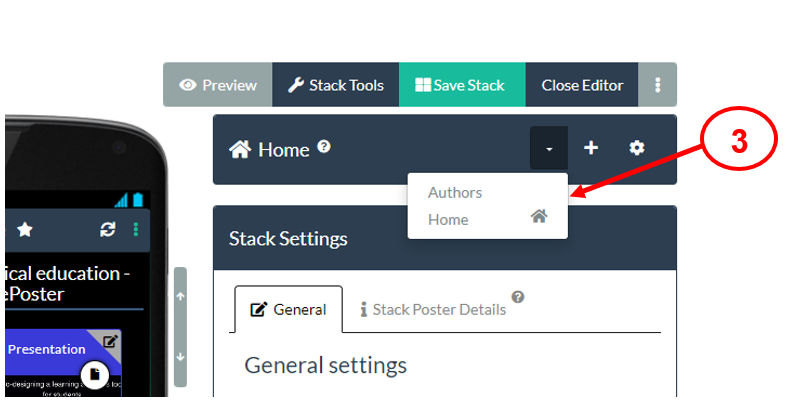
When you choose a different screen then that screen’s name will show in the bar (4) and you will see that screen in the mobile view of your stack (5). You can now use the Tile Library as normal to add more tiles to this screen or you can edit any tiles that you had already put on the screen.
Please remember that viewers of your stack will only see the Home screen. If you want them to have access to another screen then you must add a Stack Screen tile to your Home Screen and link that to the other screen. This FAQ explains how to use the Stack Screen Tile and this FAQ explains how you can move Tiles from one screen to another screen.
If you have created different screens in your stack (by using the Stack Screen Tile) then you may later want to move a Tile from one screen to another screen. You can do this in the Layout Tab of the Tile as shown below.
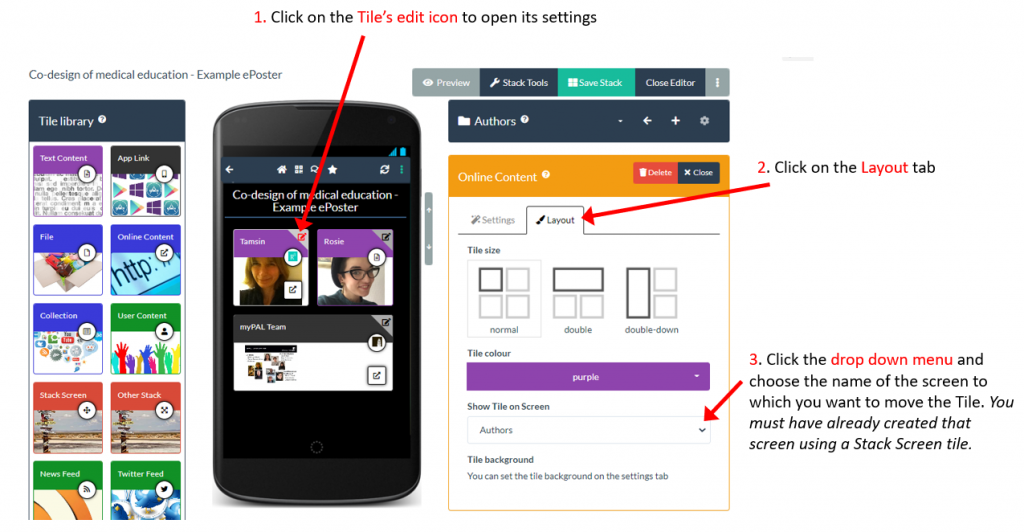
- Click on the Tile’s edit icon to open its settings
- Click on the Layout tab
- Choose the screen from the Show Tile on Screen drop down menu
The screen you want to move the tile to must already exist. The Stack Screen Tile is the easiest way to create a new screen and link to it.
Viewing and testing my ePoster/stack
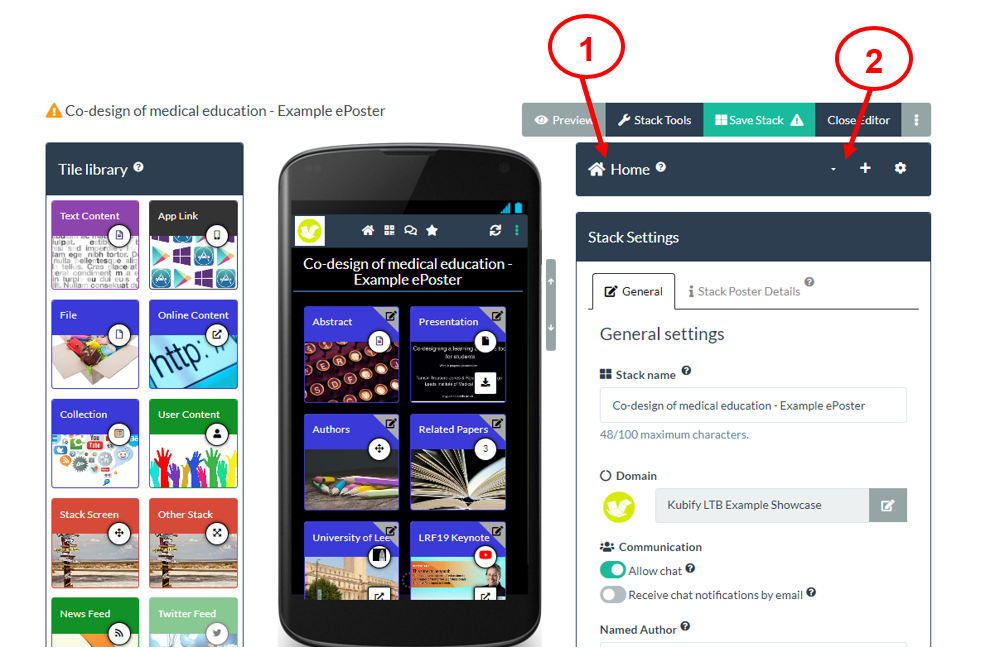
If you want to preview and check your stack in a web browser then you can just press the preview button (1) and the stack will open in the viewer. What you see is what viewers of your stack will see if they are viewing your stack in a web browser on a computer or tablet. You can click on the tiles (2) and check that it is working as you expected. Once you are finished then click on the X button (3) to close the viewer and return to the editor.
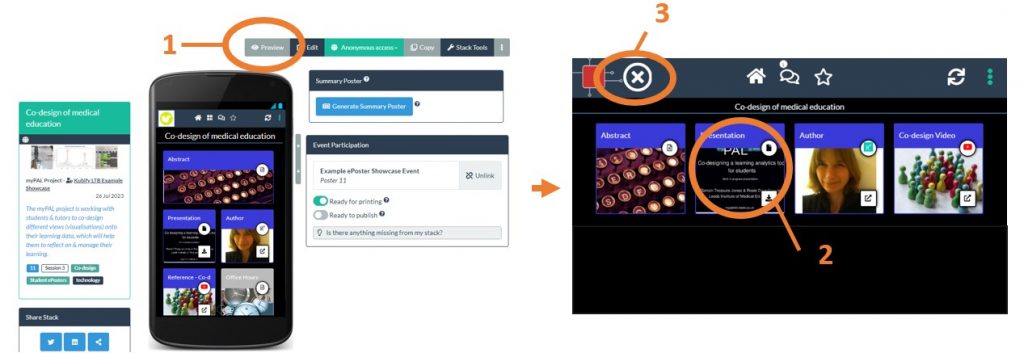
What you see in the preview is exactly what the conference organising team sees when they check and publish your stack. So the preview allows you to be sure the stack is working as you want and you know that the conference team will see exactly the same.
Things you might want to do when previewing your stack include:
- Click on the tiles to check that the content appears as you expect
- Consider if your tile titles are helpful to the viewer
- Consider if the arrangement of your tiles helps the viewer to easily find the content they want
- Consider if your tile background images help to make the ePoster content clear and attractive
- Consider if you could use different colours for your tile title bars to help the viewer see meaningful groupings in your content
If you then decide that you want to make changes then you can just return to edit your stack as normal.
You may also want to check out how you stack looks and works on a smartphone.
You can change the permissions of your stack to determine who can open it and whether it shows up in searches.
To do this sign-in and open your stack as usual, but do not click on the Edit button. Instead next to the Edit button you will see the access permissions button that indicates what permissions your stack currently has (Private, Restricted or Public). If you are still developing the stack then it is probably still set as Private.
Click on that access permissions button and you will see the drop down menu allowing you to change the access permissions for your stack.
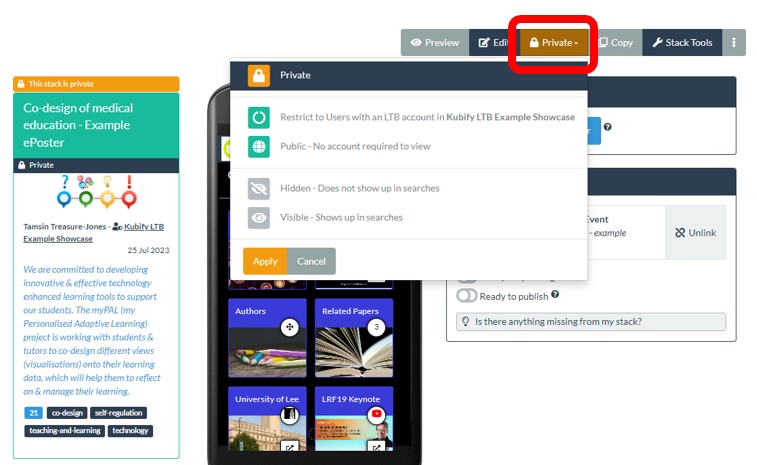
If you are still working on the stack but want to share it with others (perhaps your co-authors) so they can see what you have done, then you should change the permissions to Public and Hidden. This will mean that only people who have been sent the QR code or web address for your stack will be able to open and view it.
If you do not want your stack to be accessible any longer then you should change the permissions to Private.
If your stack is still Private then you should first set its access permissions to Public (See How do I set access permissions?) so that you can view it on your phone without signing in.
You can then view your stack on your smartphone by scanning its QR code. This will open the stack in the browser on your smartphone. You can interact with it in the browser or choose to open it in the LTB App.
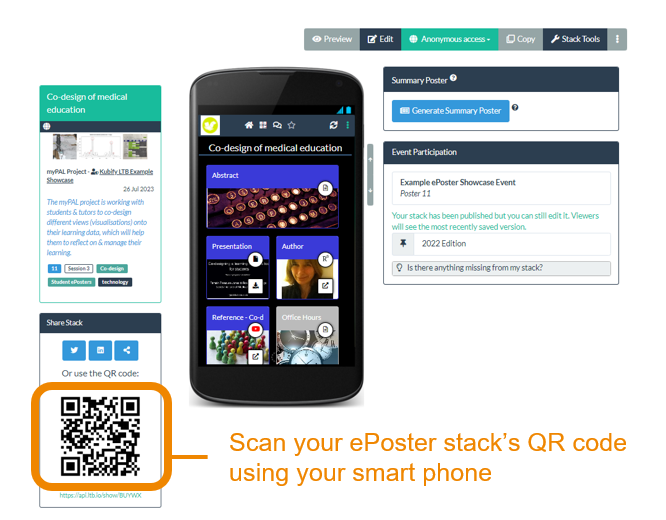
If you are in the editor then you will not see the QR code. You should first press the Close Editor button. This will then bring you to the summary screen which shows the QR code.
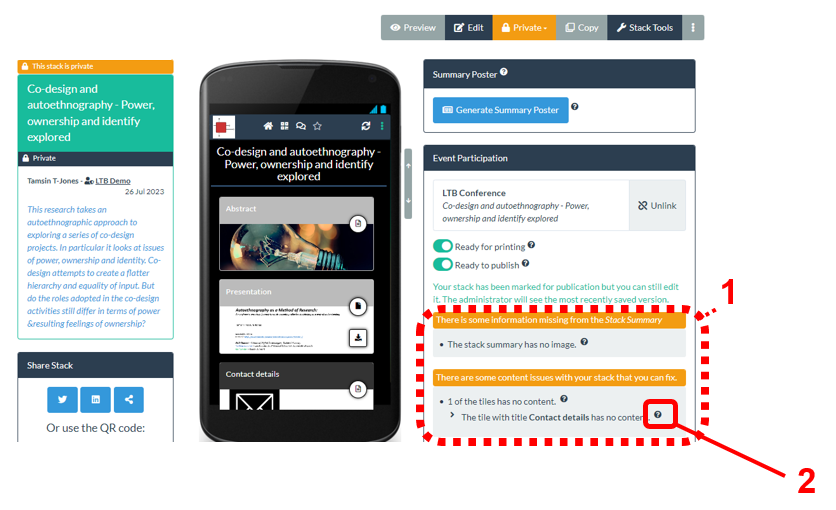
1. When you mark your stack as ready then we will run some basic checks and if we identify any issues then you will see an issue message onscreen telling you what issues we have found.
2. Just click on the help icon (?) next to any issue to find out more about it and how to fix it.
Your ePoster on the showcase website
Marking your ePoster as ready to publish to the showcase
Creating the mini-poster
An option usually used by onsite conferences to promote your ePoster onsite.
Presenting my ePoster/stack
Exploring and sharing published ePosters/stacks
Engaging with the viewers of your ePosters/stacks
Using templates
Some conferences provide templates that you can use to start creating your ePoster if you want.