Contents
- The focus of this guide
- Checking and printing the summary posters
- Publishing the ePosters to the showcase
- The focus of the next guide (onsite preparations and set-up)
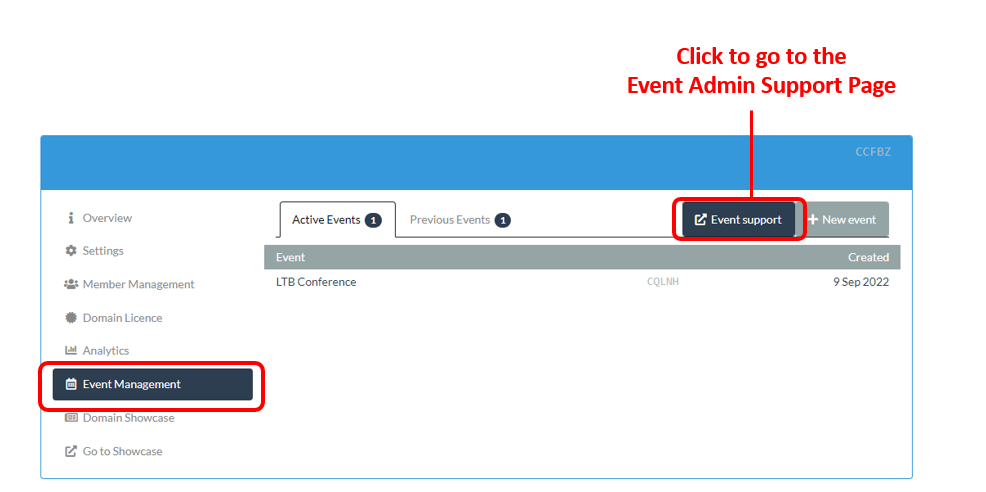
Go to Event Admin Support Page
The focus of this guide
This guide covers the third of the key stages involved in setting up and managing an ePoster event in Learning Toolbox:
- Setting up an event and inviting authors
- Monitoring and supporting your authors
- Printing summary posters and publishing ePosters
- Onsite preparations and requirements
- Setting up next year’s event
You should start this stage when you are ready to start checking and printing the summary posters for your event and/or publishing the ePosters
Checking and printing the summary posters
Learning Toolbox creates a printable summary poster for each ePoster. These summary posters were previously called mini-posters due to their small size. Onsite conferences often use the printed summary posters to give the ePosters a high profile onsite, as well as providing delegates with an easy way to browse, open and explore the interactive ePosters.
The next two sections explain how you can check and print the summary posters.
If you want to see how the summary posters are used by onsite conferences then watch this 3 minute video showing different ways that conferences set-up the ePosters onsite.
Consider changing the colours to match your branding
If you have not already done so then you may want to consider changing the default colours used for the ePoster stacks (and summary posters) in Learning Toolbox so that they match your own branding.
The Branding section of the Setting up your domain guide explains how to do this.
Checking that your authors’ summary posters are ready for printing
Your authors are able to indicate on their ePoster that it is ready to print and ready to publish. They see this view when they first open their stack and are in the summary view. If they mark their ePoster as ready but there is key information missing from their ePoster (e.g no summary text or summary image) then they will see a warning message onscreen telling them about this, as explained in this FAQ answer for authors.
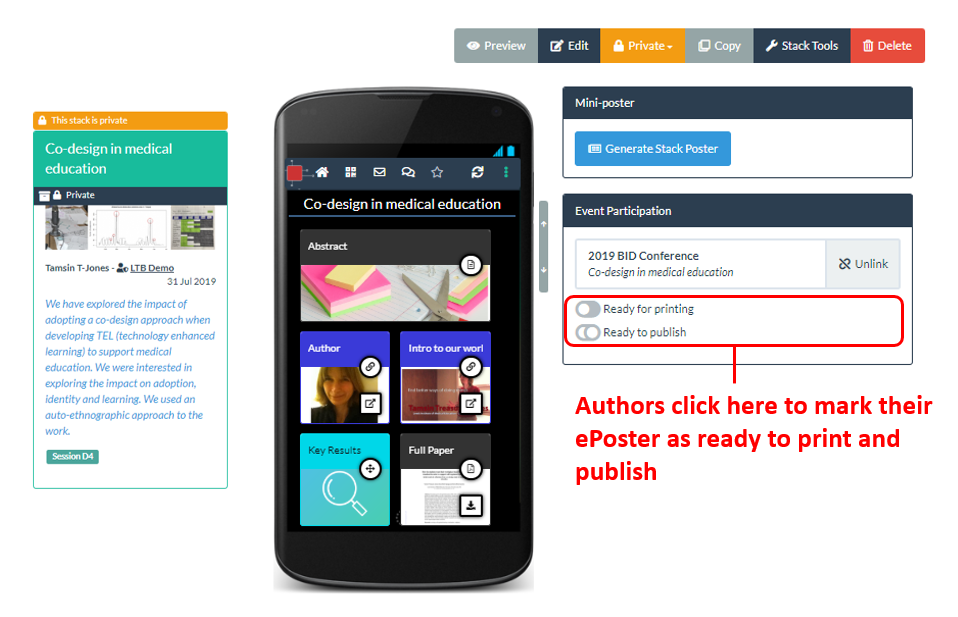
When the author clicks on ready for printing and ready to publish then it changes the stage that their ePoster appears in your author workflow view.
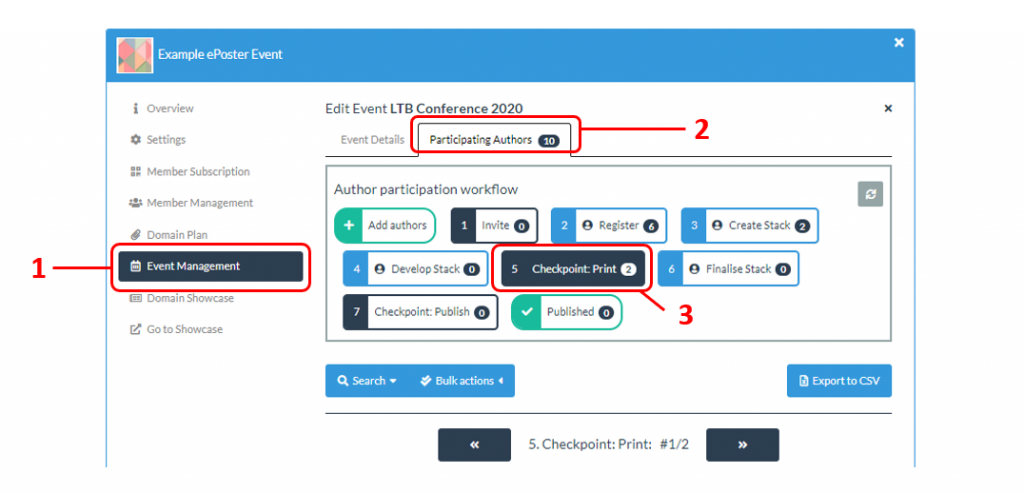
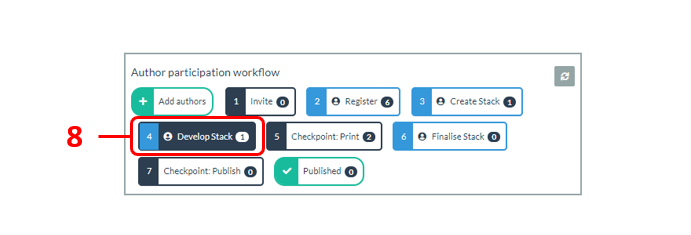
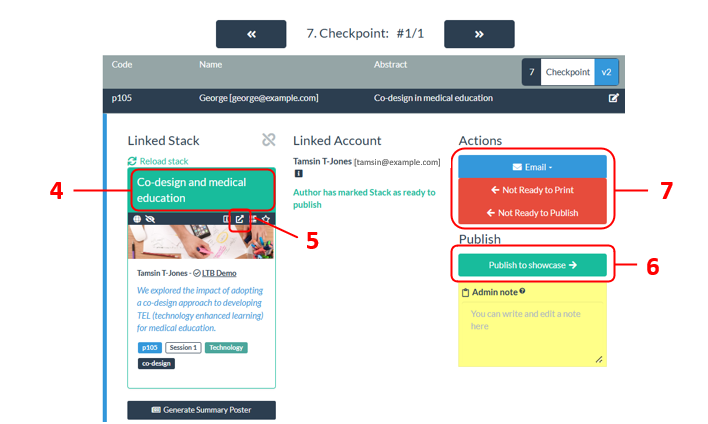
To see which ePosters’ summary posters are marked as ready for printing you should go to the workflow view:
1. Go to the Event Management, choose your Event,
2. Open the Participating Authors tab to see the workflow view.
3. Then click on stage 5 to select this stage. The list that appears below the workflow will then contain all the records where the author has marked the ePoster as ready to print.
4. The summary box in an ePoster record gives you a quick way of seeing if the author has filled in the information required to create their summary poster. If the summary box includes a description and an image then the author has provided the two most important parts of the summary poster. If the author has not added an image then when their summary poster is generated then Learning Toolbox will use the showcase banner image for this event as their summary poster image. If the author has not added a description or summary text then Learning Toolbox will use the default summary poster text for this event on their summary poster.
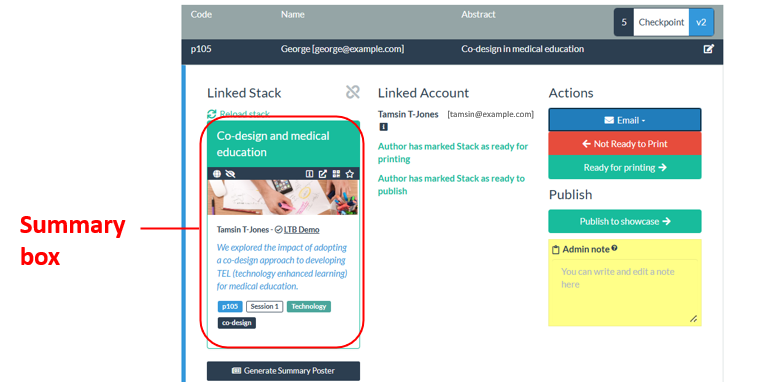
5. If you want to create and check the summary poster file in more detail, then click on the Generate Poster button. This will make the summary poster as a PDF file and save it to the Downloads folder on your computer.
6. If you are happy that the summary poster is ready then click on the Ready for printing button. This will move this record to the next stage in the workflow.
7. If you do not think it is ready then you may want to Email the author to let them know what is missing. You can click on the Email button to do this. See the Email Manager Guide for more information about sending emails. You can then also click on the Not ready to Print button, which will move the record back one step (to stage 4) in the workflow.
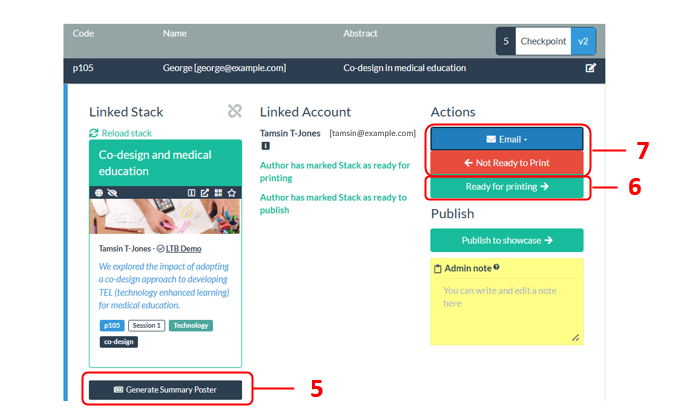
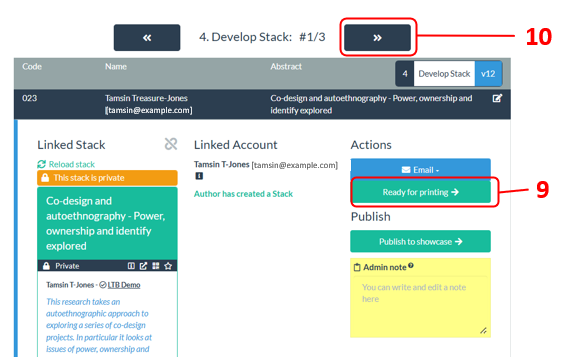
8. Some authors forget to mark their ePoster as being ready to print. So we recommend that you also select stage 4: Develop stack and check the records in this stage. You will probably find that some of these ePosters are actually ready to print.
9. In stage 4 you can also check the summary poster and confirm if it is ready for printing
10. If it is not ready then you can move to the next record to check that one. You can also choose to email the author, to explain what is missing, by clicking on the Email button in the record.
Generating and printing the summary posters
There are two ways you can generate the summary posters. You can either:
- Download the summary posters one by one for printing (by clicking on the Generate Poster button in each ePoster’s record). This approach could make sense if you have a small number of ePosters and want to manually check each summary poster before printing it.
- OR
- You can use the Generate Summary Posters button found in the Event Details tab to make all your summary posters at once. This will generate one PDF file for each 100 summary posters in your event – so if you event has 460 ePosters – then it will generate 5 PDF files that you can download. This approach is sensible if you have a large number of ePosters and you want to produce a file (or files) ready to send to your printers with the summary posters already sorted in your preferred way. Below we explain how to use the Generate Summary Posters button to make all your summary posters at once.
Making all your summary posters at once
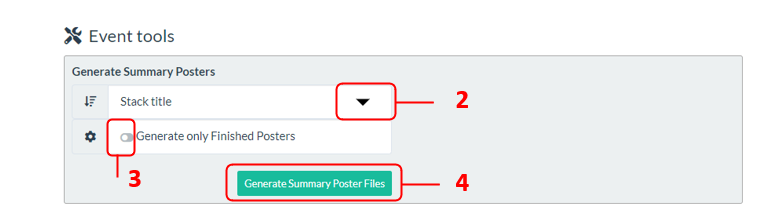
Go to the Event Manager and open your Event.
1. Scroll down to the bottom of the Event Details tab until you see the Event Tools section.
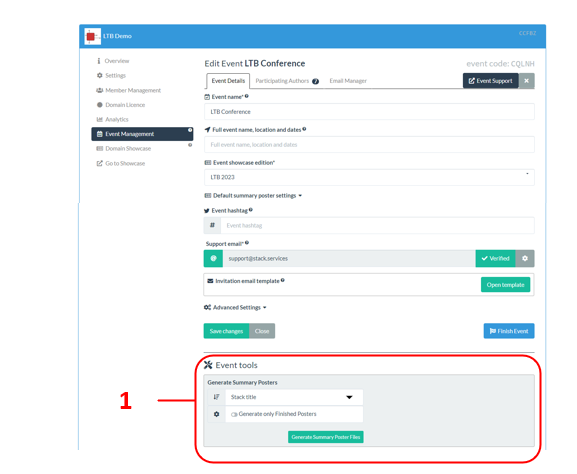
2. From the drop down menu, choose how you would like your summary posters to be sorted. The default is by Stack title.
3. Turn on the Generate only Finished Posters switch if you only want the summary posters to be made for those ePoster stacks you have marked as ready to print (any stacks in stage 6 and onwards). The default is the switch is off and summary posters are created for all the stacks.
4. Click on the Generate Summary Poster Files button.
5. Download links now appear for each of the collated summary poster files. Each file can contain up to 100 summary posters in it. Click on a download link to download that file. When you do this it will take a few minutes to start the download as it first has to create the summary posters.
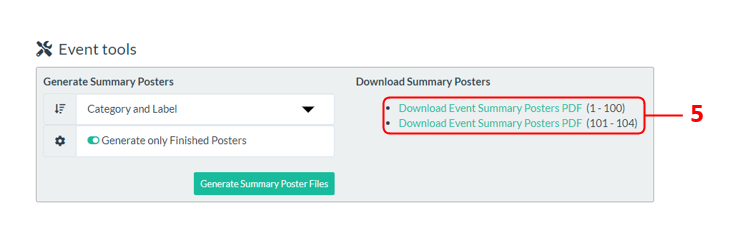
You can now send your downloaded files to your own printer or to your printing service.
Dimensions of the summary posters
The summary posters are designed at A5 page size, although some conferences choose to print them in larger sizes (A4 or A3). So please check that your printer is set to the correct size when it prints them. We recommend printing on thicker than average paper and offering the authors the chance to pick-up their summary posters to take home with them at the end of the conference. This increases the life and value of the summary poster. We know some authors choose to display their summary posters at their workplace, which works both to promote their work and your event/association.
Publishing the ePosters to the showcase
The showcase is the website on which all your ePosters can be browsed, searched, opened and explored.
The Getting started – Setting up your domain guide contains more information on setting up your showcase as well as links to an example showcase that you can explore.
Consider changing the colours to match your branding
If you have not already done so then you may want to consider changing the default colours used for the ePoster stacks’ summary box title bars, label, session, category and tags so that they match your own branding.
The Branding section of the Setting up your domain guide explains how to do this.
Is your showcase edition set-up?
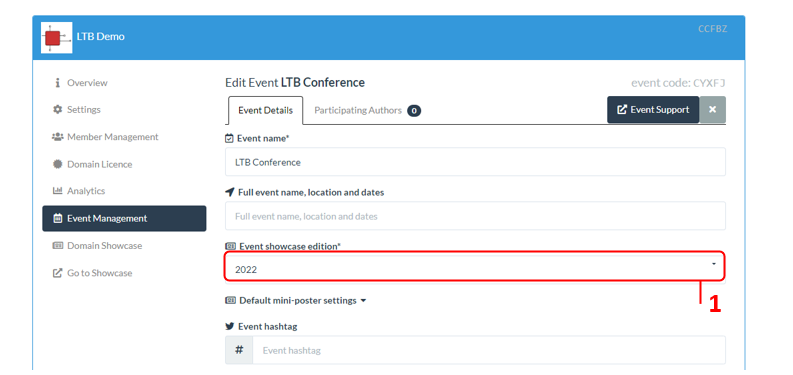
1. When you created your event you will have already chosen the showcase edition to which you want the event ePosters to be published. You can check which showcase edition your event is linked to (and change this if necessary) in the Event Details area. Remember to Save the Event if you make a change.
2. If needed, you can review and change the showcase edition settings (including showcase icon, showcase banner and welcome text) in the domain showcase area. See this section in the domain set-up guide for more information.

Publishing the ePosters to your showcase edition
Your authors can mark their ePoster as ready to publish, but you have to confirm that it is ready to publish before it will appear on the showcase. If they mark their ePoster as ready to publish but it has no content then they will see a warning message onscreen telling them about this, as explained in this FAQ answer for authors.
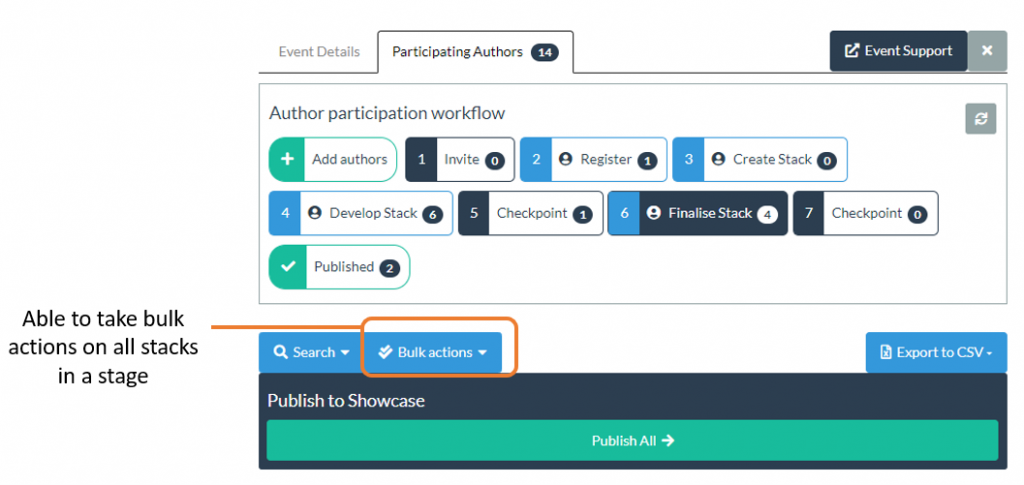
To see the ePosters your authors have marked as ready to publish you should go to the workflow view:
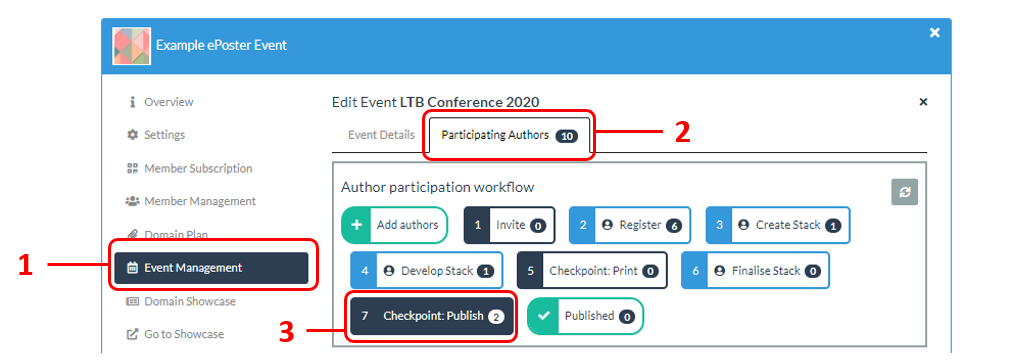
1. Go to the Event Management, choose your Event
2. Open the Participating Authors tab
If your event is online only and/or you are not using any summary posters then you should follow the steps described below, but instead of selecting stage 7 then you can select stage 5 and publish the ePosters direct from that earlier stage without needing to do the printing check first.
3. Click on stage 7 to select it. The list of records below the workflow will be the records that have been already approved for printing by you and marked as ready to publish by their authors.
4. Click on the ePoster’s title bar in a record to open and preview the ePoster.
5. You can also open the ePoster in its summary view in a new tab, which gives you access to the editor if you need to make changes to the ePoster yourself.
6. If the ePoster is ready to publish then click on the Publish to Showcase button. Once you have chosen this then the ePoster is immediately published to that showcase edition.
7. If you do not think it is ready to publish then you may want to Email the author to let them know what is missing. You can click on the Email button to do this. See the Email Manager Guide for more information about sending emails. You can then also click on the Not Ready to Publish button, which will move the record back one step in the workflow. You can also use the Admin Notes area to make a note for yourself of what is wrong with this ePoster. You may find that note useful when you return later to recheck the ePoster.
Some authors might not remember to mark their ePoster as being ready to publish. So it is also worth reviewing the ePosters that are in earlier stages since it is likely some of these are actually ready. You can publish ePosters to the showcase from stage 4 onwards.
Once you have finished doing your checks on publishing in all the relevant stages then you should have a set of ePosters published to the showcase and their records moved to the Publish stage.
The remaining records will be left in earlier stages because you have not judged the ePoster to be ready. You can return to these stages to check those ePosters and/or email the authors whenever you want.
Bulk publishing (optional)
There is a Bulk actions option that allows you to publish all ePosters from the selected stage. If you use this option then you would not be checking each ePoster individually. We only recommend using that option if you are happy to entirely pass on the responsibility for checking to the authors themselves – so that if they have marked it as ready then you can assume they are happy with it.
Checking your showcase edition is visible and is the default view
Now that you have published all your ePosters to your showcase edition, then you should make sure that your chosen showcase edition is both visible and is the default view.
This ensures that when people go to your showcase website address, they will see this showcase edition and its ePosters. They will still be able to move to other visible showcase editions by picking the edition they want from the drop-down menu that appears at the end of the search box.
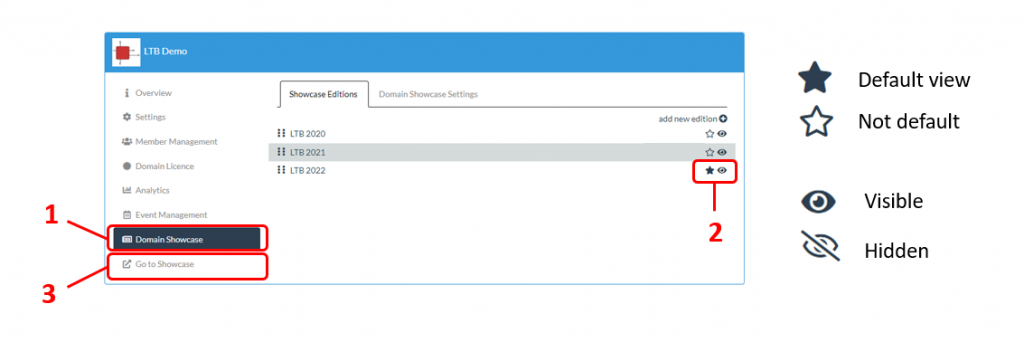
To check your showcase edition:
1. Go to the Domain Showcase admin area
2. Look at the two icons next to your chosen showcase edition. They should be showing as default and visible. You can change the setting by clicking on the icon.
3. You can also check your showcase by clicking on the Go to Showcase button. Please note that since you are signed-in as an administrator then you will be able to see hidden showcase editions when you view the showcase. If you want to check what your viewers will see then open your showcase webpage in an incognito browser window (so that you are not signed-in to Learning Toolbox).
Congratulations, you have now published your ePosters to the showcase.
The focus of the next guide
This next guide covers the fourth key stage involved in setting up and managing an ePoster event in Learning Toolbox:
- Setting up an event and inviting authors
- Monitoring and supporting your authors
- Printing summary posters and publishing ePosters
- Onsite preparations and requirements
- Setting up next year’s event
The guides are all accessible on the Event Admin Support Page. You can also get to that page from the Event Management area of the Admin Screen as shown below: