Contents
- Validating your support email address
- Sending invitations
- Three ways to access the Email Editor
- Using the Email Editor
- Domain Templates
- System Templates
- Manage your emails – Return to edit draft emails, view email history
- Thank you and feedback
Go to Event Admin Support Page
The focus of this update
On the 11th May 2024 we released an exciting new update to Learning Toolbox that now allows you to send more emails (not only invitation emails) to your event authors.
This short guide shows you how you can use this new functionality.
Validating your support email address
The most important step is that you must now validate the support email address that you are using for your event. This is a very simple step, which we described below.
Why do we now ask for this information? We will not send any emails using your support email address (all emails sent from Learning Toolbox will now come from the email address mail@ltb.io). However, we will use your validated support email address as the Reply To field for any emails sent out to your event authors. This means that if one of your authors replies to an email then their email will come to you. This approach should not cause any problems with Spam filters and will mean that you receive any replies from your authors.
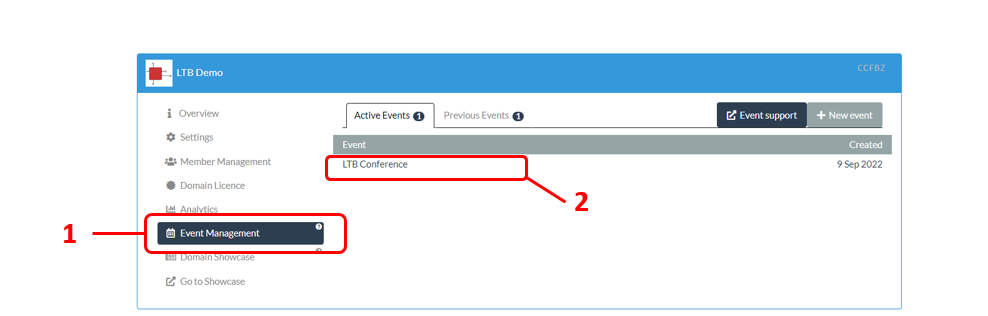
1. In the Admin screen, open the Event Management
2. Then click on the name of the event you want to manage
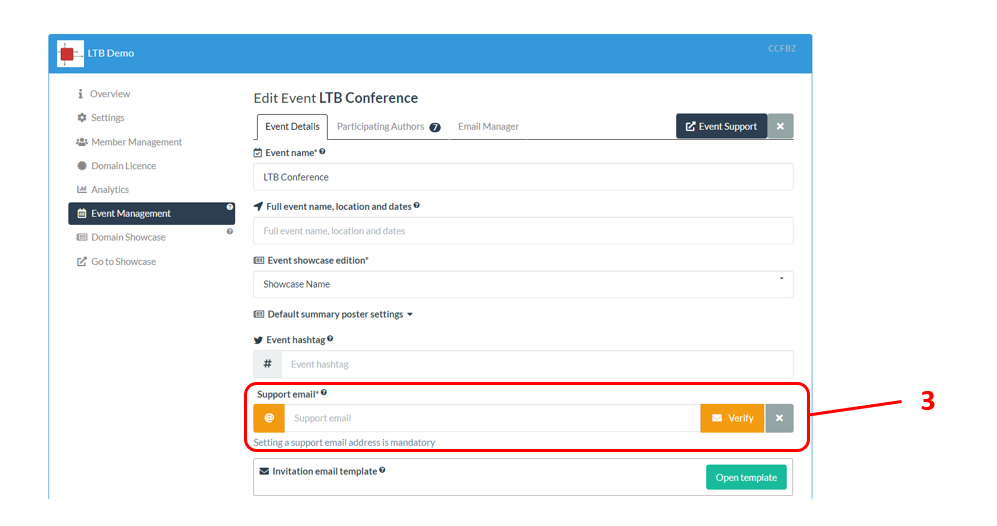
3. In the Event Details tab you will see that the Support Email address box is now orange. Type in your support email address and then click on the orange Verify button.
4. Learning Toolbox will then email a verification link to your support email address. Click on the verification link in that email when you receive it.
Your support email address will now be verified and you will be able to use the email functionality within Learning Toolbox (to send invitation and other emails).
If the support email box still appears orange when you return to your event then please click on the orange Check Verification button. This will check to see if your address has in fact been verified and if it has then it will confirm this and you can start sending emails.
Sending invitations
We have not changed the way that you send invitations. The only change is that you need to have validated your email address before you can send the invitations. So please just follow the same process as you did before (and as explained in Guide 1) to edit your invite, add your authors and send your invitations.
Three ways to access the Email Editor
If you have your Event open in the Event Manager, then there are three ways that you can access the Email Editor.
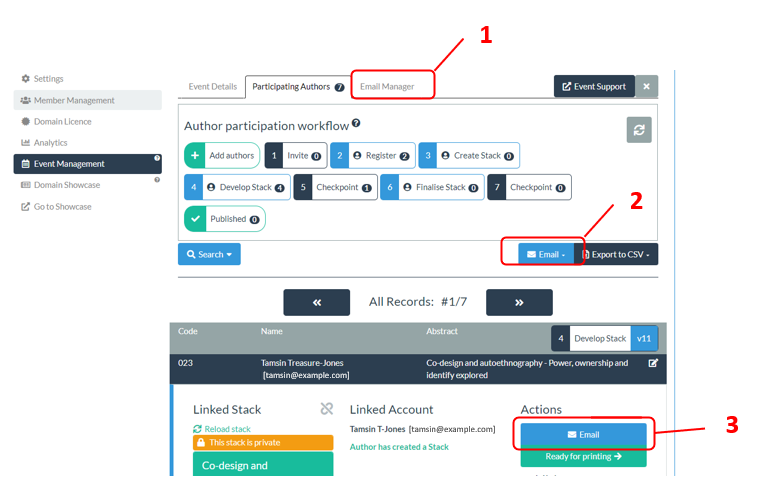
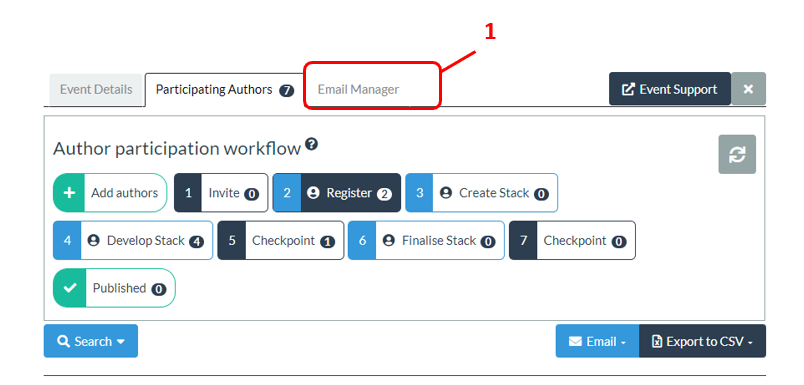
1. You can open the Email Manager. This will take you to an overview page where you can choose which email related task (creating an email, editing domain templates, managing emails or viewing system templates) you want to do.
2. You can click on the Email button below the workflow view. From here you can choose to create an email targeted at a specific workflow stage or create a general email.
3. You can click on the Email button in a record. From here you can create an email just for this record/author.
In the example below we will explain how you can use the email button below the workflow to send an email to the records/authors in a particular stage of the workflow. The key processes are the same in all cases once you have got to the Email Editor.
Example: How to send emails to the authors in a particular stage in the workflow
In this example we are sending an email to the records in Stage 2.
1. In the workflow, click on the stage to which you want to send emails
2. Click on the Email button button below the workflow
3. From the drop down menu choose the option that says Create email for selected stage.
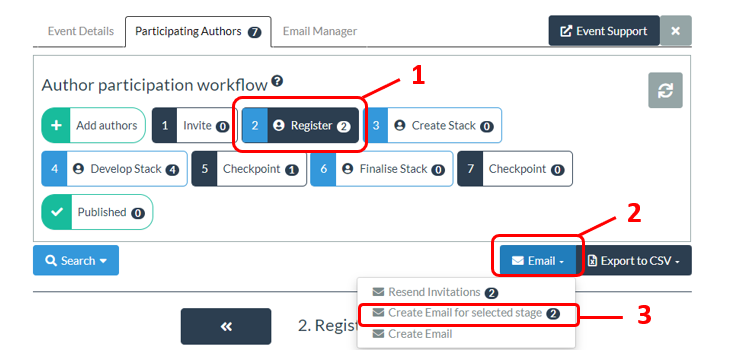
This will now take you directly to the Email Editor where you create your email.
Using the Email Editor
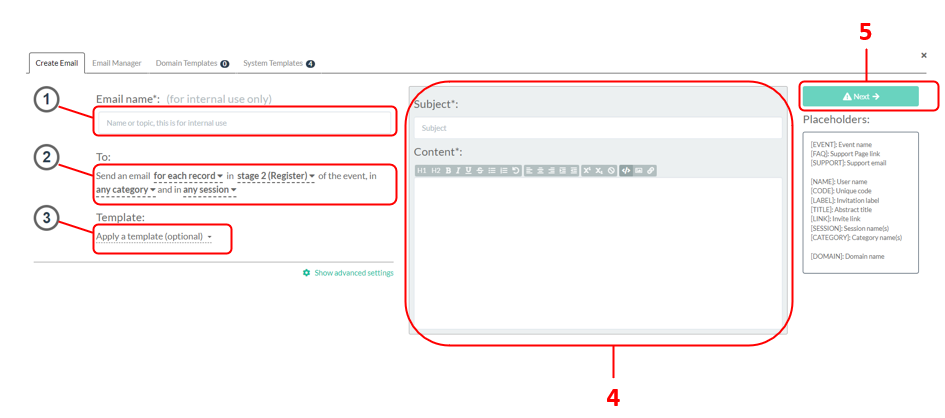
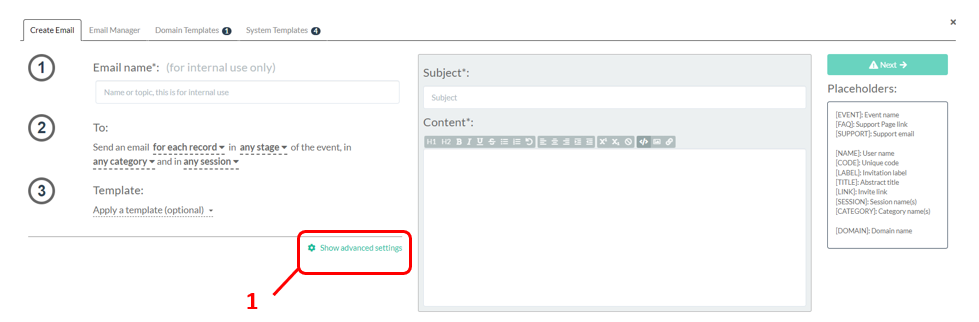
There are 5 steps to follow when you create an email in the Email Editor:
1. Give your email an internal name – this is what you will see in your list of emails sent
2. Choose who will receive the email. In our example the filter has already been set to filter only for stage 2 records. The filters and advanced settings are described in more detail below.
3. [OPTIONAL] Choose whether to apply a template If you choose a template then the text from the template will be immediately copied into the draft email to the right.
4. Write your email (or edit the text that has been added from the template). You can use any of the Placeholders from the list on the right if they are useful. They will be replaced in the email sent by the appropriate information from each ePoster record.
5. You can then click on Next to preview your email and recipient list before the email is sent. You will be able to return to make changes if you want before sending.
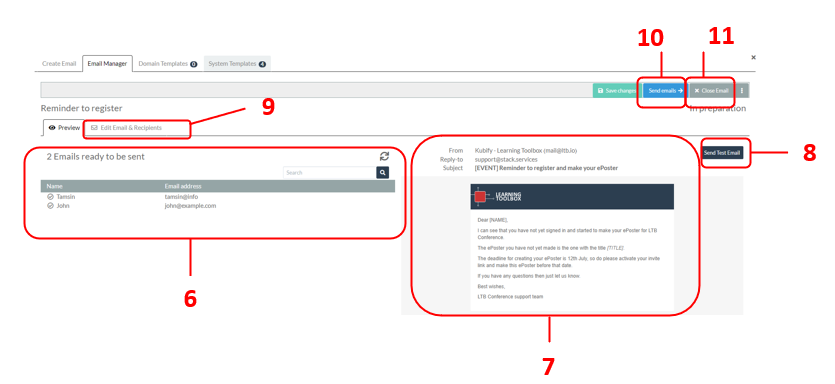
You are then moved to the Email Preview. Here you can:
6. See who the email will be sent to. If you want to exclude one of the recipients then just uncheck the box in front of their name.
7. See how the email will look to the recipient. If you want to see it with the placeholders replaced with real values then click on a recipient name in the list on the left and the preview will then show the exact email (with placeholders replaced with values) that this recipient will receive.
8. Send yourself a test email.
9. Return to edit the email.
10. Send the email
11. Close the email. You will be able to return to it later (to edit it or send it) via the Email Manager.
Email To Filters and Advanced Settings
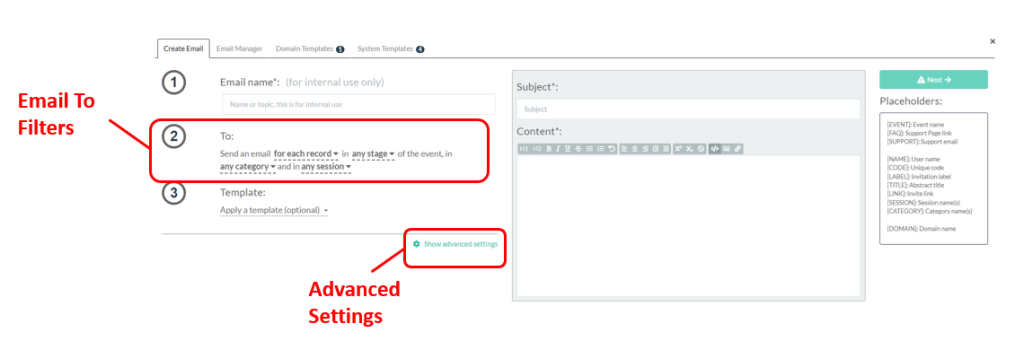
Email To Filters
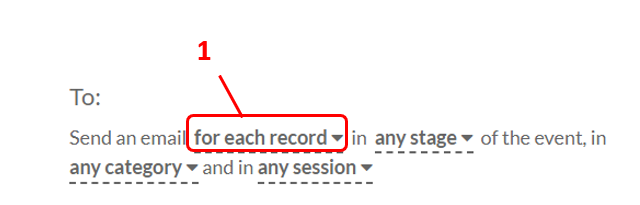
When you create the email in the Email Editor then step 2 allows you to specify who will receive the email. There are 4 Email To filter choices you can make:
1. You can click on this drop-down menu to choose whether to send an email for each record (the default) OR whether to send an email to every author. If you send an email for each record then a separate email will be created and sent for each record. So if you have an author who has 3 ePosters in the event then they will receive 3 separate emails. You will then be able to include record specific placeholders (e.g. TITLE, CODE, CATEGORY, SESSION) in the email. If you send an email to every author then each author will only receive one email however many ePosters they have in the event. In this case you will not be able to use record specific placeholders in the email.
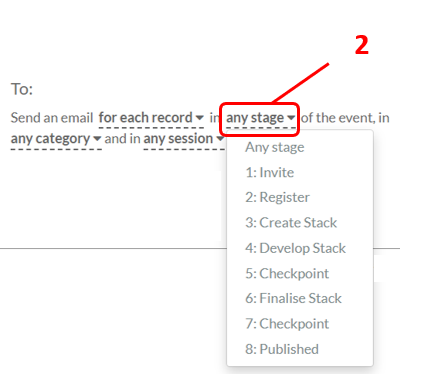
2. You can click on this drop-down menu to choose whether to only send emails related to records in a specific stage in the workflow. The default is to send to Any Stage, which means that there is no restriction and records/authors in all stages can receive the email.
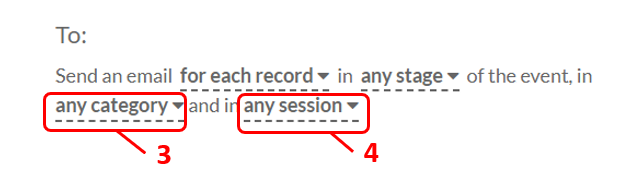
3. You can click on this drop-down menu to choose whether to only send emails related to records that have the chosen category. The default is Any Category, which means there is no restriction.
4. You can click on this drop-down menu to choose whether to only send emails related to records that have the chosen session. The default is Any Session, which means there is no restriction.
Please note that the 4 filters described above are combined together, so emails will only be sent to records/authors who fit all 4 of your filters. If you are not sure how the filters will be applied then you can check this when you move to the email preview, as it will show you the list of all the people who will be sent the email.
Advanced Settings in the Email Editor
There are some more advanced settings available in the Email Editor. To see these:
1. Click on Show advanced settings
2. In the advanced settings you can choose to turn on the switch to CC original invited email. By default this switch is turned off and (once someone has started to create their ePoster stack) emails will only be sent to the editing author (the linked account in that record). However, you might want to also make sure that the original invited author (the person to whom the invite email was sent) also receives the emails. If you turn on this CC switch then the email will also be CC’d to the original invited author if that email address is different to the editing author’s email address.
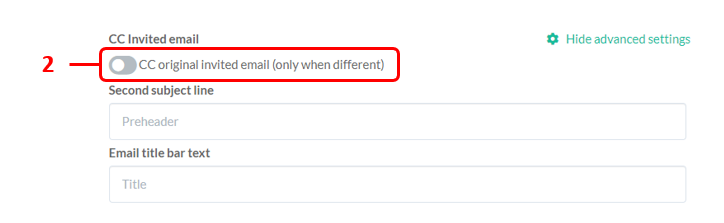
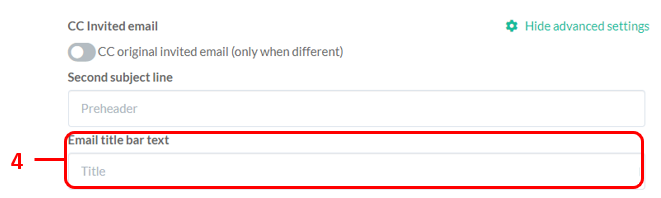
3. You can also choose to set a second subject line (sometimes called a preheader). Some mail readers will show this second subject line as a teaser when the reader is looking at the list of emails in their inbox.

4. You can also choose to add some text to the title bar that appears at the top of the email. For example with invitation emails we automatically add the text “invitation” to this title bar.
Domain Templates
You can create domain templates for emails that you think you will use more than once. Then you can simply apply the template when you create an email and the corresponding text will be automatically added. You can then check and edit the email as normal before sending.
To create a Domain Template, first open an Event in the Event Manager and then:
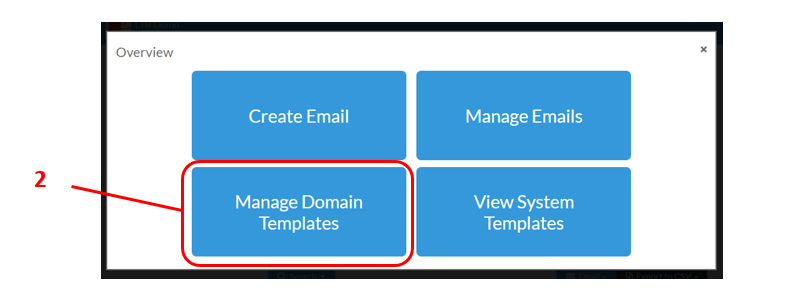
1. Click on the Email Manager tab
2. Now choose Manage Domain Templates
You are now in the Domain Template area. Here you will see a list of any Domain Templates you have already created. If you want to edit one then you just have to click on its name. You can also create new Domain Templates. Domain Templates will be available to use for emails in any event you create in this Domain.
3. Click on Create Template

You are now in the Template Editor, it looks very similar to the Email Editor. Here you can:
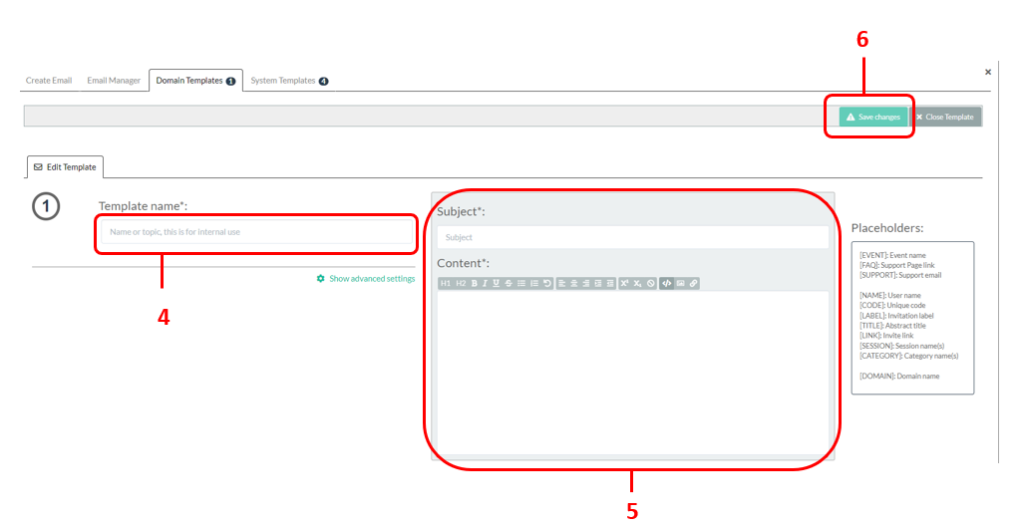
4. Give your Domain Template a name.
5. Type in whatever text you want to include in your template. You can use any of the Placeholders shown to the right.
6. Save your template.
Once you have saved your Domain Template then it will be ready to use in the Email Editor the next time that you create an email.
System Templates
System Templates are templates for emails that we have created based on our own support for ePoster events. They are available for everyone to use. You cannot edit a System Template. However you can choose to use one of the System Templates when you are in the Email Editor or you can go to the System Templates area and clone (copy) one of the System Templates to your Domain Templates area. The cloned version will then become one of your Domain Templates that you can edit and use as you wish.
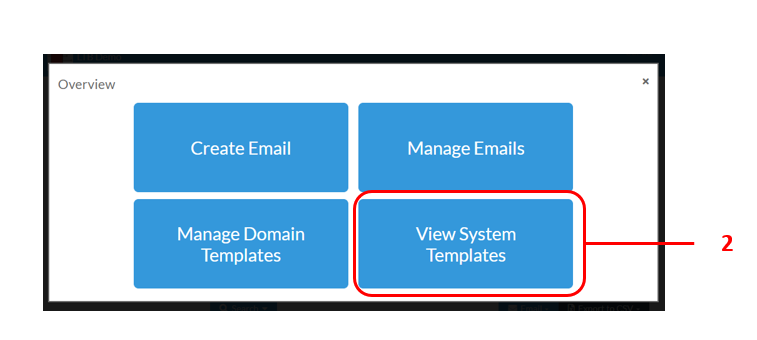
To clone (copy) a System Template, first open an Event in the Event Manager and then:
1. Click on the Email Manager tab.
2. Now choose View System Templates
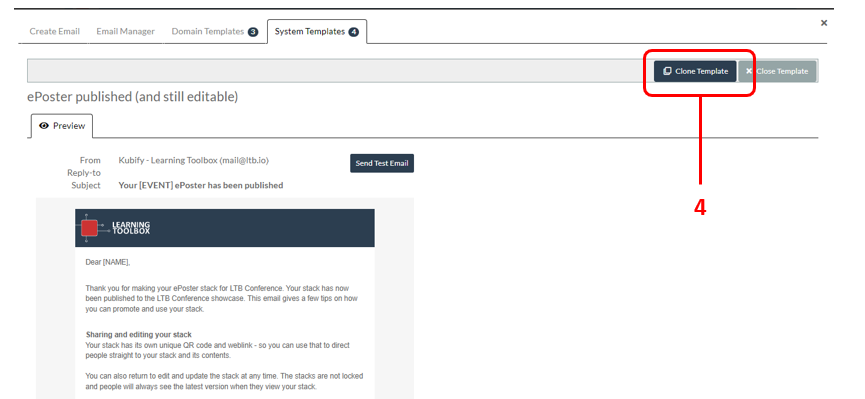
You are now in the System Template area. Here you will see a list of all the System Templates we have created.
3. Click on the name of the System Template that you want to view.

4. You can now see the Template and you can click on the Clone Template button.
The template is now cloned (copied) and the cloned version is opened in your Domain Template editor. From here you can:
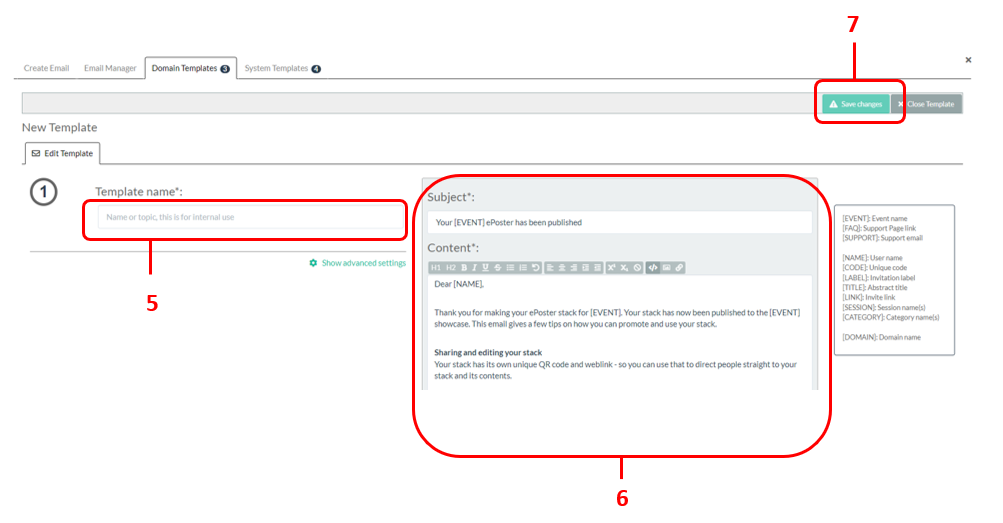
5. Give your new Domain Template a name
6. Edit the text of the template
7. Save the template.
Once you have saved your new Domain Template then it will be ready to use in the Email Editor the next time that you create an email.
Manage your emails – return to edit drafts, view email history
Within an event, you can view all the emails you have sent (or have in draft) related to that event.
To see this view of your emails, firstly open the Event in the Event Manager.
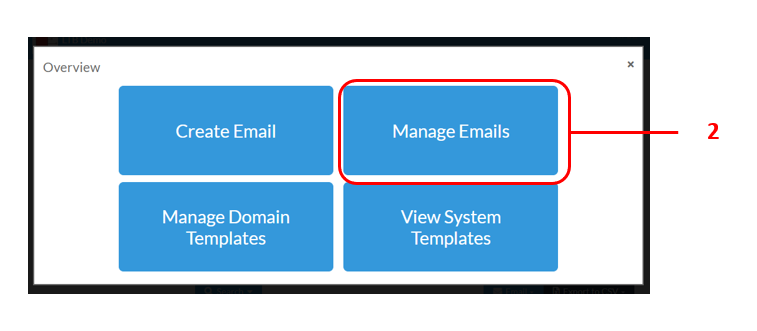
1. Then click on the Email Manager tab.

2. Choose Manage Emails
The view you now see is the history of all your email sent and any emails that are in draft (saved but not yet sent).
- To return to edit a draft email, simply click on its name. It will then open in the Email Editor.

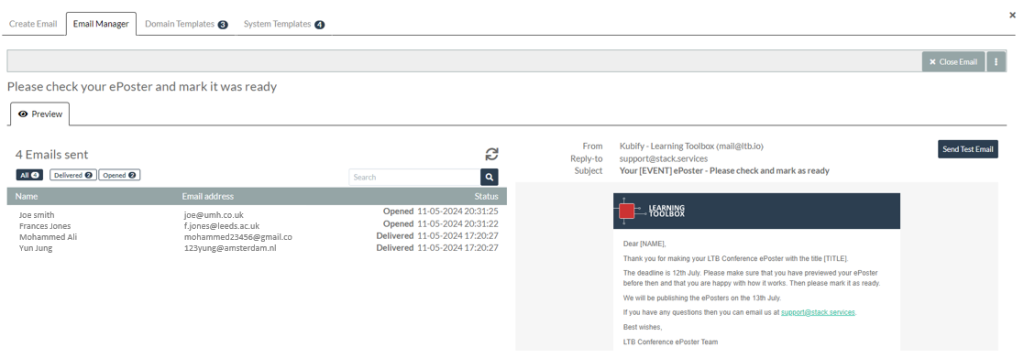
- To view the history of a sent email, simply click on its name. The view will open to show you list of recipients of the email, the status of the email sent to each recipient and the preview of the email that was sent. You will have a quick overview of how many emails have been sent, delivered, opened, clicked, delayed, bounced or returned out of office messages. You will be able to filter the view to show just the emails in each status category.
Manage your emails – View history of emails sent to a particular record
You can also check to see what emails have been sent to a particular record. To do this find the record in the Event Manager and then:
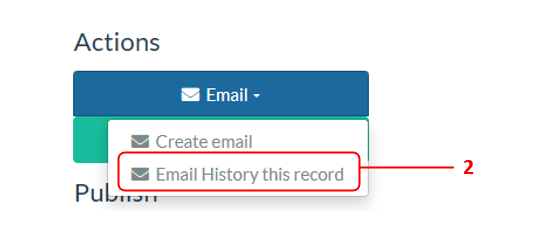
1. Click on the Email button in the record
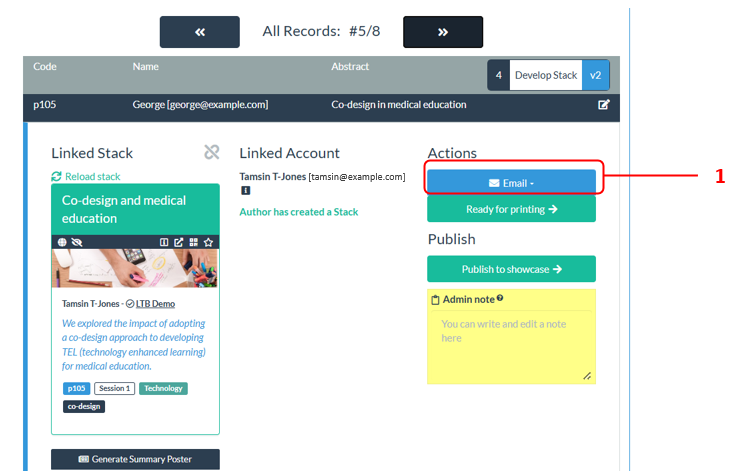
2. Choose Email History from the drop-down menu
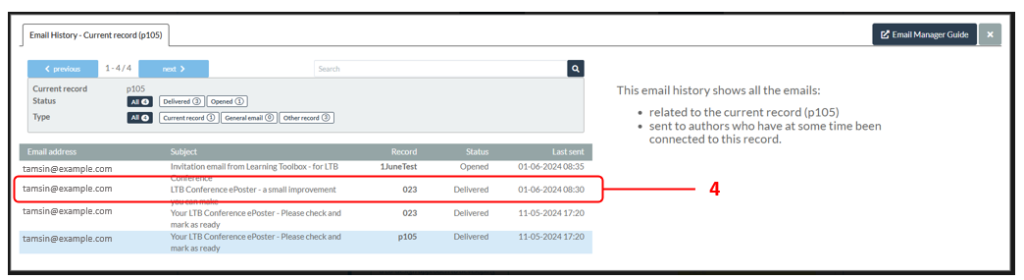
3. You will then see the full email history for this record – a list of all the emails that have been sent related to this current record or to an author who has been connected to this record. For each email you will see the email address it was sent to, the subject heading, the record it refers to, the status (delivered, read, opened) and the date it was last sent.
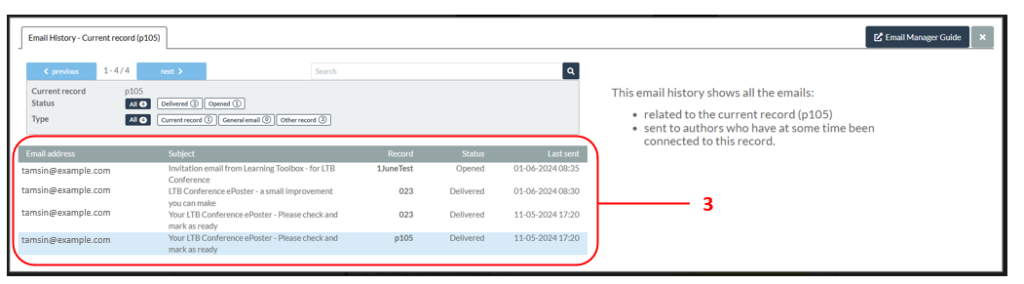
4. Click on an email in the list, to find out more about that email
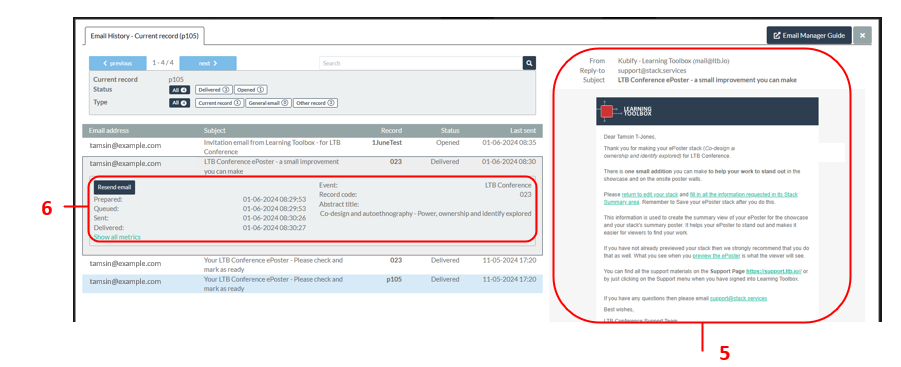
5. You will then be able to see the text of that email to the right of the list.
6. You will also see more details about when the actions (delivery, opening etc.) took place and you will be able to click on a button to resend the email.
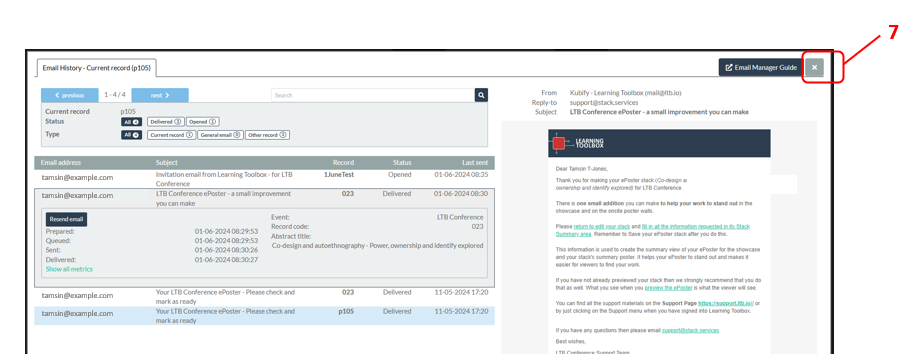
7. When you have finished reviewing the email history, you can just click on the close (X) button to return to the Event Manager.
Thank you and feedback
We hope this update guide has given you a good overview of the new functionality. We are very thankful to the conference organisers who worked with us to design this new functionality. We hope you will find it useful. If you have any feedback on the new functionality then please let us know. We will of course continue to look for ways to improve this as we all use it.