Contents
- The focus of this guide
- Creating your event
- Creating the invite emails to send to your accepted authors
- Adding your ePoster authors
- Sending the invitation to your ePoster authors
- The focus of the next guide
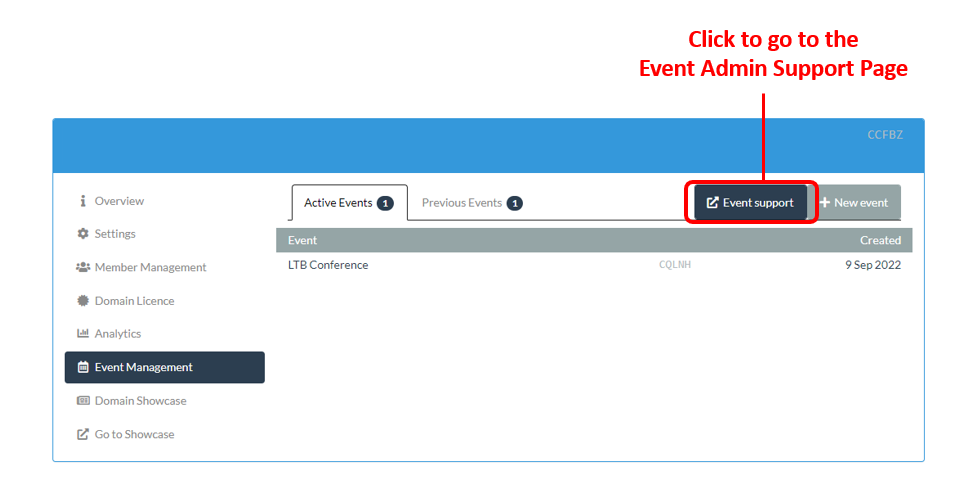
Go to Event Admin Support Page
The focus of this guide
This guide will take you through the steps needed to set up your ePoster event within Learning Toolbox and invite your authors.
This guide covers the first of the key stages involved in setting up and managing an ePoster event in Learning Toolbox:
- Setting up an event and inviting authors
- Monitoring and supporting your authors
- Printing summary posters and publishing ePosters
- Onsite preparations and requirements
- Setting up next year’s event
You should start this stage once you know which authors have been accepted to present ePosters at your event.
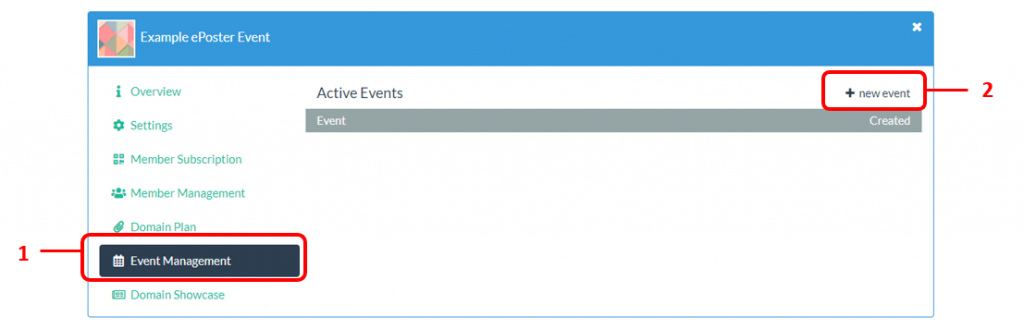
Creating your event
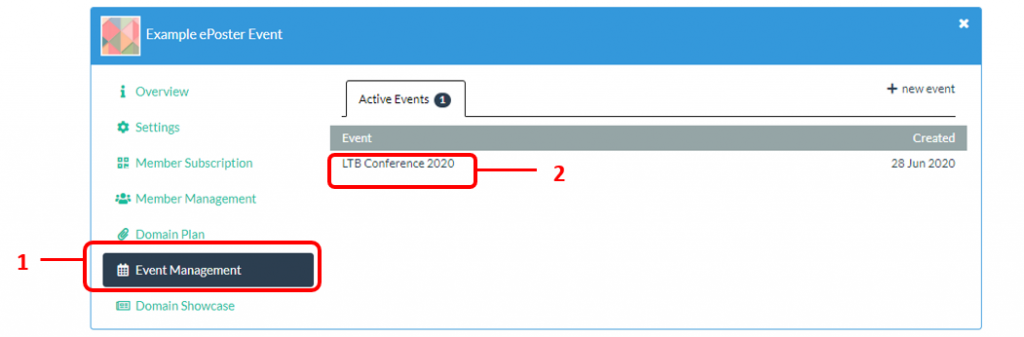
Open your domain admin screen (click on the cogwheel next to your domain name).
1. Click on Event Management
2. Then click on new event
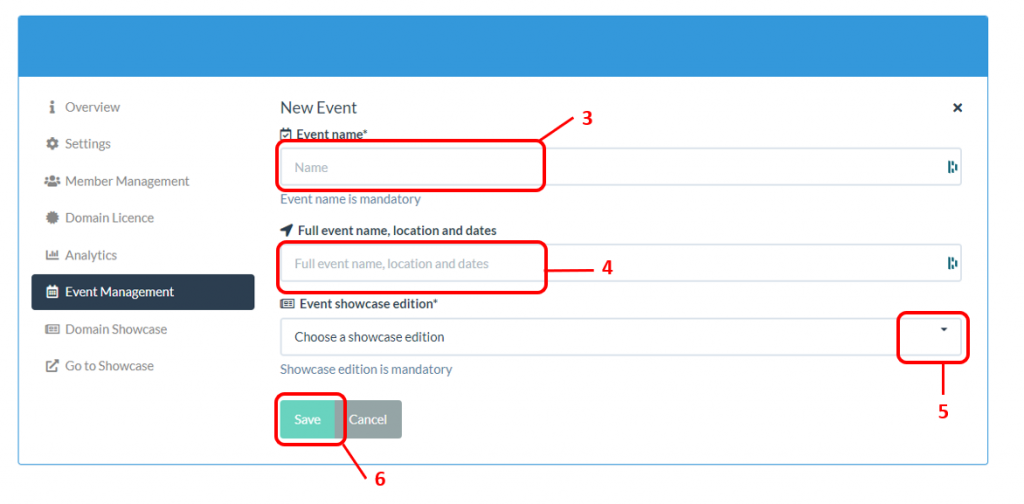
3. Give your event a Name. This name will appear in the invitation emails sent to authors. This can be the conference acronym and year, it does not need to be the full conference name.
4. In the Context, Location, Date field add the full conference name, location and date as you want it to appear on each of the summary posters.
5. Use the drop-down menu to choose the showcase edition to which the ePosters from this event will be published.
6. Click on Save.
Adding and validating your support email
When you have saved your event then the screen will show the event summary, along with some additional settings. The next required step is to add and validate the support email address that you are using for your event.
Why do we ask for your support email address? We will not send any emails using your support email address (all emails sent from Learning Toolbox come from the email address mail@ltb.io). However, we will use your validated support email address as the Reply To field for any emails sent out to your event authors. This means that if one of your authors replies to an email sent by Learning Toolbox then their email will come to you.
1. In the Support Email address box type in your support email address
2. And then click on the orange Verify button.
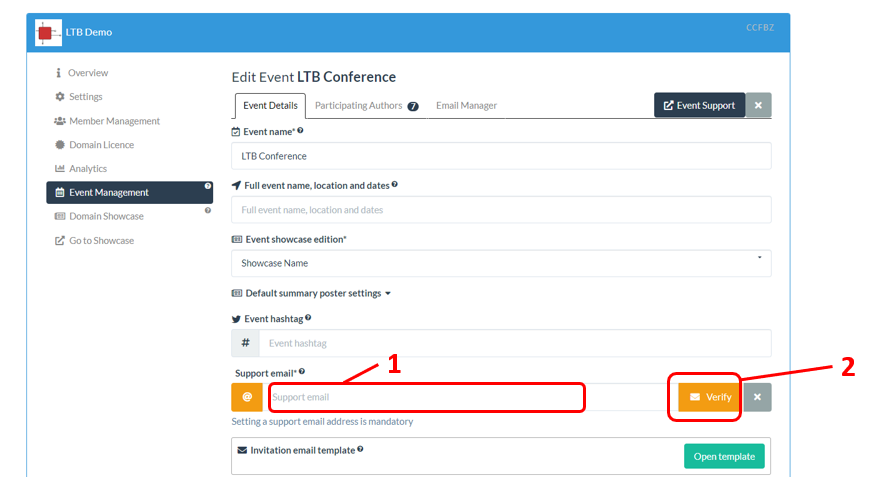
3. Learning Toolbox will then email a verification link to your support email address. Click on the verification link in that email when you receive it.
4. You can then return to your event in Learning Toolbox and click on the Check Verification button next to your support email address. The button will then turn green confirming that your email address has been verified.
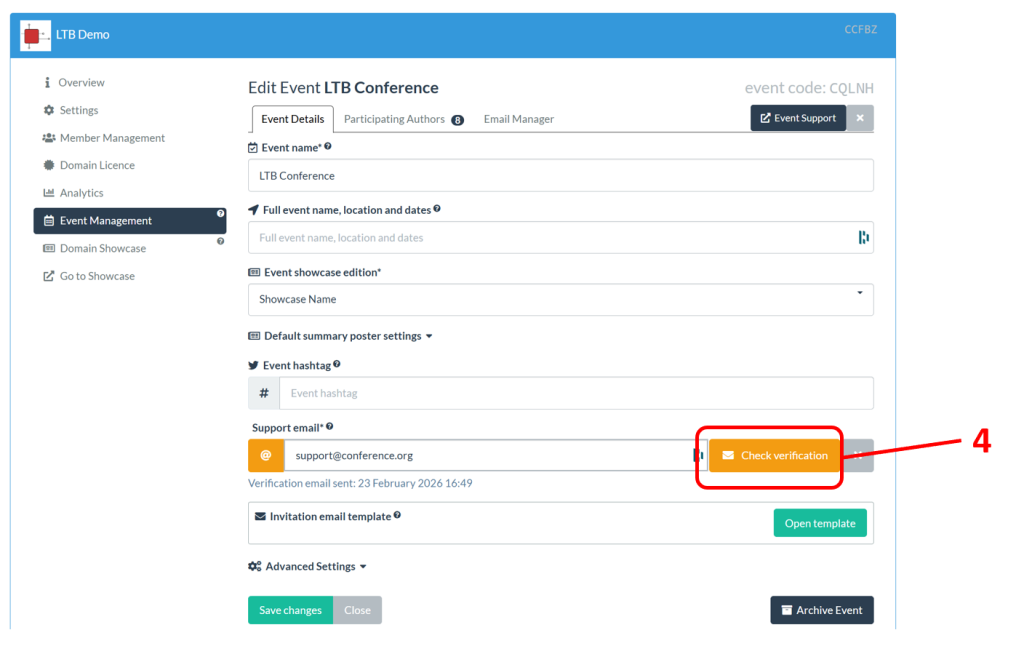
Your support email address has now been verified and you will be able to use the email functionality within Learning Toolbox (to send invitations and other emails).
Advanced settings for your event
Adding information to the other event settings is optional. Each of those additional settings is explained briefly below.
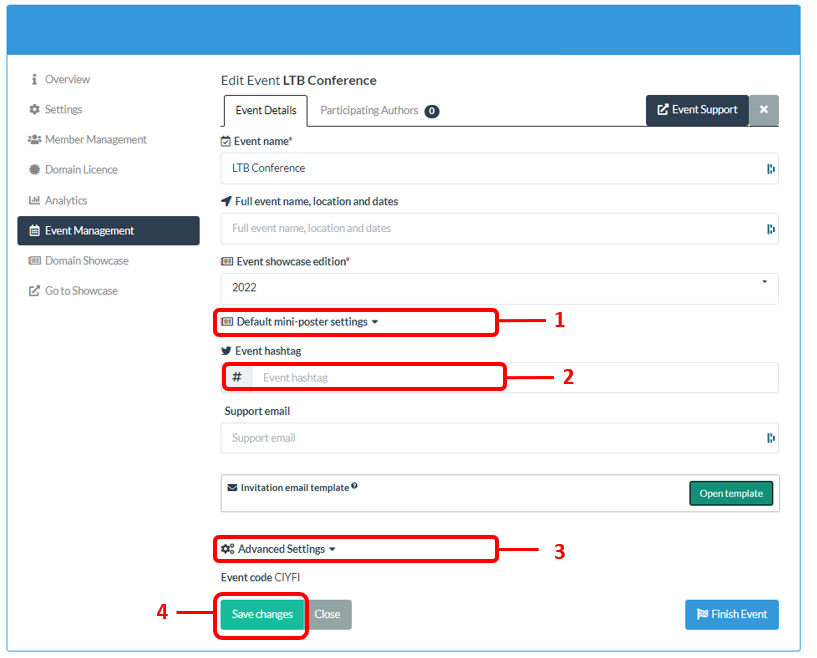
1. You can set some default text to appear on the summary posters. This will only be used if the author does not add text description text themselves.
2. If your event uses an event hashtag (such as #MedEd2022) then you can add that here. It will then be automatically added to any tweet created when people share an ePoster to Twitter from within Learning Toolbox. This can help to promote your event & community.
3. The advanced settings area allows you to set some restrictions on your event, such as:
- Publish to domain members only (default is OFF). If turned ON then only people with accounts in your domain can view the event ePosters. The default is for this to be turned off in order to make delegate access to the ePosters as easy as possible. If you do want to restrict access then you would also need to give all your conference delegates accounts in Learning Toolbox. This is possible but we recommend you talk to us support@kubify.co if you want to do this.
- Lock published stacks (default is OFF). If turned ON then once an ePoster stack is published to the showcase website then the author will no longer be able to edit it. The default is off so authors do have the ability to update their ePoster stack following discussions and feedback at the conference. This lock can be on and then turned off again later if you only want to lock the ePosters stacks for a certain time.
- Disable chat for all stacks (default is OFF). By default each published ePoster stack has a chat area. The author is able to turn the chat area off on their ePoster stack. If you (as the administrator) want to turn the chat area off on all the event stacks then you can do that here. If you turn the chat off on all the event stacks then the author will not be able to turn it on again themselves.
- Show label (default is ON). If you have given each of the ePoster stacks a label then this will appear on the summary poster and in the summary box on the ePoster showcase. You can turn this off if you do not want it to appear. Some conferences use the label field to contain the poster number if this is not the same as the invitee_code.
- Show invitee_code (default is OFF). If turned ON then the invitee_code for an ePoster will appear, as a blue tag, in its summary box on the showcase and on its summary poster. This is useful if you have used something meaningful (like the poster number) as the invitee_code.
4. Remember to Save after you make any changes to the Event.
Create the invite emails to send to your accepted authors
Within Learning Toolbox you should create and send invite emails to your accepted ePoster authors, as these invite emails will provide them with a personalised invite link to login to Learning Toolbox and start to make their ePoster for your event. To set this up:
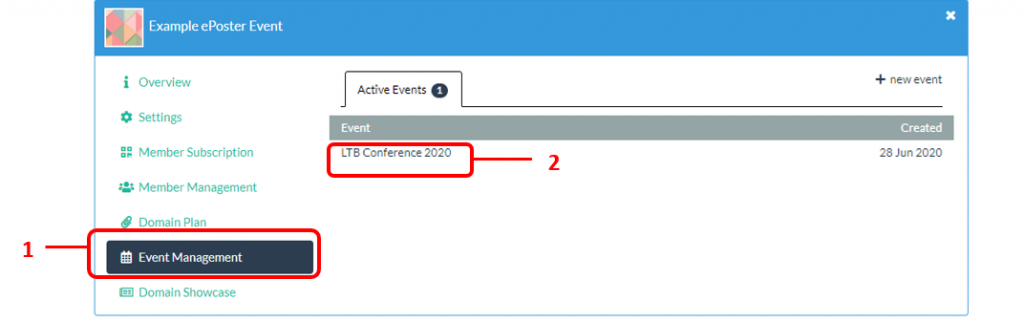
1. In the Admin screen, click on Event Management
2. Click on the name of the event you want to open
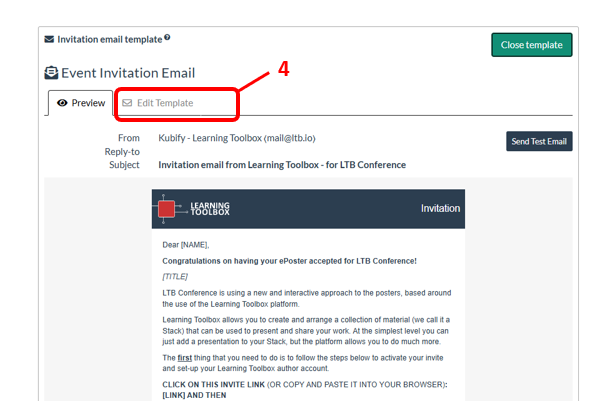
3. Click on Open Template
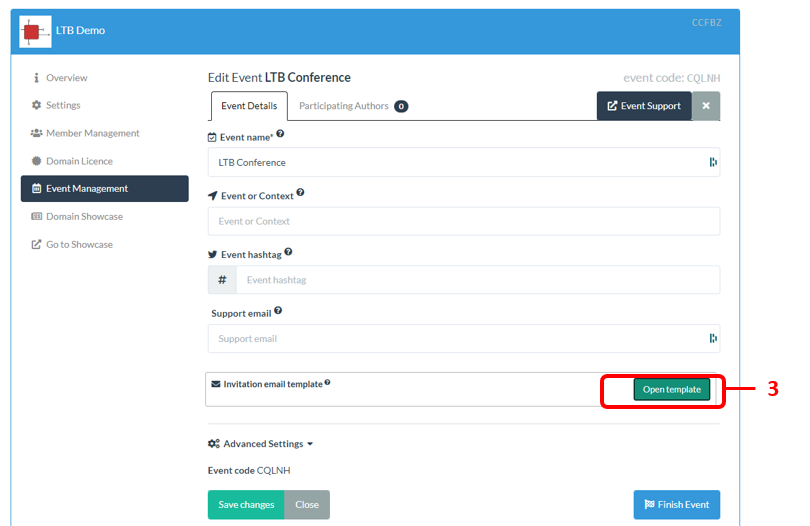
4. You will now see a screen showing a preview of the default invite email text. You can edit the default invite email text by clicking on the Edit Template tab.
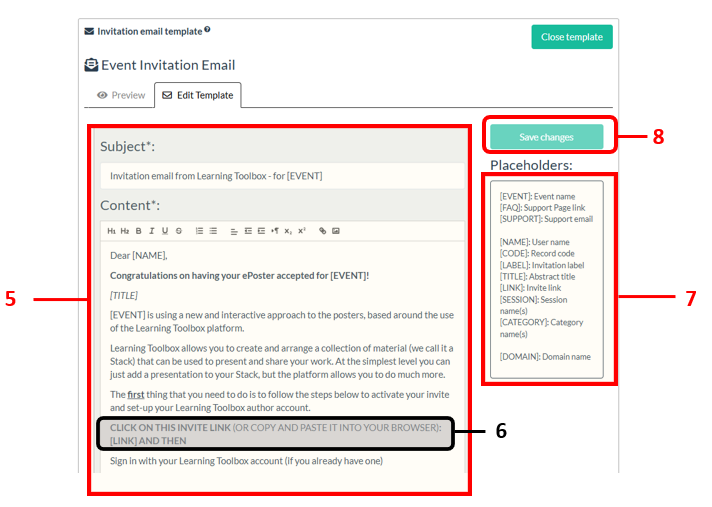
5. You can edit both the subject and the content of the invite email.
6. However, do not change the section that refers to the invite link
7. Note that you can use the placeholder text in the email and this text will be replaced when the email is sent out by the relevant information for each record and for your event.
8. When you are happy with the email then you should press Save changes.
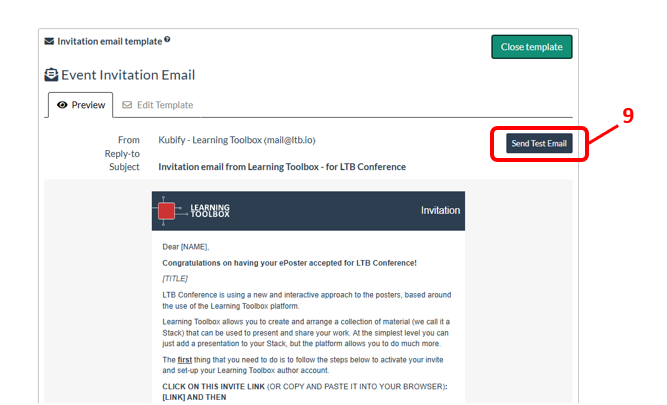
9. You will then return to the preview and you can send yourself a test email if you want to check how the email will appear to authors.
Adding your ePoster authors
Now you are ready to add your accepted ePoster authors.
You will be creating one record for each ePoster, with its key details (code, title and lead author name and email address). The author who you list for the ePoster will be the author who is emailed the invite to create that ePoster. However, they will be able to forward that email invite onto one of their co-authors if they want a co-author to become the editing author for the ePoster. Each ePoster can only have one editing author. We have an FAQ on the Support Page that explains this to authors.
1. In the Admin screen, click on Event Management
2. Click on the name of the event you want to open
3. Click on the Participating Authors tab
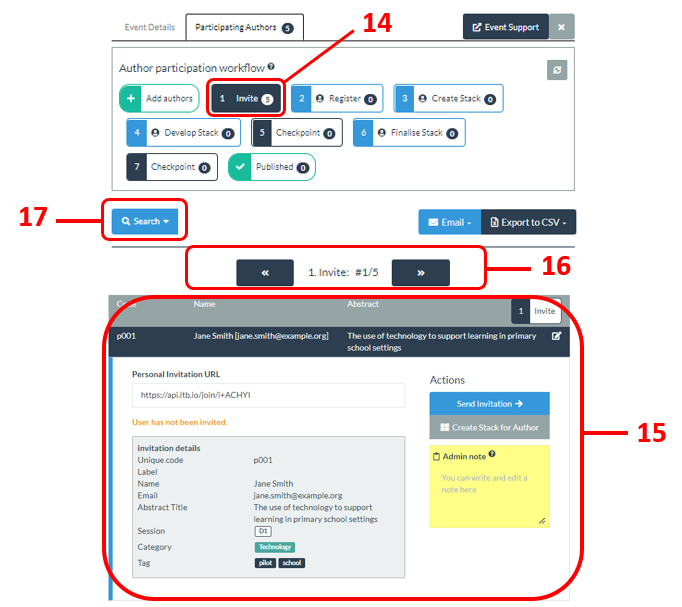
4. Here you will see a very important part of the Event Management area, the Author participation workflow. This shows you where the authors are in the ePoster creation process and allows you to monitor & manage their progress.
5. The Add authors stage is highlighted to show that is your current selected stage.
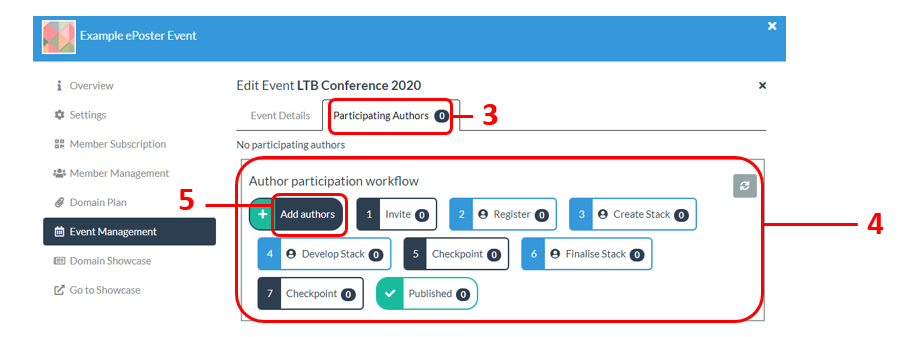
6. Below the workflow, it shows the information that we need for each ePoster. You can find out more about how this information is used here.
7. If you just want to add details of one author/ePoster then you can fill in the information requested here and click on Submit.
8. But you can also choose to add multiple author/ePoster details by using the Import from CSV option.
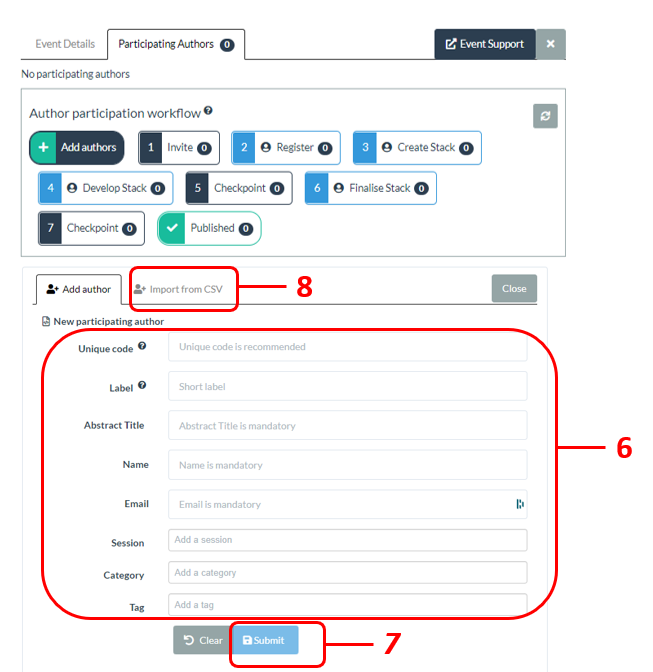
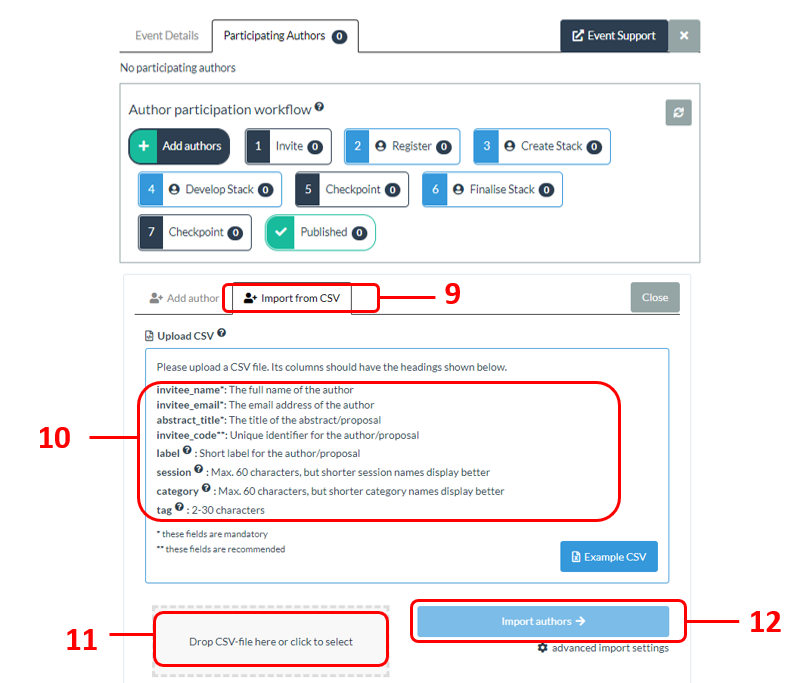
9. Unless you have a very small number of authors, then it is usually easier and quicker to import all your authors from a CSV file rather than add them one by one. To do that, click on the Import from CSV tab.
10. Onscreen it now lists the details of the expected CSV format and you can download an example CSV file. Please make sure that your CSV file contains the required information and that the columns have the required headings.
11. Once you have your CSV file ready then you can upload it from your computer.
12. Then click on the Import authors button
13. Learning Toolbox will provide you with a summary of the import, which you can close by clicking on Done.
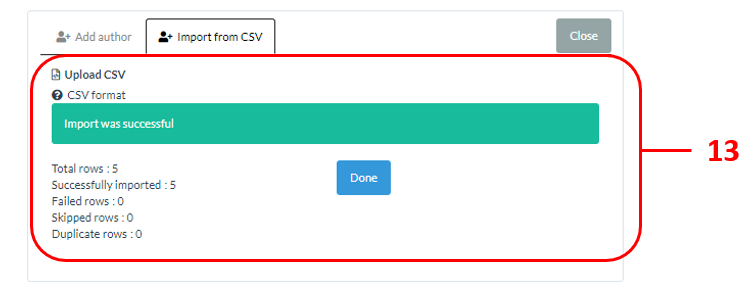
14. The number of authors that have been imported is now showing in the invite stage in the workflow view. Click on the invite stage.
15. Below the workflow view, it now shows you the first record in the selected stage. In this case this is the first author who is waiting to be sent an invite.
16. You can step through the list of records in the stage using the arrow buttons.
17. Alternatively, you can click on the search button to search for a record in this stage. The search will look for matches in code, name, email address and abstract title.
How we use the author / ePoster information that you add
| Unique code (invitee_code) | This can be whatever you use as the unique identifier for this ePoster. You will be able to use it to later search for and find this ePoster in the Event (both in the Event Manager and the Showcase). |
| Label | If you have added a label to the ePoster then this label will be shown in its summary view and summary poster. This field has now special definition and so you can use it for whatever information you want to share in this way. Some conferences use the label field to add the poster number it if is different to the invitee_code. Some conferences use it to indicate the room or screen on which an ePoster will be shown onsite. |
| Name (invitee_name) | This is the name of the author of this ePoster. This is the author who you will invite to make the ePoster. |
| Email (invitee_email) | This is the email address of that author. |
| Abstract title (abstract_title) | This is the title of this ePoster. When the author starts to create their ePoster then this will be the name it is given, although they will be able to edit it. |
| Session [optional] | This is the session in which this ePoster belongs. The sessions are used to create filter buttons in the showcase allowing the delegates to filter the view to see only ePosters in the chosen session. View our example showcase to see how the filter buttons work. |
| Category [optional] | This is the category (or categories) in which this ePoster belongs. The categories are also used to create filter buttons on your showcase allowing the delegates to filter the view to see only ePosters in the chosen category. You might use categories to group ePoster by theme or topic. A filter button will be added to the showcase for each category, so it is best to keep the number of categories relatively small and to keep the names of the categories short. You can view our example showcase to see how the filter buttons look and work. |
| Tag [optional] | You can choose to add some tags to this ePoster. When the author creates their ePoster these tags will be automatically added to it. The author will be able to add more tags and/or delete tags. Delegates will be able to search the showcase for ePoster with specific tags. There is a 20-character limit to individual tags. It is advisable not to add too many tags to an ePoster as they will all be displayed in its summary view on the showcase. You can view our example showcase to see how the tag search works. |
Sending the invitations to your ePoster authors
You have now added your author/ePoster records to Learning Toolbox, but you have not yet sent the invites out to your authors. The next steps explain how to send the invitations.
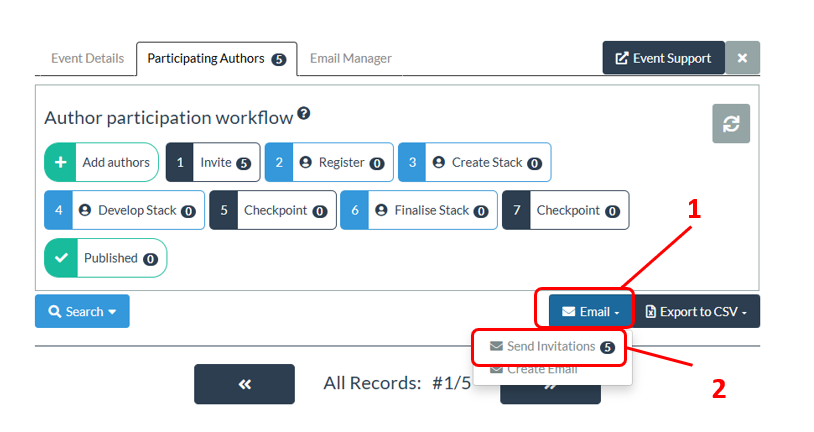
1. Return to your event’s workflow view and click on the Email button under the workflow.
2. To send the invitation emails to all the authors in the Invite stage click on the Send Invitations option in the drop-down menu.
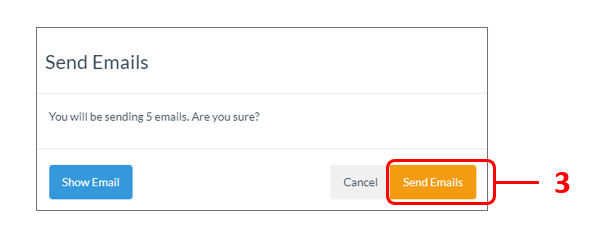
3. A confirmation box will tell you how many emails are going to be sent. If you want to see the email text then click on Show Email. Then click on Send Emails and the emails will be sent to your authors.
4. You have now successfully set up your event and sent out the invitation links to all your invited authors. Your authors have now all moved from the Invite stage to the Register stage in the workflow view. This indicates that we are now waiting for them to follow the link and register.
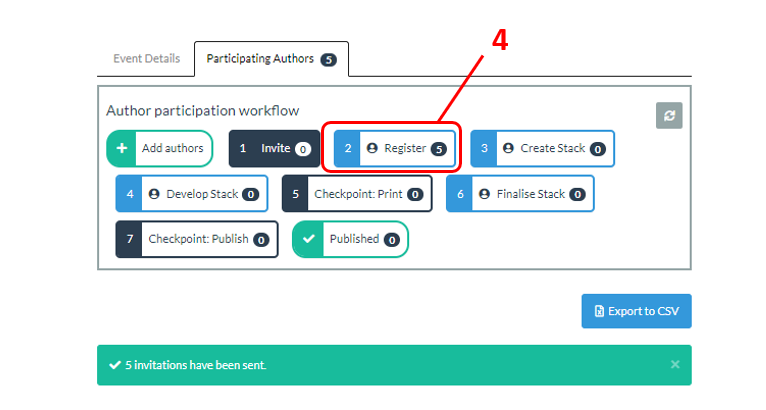
Congratulations on setting up your event and inviting your authors.
The focus of the next guide
This next guide covers the second key stage involved in setting up and managing an ePoster event in Learning Toolbox. It provides you with more information on using the workflow view to help you in monitoring and supporting your authors:
- Setting up an event and inviting authors
- Monitoring and supporting your authors
- Printing summary posters and publishing ePosters
- Onsite preparations and requirements
- Setting up next year’s event
The guides are all accessible on the Event Admin Support Page. You can also get to that page from the Event Management area of the Admin Screen as shown below: