Contents
- The focus of this guide
- Support available to your authors through Learning Toolbox
- Reminder and hints and tips emails
- Monitoring your authors’ progress through the ePoster creation process
- Answering authors’ support questions
- The focus of the next guide (printing summary posters and publishing ePosters)
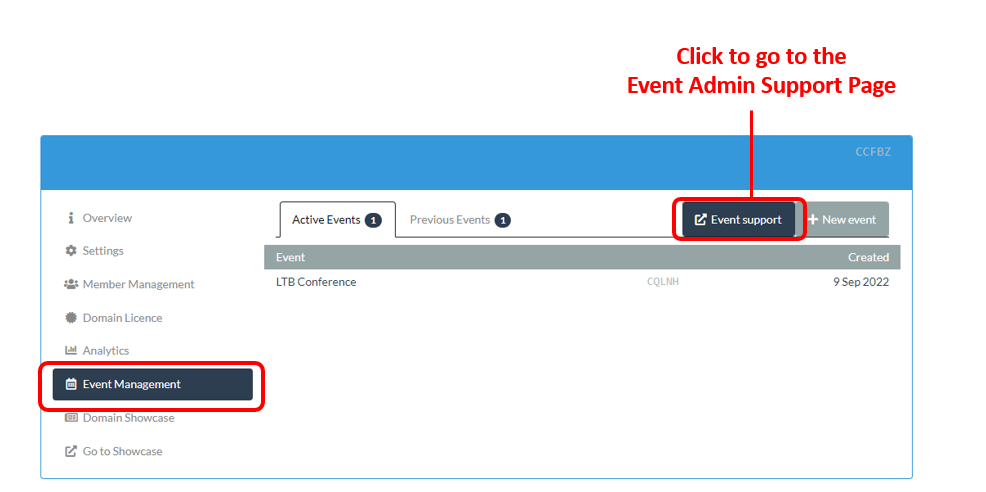
Go to Event Admin Support Page
The focus of this guide
This guide covers the second of the key stages involved in setting up and managing an ePoster event in Learning Toolbox:
- Setting up an event and inviting authors
- Monitoring and supporting your authors
- Printing summary posters and publishing ePosters
- Onsite preparations and requirements
- Setting up next year’s event
You should start this stage once you have set up your event and sent invites out to your authors.
Support available to your authors through Learning Toolbox
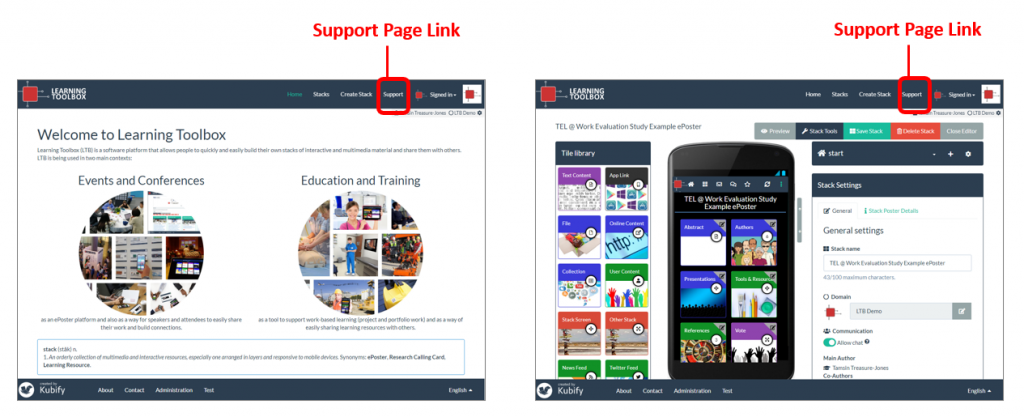
Your authors will have access to all the videos and answers to frequently asked questions on the general Support Page.
They can access this page from within Learning Toolbox itself by simply clicking on the Support link. This link is always visible in the editor.
We recommend that you (or a member of your team), familiarise yourself with the contents of the Support page and the process of creating an ePoster, so that you can answer any questions from your authors and/or direct them to the answer on the Support Page or the linked FAQ page.
Reminder and hints and tips emails
You have already sent your authors the invite email containing their personalised invite link and any other information you wanted to include in that email.
You may want to also consider sending them additional guidance and reminder emails in the run-up to the conference. You can do this using the Email Manager within Learning Toolbox. The Email Manager contains some email templates (based on information we find useful to send to authors), as well as allowing you to create your own emails and templates.
We have written a guide that explains how to use the Email Manager to send emails to all your authors, authors in a specific stage or individual authors. You can also use the Email Manager to see what emails have been sent and whether they have been opened. You can find the Email Manager guide here.
Monitoring your authors’ progress through the ePoster creation process
At any time you will be able to see how all your authors are progressing – who has started, who is making each ePoster, what stage their ePoster has reached and you will even be able to open, view and even edit (if needed) their ePoster.
The workflow view
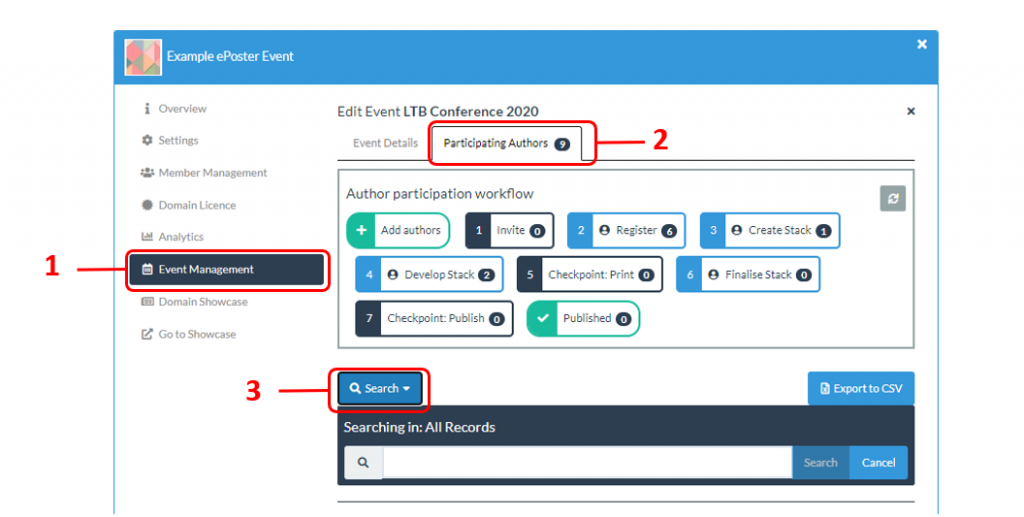
The key area you will be working in when monitoring and managing your author’s progress is
1. the Event Management and…
2. the Participating Authors tab
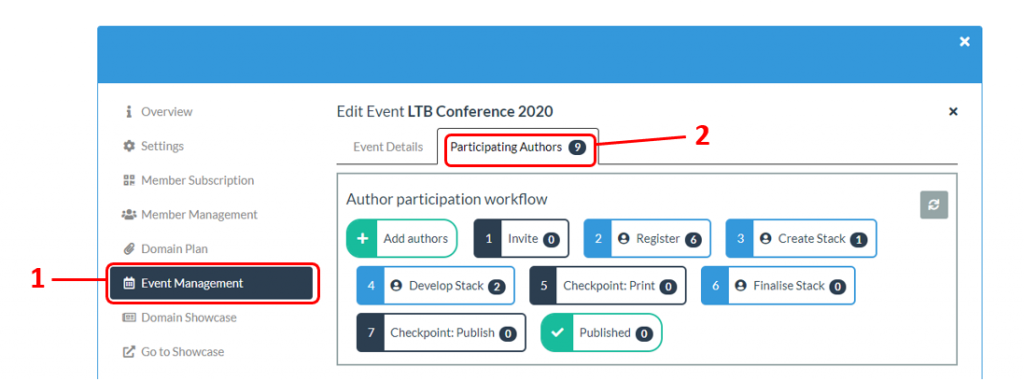
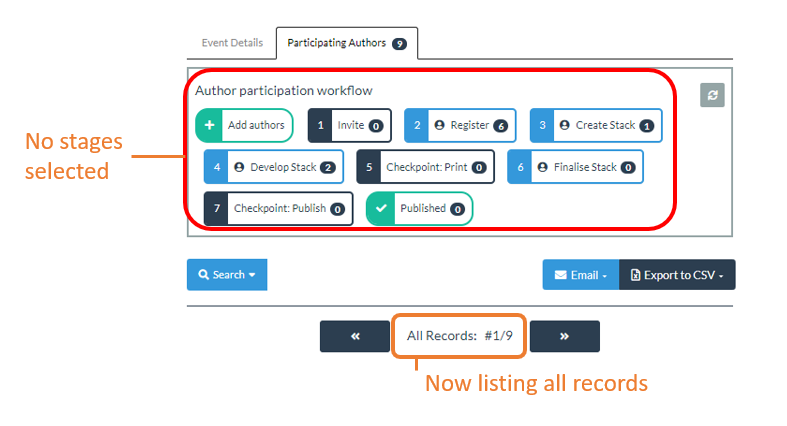
You can use this workflow view to monitor your authors’ progress as they make their ePosters.
3. The number in each stage indicates the number of records that are at that stage. Each record refers to one ePoster.
4. Boxes with a blue tab are stages where an action from the author is required to move them to the next stage. The required action is the name of that stage. For example, at stage 2 the author’s required action is Register.
5. Boxes with a black tab are stages where an action is required from you as the administrator in order to move the author to the next stage. The focus of the action is, again, the name of that stage. For example, stage 7 is a checkpoint where the author has indicated their ePoster is ready and your required action is to Check and Publish it.
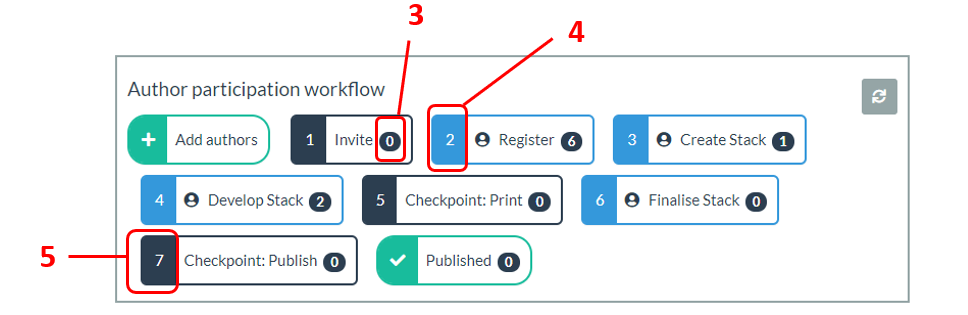
If you click on a stage to select it then you will be shown the list of records that are in that stage.
6. You can then step through the records in that stage one by one or…
7. You can search the records in the stage. The search matches text in the code, author name, email address, abstract title, programme slot or showcase name.
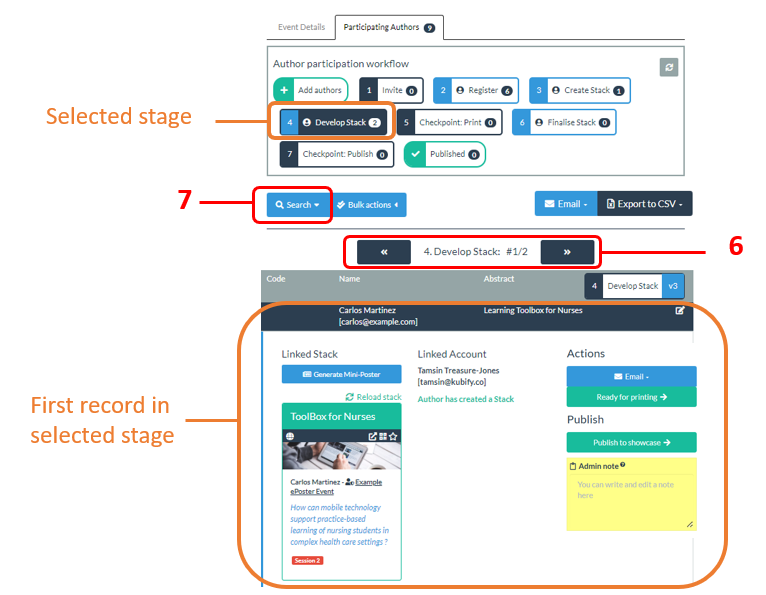
If you click on the selected stage (to deselect it) then it turns off that filtered view and you return to seeing all the records in your event. Again you can choose to either step through these or search them.
When you are viewing a record you will be able to see important information about the author’s progress as well as seeing the actions that you (as the administrator) can take.
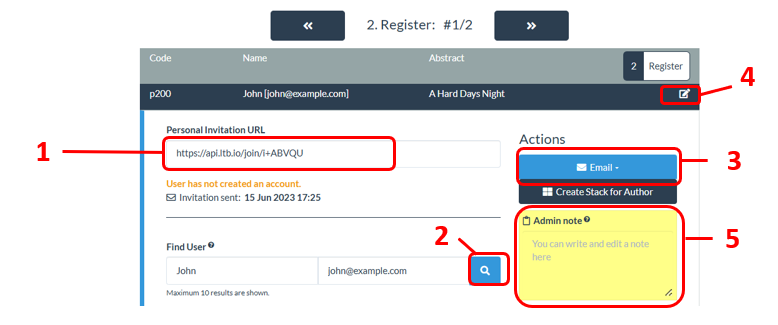
Viewing a record in stage 2 – author yet to register
For a record in stage 2 (author needs to register) you can:
1. See their personal invite link (this will have been emailed to the author). You can copy this to send it to them yourself if you want.
2. Search to see if they have created a Learning Toolbox account without following the link. If you find them here then you will be offered the opportunity to link them to the invite so they no longer need to use the invite link themselves, but can sign in directly to Learning Toolbox.
3. Email them – you can find more information about sending emails in the Email Manager guide.
4. Edit the record. You might use this to make a correction to their abstract title, delete them from the event or change their session or category.
5. Add an Admin Note (for example you could add a note that the author has been given an extension). The Admin Note is visible and editable by all administrators.
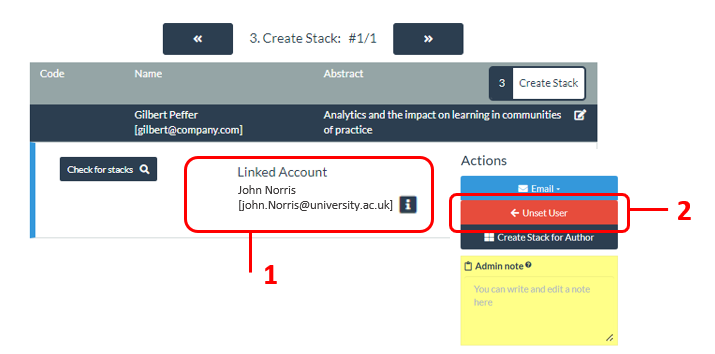
Viewing a record in stage 3 – author registered but not yet made a stack/ePoster
For a record in stage 3 (author has registered & needs to create their stack) you can:
1. See the details of their linked Learning Toolbox account. As is shown here, sometimes the email address they use for their Learning Toolbox account is not the same as the one you have on record for the ePoster. This is not a problem, but it is helpful to be able to see this since sometimes an author passes on the invite to one of their co-authors and then you can see here that it is actually their co-author who has followed the invite link and who is creating the ePoster.
Note: You can find out more detailed information about the Linked Account including the date it was created and whether the author signed in via one of the social media routes by clicking on the [i] button.
2. Unset the user from this record. You may need to do this if the author has changed their mind about which co-author will actually create & edit the ePoster. Refer to the specific questions at the end of this guide if you come across this issue.
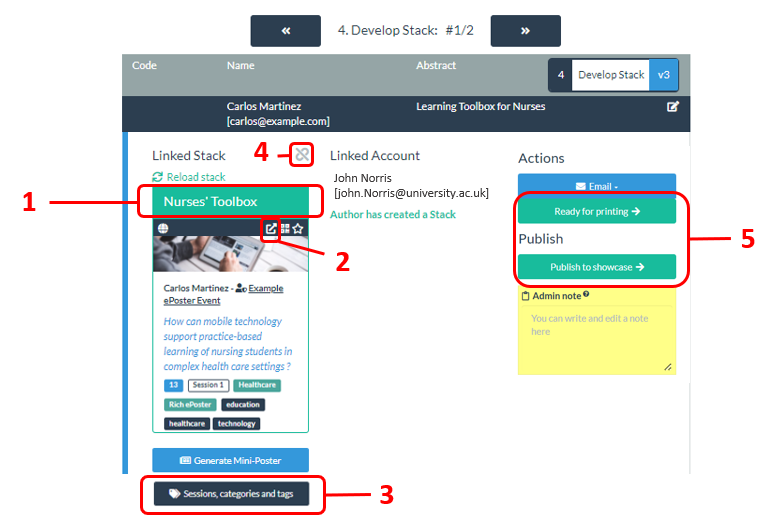
Viewing a record in stage 4 – author is developing their stack/ePoster
For a record in stage 4 (author has registered and started to create their ePoster), you can:
1. Preview their developing ePoster by clicking on its title.
2. Open their ePoster’s summary view in a new browser tab. From this view you can also choose to edit the ePoster if you need to make changes to their ePoster yourself.
3. Change the ePoster’s session, category or tags.
4. Unlink this ePoster from the invitation. You would only need to do this if they had started to create this ePoster in error (perhaps linked to the wrong invitation if they are an author with multiple ePosters/invites).
5. Confirm the ePoster is ready to print or publish the ePoster to the showcase. These steps and the later stages in the workflow will be explained in more detail in Guide 3 – Printing and Publishing ePoster stacks.
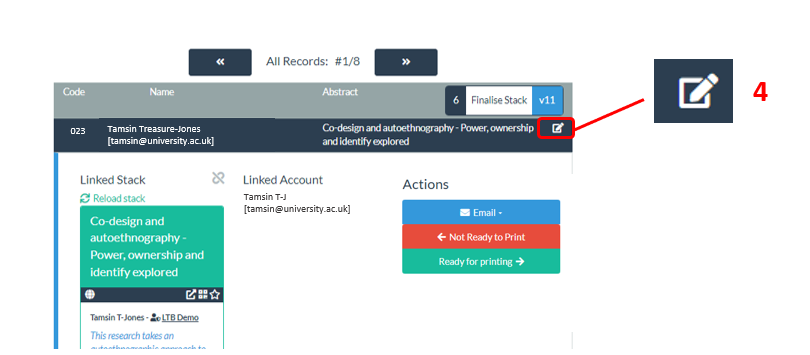
Withdrawing a record (and reinstating it)
Sometimes you might want to withdraw a record from your event – for example if an author is no longer going to participate in the conference. You can withdraw a record from any stage in the workflow. To withdraw a record follow these steps:
1. Go to the Event Manager in Learning Toolbox, open the Event
2. Then click on the Participating Authors tab to open the Workflow view
3. Use the Search to find this author’s record (the search covers name, email address and the unique code you gave this ePoster)
4. In the record, click on the record edit icon.
5. Click on the Withdraw button in the record. If you click on the Delete button instead then the record will be deleted from your Event. The advantage of choosing to click on Withdraw is that the record will be moved into a separate Withdrawn area and you will be able to reinstate it later if you need to.
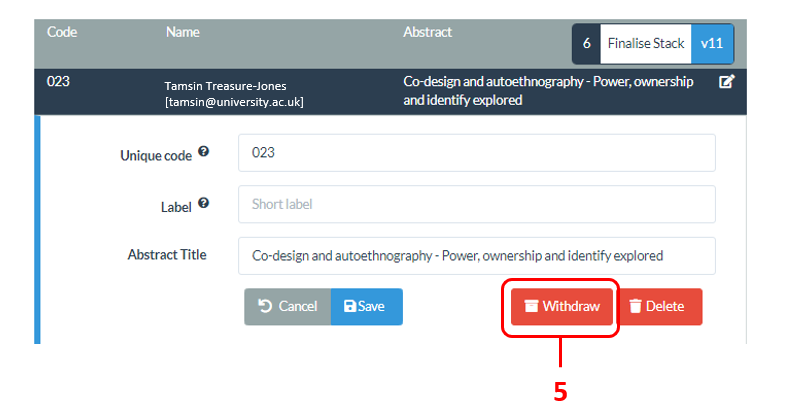
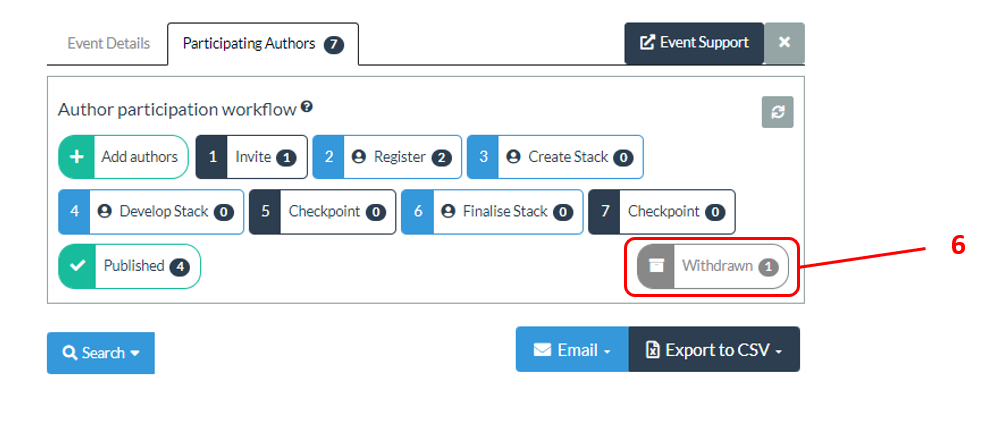
6. In the workflow view you will now see a new area called Withdrawn. The record has been moved to this Withdrawn area.
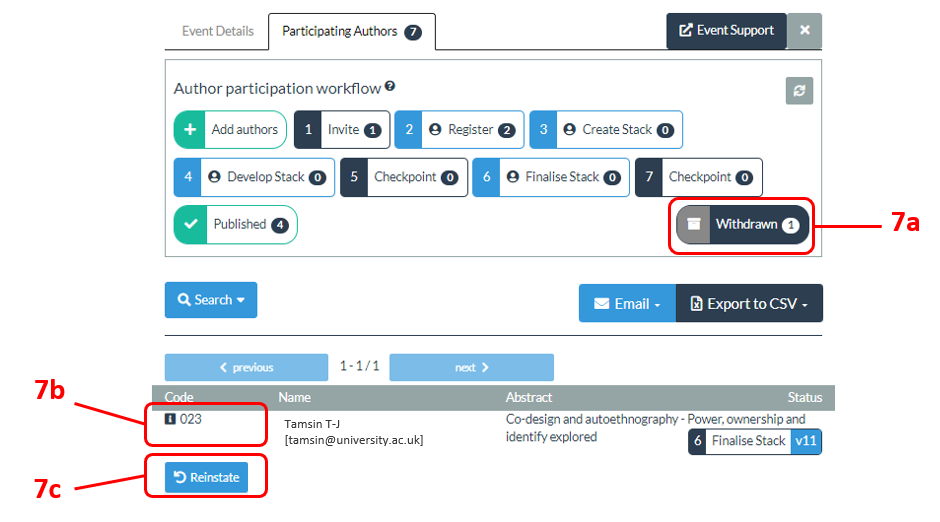
7. If you need to reinstate a record from the Withdrawn area (for example an author is now able to attend the conference after all) then you can do this by clicking on the Withdrawn area (7a), find the record, clicking on the record (7b) to open it and then clicking on the reinstate button (7c) that appears. A record will be reinstated to the same stage that it was in previously with one exception. If a withdrawn record had been in the Published stage then it will be reinstated to the checkpoint stage (stage 7) so that you are able to check it first before deciding whether to publish it.
Answering authors’ support questions
The Support Page gives authors quick guides to getting started, including a 3 minute introduction to the editor. The page also includes links to existing ePosters which authors can explore and short interviews with other ePoster authors talking about how they made their ePosters. If an author asks how to get started then the 3 minute video is a good place to direct them to. If an author wants to know what is possible then the interviews with ePoster authors are a good place to start. To see the Support Page simply click on Support when signed into Learning Toolbox.
From the Support Page authors can also access the FAQ Page which gives detailed step-by-step answers to more advanced questions. So if an author asks you a specific question about using Learning Toolbox then you can often point them towards the relevant answer on the FAQ page.
This is why it is helpful to familiarise yourself with the Support Page and FAQs, so you know where to point people towards. Note that if you right click on a section in the Support Page or FAQ page then you can copy its URL (web address) so that you can send the author that direct link to that section.
However, there are a few support questions which require you as the administrator to make some checks or changes. Click on the links below to see the guidance for how to answer each of these questions:
- I have not received my invitation link
- My invitation link is not working
- I would like one of my co-authors to edit the ePoster
- I have accidentally deleted my ePoster can you restore it
- Can an administrator make an ePoster for an author
The focus of the next guide
This next guide covers the third key stage involved in setting up and managing an ePoster event in Learning Toolbox:
- Setting up an event and inviting authors
- Monitoring and supporting your authors
- Printing summary posters and publishing ePosters
- Onsite preparations and requirements
- Setting up next year’s event
The guides are all accessible on the Event Admin Support Page. You can also get to that page from the Event Management area of the Admin Screen as shown below: