This guide is for people who are administrators within a Learning Toolbox domain and who will be using Learning Toolbox for an ePoster event. You should have received confirmation from us that your domain has been created and that your account has been made an administrator in that domain.
If any of these steps have not already been completed then please email support@kubify.co
CONTENTS
- Getting started – Setting up your domain
- Setting up your Showcase
- Overview of the domain administration area
- The focus of the next guide
Go to Event Admin Support Page
Getting started – Setting up your domain
Login to your Learning Toolbox domain administration area
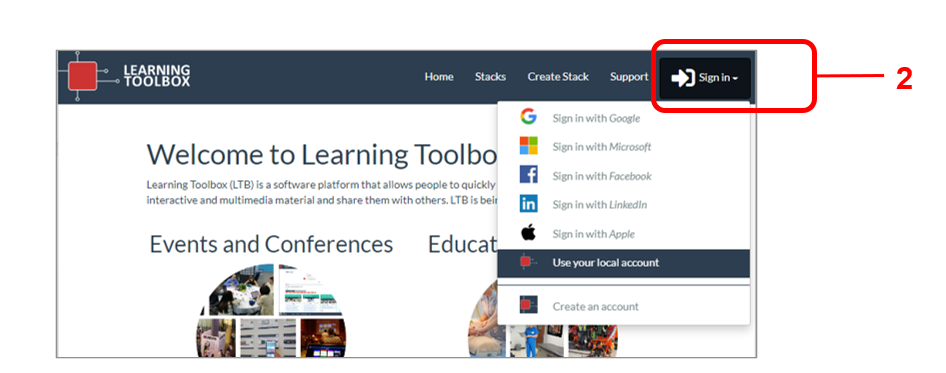
1. Open a browser on your computer and go to https://my.ltb.io
2. Click on ‘Sign in’ and sign in with the account details you are using for Learning Toolbox. This could be a local account you set up or your Google, Facebook, Microsoft or LinkedIn accounts. It should be the account that you asked us to make into an administrator account.
3. Onscreen next to your name you will see the name of the domain you are logged into. If you only have one Learning Toolbox domain then this should be the domain shown here.
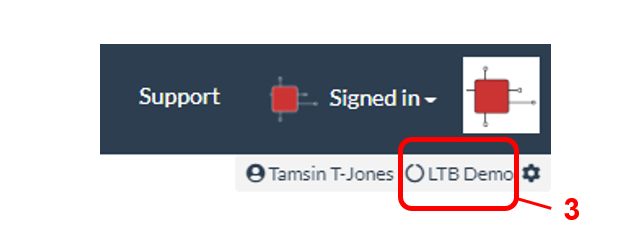
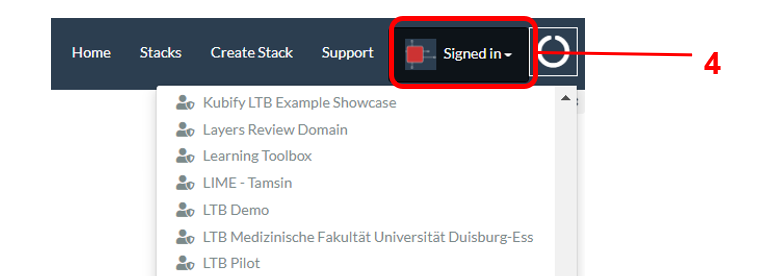
4. However, if it shows a different domain then you will first need to move to your domain. To do that click on the Signed in button. The drop-down menu will show all the domains in which you are a member. Choose the domain you want to manage from the drop down menu.
5. Now that you are in your domain then you will see the small settings cogwheel next to your domain name. Click on that cogwheel.
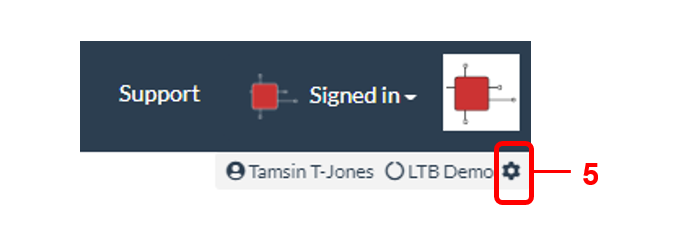
6. This will take you to your domain administration area.
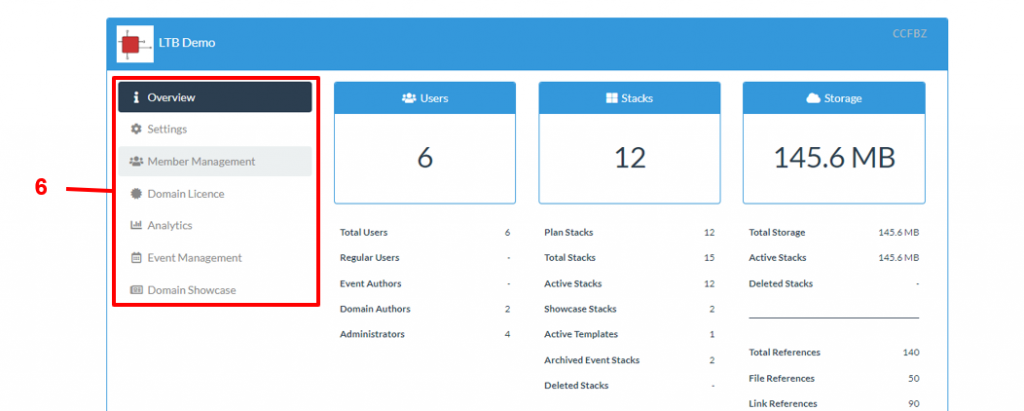
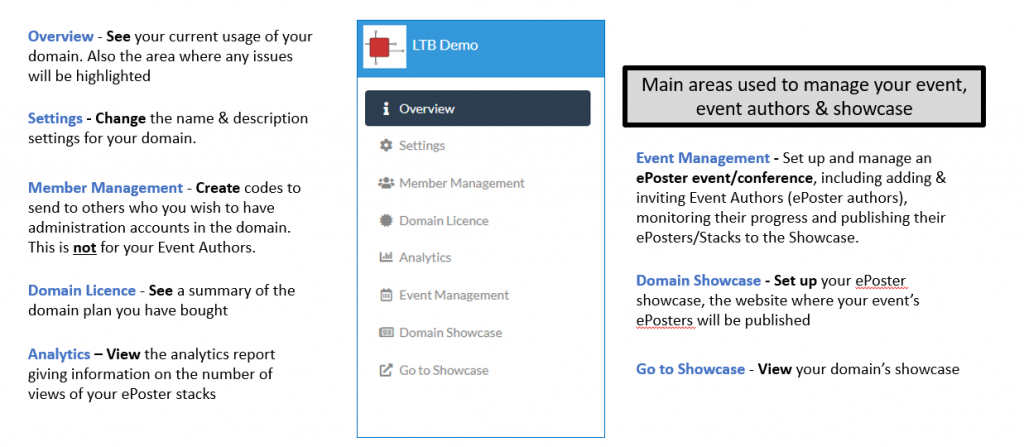
There are seven sections in this area (Overview, Settings, Member Management, Domain Licence, Analytics, Event Management and Domain Showcase). A summary of each section is provided at the end of this guide and you can explore each section by clicking on its name in the menu on the left of the screen (6). But before you start exploring, we will firstly take you through the most important steps in setting up your domain.
Review your domain licence
7. Click on the Domain Licence link
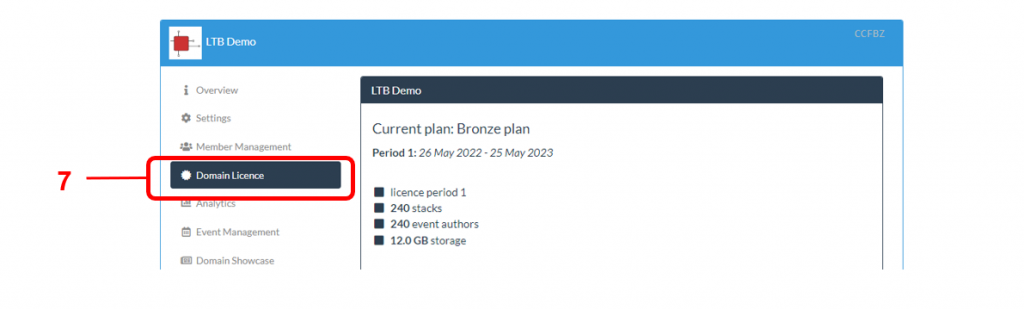
This will show you a brief summary of your plan including:
- The licence period
- How many stacks can be created in your domain
- The number of event authors that can be created in your domain.
- How much storage space comes with your domain. Storage space is used for storing images and files that authors upload when creating stacks.
Edit your domain settings
8. Click on the Settings link.
Here you can change:
9. Your domain name and
10. Add a square logo image. This logo will appear in the top right of the screen when your authors sign-in to Learning Toolbox, so that they have a visual indication that they are in the correct domain.
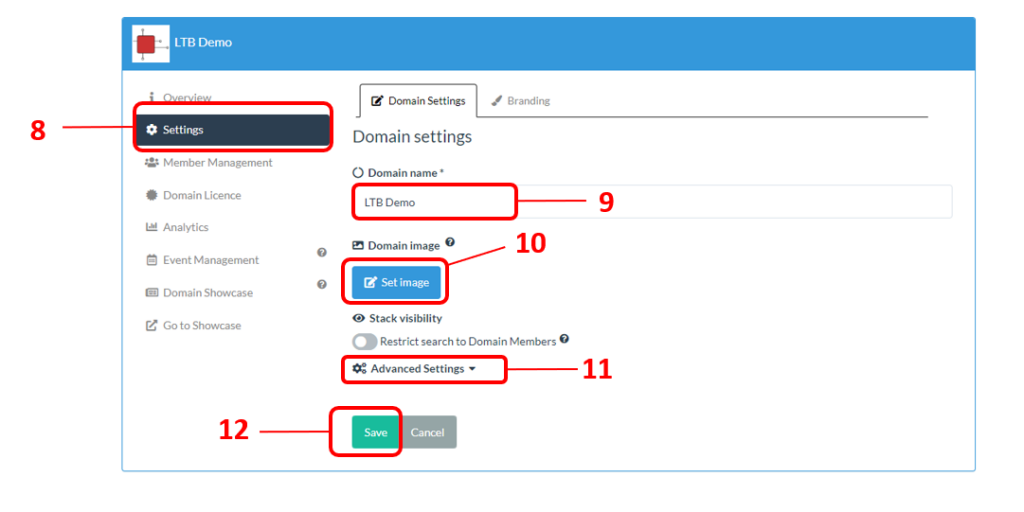
11. We recommend that you do not change the advanced settings. These settings are more commonly used when Learning Toolbox is being used in an educational setting and that use case it not covered in this guide.
12. Remember to save before you leave this settings page
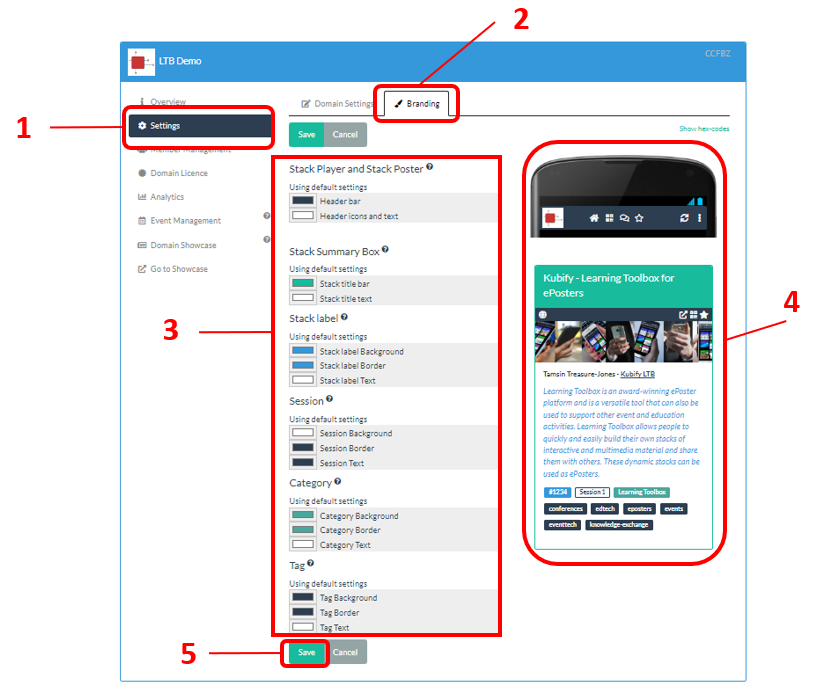
Branding – Changing the colours to fit your branding
You can change the colours used in the Learning Toolbox ePoster stacks to match your branding.
1. Click on Settings
2. Click on the Branding tab
3. Here you will see all the places where you can make changes to the colours. To change a colour simply click on the colour box. See below to see the different options you have for choosing the exact colour that you want.
4. The colour changes will affect how the ePoster appears in the player/viewer, the showcase and the printable stack poster. Click on the ? next to a colour setting to find out more about where the change will be made. The impact of any change you make will be immediately shown to you in the mobile view of the ePoster stack.
5. Remember to Save after you have finished making changes.
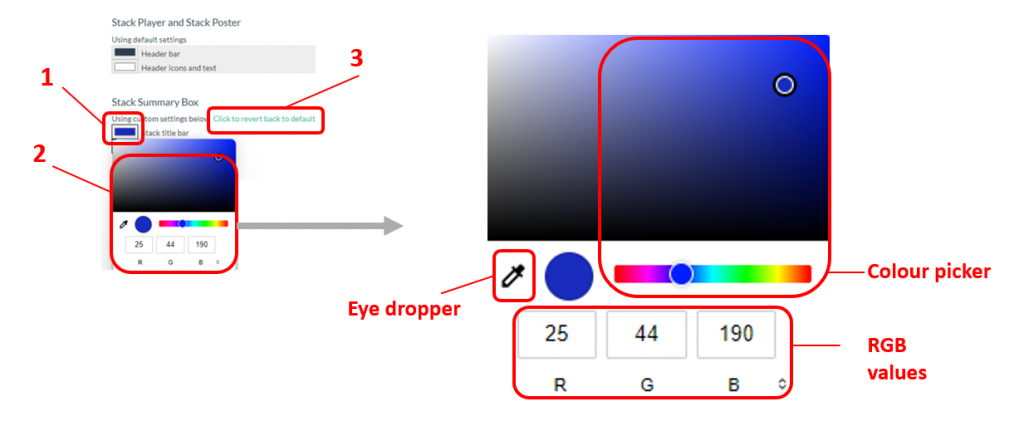
How to choose the exact colour that you want
1. Click on the colour box of the colour you want to change
2. You will now be offered a range of different ways you can choose the colour you want – including using the colour picker, entering the RGB values for your chosen colour or using the eye dropper to pick a colour from somewhere-else on your screen.
You will immediately see the impact of any colour change you make in the mobile view of the ePoster stack.
3. If you do not like your chosen colour you can choose a new one or just click on the link to revert back to the default colour.
Once you are happy with your chosen colours then remember to Save
Adding other members of your admin team to your domain
The Member Management area provides you with a view of all the members of your domain and a way to add members of your admin team to your domain.
It is very important that you do not use this area to add your event authors. Event authors’ (e.g. ePoster authors) invites are managed within the Event Management area.
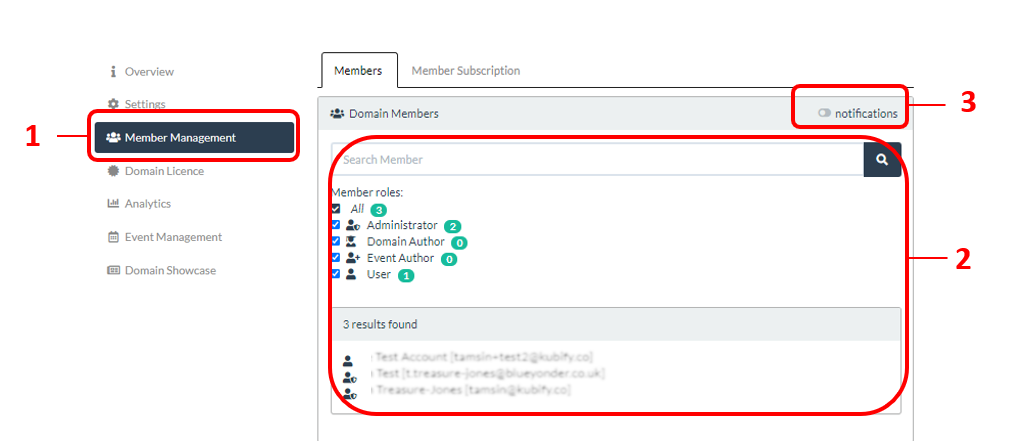
REVIEWING THE MEMBERS OF YOUR DOMAIN
To review your domain members:
1. Click on Member Management
2. Here you can view and search for the members in your domain
3. You can also turn on notifications to get email notifications if someone new joins your domain
ADDING SOMEONE WHO ALREADY HAS A LEARNING TOOLBOX ACCOUNT
NOTE: You do not use this approach to add your event authors. Event authors’ (e.g. ePoster authors) invites are managed within the Event Management area & explained in Guide 1.
You need to know the email address connected to this person’s Learning Toolbox account
1. Click on the Add Members by Email option
2. In the search box that appears below type the person’s email address
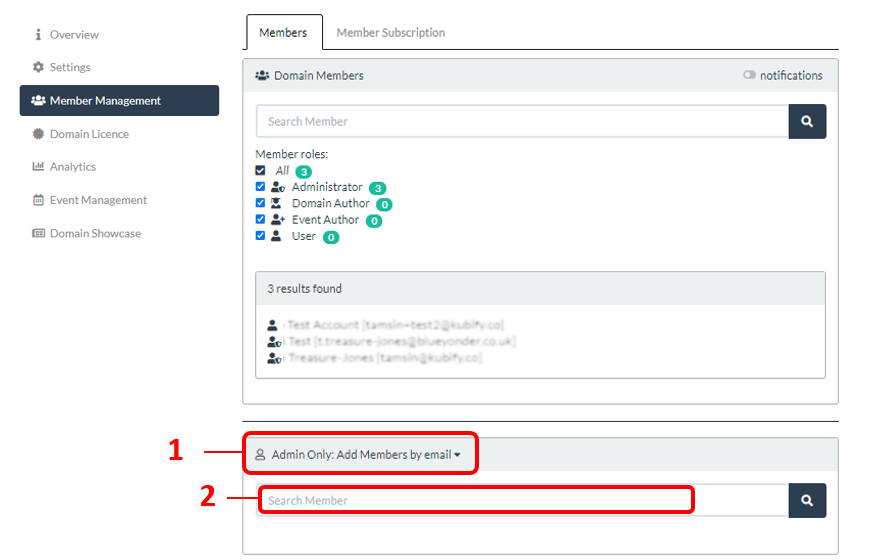
3. Click on the person’s account in the results list
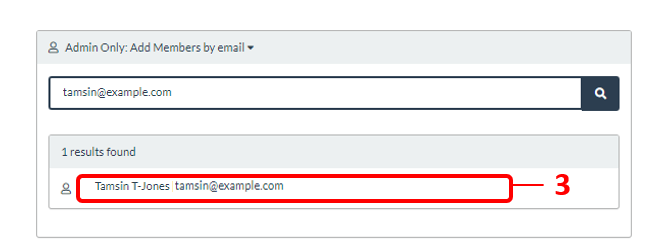
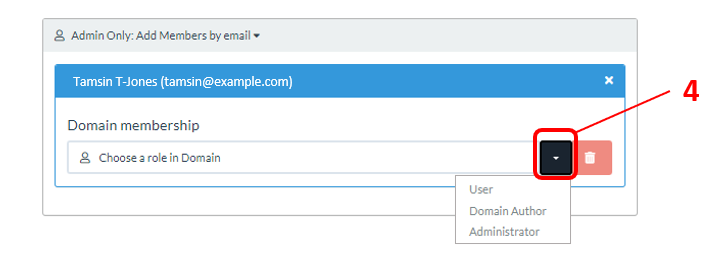
4. You can then use the drop-down menu to choose the role you want to give this person within your domain.
ADDING SOMEONE WHO DOES NOT YET HAVE A LEARNING TOOLBOX ACCOUNT
NOTE: You do not use this approach to add your event authors. Event authors’ (e.g. ePoster authors) invites are managed within the Event Management area & explained in Guide 1.
Use this approach to invite a member of your admin team to join the domain if they do not already have an account. You can also use this approach if the person has a Learning Toolbox account but you do not know the email address associated with their account.
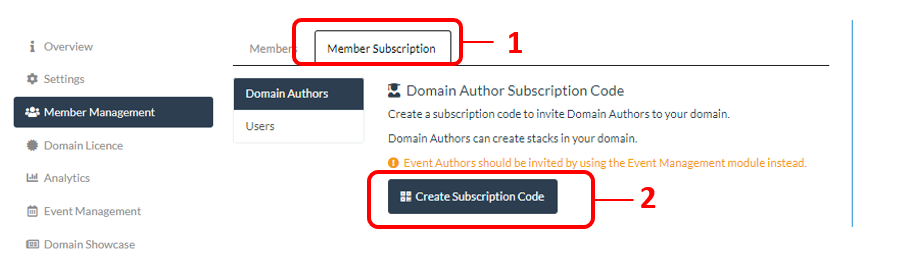
1. Click on the Member Subscription tab
2. Click on the Create Subscription Code button.
This will create a QR code and weblink which you can copy. You can send the weblink to your team members and ask them click on it and follow the instructions to sign-in. The account they create will be a Domain Author (able to create stacks that are not tied to an event) in your domain. Once they have created their account and signed in then you can upgrade the account to be an admin account if you want them to also have access to the Admin interface.
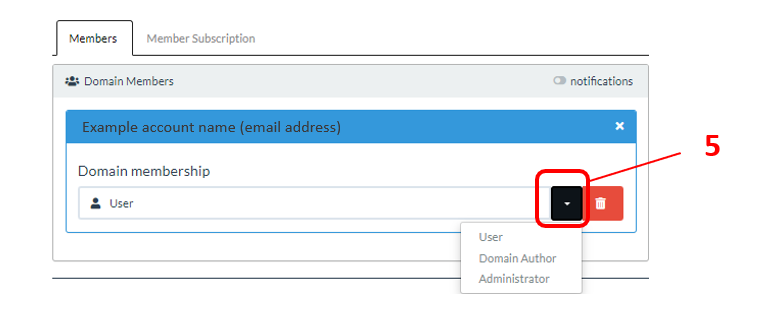
To upgrade your team member’s account to be an Administrator:
3. Return to the Members Tab
4. Find and click on your team member’s account in the membership list
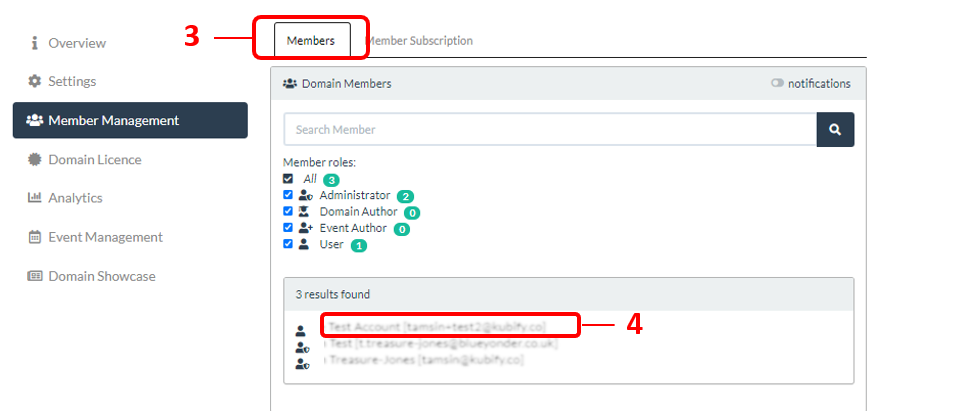
5. From here you can change their account role by choosing the role from the drop-down menu.
The Member Management area also offers some options for subscribing Users to the domain. Accounts with the User role can only view stacks, they cannot create stacks or access the Admin interface. Users can be subscribed to a particular named group (Circle) in the domain.
The User and Circle Subscription options are not usually used by Events.
These options are being used by some educational institutions who want to invite (and manage) classes of students to their domain in Learning Toolbox.
If you want to find out more about this use of Learning Toolbox then please contact support@kubify.co
Setting up your showcase
Overview of a showcase
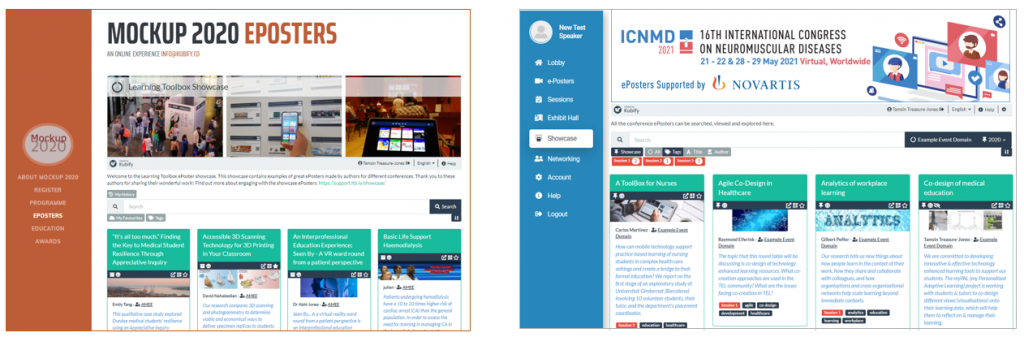
The showcase is the webpage to which you publish your events’ ePosters/Stacks.
Our example showcase is shown below. Please explore it to see how a showcase works. Its web address is: https://my.ltb.io/#/showcase/kubify-ltb-showcase-demo
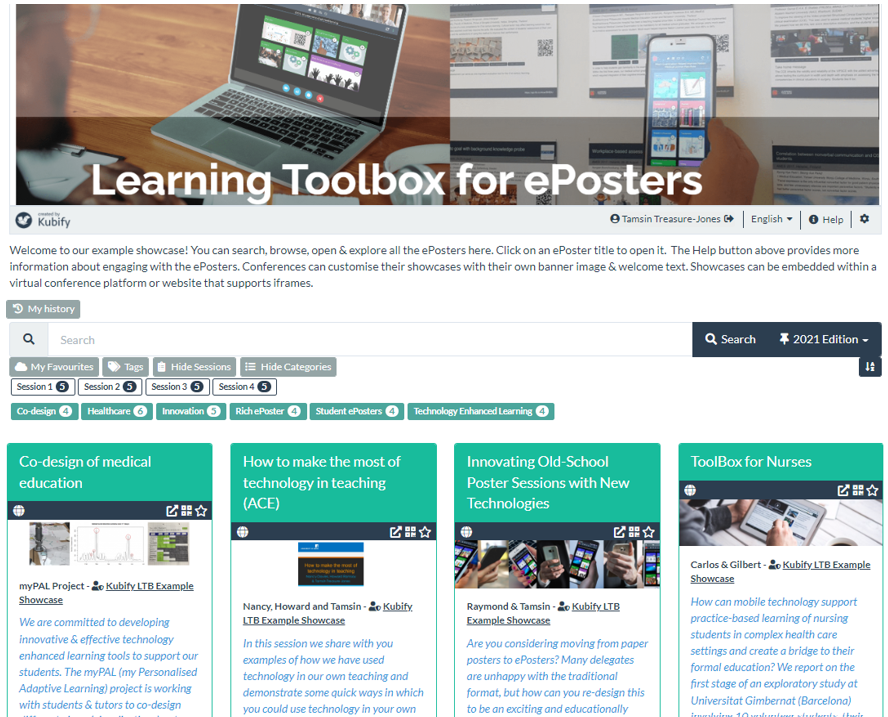
The showcase allows viewers to browse, search, open and explore your ePosters. Learning Toolbox will create one showcase webpage for you, but you can also create different editions of your showcase. Usually, administrators create separate editions for each event. If your showcase has more than one edition, then viewers can switch between the editions by using the drop-down menu at the end of the showcase search bar.
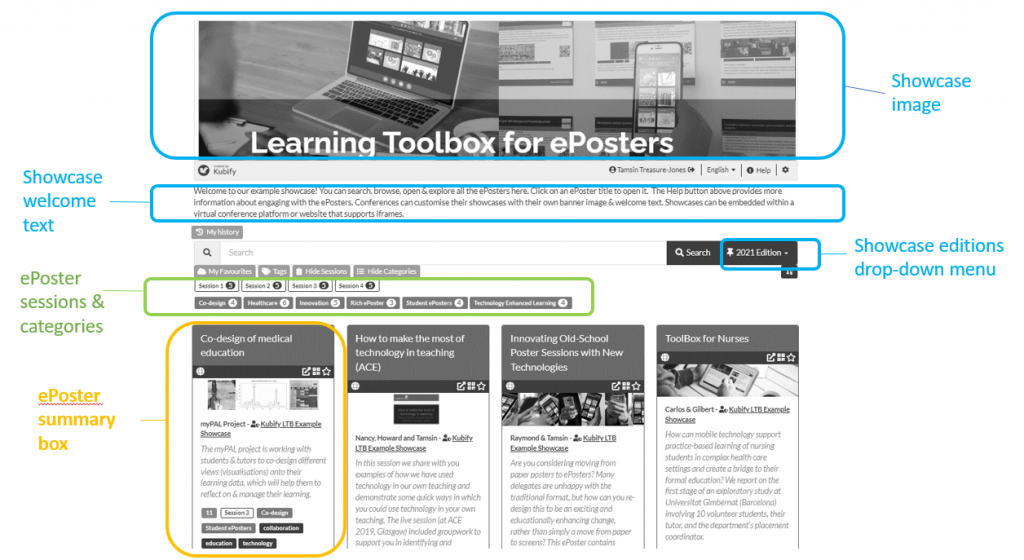
The key parts of the showcase which you will be setting up in this stage (showcase image, welcome text and first edition) are identified in blue below. The ePoster sessions and categories are set at a later stage (when you add your authors to Learning Toolbox) and the ePoster summary box is added when you publish the author’s ePoster to the showcase.
Switch on and set-up your Showcase
1. In your admin screen, click on Domain Showcase
2. Then click on the button to Enable public showcase. This will then open the Showcase Set-up page.

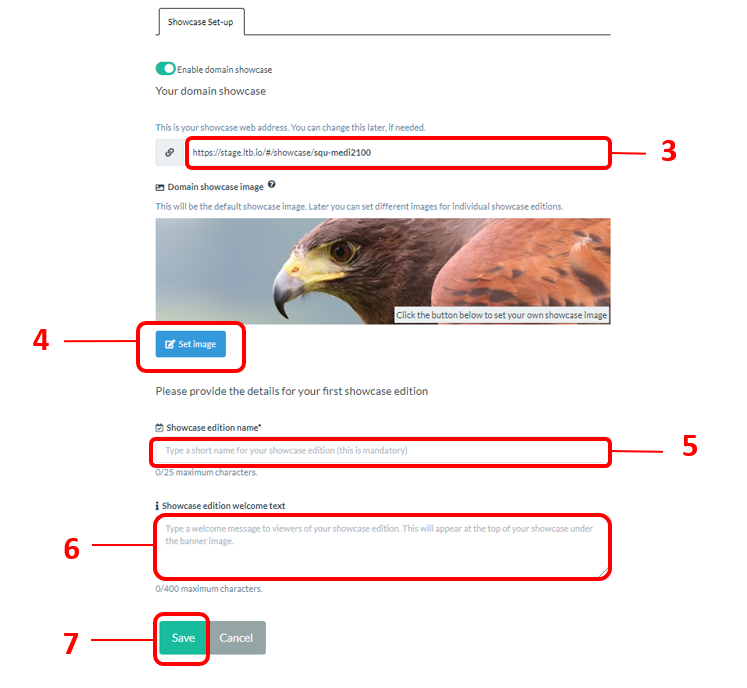
3. It will show you the unique web address that has been created for your showcase. If you want to change the ending of this web address then you will be able to do that in the Domain Showcase Settings tab, after you have completed this set-up step.
4. A default image will be given to your showcase (this is the image that appears at the top of the showcase page. You can change this by clicking on the set image button from where you can upload your own image or search for one in the copyright free library. The ideal dimensions for the showcase image are 1200 wide and 280 high (or anything that has those proportions, since the website is responsive).
5. You should give this edition of your showcase a short and meaningful name. For example, you could use the conference acronym and year.
6. You should also add some welcome text for your showcase. This text will appear under the image at the top of your showcase page. You could copy and adapt the welcome text from our example showcase.
7. Click on save when you have finished making your changes.
8. Congratulations your showcase and its first edition are now set-up.
Reviewing the domain showcase settings
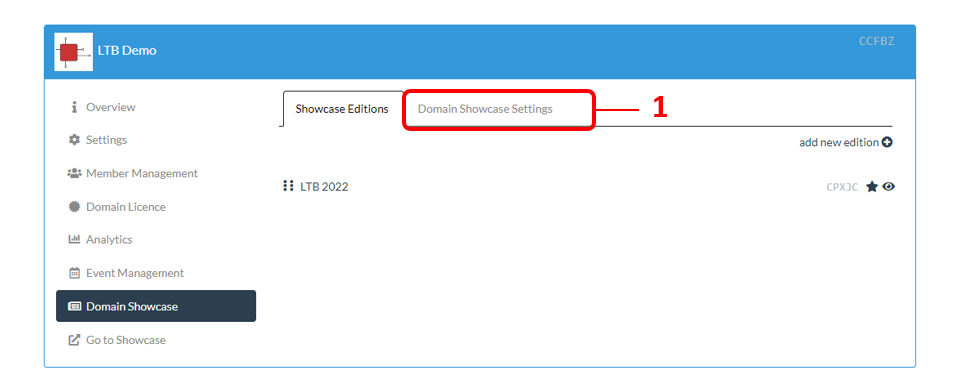
When you now click on the Domain Showcase you see a list of the showcase editions you have created (in this case, just one) and a tab giving you access to the domain showcase settings. Before looking at the showcase edition you have created, you may want to review the overall domain showcase settings.
1. You can review your domain showcase settings, by clicking on the Domain Showcase Settings tab.
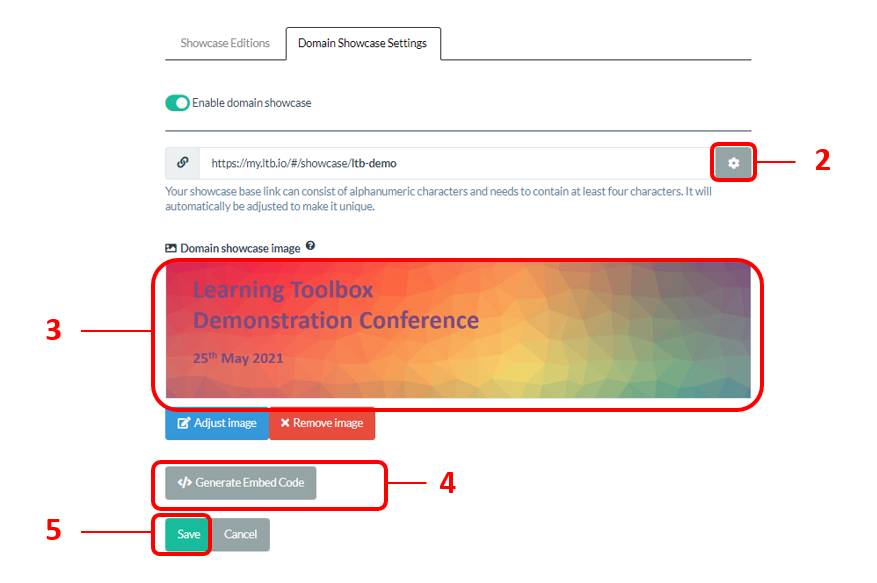
In the settings screen you can review and make changes to your showcase’s main website address and the domain showcase image. You can also see your showcase’s embed code.
2. It shows the unique web address that has been created for your showcase. From this web address viewers will be able to access all the visible editions of your showcase. You can edit the last part of this if you want by clicking on the edit icon. We suggest using a generic name that does not mention a year since this will allow you to keep the same showcase web address for each year’s conference.
3. It shows the domain showcase image that you just added during the set up. Within each showcase edition you can choose to use this domain showcase image or to give the edition its own image.
4. If you click on the Generate Embed Code button then it will make the code that can be used to embed your showcase in an iframe in a virtual event platform or website.
5. If you make any changes to the settings then remember to Save.
Review your showcase edition settings
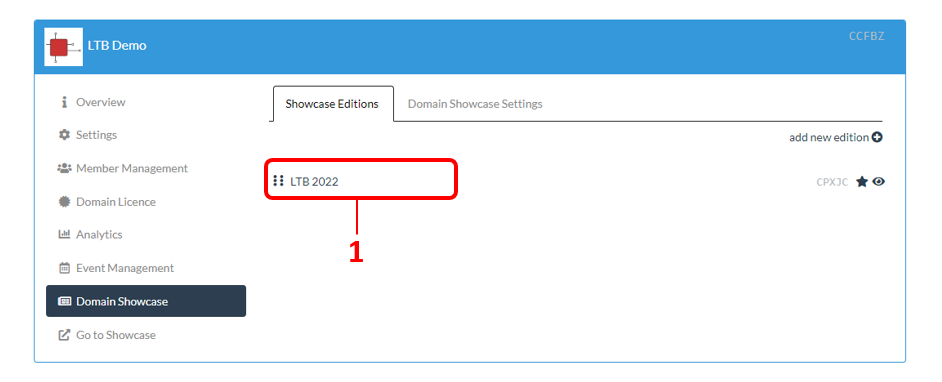
1. Within the Domain Showcase area you can also review and change your showcase edition settings, by clicking on the edition name.
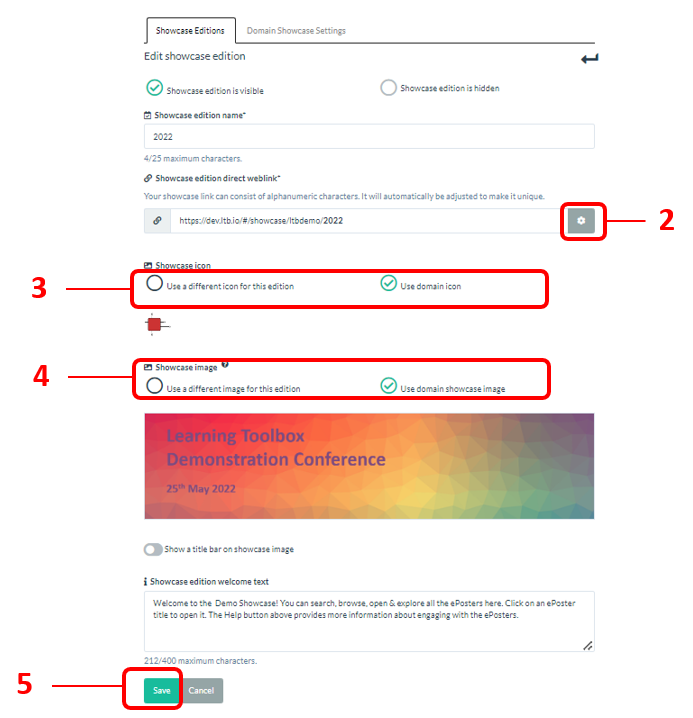
In the screen that now opens you can review and change the details you had already provided (edition name and welcome text). You can also make some additional changes:
2. Viewers will have access to all your showcase editions by going to the main domain showcase webpage. But in addition, each showcase edition has its own unique web link. You can edit the end of this web link here if you want.
3. Add the showcase icon image that you want to appear in each ePoster published to this showcase edition. This square image will appear in the top right of each summary poster and in the menu bar of each ePoster when it is opened. It will give the ePosters in this showcase edition a clear branding and identify them as this edition.
4. Add the showcase banner image that you want to appear at the top of this showcase edition.
5. If you make any changes on this screen then remember to Save before you leave.
Advanced settings such as making showcase editions visible or hidden or making a showcase edition the default view, are only relevant once you have more than one showcase. These settings are discussed in Guide 5 which includes setting up new showcase editions.
Embedding your showcase (optional)
In some cases, organisers want to embed the showcase into a virtual conference platform or a conference or association website, rather than, or in addition to, directing people to the showcase’s own website address.
This is possible so long as your virtual conference platform or website supports and allows iframe embedding.
An embedded showcase would look something like the examples below – sitting inside the virtual conference platform and its menus.
Learning Toolbox automatically generates the embed code that you need to embed your showcase within an iframe. To see and copy that code:
1. Go to the Domain Showcase area
2. Click on the Domain Showcase Settings tab
3. Click on the Generate Embed Code button. This will make the code that you can copy and use in the virtual conference platform or website.

Examples of virtual conference platforms in which the showcase has been embedded include Crowdcomms, Pheedloop, Swapcard and Swoogo. But there will be many others as well. If this is important to you then please contact your virtual conference platform provider to ask if they allow iframe embedding. If they don’t currently support this, but they would be interested in exploring this option, then we would be very happy for you to put them in contact with us to discuss this.
Overview of the Domain Administration Area
Below we include below a summary of what is covered in each of the Admin areas.
The Admin area that is key to the event administration is the Event Management button. How you use this to set up and manage an Event is explained in the next guides.
The focus of the next guide
This next guide covers the first key stage involved in setting up and managing an ePoster event in Learning Toolbox. It takes you through the steps involved in creating your event and inviting your authors:
- Setting up an event and inviting authors
- Monitoring and supporting your authors
- Printing summary posters and publishing ePosters
- Onsite preparations and requirements
- Setting up next year’s event
All the guides are accessible on the Event Admin Support Page.
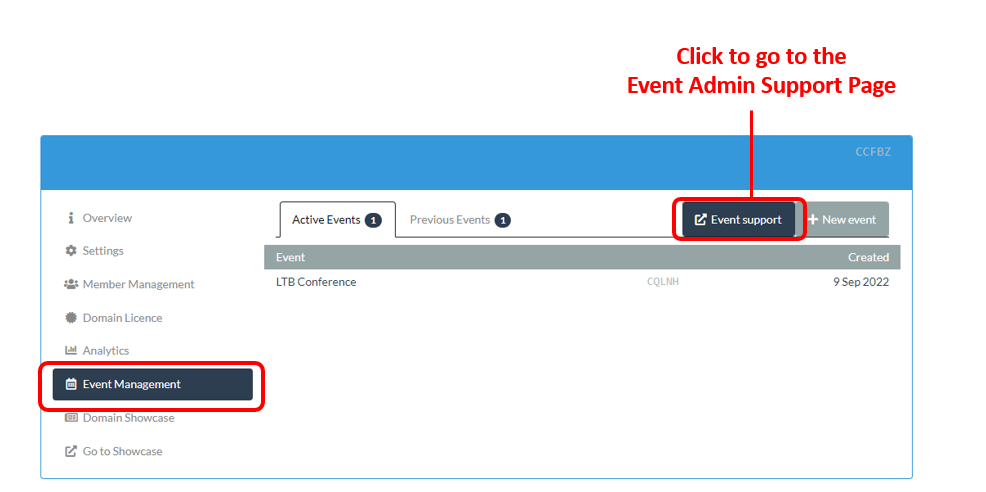
You can also get to the Event Admin Support Page from the Event Management area of the Admin Screen as shown below.