If you cannot find the answer to your question below or on the FAQ page then please contact wonca2024-programme@icsevents.com
Creating an ePoster/Stack
This video gives you a very quick introduction to the Learning Toolbox editor. We recommend that you play this video in full screen.
Press the full-screen icon ![]() at the end of the play bar to play in full-screen.
at the end of the play bar to play in full-screen.
If your country does not allow access to the Vimeo video streaming service then you can access this video here instead.
Sign in to the Learning Toolbox website https://my.ltb.io/ and then:
- Click on the Stacks menu
- Click on the title bar of your stack to open it
- Click on the Edit button to open the editor
- You can now edit it as normal. Remember to Save regularly.
These steps are shown in the annotated screenshots below.
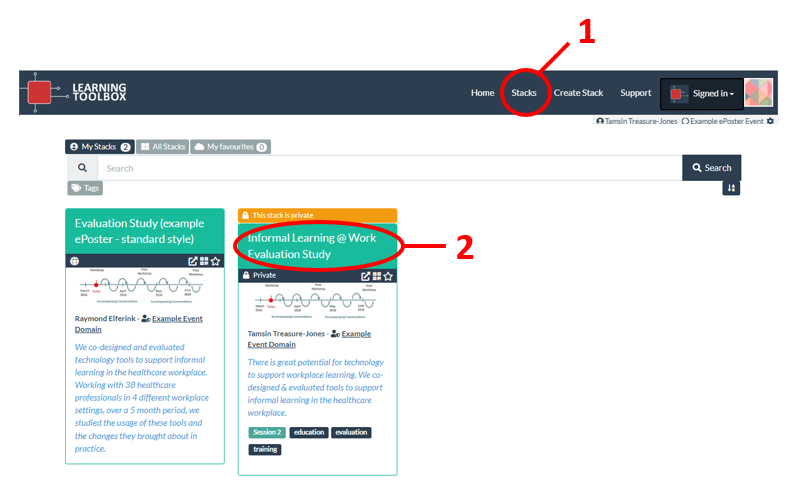
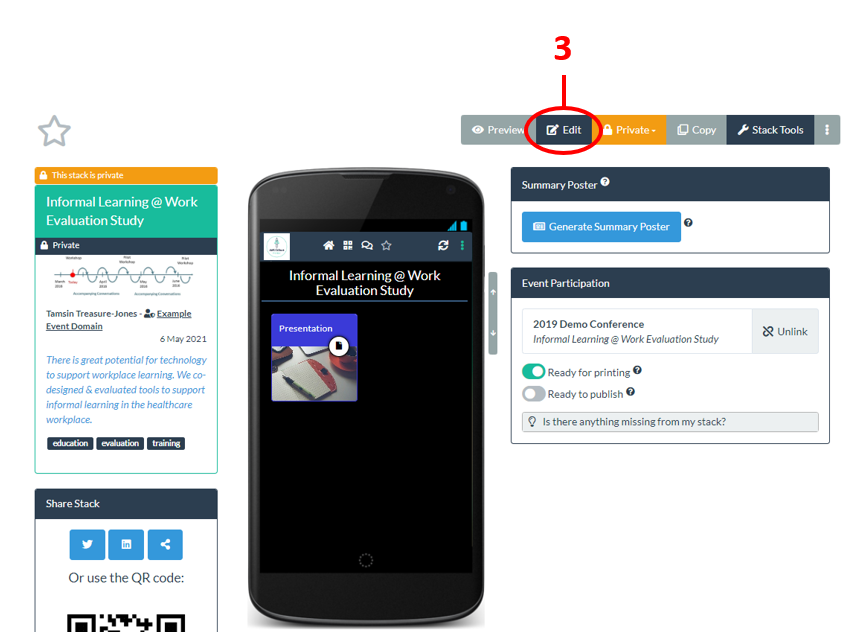
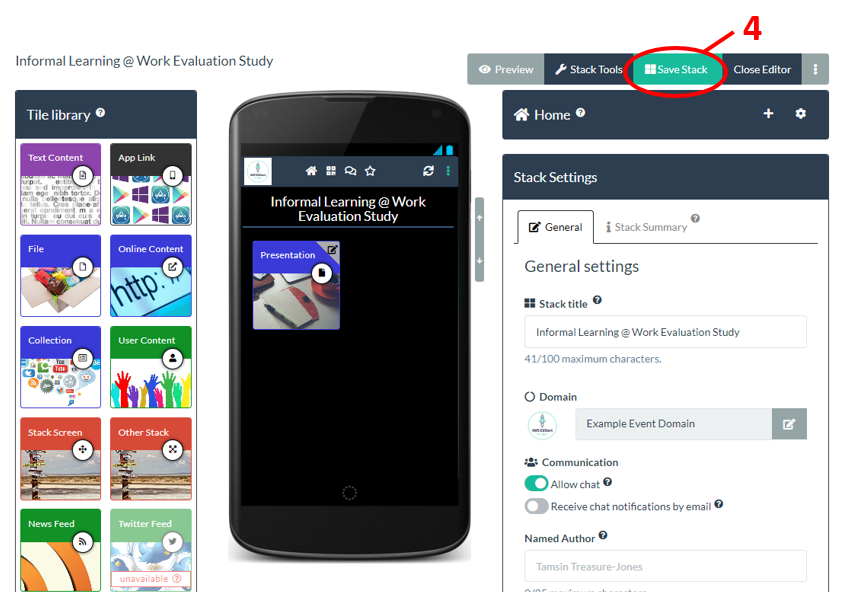
In order to create a stack in Learning Toolbox for a conference or event you must have activated the Learning Toolbox invite link you were sent for that ePoster or stack and you must have signed in using the same account you used when you activated your invite link. If you have not received and activated your invite link then read this FAQ answer [How do I find my invite link].
After you have signed into Learning Toolbox (https://my.ltb.io/) do you see the Getting Started Page (image below) when you click on Create Stack?
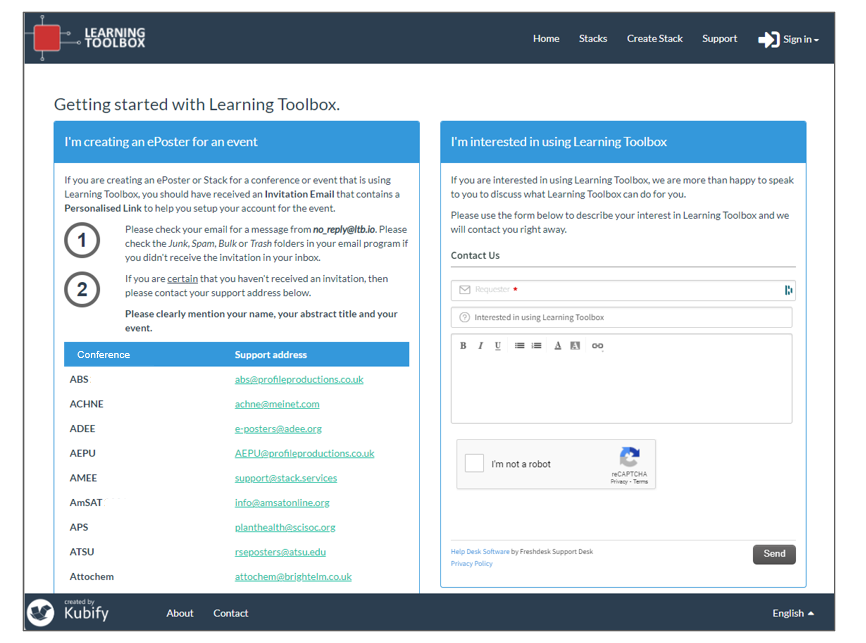
If you see the Getting Started Page then this means your account does not have permission to make a stack. There are two possible reasons for this:
You are not signed in. Check that you are signed in. If you are not signed in then click on Sign In and make sure to sign in using the same account as you used when you activated your invite.

You are signed in but not with the account that you used when you activated your invite. Please sign out and then sign back in again making sure you use the same account that you used when you activated your invite. You will have received an email from Learning Toolbox (no_reply@ltb.io) when you activated your invite reminding you what account you used to do this.

In order to create a stack in Learning Toolbox for a conference or event you must have activated the invite link you were sent for that ePoster/stack and you must have signed in using the same account you used when you activated your invite link.
If you click on Create Stack then you will see the list of the invites that you have activated (as shown in the example screenshot below).
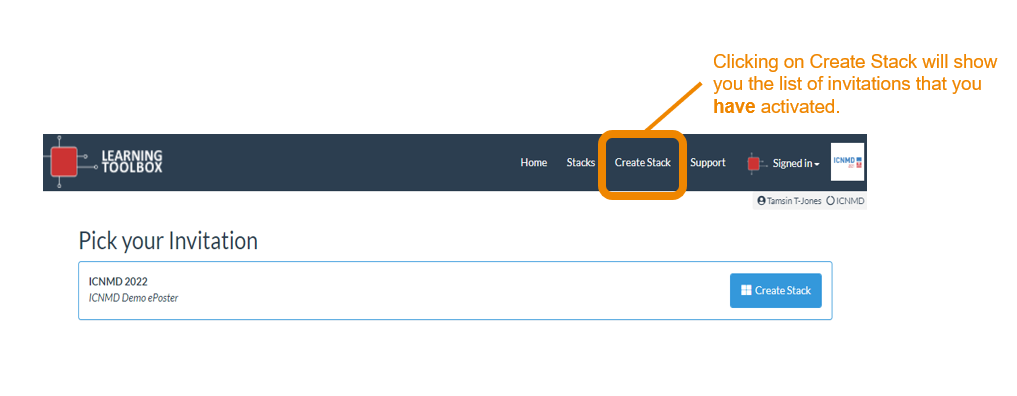
If you do not see the name or title you are expecting in the list then this indicates that the account you are using does not yet have permission to create that ePoster/stack. There are two possible reasons for this:
You have not yet activated that ePoster/stack’s invite. If you are making more than one ePoster/stack for an event then you will have been sent a separate invite email for each of your ePosters/stacks. You need to activate each one. If you have not yet activated this ePoster/stack’s invite then find the invite email (it will have been sent to you by no_reply@ltb.io) and click on the invite link and sign-in.
You activated that ePoster/stack with a different account. Sometimes authors accidentally activate their ePoster/stack invites with different accounts (e.g. activating their first ePoster/stack invite by signing in using Google and activating their second ePoster/stack invite by making a local account). If you have done this by accident and you want all your invites connected to the same account then please contact your conference support team (click on Support to see the email address or look for their address on the Getting Started Page) and they should be able to sort that out for you.
If you are creating (or have created) stacks for more than one conference or event (e.g. AMEE and NASS) then you will be an author in more than one domain in Learning Toolbox (e.g. both AMEE and NASS).
When you sign-in to Learning Toolbox you will automatically be in the domain that you most recently accessed. If you click on Create Stack or Stacks then it will only show you your activated invitations or stacks that are part of that domain.
You can see which domain you are in by looking at the top right hand corner of the screen. Next to your name it will show you the name of the domain. Next to the Signed In button it will show you the logo of that domain.

To switch to another domain you click on the Signed In button and choose the domain from the drop-down menu.
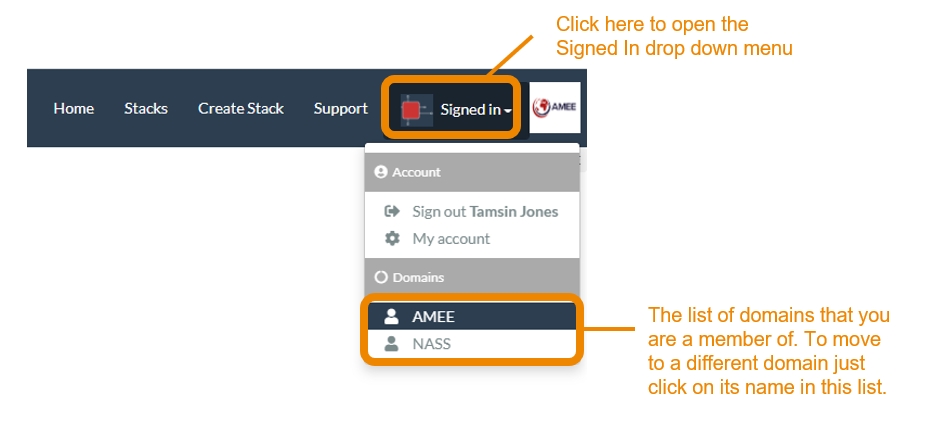
You will then see that the domain name and the domain logo change to the new domain. If you click on Create Stack or Stacks then it will show you your activated invitations or stacks within this domain.
Be inspired by other authors
Frequently Asked Questions (FAQs)
You can find answers to more detailed questions on the FAQ page or by pressing the in-line help button (?) next to the item that you want to know more about.
